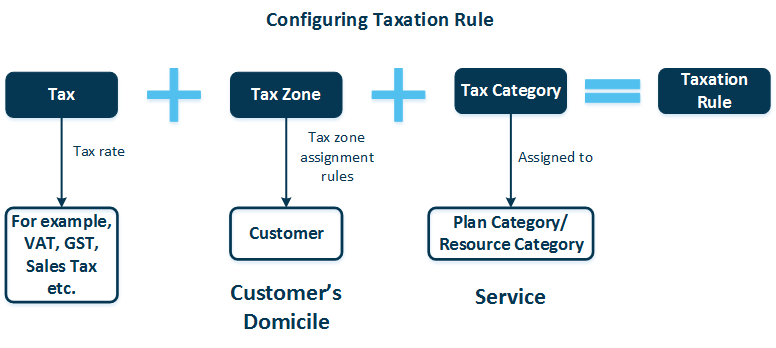
A Taxation Rule defines what Tax to charge the customers who belong to a Tax Zone when they purchase a product or service from a Tax Category.
To add a new taxation rule:
- In Billing control panel, go to System > Settings > Taxation > Add. The Add New Taxation Rule wizard starts.
- Follow the wizard steps. Each step allow to use the already existing taxation objects in the system or create the new ones.
Step 1. Specify Tax
If you have installed a respective Billing tax plug-in for integration with external tax engine, the Taxation Method can be chosen:
- Taxes – internal tax engine will be used for calculations.
- BillSoft EZTax – external BillSoft EZtax tax engine will be used for automatic calculations.
- Vertex – external Vertex O Series (or Vertex Cloud) tax engine will be used for automatic calculations.
By default, the system operates with manually defined tax rates and properties. You can choose the existing tax, or create a new one. For the new one, fill out the form:
- Tax ID – the field displays the alphanumeric identifier of the sales tax.
- Name – tax name to be shown in online store and invoices (for example, Sales Tax or VAT).
- Rate – the tax rate in percents.
- Calculation Level – the field displays the level of tax calculation:
- Level 1 – tax is calculated on item (product or service) amounts only.
- Level 2 – tax is calculated on item amount plus the Level 1 tax amounts. For example, Tax_level_2 = % of (Item_Amount + Tax_Level_1 + Another_Tax_Level_1 + ...).
- Calculation Type – the field defines how tax amount is summarized for the document:
- Calculate Per Item – tax is calculated for each invoice line and then totaled for the invoice.
- Calculate Per Document – taxable amount is totaled for invoice and then tax amount is calculated.
- Extract Tax Amount from Item Amount – the parameter defines whether the tax amount is already included in service price (the so-called inclusive tax) or not. Enable the option if you need to use tax-inclusive prices in subscription periods and resource rates.
Step 2. Specify Tax Zone
You can select the category of customers to whom the taxation rule will be applied. You can choose the existing tax zone or create a new one. For the new one, fill out the form:
- Country – name of the country of the customer to be assigned with a tax zone.
- State / Province – state/province of the respective country.
- Requires Account Verification – parameter defines if a customer account must be in status Verified.
Step 3. Specify Tax Category
You can select the category of products/services to which the taxation rule will be applied. You may choose the existing tax category or create a new one. For the new one, fill out the form:
- Tax Category ID – internal unique identifier of the group of products/services that have the same taxation policy (for example, Hosting Products).
- Tax Category Description – description of that group of products/services to which the same taxation policy is applied.
Step 4. Confirm
Review the taxation rule information and click Finish to confirm its creation.
Note: If multiple taxation rules are applicable to the same transaction (order detail or invoice line), each rule is applied.