Note: The IDP version 1.2-71 is required for integration with Azure AD.
Step 1. Choose a Brand
- Enable the Identity Service.
- Select an existing brand for which you plan to set up the integration, for example, "mybrand.com".
Step 2. Create an Enterprise Application in Azure AD
- Go to Microsoft Azure, select your tenant and open Azure Active Directory from the menu on the left.
- Select Enterprise applications and click New application.
- Choose Non-gallery application and specify its name as "oss-brand-<brand domain>".
- Select Users and Groups, click Add user and add the "CanSSOtoCBC" group to allow Azure AD users of this group to log in to CloudBlue Commerce.
- Select Single Sign-On, then choose the SAML SSO method. In the Basic SAML Configuration tile, enter the following values:
Parameter Value Identifier (Entity ID) https://<brand_domain>/auth/realms/sr<brand_id> Reply URL (Assertion Consumer Service URL) https://<brand_domain>/auth/realms/sr<brand_id>/broker/saml/endpoint Sign on URL https://<brand_domain>/auth/realms/sr<brand_id>/broker/saml/endpoint
Where: <brand_id> is the brand identifier in CloudBlue Commerce. - Go to the SAML Signing Certificate tile and download the Base 64 SAML Signing Certificate.
- Go to the Set up oss-brand-mybrand.com tile and copy the login URL value from it.
To sum up, you must obtain the following parameters from Azure AD:Parameter Value example Login URL https://login.microsoftonline.com/9a3c0433-26a5-4deb-b203-591c46652afc/saml2 Certificate (Base64) file: oss-mybrand.com.cer
Step 3. Configure External IDP Service
- Log in to the PCP, then go to Services > Identity Service.
- In the External IDP Service tab, select a brand.
-
Check the External IDP service enabled checkbox and specify these parameters:
Parameter Example Notes External IDP Login URL https://login.microsoftonline.com/9a3c0433-26a5-4deb-b203-591c46652afc/saml2 The Login URL value from Step 2 External IDP Logout URL https://login.microsoftonline.com/9a3c0433-26a5-4deb-b203-591c46652afc/saml2 The Login URL value from Step 2 External IDP display name Azure AD A human-readable name External IDP certificate in PEM format -----BEGIN CERTIFICATE----- MIIDjjCCAnYCCQCErQYi+gB/0jANBgkqhkiG9w0BAQUFADCBiDELMAkGA1UEBhMC .... -----END CERTIFICATE----- The Certificate (Base64) value from Step 2 External IDP username SAML assertion attribute http://schemas.xmlsoap.org/ws/2005/05/identity/claims/emailaddress The SAML assertion attribute that designates the user log-in name in OSS
Step 4. Create a User
Now, you can create a user in CloudBlue Commerce. The user log-in name must be equal to the value of the SAML assertion attribute set for External IDP username SAML assertion attribute at the previous step.
Important: Users are not created automatically, they must be created beforehand in CloudBlue Commerce.
Setting Up Automatic Redirect to the External IDP Log-in Form
To disable the IDP log-in form and set up automatic redirect to the external IDP log-in form, complete the following steps:
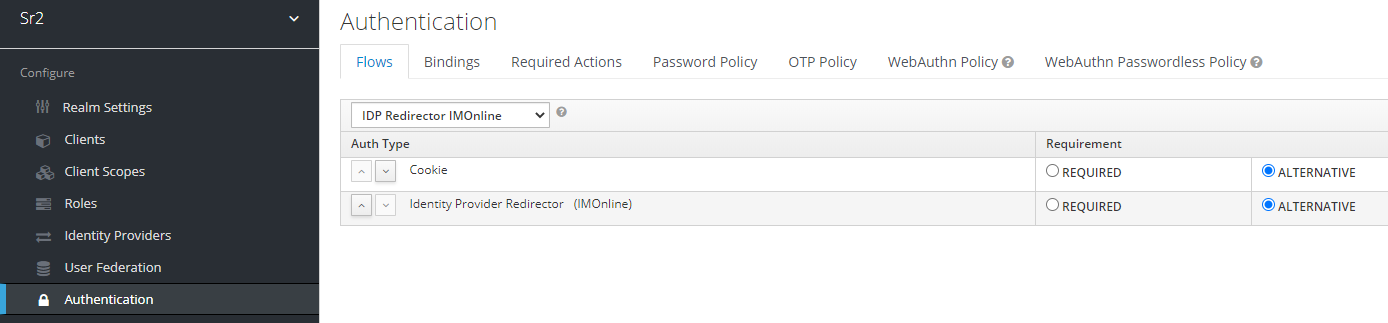
- Log in to the Keycloak administration panel.
- Open the
sr<brand_id>security realm. - Go to Authentication > Flows, then create a new flow: "External IDP Redirector".
- Add these executions with the Alternative requirement in the following order:
- "Cookie"
- "Identity Provider Redirector"
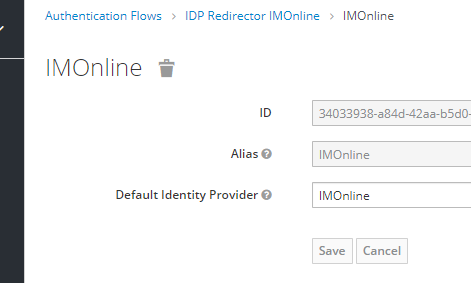
- Open the "Identity Provider Redirector" configuration screen.
- Set Alias to your external IDP alias, which is located at Identity Providers > Settings > Alias.
Set Default Identity Provider to the same alias value.
- Go to Authentication > Bindings, then set Browser Flow to "External IDP Redirector".