Executing Marketing Campaigns
The Marketing Campaigns section of the Go-to-Market Hub allows you to start a new campaign, search for assets, keep track of assets, manage contacts and marketing lists, as well as view and download reports.
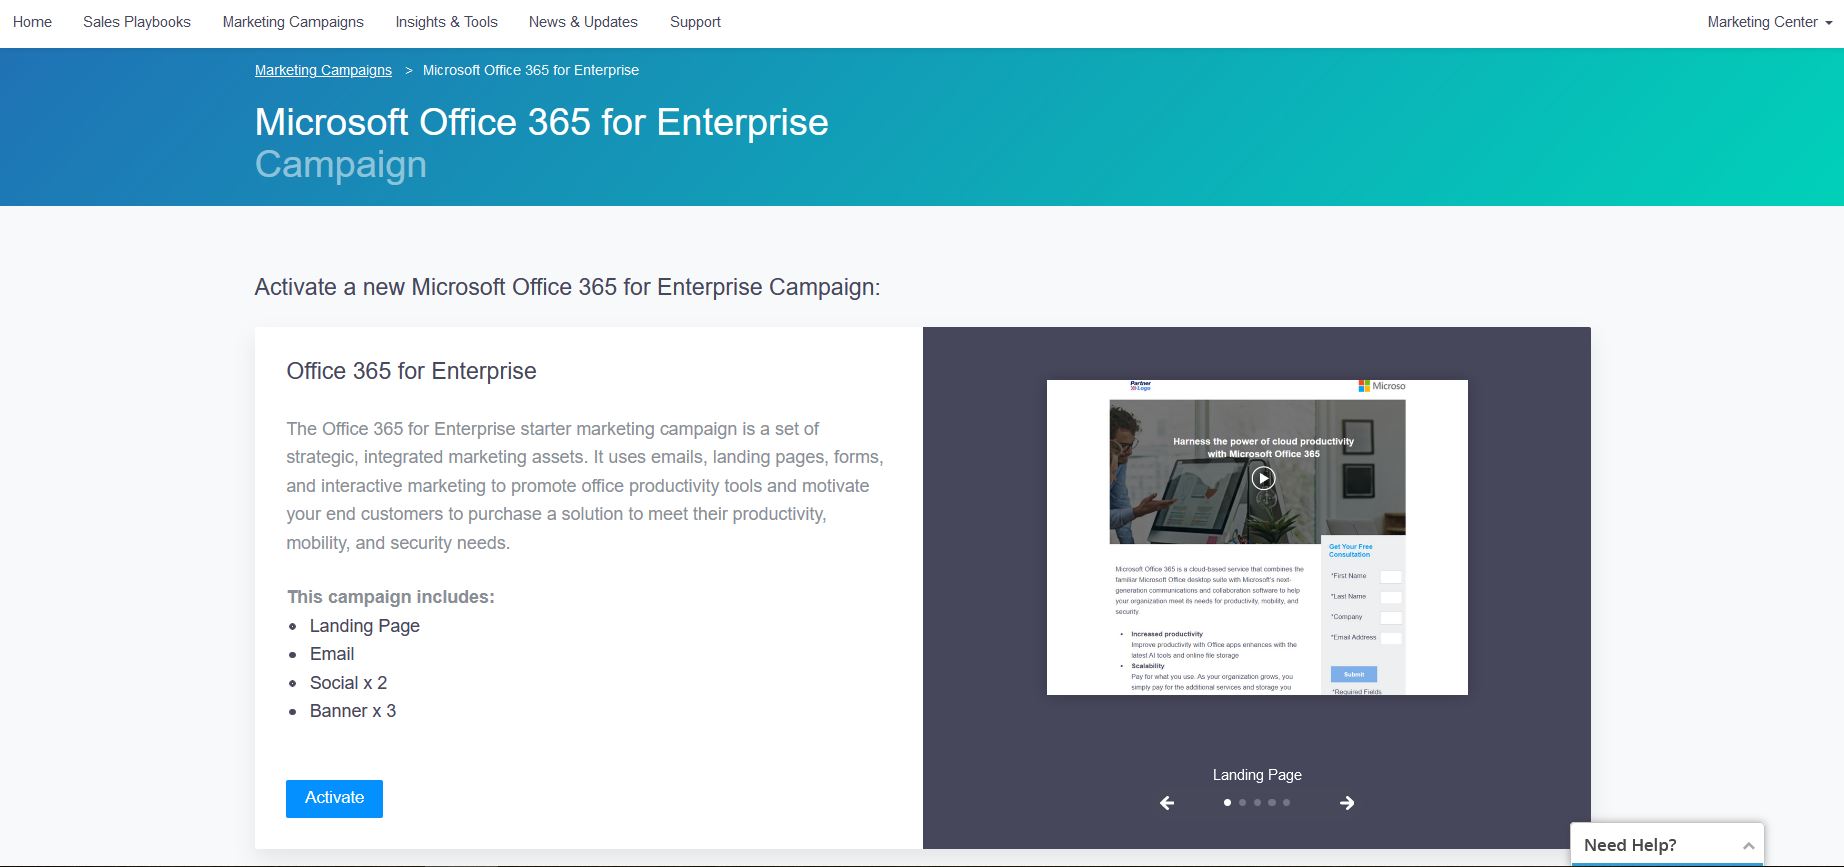
Searching for a Product-based Campaign
To search for a product-based campaign, follow these steps:
- On the Go-to-Market Hub homepage menu, hover over Marketing Campaigns.
- Click Campaigns in the drop-down menu to view all campaigns.
- In the menu on the left, you can narrow your search: Click the Product field with the blue pencil to select which product or products to search by (you can also use All to select all or clear the list).
- In the search results, click the tile of the campaign you want to use. From the campaign page, you can view the campaign information, and click Activate to add it to your account.
Setting Up a New Campaign
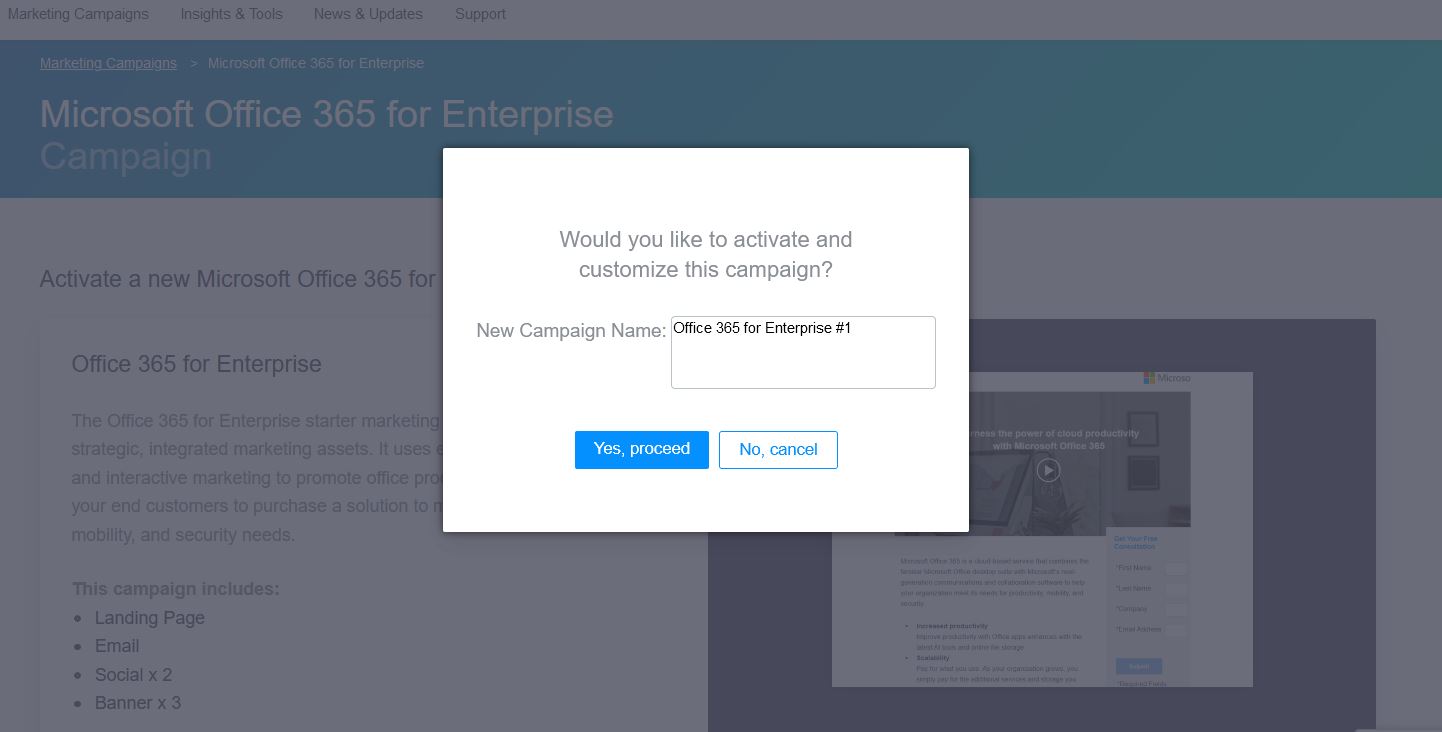
After selecting a campaign, you must set it up. Complete these steps:
-
On a campaign page, click Activate.
-
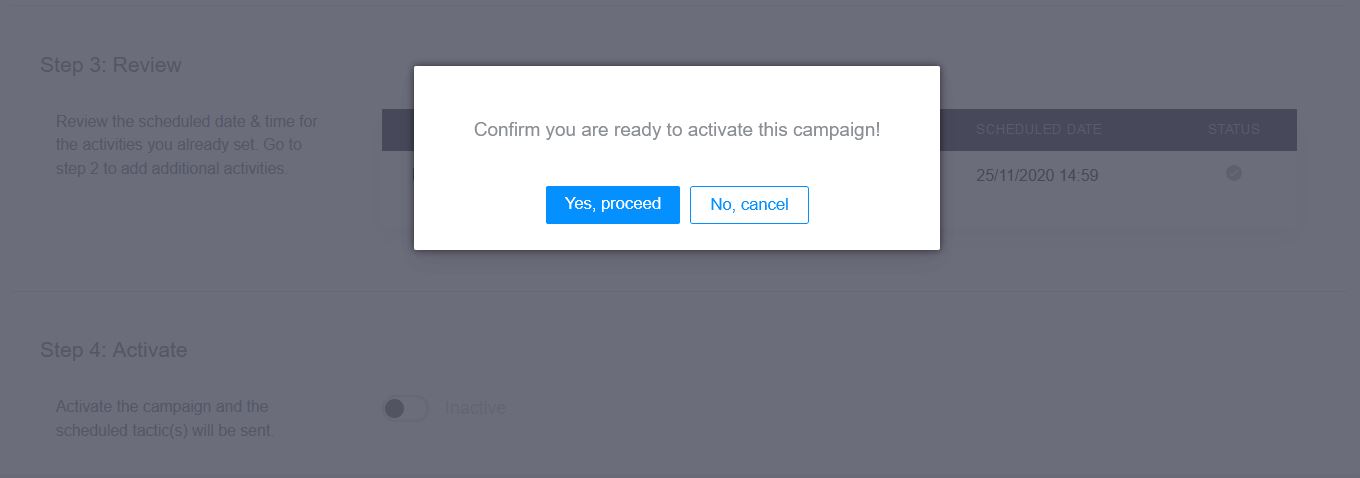
In the pop-up window, enter the name of the campaign and click Yes, Proceed.
-
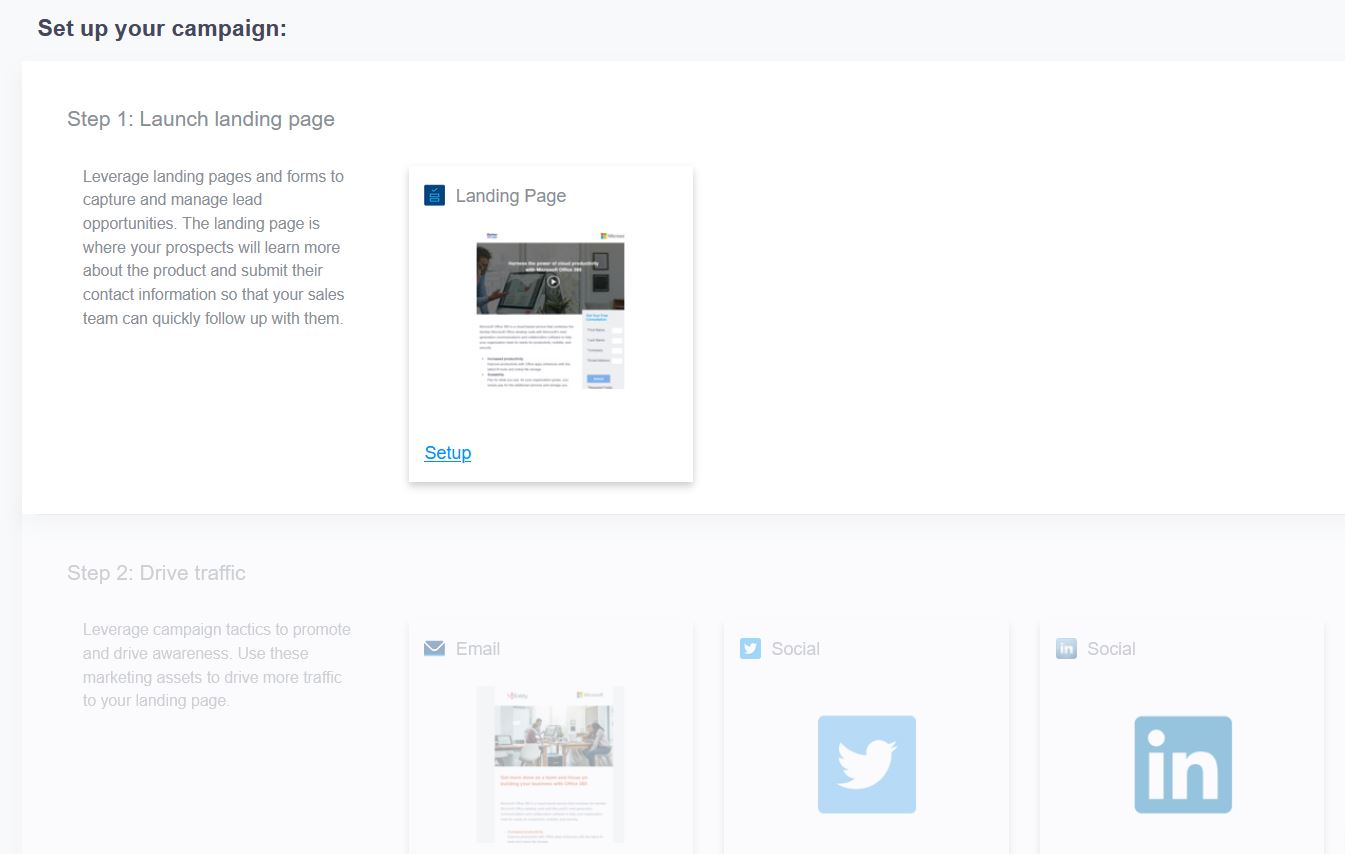
Under Step 1: Launch Landing Page, click Edit on the Landing Page tile. Here you can review, customize and download the Landing page of this campaign. When you are finished, click the blue Back button.
Note: Step 2 only becomes available to edit after you edit the Launch page.
-
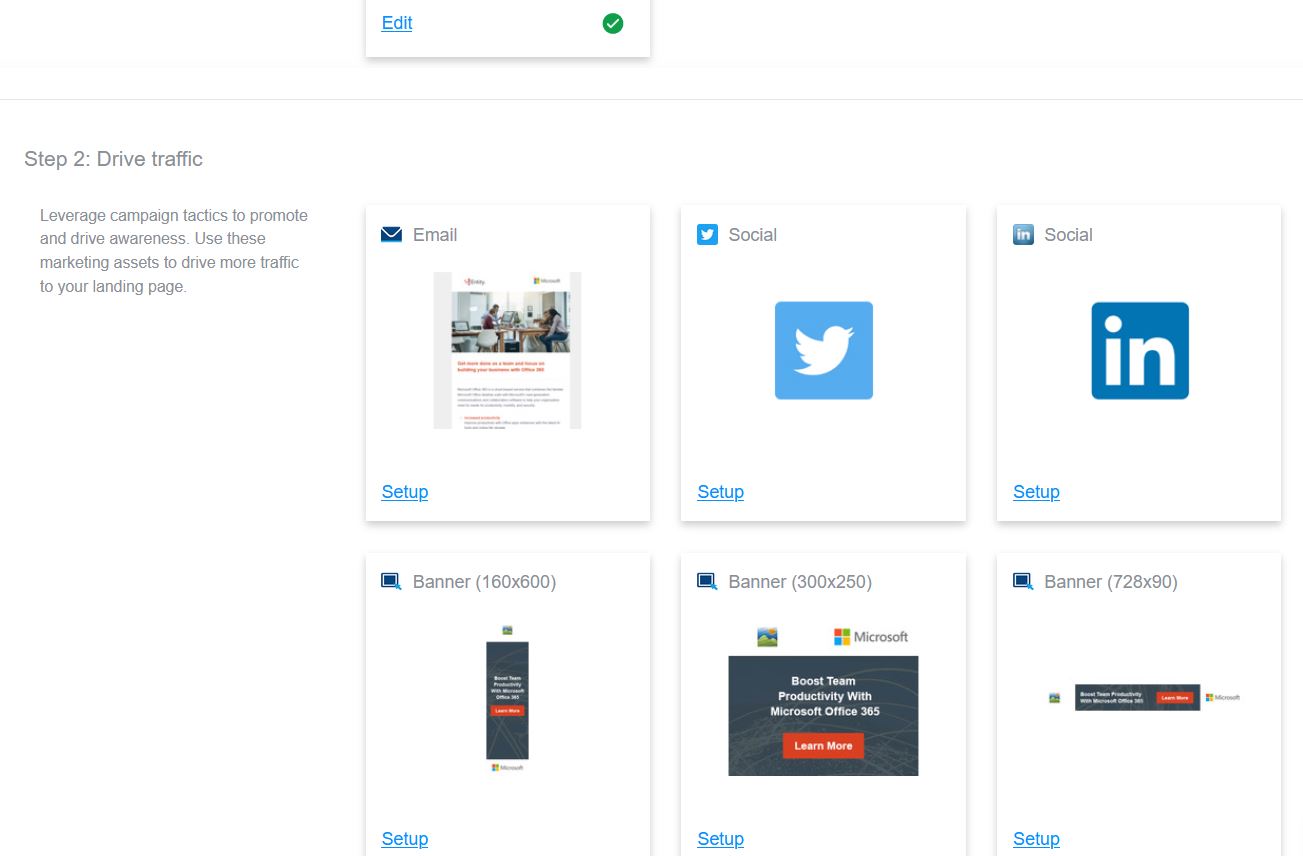
Under Step 2: Drive traffic, click Setup on one of the tiles. For Email, you must add at least one mailing recipient on the Mailing Lists tab and set up the Schedule & Send tab. For other social accounts, you need to authorize the corresponding social media account. You can also customize banners under Step 2.
Important: You must set up the landing page and at least one recipient to be able to activate a campaign.
For mail recipients:


For social media accounts:
-
Review the campaign details in Step 3 and click the Activate radio button, then click Yes, proceed in the pop-up window.
This campaign is now active and will be sent to recipients using the channels and the date that you selected.
Setting Up and Deploying a Marketing Email
You can add preconfigured email campaign templates and deploy them through the Go-to-Market Hub. To set up and deploy a marketing email, follow these steps:
-
On the Go-to-Market Hub homepage menu, hover over Marketing Campaigns and click Campaigns in the drop-down menu.
-
Click a campaign tile and click View Campaign next to the campaign you want to use.
-
On the Email tile, click Edit.
-
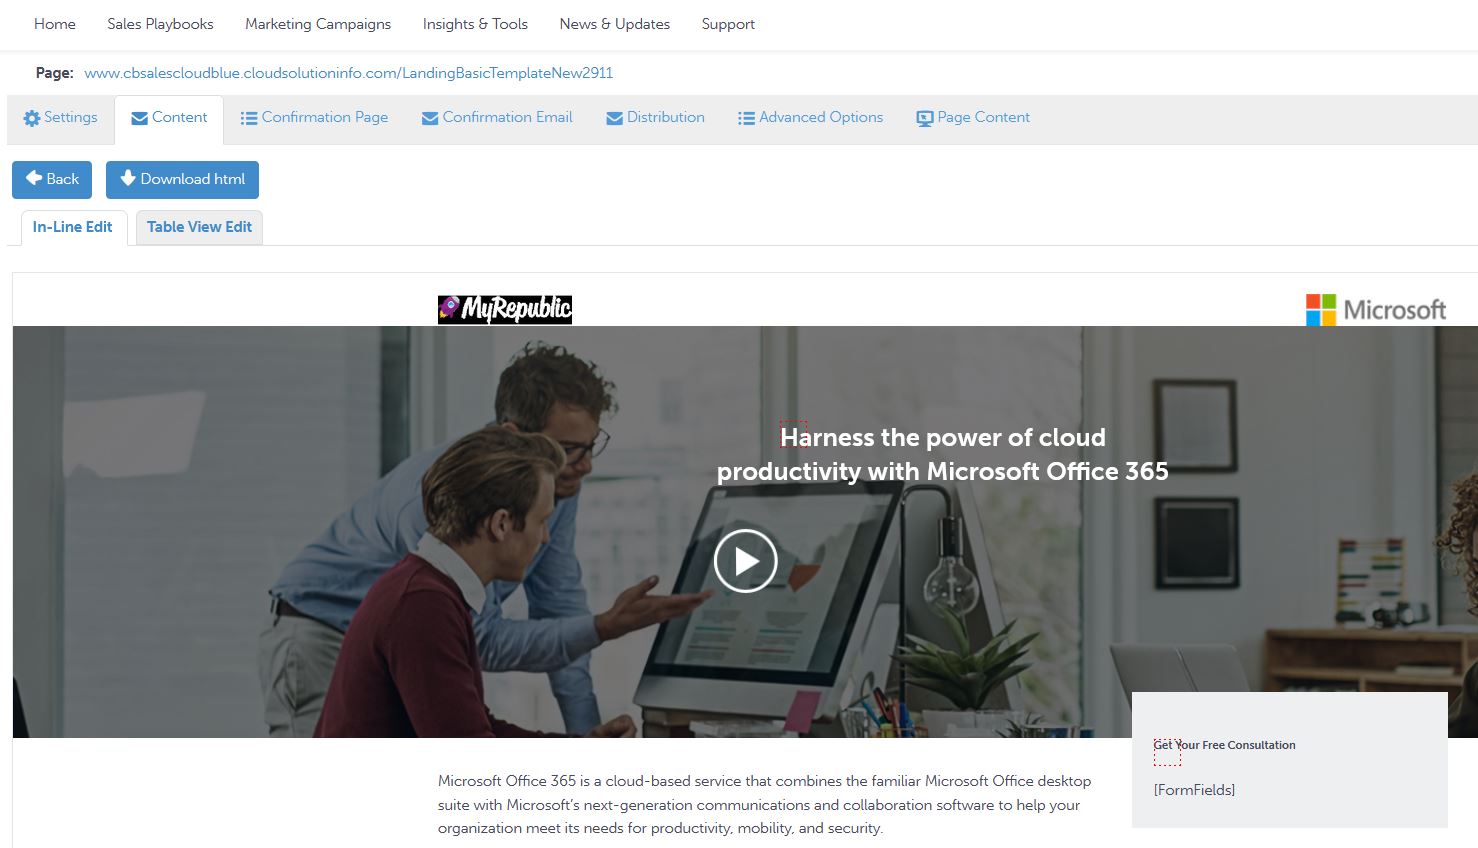
On the Content tab, edit the content of the email using In-line Edit or Table View Edit.
-
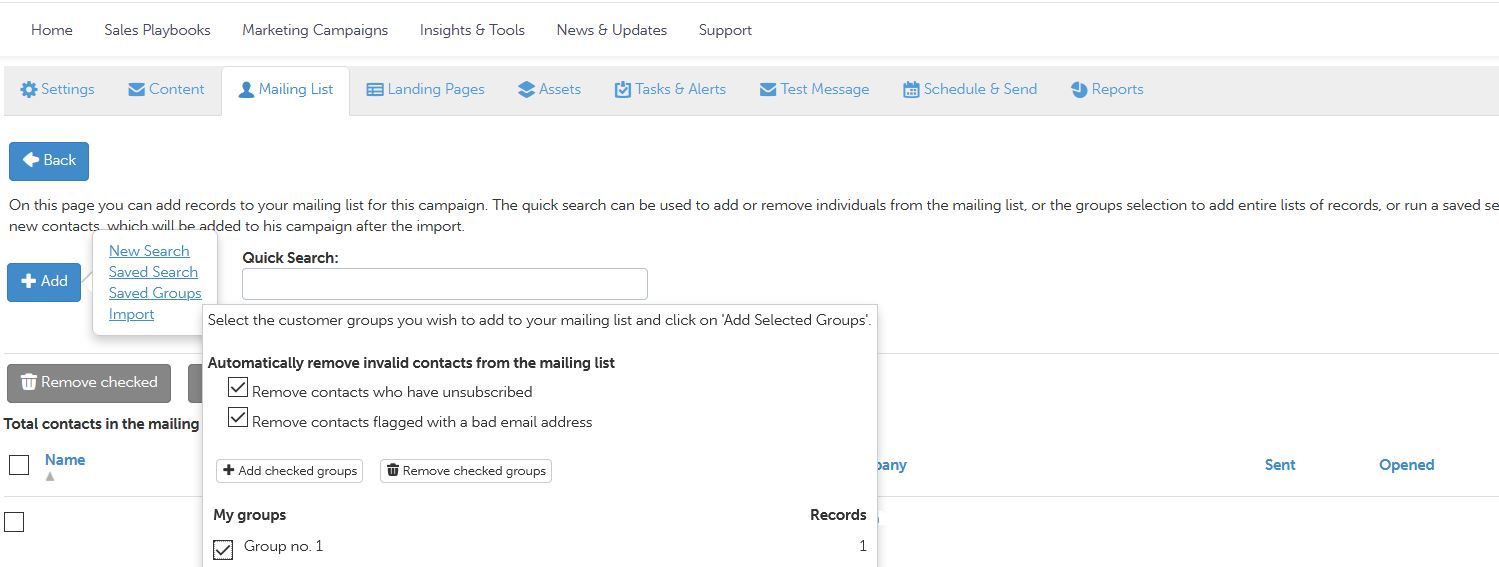
On the Mailing List tab, import a mailing list or select a previously created contact group for this marketing campaign email.
-
On the Assets tab, you can edit the marketing assets such as company name and address if they are different from your default settings.
-
On the Landing Page tab, view what landing page is being used to confirm it is correct.
Note: We recommend submitting a test lead on your landing page to ensure it is being captured correctly within your lead management section.
- On the Tasks & Alert tab, you can add tasks and alerts such as what type of feedback and how much information to send to which recipients. We recommend sending a test message to confirm what the mailing list recipients will see on their end, and including your email address in your marketing lists list to confirm the final email was sent.
- On the Schedule & Send tab, you can select the date and time the campaign will launch and whether all emails will be sent at once or in batches with a daily limit.
- Review the campaign overview at the bottom of the page and when finished, click Schedule.
Activating and Syncing Social Syndication
To activate and sync social syndication, you need to have a campaign to select. After you create a campaign, follow these steps:
- On the Go-to-Market Hub homepage menu, hover over Marketing Campaigns.
- Click Campaigns in the drop-down menu.
- Click a campaign tile. If there is no active campaign under this tile, click Activate.
-
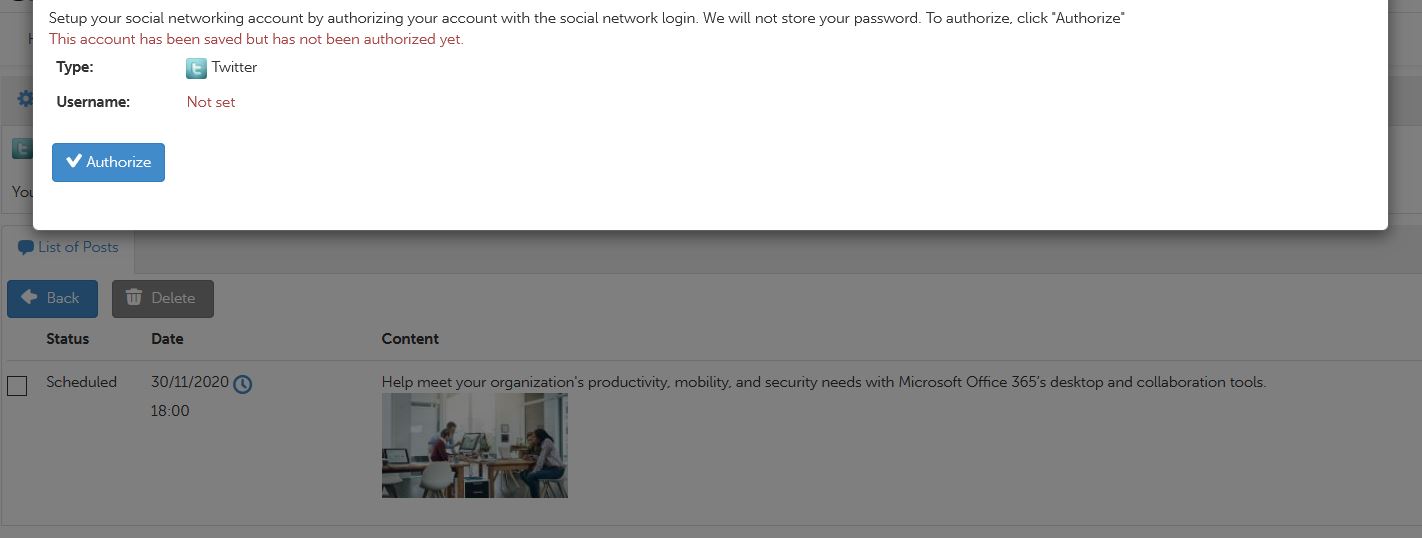
Scroll to the bottom and click Setup on one of the Social asset tiles such as Twitter or LinkedIn.
-
Click Authorize, which will take you to the social page where you will need to enter your social login information to complete authorization of your chosen social account.
Customizing and Downloading Banners
Customizing ad banners allows you to advertise and promote using your brand. Follow these steps to customize and download ad banners:
- On the Go-to-Market Hub homepage menu, hover over Marketing Campaigns.
- Click Campaigns in the drop-down menu, then click a campaign tile.
- Click Setup on the tile of the banner you want to edit. In the window that opens, click Customize & download.
- There are two fields that you can edit, Banner Content and CTA Text. Click Edit to edit either field, then click Save.
- Click Save & Refresh Preview to update the preview and review your edits.
- To download the banner, on the Banner tab, click Download and choose HTML or image format.
Managing Your Tactics
The My Tactics section of the Go-to-Market Hub allows you to manage email, social and banner ad assets. Additionally, you can review your campaign’s landing pages under forms, see what video assets you are using, and get a snapshot of your content syndication as well as the files you have downloaded (such as sales sheets). To manage your tactics, follow these steps:
-
On the Go-to-Market Hub homepage menu, hover over Marketing Campaigns.
-
Click My Tactics. Under each subtab (Email, Social, Banner Ads and so on) you can see and manage the assets currently active on your account.
Managing Tactics Settings
You can change your tactics settings to reflect changes in company information, which will then be applied to all users of this account. To manage your settings, follow these steps:
- On the Go-to-Market Hub homepage menu, hover over Marketing Campaigns and click Settings.
- Go to the Marketing Assets tab.
- Change your company information in the fields provided. This information will populate your marketing assets for all users under this account.
Importing and Managing Marketing Lists
In the Go-to-Market Hub, marketing lists are called groups. You can separate your marketing lists into different groups, allowing you to be more organized and keep track of different customer segments. To import marketing lists, you must first create a group:
-
On the Go-to-Market Hub homepage menu, hover over Marketing Campaigns and click Groups.
-
Click Add New.
-
Fill out the fields and click Save to create the new group.
-
On the following page, you can add customers to this group using Quick select or Advanced search. We recommend including your email address in your group to confirm the final email was sent.
-
To import multiple customers using a file, click Import and choose the necessary file.
Searching for Contacts
To search for contacts, follow these steps:
-
On the Go-to-Market Hub homepage menu, hover over Marketing Campaigns and click Contacts.
-
Enter a search term into one or more of the following fields: last name, company name and email. You can also narrow the search by groups you have created or by record type (accounts or contacts only).
-
Click Search.
Managing Your Leads
To manage leads, you need to select Lead Management. Follow these steps:
-
On the Go-to-Market Hub homepage, click Marketing Center in the right-hand corner, then click Lead Management.
-
Go to the Leads tab.
Leads are broken down by several columns that can be sorted by clicking the column name:
-
Subject. This is the subject line of the lead. This displays the name of the campaign and whether it was an inbound call or form submission.
-
Contact. Displays the lead’s contact information.
-
Follow Up. Provides you with an estimated follow-up date.
-
Stage. Displays the stage the lead is in.
-
Assigned. Displays the user the lead is assigned to.
-
Created. Displays the date the lead was originally created.
-
Source. Displays the source of the lead (form, inbound call).
-
You can also click the arrow next to the Lead Subject to view more options for managing it, including:
-
Edit this contact
-
Enter a note
-
Send an email
-
New calendar entry
-
View activity
-
To view the lead details, click Lead Subject. To view or modify the contact information, click the name of the contact.
Managing Leads
To conduct actions on a lead, you can create new tasks under the Leads section of the Lead Management area. To set a follow-up date, follow these steps:
-
Click New Task, then fill in the fields.
-
Choose a date under the Follow Up field by clicking the date field or the calendar icon.
-
Click Save to save your changes and stay in this window or click Save & Close to finish and exit.
Downloading and Analyzing Reports
Conveniently, you can view and analyze reports in the Go-to-Market Hub or you can download them for offline use. To download reports, follow these steps:
-
On the Go-to-Market Hub homepage menu, hover over Marketing Campaigns and click My Tactics.
-
Click the Email, Social, or Banner Ads tab to see a list of all active campaigns in one of those categories.
-
Click a campaign name, then go to the Reports tab.
-
Under Reports, you will see the Campaign Summary. For Email and Banner Ad campaigns, you can print the report by clicking Print. For Social campaigns, you can download the report by clicking PDF.