Getting Ready for Selling
This section explains how to get ready for selling your offers:
- Becoming Familiar with Sales Channels and Marketplace
- The Ways to Configure Sales Channels
- How to Fill in Your Product Catalog and Get Ready for Selling
-
Step 2: Import the product catalog from Billing to the Reseller Marketplace
-
Step 3: Configure the product catalog in the Reseller Marketplace
-
Step 4: Promote services on the landing page (Home page) of the Reseller Marketplace
-
Step 6 (Optional): Customize the Marketplace tile on the Dashboard
-
Step 7: Import the product catalog from Billing to the Customer Marketplace
-
Step 8: Configure the product catalog in the Customer Marketplace
-
Step 9: Promote services on the landing page (Home page) of the Customer Marketplace
-
Step 10: Enable customers to access the Customer Marketplace
-
Step 11 (Optional): Customize the Marketplace tile on the Dashboard
Becoming Familiar with Sales Channels and Marketplace
After UX1 Marketplace is deployed, a new item called Sales Channels becomes available when you log in as a provider to CloudBlue Commerce.

Sales Channels is the location where you configure the offers that will be available to your resellers and customers.

Resellers can both consume services and resell them to their own customers.
This is where you configure the offers that will be available to your customers and enable customers to purchase them through their Customer Panels.

When your customers log in to their Customer Panels, and when resellers log in to their Reseller Panels, they can browse and purchase your offers in the area called Marketplace.

To sum up, what you configure through Sales Channels is what your resellers and customers purchase through their Marketplaces.
The Ways to Configure Sales Channels
There are three ways to configure sales channels:
-
A provider sells directly to customers. The provider configures a catalog and a customer marketplace. Customers use it.
-
A provider sells to resellers. Resellers have customers. The provider configures resellers’ marketplaces. Resellers use their Marketplaces to sell to their customers.
-
L1 resellers sell to L2 resellers. L1 resellers configure reseller marketplaces for L2 resellers. L2 resellers buy from L1 for their own use and for reselling to their own customers.
How to Fill in Your Product Catalog and Get Ready for Selling
By default, the product catalog is empty. To start selling, you first need to fill it in. To do this, create sales categories and service plans in the Billing area of the CloudBlue Commerce Provider Panel, and then import them into the Reseller Marketplace or Customer Marketplace. When the import is completed, you select which of your offers will be available to users, specify pricing and prepare visually appealing tiles, called product pages, to showcase your offers in the Marketplaces.
Step 1: Prepare products and plans
You can configure products and plans in the following ways:
-
In PLM as described in Creating Products and Plans.
-
In the Classic Panel by configuring plans as described in Creating and Managing Service Offers.
Step 2: Import the product catalog from Billing to the Reseller Marketplace
-
Go to Provider Panel (UX1 for Providers) > Sales Channels > Home Page.
On this page you can find:

-
The items in the left navigation pane (1), Reseller Marketplace and End-customer Marketplace, provide access to the global settings of the Marketplaces. This is where you switch the Marketplaces on or off.
-
The Home page link in the navigation pane (2) and the RESELLER MARKETPLACE and END-CUSTOMER MARKETPLACE tabs at the top (3) provide access to configuring the contents of your Marketplaces. This is where you select which offers to display in your showcase and change how they look.
-
-
Go to Provider Panel > UX1 > Sales Channels, click Home page in the left navigation pane, click RESELLER MARKETPLACE at the top, and then click Import Catalog. When the import is finished, you can start preparing the landing page of the Reseller Marketplace.
Step 3: Configure the product catalog in the Reseller Marketplace
-
Go to Provider Panel > UX1 > Sales Channels > Home Page > RESELLER MARKETPLACE.

The essential building blocks of your product catalog are service plans, product pages, and category pages. Use the links (1) and (2) to work with them. In general, it is a good idea to prepare service plans first, and then prepare product pages, including service plans in them. You can also create category pages if you want to group your offers into categories.
As you imported service plans from Billing, you probably do not need to adjust or edit them. However, let’s review the plans and see how to add, edit, and remove them.
-
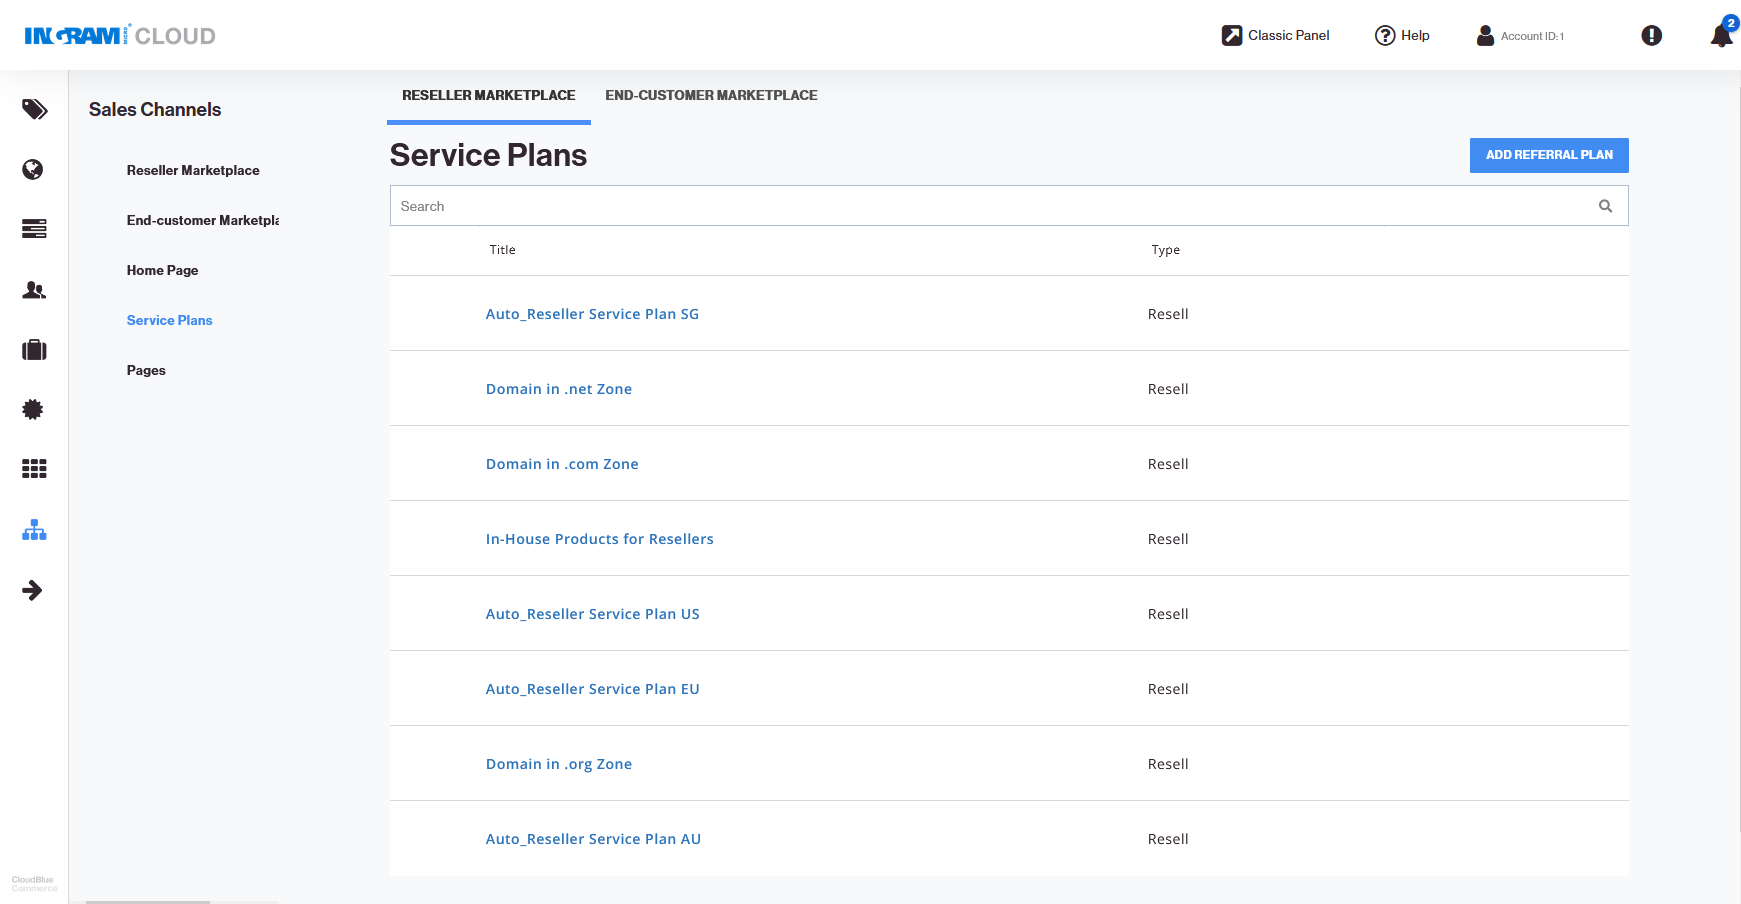
Go to Service plans (Provider Panel > UX1 > Sales Channels > Service Plans > RESELLER MARKETPLACE). This is a list of all service plans that were imported from Billing in Step 2.
-
To review or change the plan information and adjust how it will appear in the Marketplace, click the plan name. Specify the location of an image to use as a plan icon (it should be located elsewhere on the internet), specify a title and a description.
While editing, you can use these items in the toolbar:
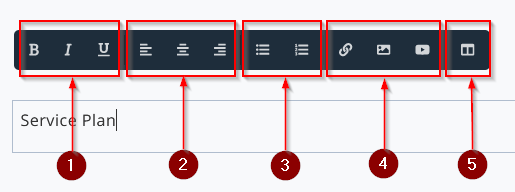
1. Change the font style to bold, italics, or underlined.
2. Align text to the left, center, or to the right.
3. Add a bullet list or a numbered list.
4. Insert a link to a webpage, an image, or a video clip.
5. Change the layout of a block by adding columns.
-
Click Save.
-
If your customers speak languages other than English, select a language from the menu, specify a title and a description in the other language and click Save.
-
To redirect users to an external store for purchase, click Add Referral Plan. Specify the location of an image to use as a plan icon (it should be located elsewhere on the internet), specify a title, a description, and a link (URL) to the store. Click Save. If you want to add a name and description in another language, select a language from the menu, specify a title and a description in the other language and click Save.
-
To add a new service plan, go to the Billing panel, add the plan there, and then repeat the import.
-
To make a plan temporarily unavailable to users, hover the mouse pointer over the plan’s name and click the
 icon.
icon. -
To remove a plan from the Marketplace, click the plan name, click the
 icon, and then click Delete. Note that this does not delete the service plan from Billing. It only removes the record about this plan and all your customizations to the plan from the Marketplace.
Now, the service plans are ready. Let’s create pages.
-
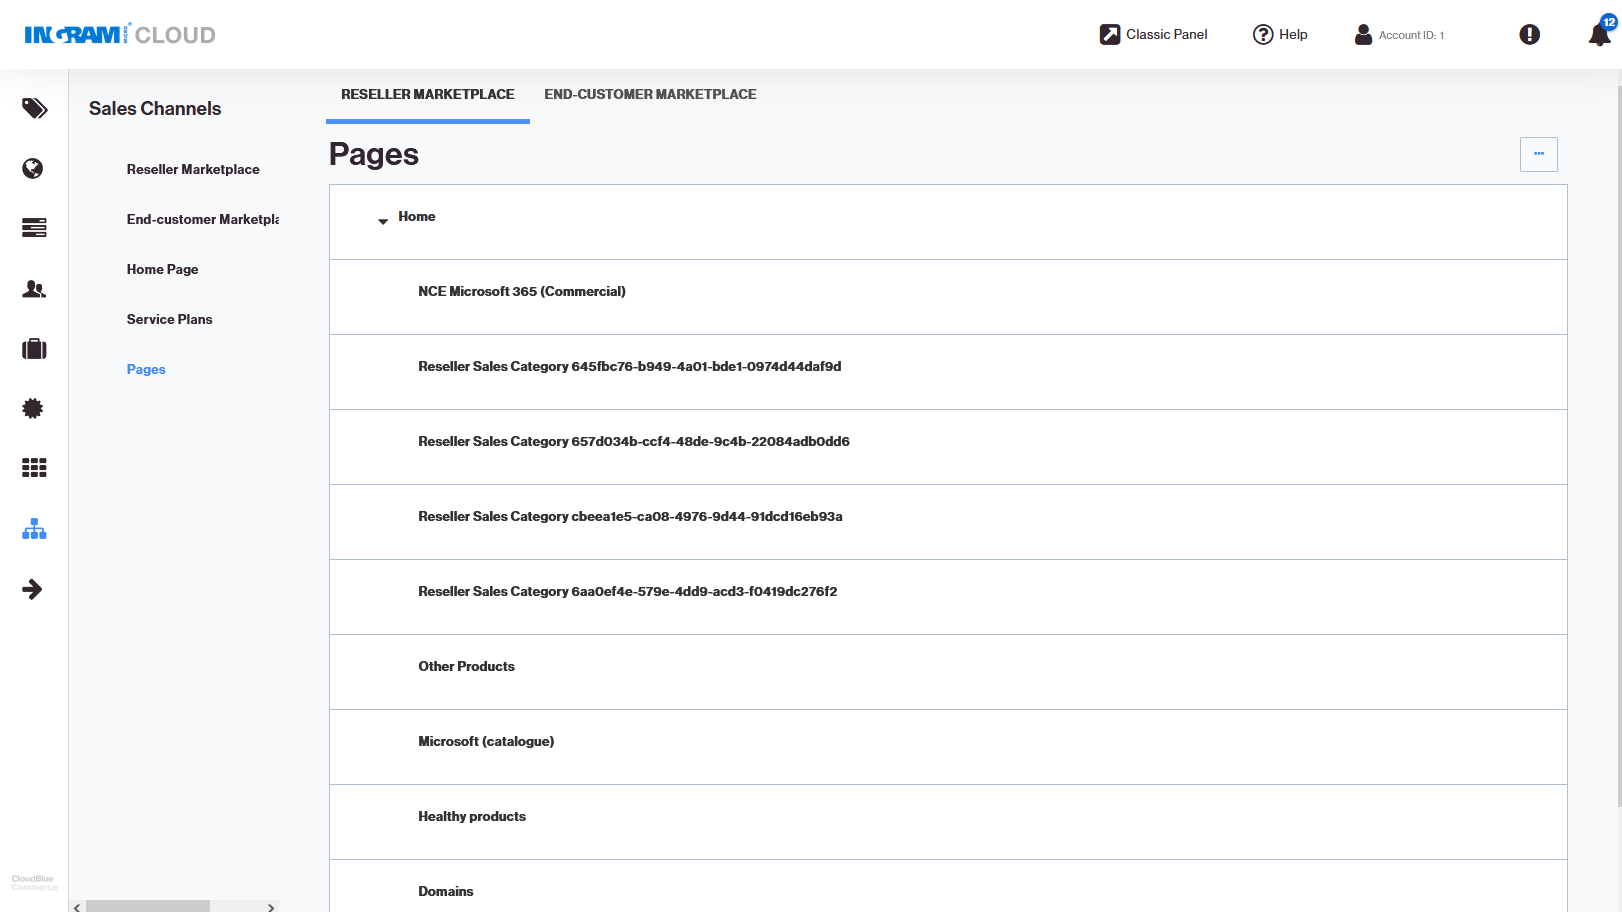
Go to Pages (Provider Panel > UX1 > Sales Channels > Pages > RESELLER MARKETPLACE). This is a list of all product pages that were created from sales categories during the import from Billing in Step 2. The pages are organized in a top-down structure starting with Home.
-
Let’s configure the Home page first. This is the landing page of your Reseller Marketplace that your resellers see when they visit the Marketplace.

1. A search by products and services.
2. A banner. You can add several pictures and make a slide show.
3. A list of featured products or services, also referred to as promo pages or promotions.
4. A product catalog. It consists of product pages and sub-pages with service plans. You can also create category pages if you want to group your offers into categories.
-
Click Home.
-
Specify what you want to display in the banner area. Click the
 icon.
icon. -
You can choose to upload one banner or make a slide show out of two or three banners.
-
Specify the URL to the banner image. The image must be available elsewhere on the internet. The image dimensions must not exceed 1300 by 375 pixels, and the file size must not exceed 100 kilobytes. We recommend using images in PNG format.
-
If you want to redirect users to a website when they click the banner, type a link in the Link box and select the Open link in new window checkbox.
-
To make a slide show, click the navigation icons
 and
and  to switch between image slots and upload more images.
 -
If you want to rearrange images in the slide show, select the order of each image in the Position menu.
-
If you want to delete an image, click DELETE.
-
Click SAVE.
The banner on the Home page is ready. Next, configure the pages of your product catalog that will showcase your offers.
-
-
To edit a page with your offering, complete the following steps:
-
Go to Pages (Provider Panel > UX1 > Sales Channels > Pages > RESELLER MARKETPLACE).
-
Click a page name. All items on the page must be editable by now. If you previously visited this area of the Marketplace settings and selected the Preview mode, click EDIT to switch back to the editing mode.
-
Click the title and description to edit them.
-
Click the
 icon to specify the URL to the icon that will accompany the product page in the showcase. You can also select a background color if you want to fill the transparent portions of the image with it.
 -
On the PRICING tab, under Service Plans, select the plans that you will offer for users to purchase when they view the product showcase.
-
To add a plan from the list of all plans created earlier, click in the Add plan box, find the plan by name, and select it.
-
To rearrange plans in the showcase, drag plans by the
 icon.
icon. -
To remove a plan from the showcase, click the
 icon.
icon. -
On the PRICING tab, under Frequently Bought Together (this may also appear as Cross-Sell, depending on your Marketplace version, but it is customizable), select the complementary plans that you want to offer.
-
Go to the OVERVIEW tab. Provide more information about the solution that you offer. Add screenshots, video clips, and other marketing materials.
-
Go to the SUPPORT tab. Provide information about the ways to contact the technical support of the service vendor.
-
Click SAVE.
-
-
To add a page, go to Pages (Provider Panel > UX1 > Sales Channels > Pages > RESELLER MARKETPLACE), click the
 icon, and click Add Category Page or Add Product Page. A category page is a container that you can use to group similar product pages together.
 -
To rearrange pages, hover the mouse pointer over a page name, point at the
 icon, and drag the page to another location. Note that by default, all pages are added without any particular order, and the order might change after you edit a page. If you want a specific order of pages, drag the pages within the structure.
 -
To make a page unavailable to users, hover the mouse pointer over the page name, and click the
 icon.
icon.
The product catalog is now configured in the Reseller Marketplace.
Step 4: Promote services on the landing page (Home page) of the Reseller Marketplace
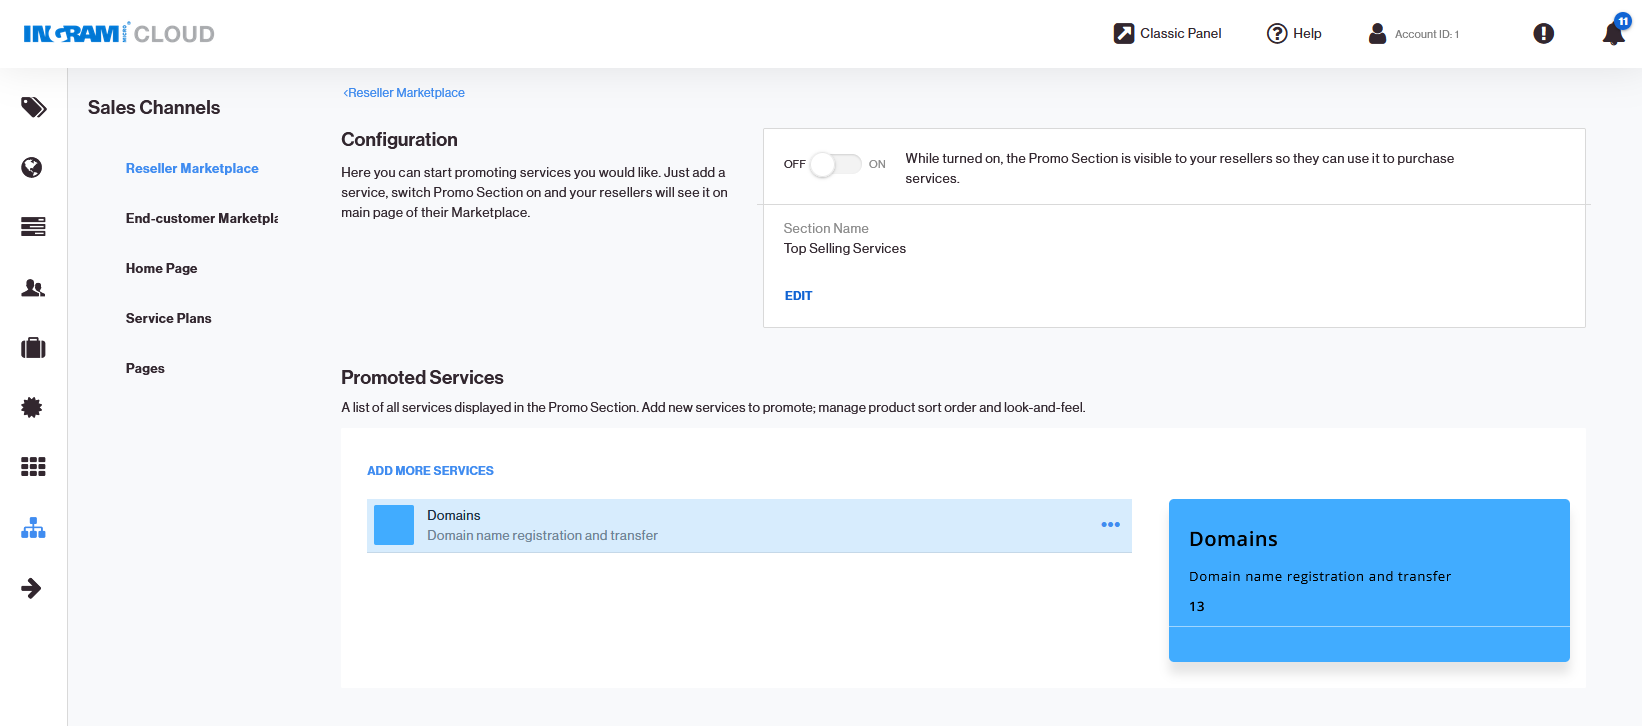
To specify which items or offers to display on the landing page of the Marketplace, in the Top Selling Services area below the banner:
-
Go to Provider Panel > UX1 > Sales Channels > Reseller Marketplace (in the left navigation pane) > Content > Promo Section > Launch.
-
Click SELECT.
-
Specify the following:
-
Title. Up to 50 characters.
-
Description. Up to 150 characters.
-
Promo price. The price that will be in effect during the promotion period. Up to 20 characters.
-
Button label. The button label, such as Buy Now. Up to 20 characters.
-
Under Appearance, select the colors to use for the tile name and button label. Select an icon for the tile (150 by 150 px, PNG or SVG format). Select a background image to fill in the entire Top Selling Services area. We recommend using an image of 400 by 1000 px for a background.
-
Under Promotion Period, specify when and for how long the promoted items will appear in the Reseller Marketplace.
-
-
Click ADD.
-
To launch the promotion campaign, under Configuration, click On.
-
If you want to edit or remove an item from the Top Selling Services area: Go to the Provider Panel > UX1 > Sales Channels > Reseller Marketplace (in the left navigation pane) > Content > Promo Section > Manage, click the
 icon, and click Customize or Delete.
Your Reseller Marketplace is ready. Let’s enable resellers to access it.
Step 5: Enable resellers to access the Reseller Marketplace
To enable resellers to access the Reseller Marketplace:
-
Go to Provider Panel > UX1 > Sales Channels > Reseller Marketplace.
-
In the General section, click On.
-
Click Configure and specify the following settings:

-
Which Marketplace to use. Select UX1 Marketplace.
-
The default page for your customers after login (Marketplace or Dashboard).
-
Allow resellers to configure their own Marketplace. Select this checkbox. It enables the Sales Channels item in the navigation pane of the Reseller Panel.
-
MSRP is available to resellers. Select this checkbox if you want to display the price recommended by the vendor in the Marketplace.
-
Allow resellers to buy services for their own use. Select this checkbox.
-
Display the introduction tour and walk-through guides to your resellers. Select this option for your resellers to see a brief presentation on first login.
-
Allow resellers to place orders if automatic payments are enabled for their accounts. Select this checkbox.
-
-
Click Apply to save the changes.
Step 6 (Optional): Customize the Marketplace tile on the Dashboard
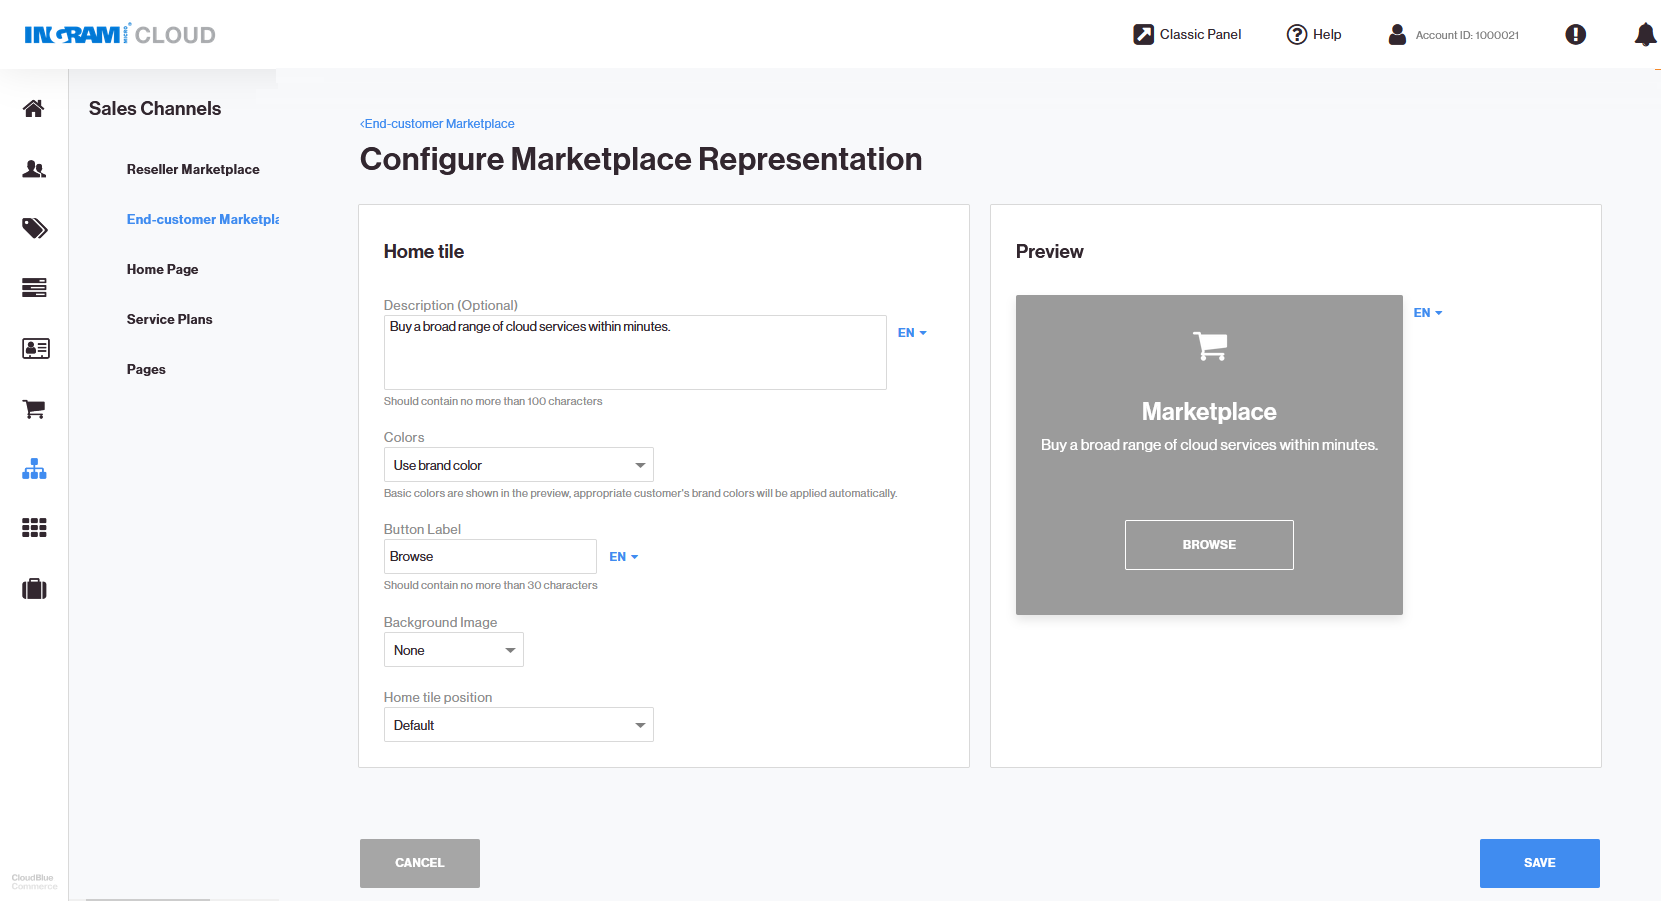
There are two items in the Reseller Panel that lead to the Marketplace: the Marketplace link in the left navigation pane, and the Marketplace tile on the Dashboard.
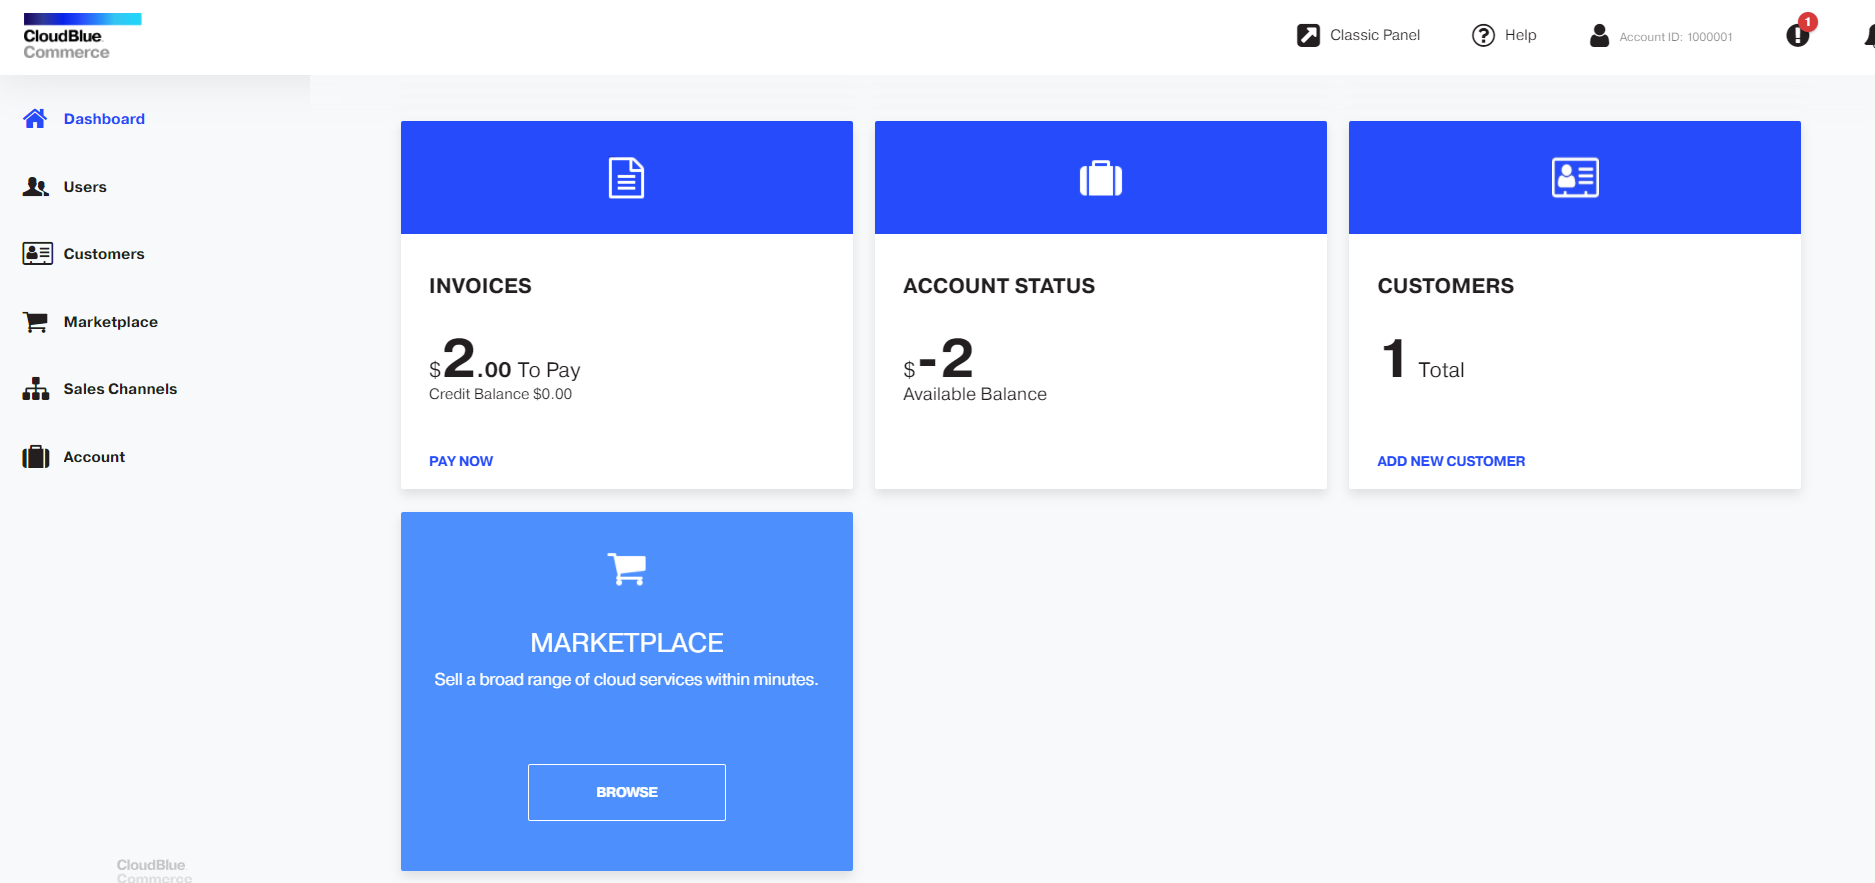
If you want to adjust the appearance of the Marketplace tile on the Dashboard, go to Provider Panel > UX1 > Sales Channels > Reseller Marketplace (in the left navigation pane) > Appearance > Preview > CUSTOMIZE.
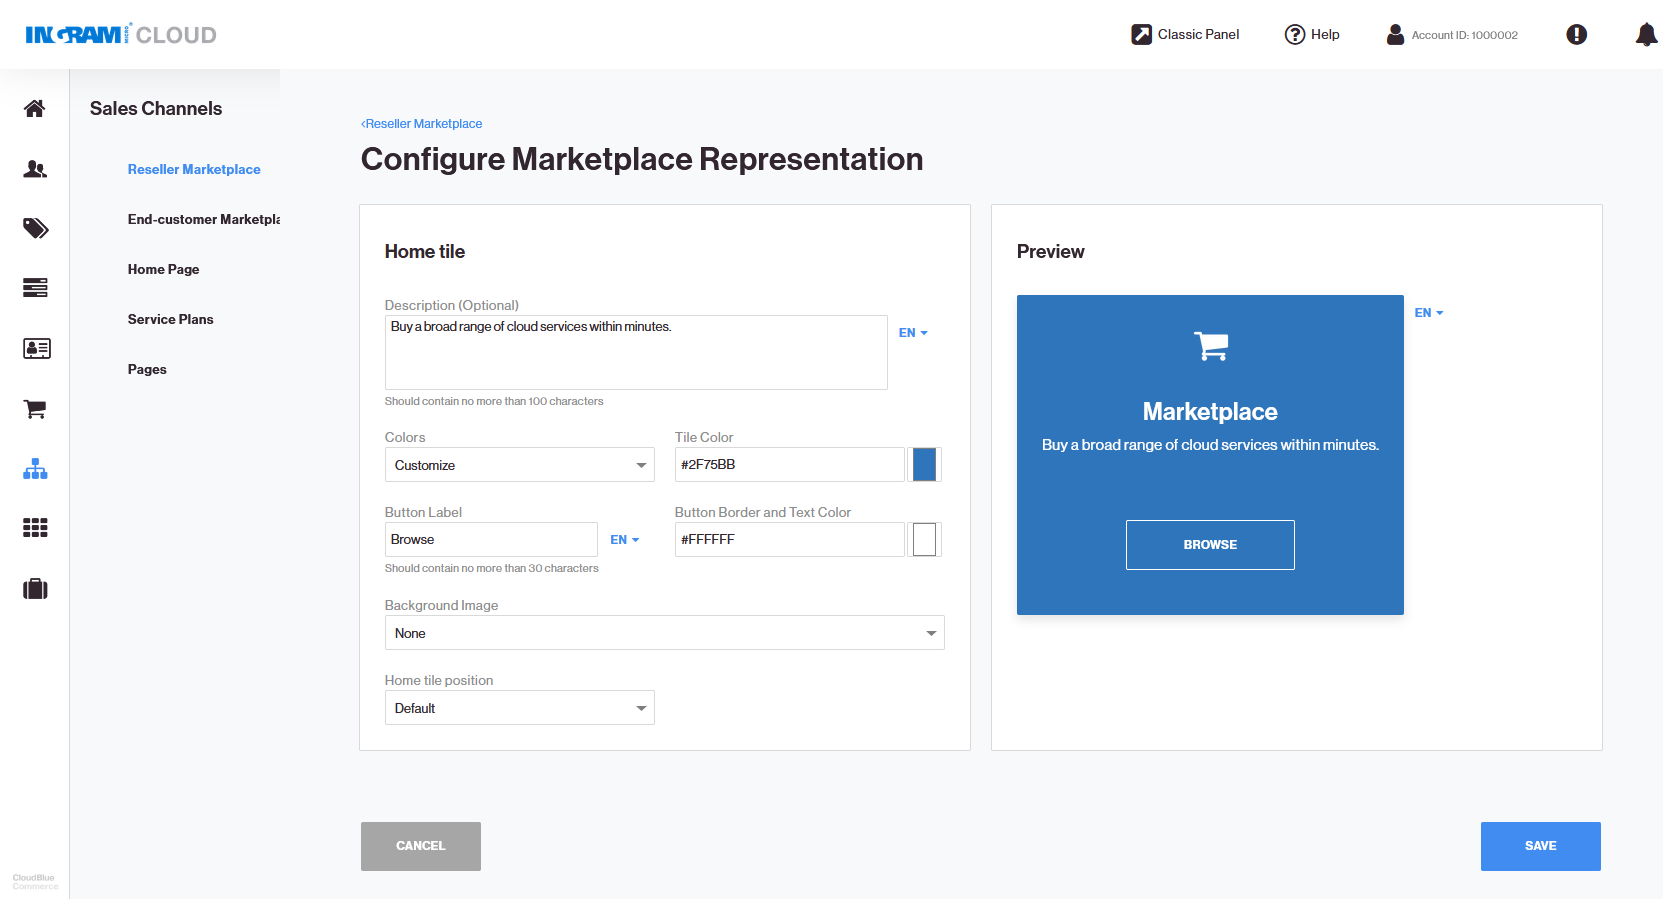
The Reseller Marketplace is ready. Now, let’s prepare a Customer Marketplace to enable your customers to purchase services from you.
Step 7: Import the product catalog from Billing to the Customer Marketplace
Go to Provider Panel > UX1 > Sales Channels, click Home page in the left navigation pane, click END-CUSTOMER MARKETPLACE at the top, and then click Import Catalog.
Step 8: Configure the product catalog in the Customer Marketplace
The building blocks of your product catalog are service plans and product pages. Prepare service plans first, and then prepare product pages that include service plans. You can also create category pages if you want to group your offers into categories.
-
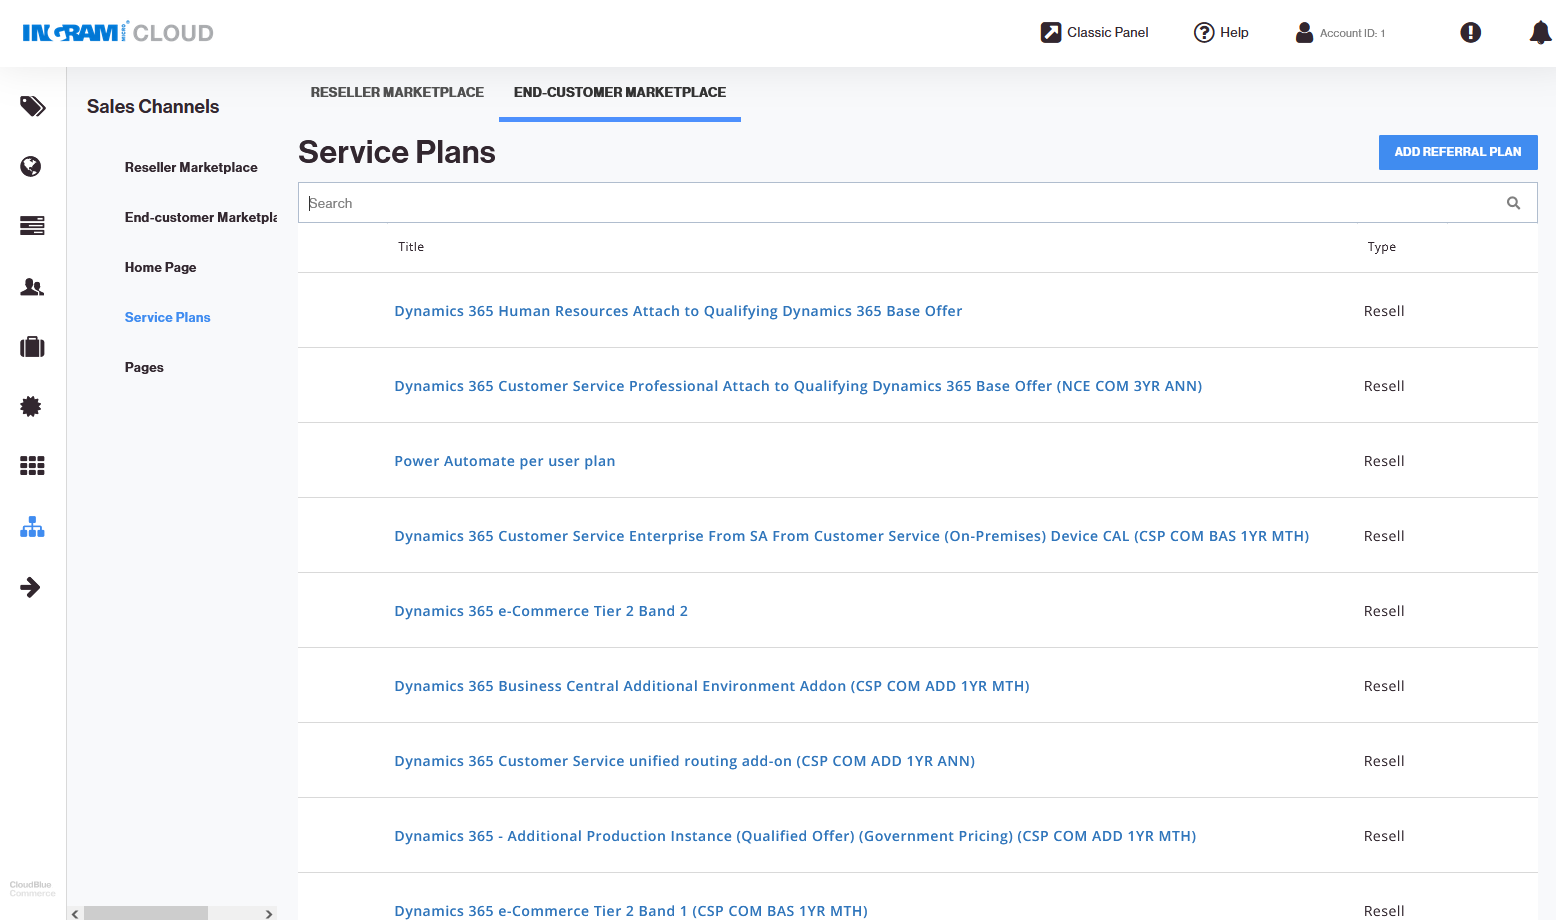
Go to Service plans (Provider Panel > UX1 > Sales Channels > Service Plans > END-CUSTOMER MARKETPLACE). This is a list of all service plans that were imported from Billing in Step 7.
-
To review or change the plan information and adjust how it will appear in the Marketplace, complete the following steps:
-
Click the plan name. Specify the location of an image to use as a plan icon (it should be located elsewhere on the internet), specify a title and a description.
While editing, you can use these items in the toolbar:

1. Change the font style to bold, italics, or underlined.
2. Align text to the left, center, or to the right.
3. Add a bullet list or a numbered list.
4. Insert a link to a webpage, an image, or a video clip.
5. Change the layout of a block by adding columns.
-
Click Save.
-
If your customers speak languages other than English, select a language from the menu, specify a title and a description in the other language and click Save.
-
To return to the list of service plans, click the < Service Plans < End-customer Marketplace link in the top navigation.
-
-
To redirect users to an external store for purchase, click Add Referral Plan. Specify the location of an image to use as a plan icon (it should be located elsewhere on the internet), specify a title, a description, and a link (URL) to the store. Click Save. If you want to add a name and description in another language, select a language from the menu, specify a title and a description in the other language and click Save.
-
To add a new service plan, go to the Billing panel, add a service plan there, and then repeat the import as described in Step 7.
-
To make a plan temporarily unavailable to users, hover the mouse pointer over the plan’s name and click the
 icon.
icon. -
To remove a plan from the Marketplace, click the plan name, click the
 icon, and then click Delete. Note that this does not delete the service plan from Billing. It only removes the record about this plan and all your customizations to the plan from the Marketplace.
Now, the service plans are ready. Next, create pages.
-
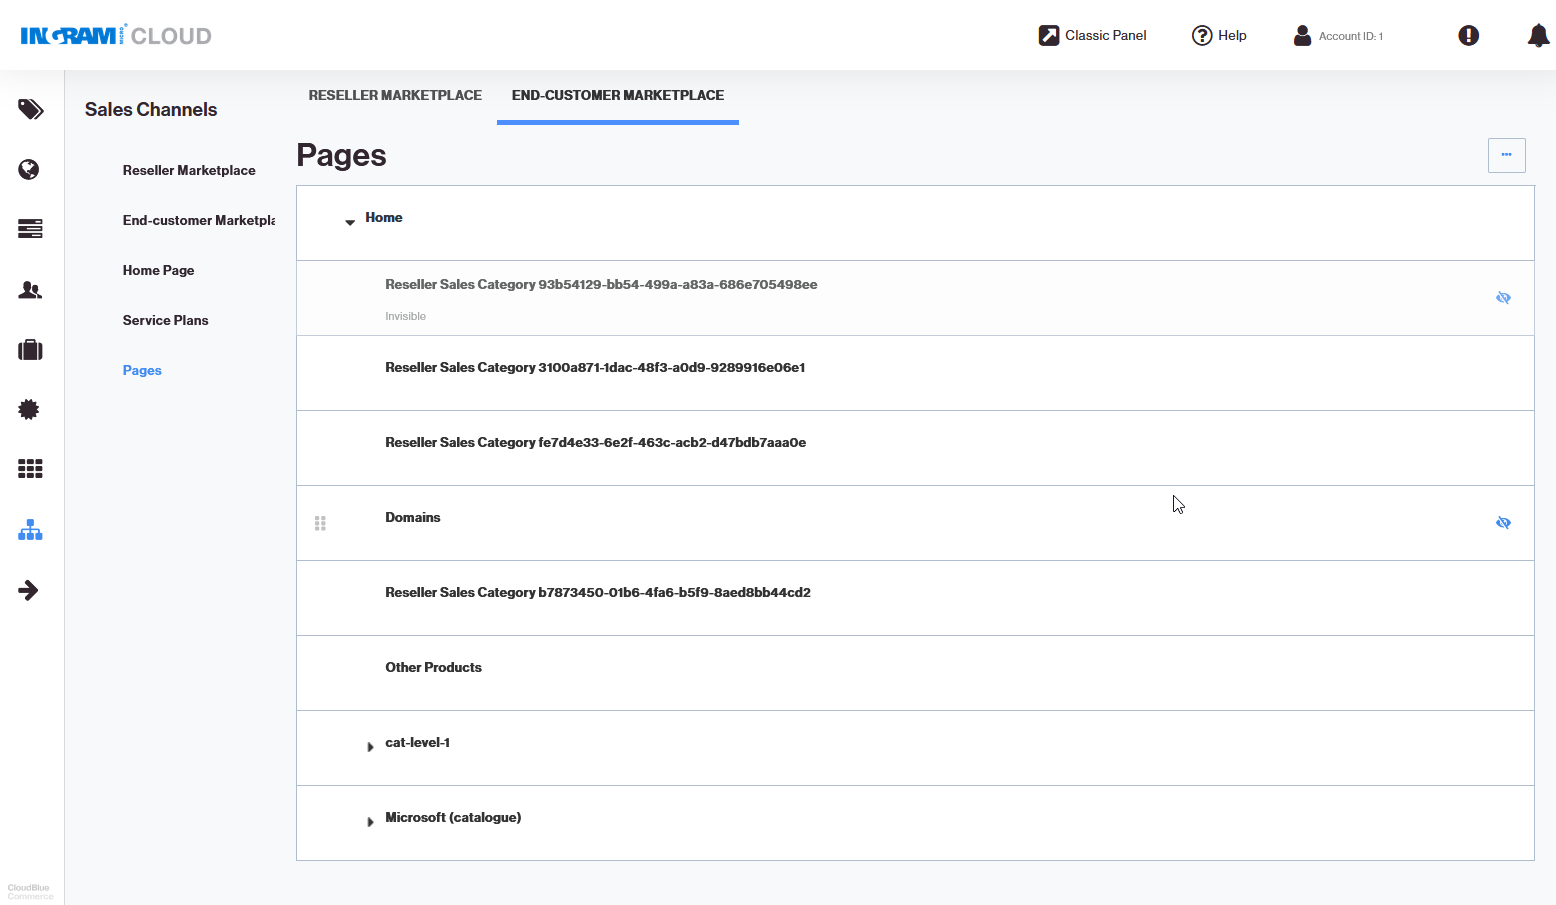
Go to Pages (Provider Panel > UX1 > Sales Channels > Pages > END-CUSTOMER MARKETPLACE). This is a list of all product pages that were created from sales categories during the import from Billing in Step 7. The pages are organized in a top-down structure starting with Home.
-
Let’s configure the Home page first. This is the landing page that your customers see when they visit the Customer Marketplace.
-
Click Home.
-
Specify what you want to display in the banner area. Click the
 icon.
icon. -
You can choose to upload one banner or make a slide show out of two or three banners.
-
Specify the URL to the banner image. The image must be available elsewhere on the internet. The image dimensions must not exceed 1300 by 375 pixels, and the file size must not exceed 100 kilobytes. We recommend using images in PNG format.
-
If you want to redirect users to a website when they click the banner, type a link in the Link box and select the Open link in new window checkbox.
-
To make a slide show, click the navigation icons
 and
and  to switch between image slots and upload more images.
 -
If you want to rearrange images in the slide show, select the order of each image in the Position menu.
-
If you want to delete an image, click DELETE.
-
Click SAVE.
The banner on the Home page is ready. Let’s configure the pages of your product catalog that will showcase your offers.
-
-
To edit a page with your offering, complete the following steps:
-
Go to Pages (Provider Panel > UX1 > Sales Channels > Pages > END-CUSTOMER MARKETPLACE).
-
Click a page name. All items on the page must be editable by now. If you previously visited this area of the Marketplace settings and selected the Preview mode, click EDIT to switch back to the editing mode.
-
Click the title and description to edit them.
-
Click the
 icon to specify the URL to the icon that will accompany the product page in the showcase. You can also select a background color if you want to fill the transparent portions of the image with it.
 -
On the PRICING tab, under Service Plans, select the plans that you will offer for users to purchase when they view the product showcase.
-
To add a plan from the list of all plans created earlier, click in the Add plan box, find the plan by name, and select it.
-
To rearrange plans in the showcase, drag plans by the
 icon.
icon. -
To remove a plan from the showcase, click the
 icon.
icon. -
On the PRICING tab, under Frequently Bought Together (may also appear as Cross-Sell, depending on your Marketplace version, but you can change it), select the complementary plans that you want to offer.
-
Go to the OVERVIEW tab. Provide more information about the solution that you offer. Add screenshots, video clips, and other marketing materials.
-
Go to the SUPPORT tab. Provide information about the ways to contact the technical support of the service vendor.
-
Click SAVE.
-
-
To add a page, go to Pages (Provider Panel > UX1 > Sales Channels > Pages > END-CUSTOMER MARKETPLACE), click the
 icon, and click Add Category Page or Add Product Page. A category page is a container that you can use to group similar product pages together.
 -
To rearrange pages, hover the mouse pointer over a page name, point at the
 icon, and drag the page to another location. Note that by default, all pages are added without any particular order, and the order might change after you edit a page. If you want a specific order of pages, drag the pages within the structure.
 -
To make a page unavailable to users, hover the mouse pointer over the page name, and click the
 icon.
icon.The product catalog is now configured in the Customer Marketplace.
Step 9: Promote services on the landing page (Home page) of the Customer Marketplace
To specify which items or offers to display on the landing page of the Customer Marketplace, in the Top Selling Services area below the banner:
-
Go to Provider Panel > UX1 > Sales Channels > End-customer Marketplace (in the left navigation pane) > Content > Promo Section > Launch.
-
Click SELECT.
-
Specify the following:
-
Title. Up to 50 characters.
-
Description. Up to 150 characters.
-
Promo price. The price that will be in effect during the promotion period. Up to 20 characters.
-
Button label. The button label, such as Buy Now. Up to 20 characters.
-
Under Appearance, select the colors to use for the tile name and button label. Select an icon for the tile (150 by 150 px, PNG or SVG format). Select a background image to fill in the entire Top Selling Services area. We recommend using an image of 400 by 1000 px for a background.
-
Under Promotion Period, specify when and for how long the promoted items will appear in the Customer Marketplace.
-
-
Click ADD.
-
To launch the promotion campaign, under Configuration, click On.

-
If you want to edit or remove an item from the Top Selling Services area: Go to Provider Panel > UX1 > Sales Channels > End-customer Marketplace (in the left navigation pane) > Content > Promo Section > Manage, click the
 icon, and click Customize or Delete.
Your Customer Marketplace is ready. Let’s enable customers to access it.
Step 10: Enable customers to access the Customer Marketplace
To enable customers to access the Customer Marketplace:
-
Go to Provider Panel > UX1 > Sales Channels > End-customer Marketplace.
-
In the General section, click On.
-
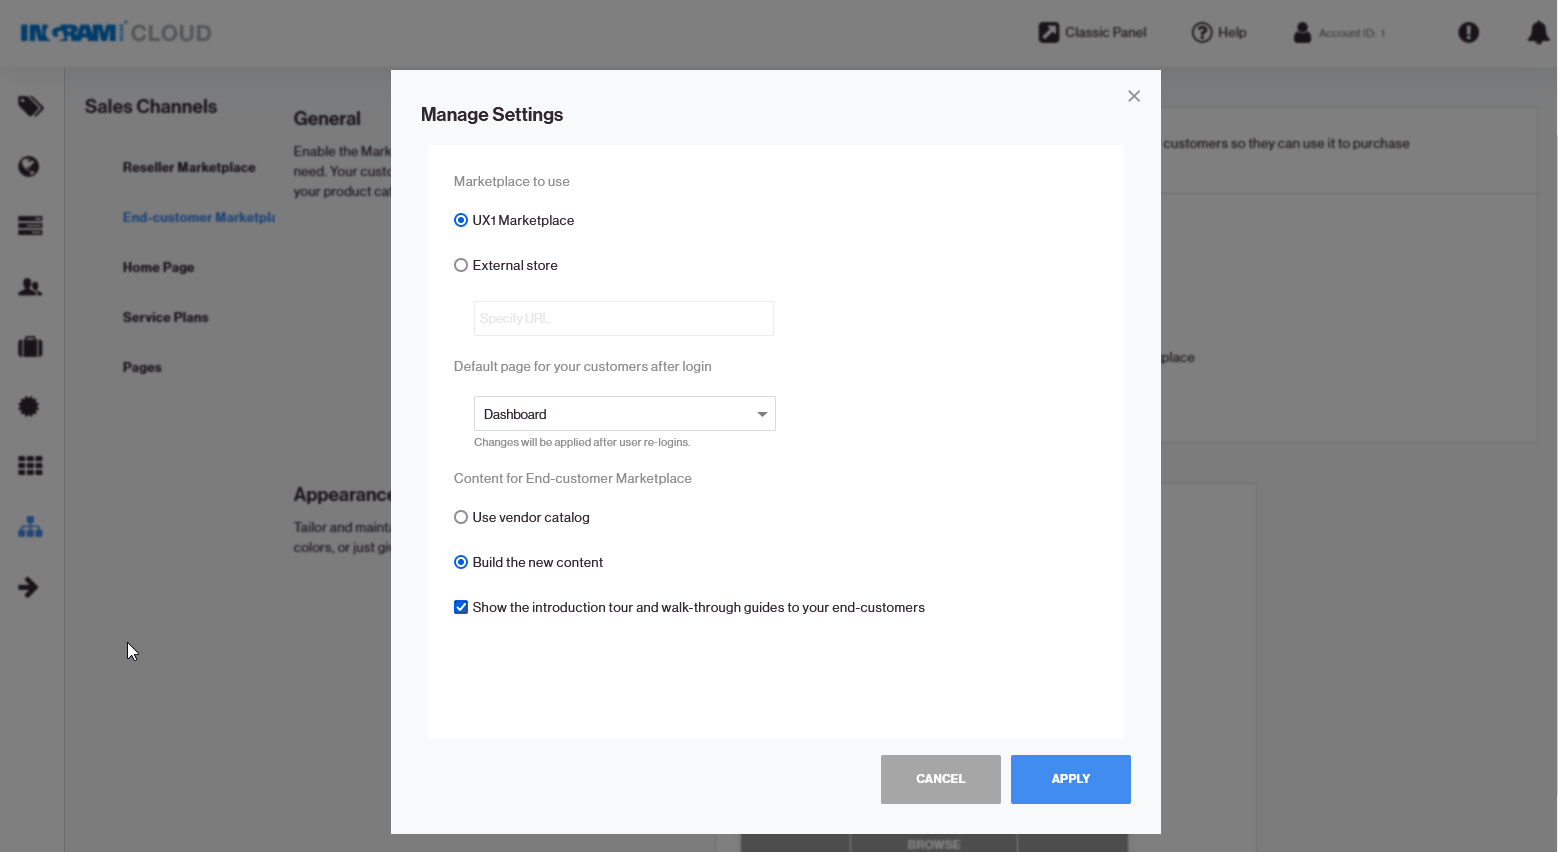
Click Configure and specify the following settings:
-
Which Marketplace to use. Select UX1 Marketplace.
-
The default page for your customers after login (Marketplace or Dashboard).
-
What to offer in the Customer Marketplace. Select Build new content.
-
Whether to display the introduction tour and walk-through guides to your end customers. Select this option for your customers to see a brief presentation on first login.
-
-
Click Apply to save the changes.
Step 11 (Optional): Customize the Marketplace tile on the Dashboard
There are two items in the Customer Panel that lead to the Marketplace: the Marketplace link in the left navigation pane and the Marketplace tile on the Dashboard.
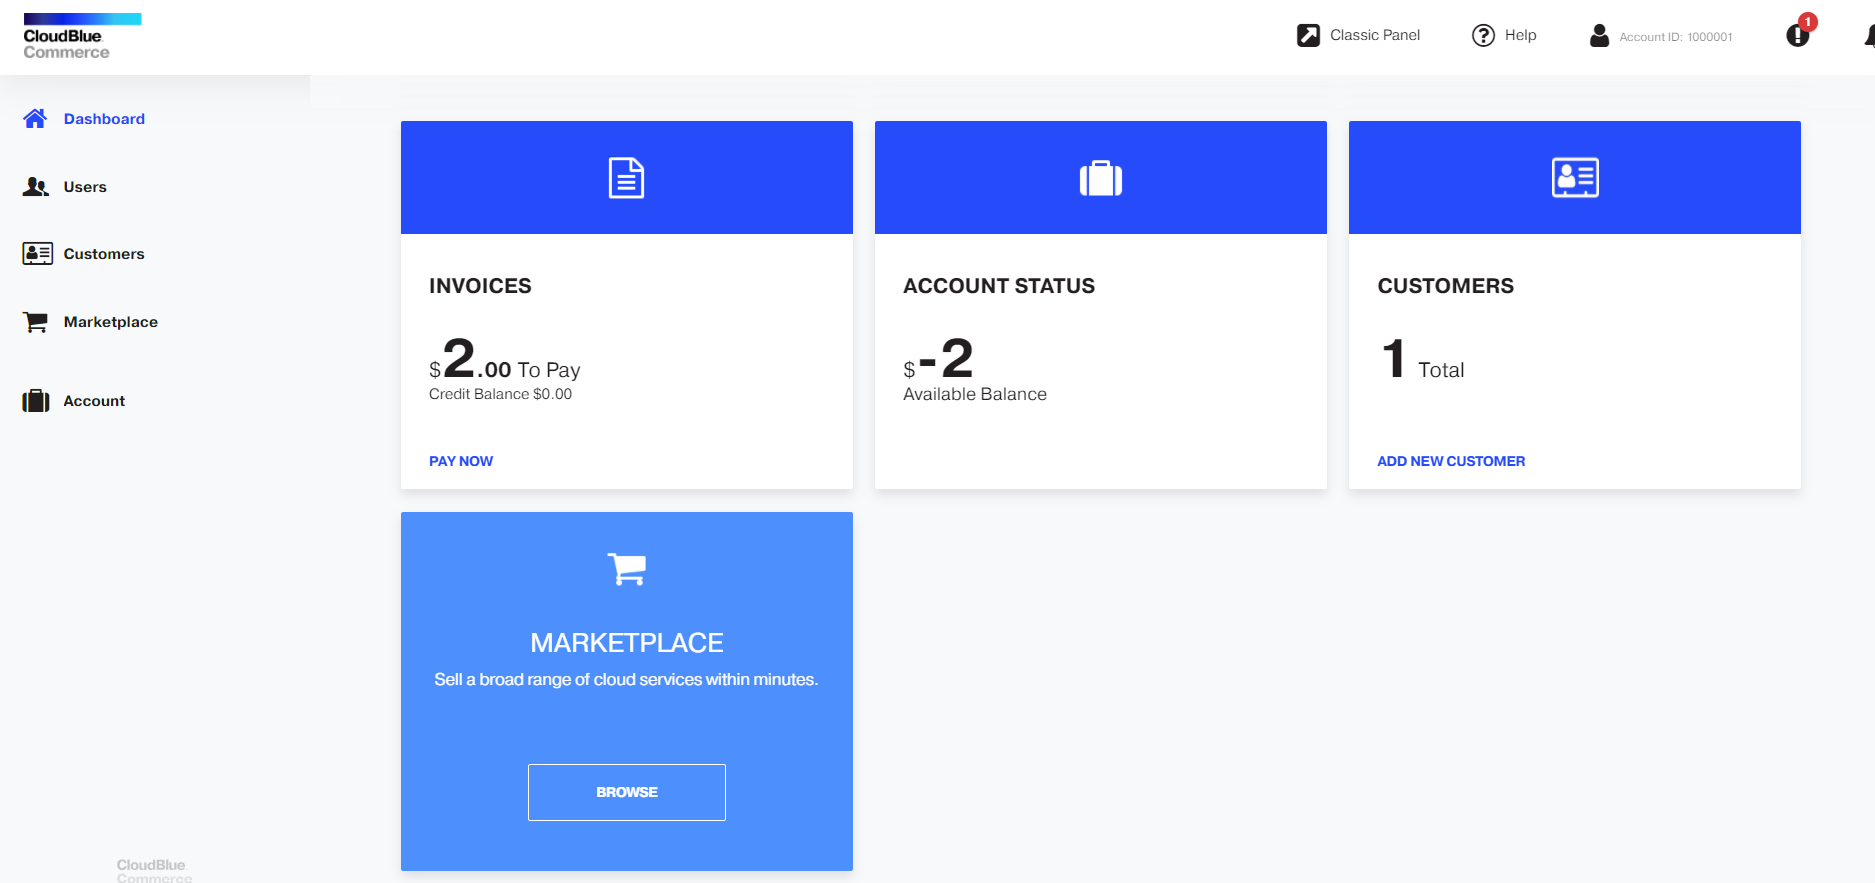
If you want to adjust the appearance of the Marketplace tile on the Dashboard, go to Provider Panel > UX1 > Sales Channels > End-Customer Marketplace (in the left navigation pane) > Appearance > Preview > CUSTOMIZE.
