Important:
- Performing a CloudBlue Commerce database pre-check is a mandatory manual procedure, which is not launched automatically during an upgrade of a CloudBlue Commerce installation.
- A CloudBlue Commerce database pre-check must be performed by each customer before upgrading a CloudBlue Commerce installation.
- An archive file, which includes logs and reports, automatically generated by the CloudBlue Commerce database pre-check must be attached to each post-upgrade issue when a customer contacts the support team.
Before upgrading Odin Automation 7.4 or later to CloudBlue Commerce 20.5, you need to make sure that your OSS and BSS databases of a current CloudBlue Commerce installation can be upgraded. We provide a special utility which lists errors to be fixed on your current CloudBlue Commerce installation. Note that this tool will not fix these errors.
Ensure you launch the database pre-check procedure in advance, as it can take a substantial amount of time for your installation to be ready to upgrade.
To perform the database pre-check, do the following:
- Prepare a Docker Host node according to Database Pre-check Requirements.
- Prepare input data according to Database Pre-check Input Data and put it to the
/opt/db_precheck_datadirectory on the Docker Host node.Note: Use the
--precheck-data-dir <PATH>parameter to specify a custom location for input data. - Download the pre-check archive from https://download.platform.cloudblue.com/cb/db_precheck/precheck-latest.tar and extract all files from the archive to any directory on the Docker Host node.
- Run this command:
python db_precheck.py
Note: If you use a proxy server, ensure that your proxy server is configured correctly to be used by the Docker service. For additional information, refer to the Docker documentation: Control Docker with systemd.
- The database pre-check script may return various errors which must be fixed before beginning the upgrade process.
- When the database pre-check is finished, it shows the location of the
db_precheck.tgzarchive file, which includes logs and reports, in the/var/log/padirectory on the Docker Host node. The archive file contains all errors found by the utility and a summary report in thedb_precheck_report.jsonfile. - If the database pre-check script finds errors and shows them in the summary report, please refer to the KB article: https://kb.cloudblue.com/134312. If this KB article does not help you, please send the
db_precheck.tgzfile to the support team to investigate before upgrading CloudBlue Commerce.
Database Pre-check Requirements
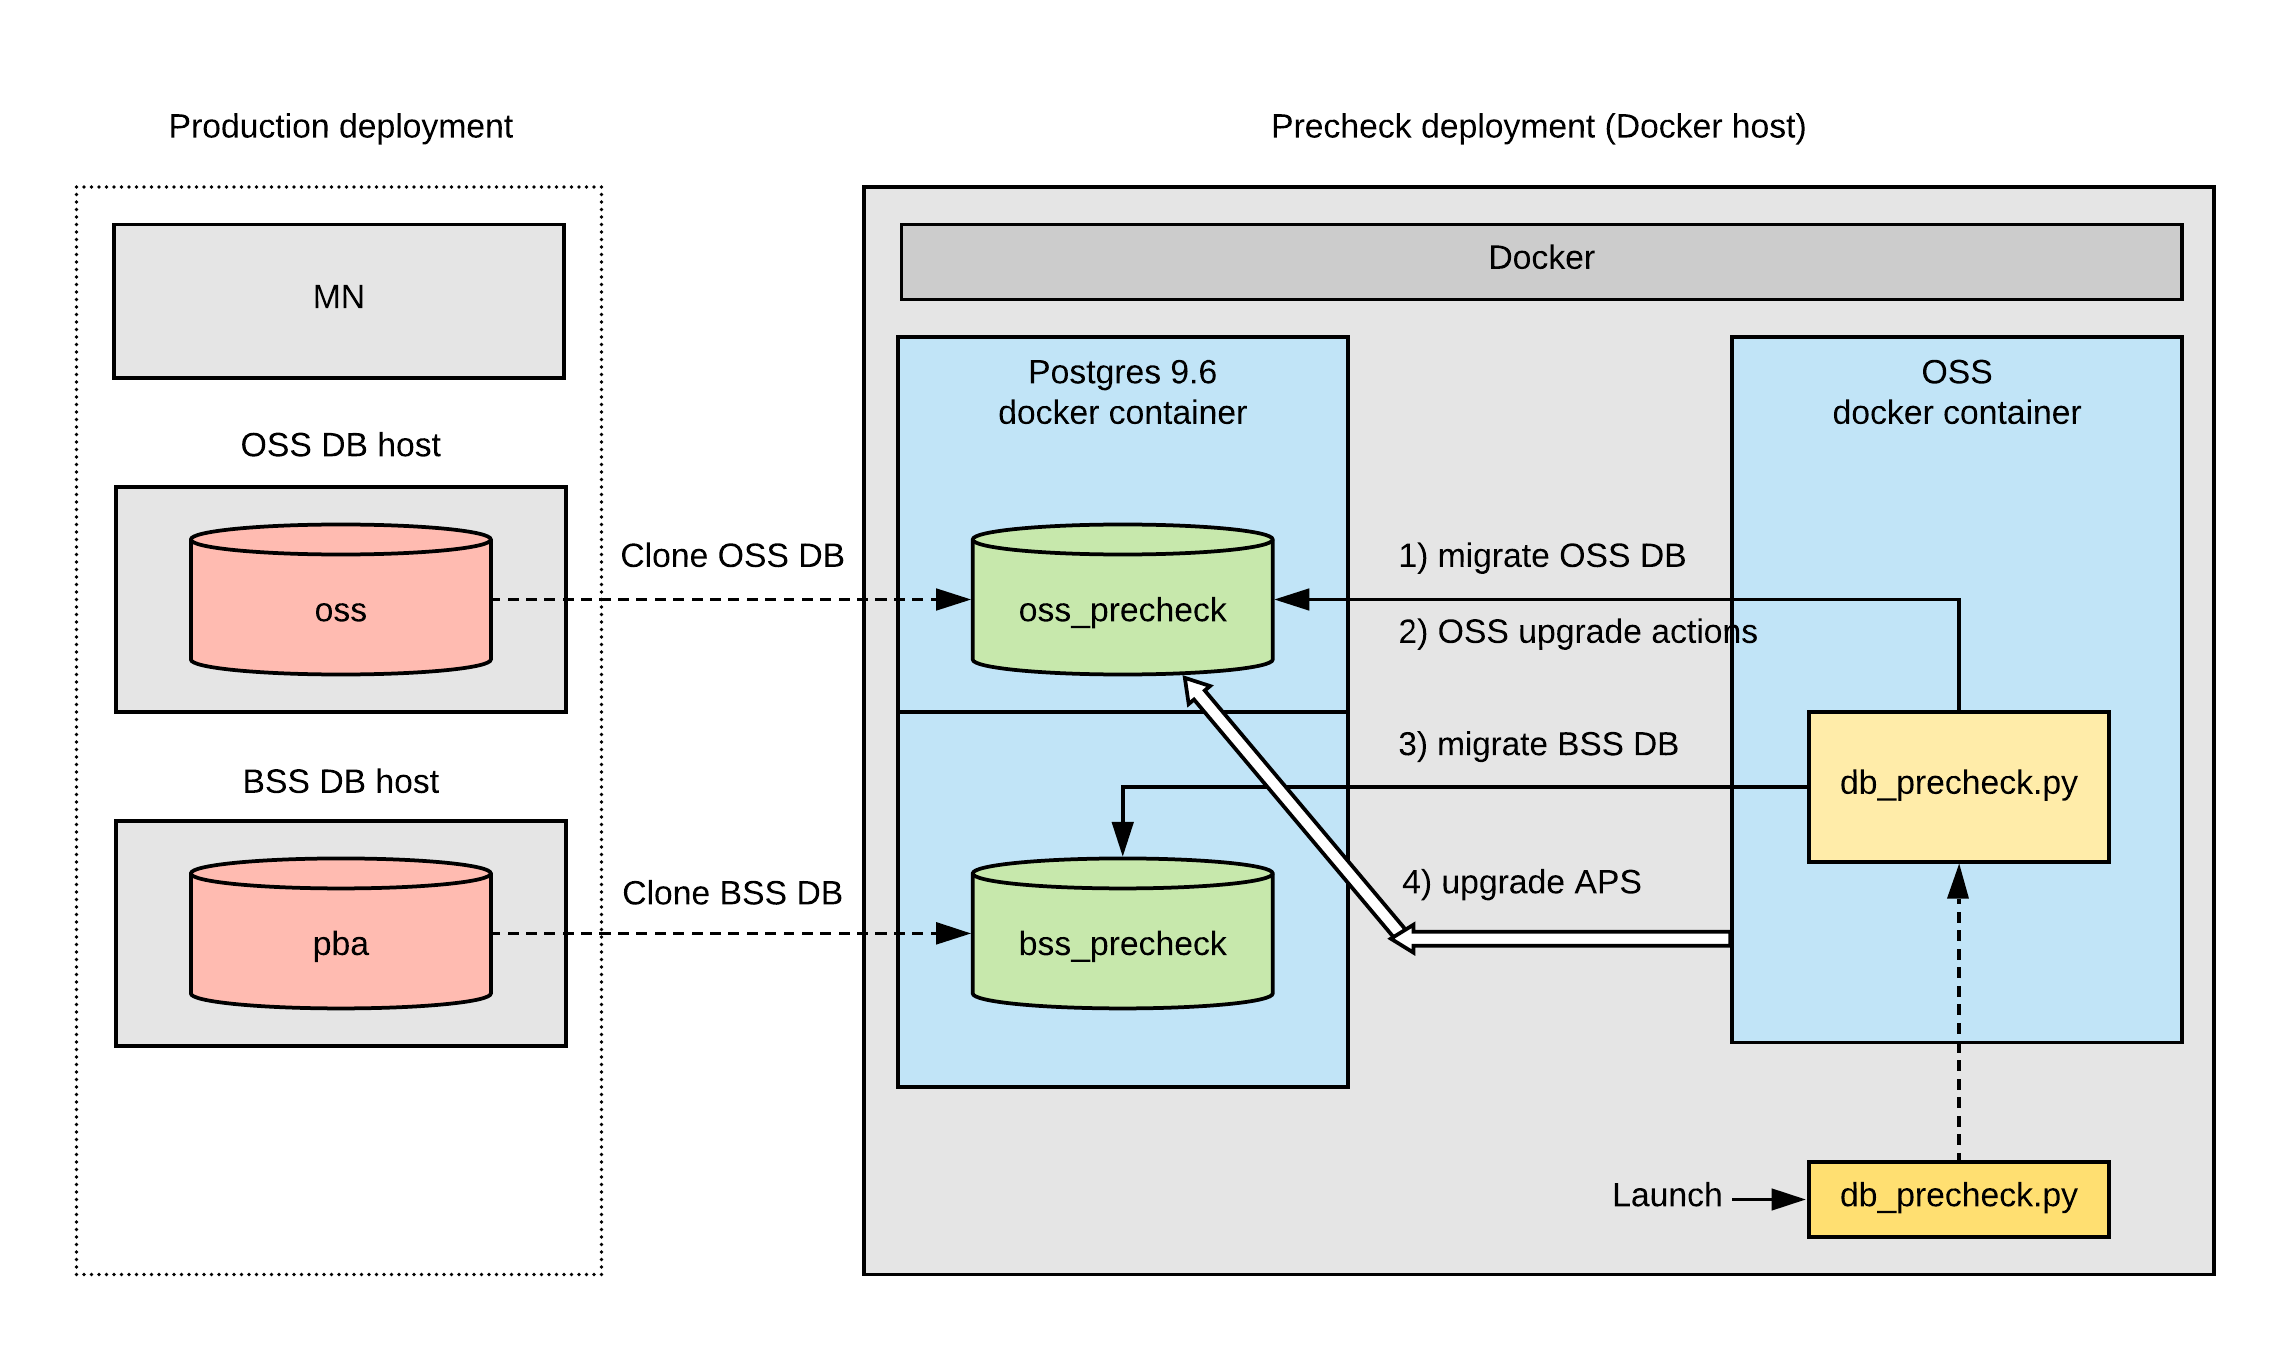
According to the working model of the database pre-check tool (see Database Pre-check Model), one VM node with Docker (Docker Host node) and access to internet is required outside a production network. Internet access is required to download Docker images from repositories to use in the pre-check model.
Note: The database pre-check tool uses iptables to isolate the database checking process from the external environment. Also, the database pre-check tool uses special names for databases clones:
- oss_precheck for the OSS database clone
- bss_precheck for the BSS database clone
The Docker Host node OS requirements are:
- CentOS 7.4 (x64)
- RHEL 7.4 (x64)
The Docker Host node software requirements are:
- Python 2.7
- Docker 17.0.7 (or later); please refer to the Docker documentation for more details.
- iptables
The Docker Host node hardware minimum requirements are:
- CPU: 4 core or more (with 2.4 GHz or higher)
- RAM: 16 GB or more
- Disk: 1 TB or more
Note: The disk must be capable of storing OSS and BSS databases with their dumps.
The Docker Host node hardware maximal requirements are:
The Docker Host node timezone requirements are:
-
The Docker Host node timezone must be the same as the timezone of the database server you want to precheck. To ensure the correct timezone on your Docker Host node, refer to Linux documentation.
Database Pre-check Model
Database Pre-check Input Data
Important:
- All files in the input data directory must have the following access permission: “read” (including “other” users)
- All directories in the input data directory must have the following access permissions: “read” and “execute” (including “other” users)
- For PostgreSQL version 9.6 database, use the pg_dump 9.6 utility. To run the pg_dump 9.6 on OSS DB and BSS DB nodes, use the /usr/pgsql-9.6/bin/pg_dump utility.
- The OSS database dump named:
pg_dump-oss.dump. On the OSS DB host, run the following command to create the dump:su - postgres -c 'pg_dump --format=directory --no-owner --jobs 4 -U postgres oss -f pg_dump-oss.dump'
- The OSS database dump of global objects named:
pg_dump-oss.globals.dump. On the OSS DB host, run the following command to create the dump:su - postgres -c 'pg_dumpall --globals-only --no-owner -U postgres > pg_dump-oss.globals.dump'
- The BSS database dump named:
pg_dump-bss.dump. On the BSS DB host, run the following command to create the dump:su - postgres -c 'pg_dump --format=directory --no-owner --jobs 4 -U postgres pba -f pg_dump-bss.dump'
-
The BSS database dump of global objects named:
pg_dump-bss.globals.dump. On the BSS DB host, run the following command to create the dump:su - postgres -c 'pg_dumpall --globals-only --no-owner -U postgres > pg_dump-bss.globals.dump'
- A copy of the
APSdirectory is located in the/usr/local/pemdirectory on the MN node. - A copy of the
credentialsdirectory is located in the/usr/local/pemdirectory on the MN node.
Database Pre-check Input Data for PostgreSQL in Azure Installation
For PostgreSQL in Azure installation, use the following instructions for dump collecting:
- Log in to OSS MN as
sudouser with permissions to usepg_dump. -
Create a directory for dumps and data:
# mkdir dbprecheck_data
-
Upload the
get_dumps.shscript into this directory. Copy the
 get_dumps.shscript from hereCopy#!/bin/bash
FILE="/usr/local/pem/etc/Kernel.conf"
[ ! -f $FILE ] && echo "$FILE does not exist. Are you sure you are on MN?" && exit 1
source $FILE
echo "Creating OSS database dump....."
PGPASSWORD="$dsn_passwd" pg_dump --format=directory --no-owner --jobs 4 -h "$dsn_host" -U "$dsn_login" "$dsn_db_name" -f pg_dump-oss.dump
status=`echo $?`
[ "$status" -eq 0 ] && echo "oss database dump created: ./pg_dump-oss.dump" || exit 1
echo "Creating BSS database dump....."
PGPASSWORD="$bss_db_passwd" pg_dump --format=directory --no-owner --jobs 4 -h "$bss_db_host" -U "$bss_db_user" "$bss_db_name" -f pg_dump-bss.dump
status=`echo $?`
[ "$status" -eq 0 ] && echo "bss database dump created: ./pg_dump-bss.dump" || exit 1
echo "Creating OSS database globals dump......"
read -p "Enter pgadmin password for OSS database postgres azure service: " -s pgadmin_passwd
echo
PGPASSWORD="$pgadmin_passwd" pg_dumpall --globals-only -h "$dsn_host" -U pgadmin@"${dsn_host%%.*}" > pg_dump-oss.globals.dump
status=`echo $?`
[ "$status" -eq 0 ] && echo "OSS database globals dump created: ./pg_dump-oss.globals.dump" || exit 1
echo "Creating BSS database globals dump......"
read -p "Enter pgadmin password for BSS database postgres azure service: " -s pgadmin_passwd
echo
PGPASSWORD="$pgadmin_passwd" pg_dumpall --globals-only -h "$bss_db_host" -U pgadmin@"${bss_db_host%%.*}" > pg_dump-bss.globals.dump
status=`echo $?`
[ "$status" -eq 0 ] && echo "BSS database globals dump created: ./pg_dump-bss.globals.dump" || exit 1 -
Run this script:
# cd dbprecheck_data
# chmod a+x get_dumps.sh
# ./get_dumps.shNote: The script asks the
pgadminpassword.
The following dump files appear inside your dbprecheck_data folder:
pg_dump-bss.dumppg_dump-bss.globals.dumppg_dump-oss.dumppg_dump-oss.globals.dump
A copy of the APS directory is located in the /usr/local/pem directory on the MN node.
A copy of the credentials directory is located in the /usr/local/pem directory on the MN node.