If you are using CloudBlue Commerce with the Billing module, then you should also set up a service plan in billing, based on the service template you created in the previous steps. Service plans define the amounts of available resources and the applicable charges.
To create a service plan based on a service template:
- Click the Billing link in the top right corner of the screen.
-
Go to Products > Service Plans > Add New Service Plan.
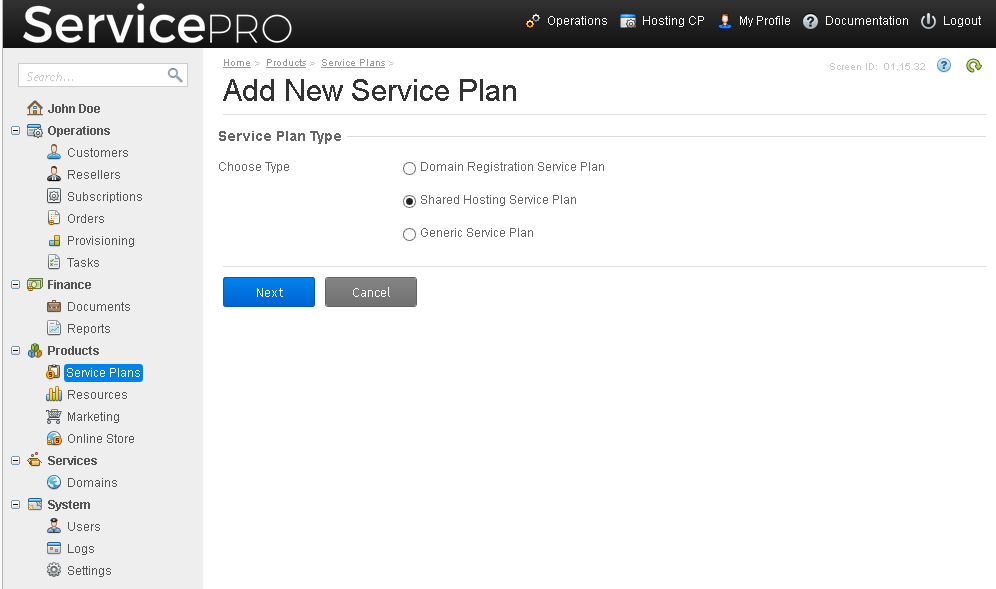
- Select Generic Service Plan and click Next.
- Specify a plan name and a description in the Name, Short summary, and Detailed description boxes.
- In the Service template field, click the icon
 and select the service template that you created earlier.
 - In the Plan category menu, select Hosting Services.
- In the Service terms menu, select Hosting Service Terms.
- Select the Published and Attach usage statistics check box.
- Select the billing terms:
-
Billing model. Select any of the following:
- Charge Before Subscription Period (BSP). Customers will be charged a setup fee and a fee for the whole subscription period upon purchase. On each billing date, customers will be charged for overuse (if any occurred during the previous billing period), even if the respective subscriptions are on hold.
- Charge Before Billing Period (BBP). Customers will be charged a setup fee and a subscription fee for the first billing period upon purchase. On each billing date, customers will be charged a fee for the next billing period and for overuse (if any occurred during the previous billing period), even if the respective subscriptions are on hold.
- Charge After Billing Period (ABP). Customers will be charged a setup fee upon purchase. On each billing date, customers will be charged a fee for the previous billing period and for overuse (if any occurs). If subscriptions are on hold, billing orders will not be issued and customers will not be billed for services while subscriptions are on hold, even if overuse occurred before the subscriptions were put on hold.
-
Billing period. Select any of the following:
- Monthly – a recurring fee is charged every month on the order date.
- Quarterly – a recurring fee is charged every three months on the order date.
- Half-yearly – a recurring fee is charged every six months.
- Yearly – a recurring fee is charged every year on the order date.
-
Set recurring prices. Select any of the following:
- To set a recurring fee per billing period, select Billing period. All the recurring fees you set in the next steps of the wizard, called Specify Prices and Subscription Periods, will be considered as fees per your chosen billing period. For example, if you set a recurring fee to $10 and select half-yearly in the Billing Period field, Billing will charge your customers the recurring fee of $10 every half a year.
- To set a recurring fees per month, select Month. All the recurring fees you set in the Specify Prices and Subscription Periods step will be considered as fees per month. For example, if you set a recurring fee to $10 for any selected subscription duration and choose Half-yearly in the Billing Period field, Billing will charge your customers a recurring fee of $10 per month * 6 months = $60 every half a year.
- Align billing order to statement day. Select this check box to bill all customers who buy this service plan on fixed billing dates (usually the first days of the respective months). The fixed billing dates depend on the billing period you selected.
- Autorenewal. Select whether you want to renew subscriptions to this service plan automatically.
- Under Notification schedule, click the icon and select Hosting Subscription Expiration.
- Under Listing priority, type a number. The highest priority is 1. The service plan with the highest priority will be shown in the topmost left position of its sales category in the online store.
- Select an image that you want to show next to this service plan in the online store.
- Click Next.
- Specify prices and subscription periods. Click Next.
- Configure all the subscription periods you have selected in the previous step, one-by-one.
- Click Set Up Plan Rates.
-
Select the check boxes next to the resources that you want to provide to users, and specify the amounts and prices of these resources. These resources are taken from the service template on which this service plan is based.
- Specify the amounts of resources that should be initially included in a plan in the Inc Units field.
- For the resources that you want to offer as additional resources, leave the default amount of included resources in the Inc Units field, and specify the minimum and maximum amounts in the Min Units and Max Units fields.
- If you do not want to limit the use of a resource, specify -1.00.
- Specify the setup, recurring, and overuse fees. Additionally, specify how you want to charge the setup fee: select the Charge per unit check box if you want to have the total setup fee equal to the number of included units multiplied by the setup fee.
- If you want to allow overuse, select the Measurable check box.
- If you want to make a resource available for purchase in the Online Store, select the Show in Store check box.
- If you want to make a resource available for purchase from the Customer Panel, select the Show in CP check box.
Note: If you include a resource in a service plan, but do not specify the amount or price of that resource, the resource will be available to users in the amount that is specified in the service template, but users will not be billed for its use.
Here is a complete list of resources relevant to WebHosting Plesk:
- IPv6 addresses. Specifies the total number of exclusive IPv6 addresses that should be available to the subscription owner.
- IP addresses. Specifies the total number of exclusive IPv4 addresses that should be available to the subscription owner.
- DNS hosting. Allows DNS hosting and specifies the total number of domains that can be hosted by the provider's name servers.
- DNS management. Allows customers to manage DNS zones and specifies the total number of domains whose zones they can manage.
- Webspace. This allows users to create webspaces and specifies the total number of webspaces inside a single subscription.
- Maximum number of additional FTP accounts per webspace. The maximum number of additional FTP accounts that can be created for a webspace.
- Website. This allows users to create websites and specifies the maximum number of websites inside a single subscription.
- WordPress site. This allows users to install WordPress on websites and specifies the maximum number of installations per single subscription.
- Site without web hosting. The total number of sites that can be used for email-only hosting.
- Web traffic. The total amount of bandwidth that can be used by all websites of a subscription per month.
- Web storage. The total amount of disk space that can be used by all websites of a subscription.
- Hard disk quota for a webspace. This is a hard quota on the amount of available disk space.
- Maximum bandwidth that can be used by all websites of a webspace. This setting restricts network usage by websites of a webspace.
- Maximum number of concurrent HTTP connections to websites per webspace.
- Maximum number of MySQL and PostgreSQL databases per webspace.
- Maximum number of Microsoft SQL Server databases per webspace.
- MySQL and PostgreSQL databases usage. This specifies the total number of databases that can be created per subscription.
- Microsoft SQL Server databases usage. This specifies the total number of databases that can be created per subscription.
- Email domains. This specifies the total number of sites under which email services can be set up.
- Email accounts. This specifies the total number of mailboxes that the subscriber can host within a subscription.
- Email storage. This specifies the total amount of disk space that can be used by all mailboxes within a subscription.
- Maximum size of a mailbox. This specifies the maximum allowed size per each mailbox.
Note: As you may notice in the user interface, there are also the following resources that are shown in the list: Traffic, Web Hosting Service, Web Hosting General Limits, Generic Hosting Configuration, Plesk Apache Web Service, Plesk Mail Service, and Plesk IIS Web Service. These are the internal resources that CloudBlue Commerce uses for provisioning. Do not change the default settings for these resources.
- Click Finish.
- Update the online store with information about the newly created service plan: go to Products > Online Store, and click Synchronize Now.