Integrating Other E-commerce Systems with UX1 Marketplace Checkout
This article explains how to integrate an external or an in-house e-commerce system with the checkout in the UX1 Marketplace. To do this, you need CloudBlue Commerce 20.4 or later with UX1 Marketplace 5.7 or later. Additionally, you might want to implement a single sign-on by following these instructions.
The first step is to implement a redirect from the external system to the checkout by a direct link. Use the following instructions to learn how to form the link:
-
Look up the branded domain name that you need to use in the link.
Go to Operations > System > Settings > Brands > the Domain column, or Operations > Customers > company name > the Brand column.
For example, brand.example.com.
-
Look up the ID of the service plan that you want to promote and make available to customers.
Go to Billing > Service plans > the ID column.
The plan name is, for example, Microsoft 365 Business Standard (Annual Pre-Paid), and the plan ID is 6.
-
Prepare a JSON snippet with the following contents:
{
	"products": [
	{
				"period": {
						"duration": <duration>,
						"unit": "<unit>"
				},
				"billingPlanId": <plan identifier in the Billing system>
				}
			]
}
Where
<duration>is the desired duration of subscriptions (the number of units),<unit>is a duration measurement unit (can be DAYS, MONTHS, or YEARS), and<plan identifier in the Billing system>is the numeric identifier of a plan that corresponds to a product in the store.For example:
{ "products": [ { "period": { "duration": 1, "unit": "YEARS" }, "billingPlanId": 6 } ] } - Visit an online JSON minify encoder such as https://www.minifyjson.org/.
-
Minify the JSON snippet with all your data prefilled.
- Click MINIFY.
- Copy the minified JSON. It should look like
{"products":[{"period":{"duration":1,"unit":"YEAR"},"billingPlanId":6}]} -
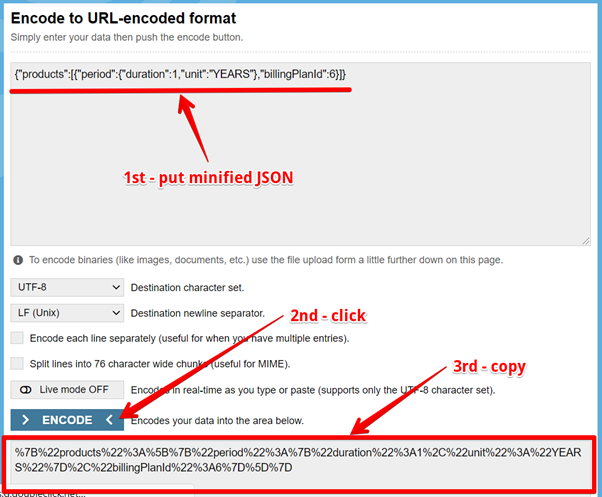
Open the URL Encode tool.

-
Encode the JSON snippet.
- Paste the minified JSON snippet into the URL Encode tool.
- Click ENCODE.
-
Copy the URL-encoded data. You should have something similar to this:
%7B%22products%22%3A%5B%7B%22period%22%3A%7B%22duration%22%3A1%2C%22unit%22%3A%22YEARS%22%7D%2C%22billingPlanId%22%3A6%7D%5D%7D
-
Form the checkout link from these parts:
https://<branded domain name>/ccp/v/pa/marketplace/checkout-integration?externalCart=<URL-encoded JSON snippet>
You will have a link similar to this: https://brand.example.com/ccp/v/pa/marketplace/checkout-integration?externalCart=%7B%22products%22%3A%5B%7B%22period%22%3A%7B%22duration%22%3A1%2C%22unit%22%3A%22YEARS%22%7D%2C%22billingPlanId%22%3A6%7D%5D%7D
Notes:
- You need to prepare an individual link for each product where redirection is needed.
- If a user is logged in to CloudBlue Commerce, they will be redirected to the first step of the checkout wizard. Otherwise, they will be redirected to the login page.
-
If there is an error in the link, users will be redirected to the following screens, depending on which part of the link contains the error:
- If there is an error in the branded domain name, the user will be redirected to a blank screen with the message “This site cannot be reached.”
- If there is an error in the
/ccp/v/pa/marketplace/checkout-integration?part, the user will be redirected to a blank screen with the message “404 Page not found.” - If there is an error in the URL-encoded JSON snippet, (in our example,
externalCart=%7B%22products%22%3A%5B%7B%22period%22%3A%7B%22duration%22%3A1%2C%22unit%22%3A%22YEARS%22%7D%2C%22billingPlanId%22%3A6%7D%5D%7D), the user will be redirected to an empty shopping cart with the message “404 Page not found.”
Specifying several plans in the URL
You can specify several plans in the URL as the entries of the products array:
 {
	"products": [
		{
			"period": {
				"duration": <duration>,
				"unit": "<unit>"
			},
				"billingPlanId": <plan identifier in the Billing system>
		},
		{
			"period": {
				"duration": <duration>,
				"unit": "<unit>"
			},
				"billingPlanId": <another plan identifier in the Billing system>
		}
	]
 }
Example
JSON
{
	"products": [
		{
			"period": {
				"duration": 1,
				"unit": "YEARS"
			},
				"billingPlanId": 18
		},
		{
			"period": {
				"duration": 1,
				"unit": "MONTHS"
			},
				"billingPlanId": 19
		}
	]
}
The resulting URL
https://brand.example.com/ccp/v/pa/marketplace/checkout-integration?externalCart=%7B%22products%22%3A%5B%7B%22billingPlanId%22%3A18%2C%22period%22%3A%7B%22duration%22%3A1%2C%22unit%22%3A%22YEARS%22%7D%7D%2C%7B%22billingPlanId%22%3A19%2C%22period%22%3A%7B%22duration%22%3A1%2C%22unit%22%3A%22MONTHS%22%7D%7D%5D%7D
Letting customers select their previous cart before the checkout
When a registered customer adds items to a cart but does not check out, the cart stays remembered, and the customer can check out later.
However, if the customer uses a direct link, this remembered content will be automatically replaced by the data specified in the direct link and the customer will not be able to check out the items in the previous cart since that moment.
To override this automatic behavior and let customers decide which of the carts they want to check out, add the offerCartSelection parameter with the true value to the URL.
The new format of a URL, including this parameter, is as follows:
https://<brand-domain>/ccp/v/pa/marketplace/checkout-integration?externalCart=<cart-data>&offerCartSelection=true
The above example of a URL, including this parameter, is as follows:
https://brand.example.com/ccp/v/pa/marketplace/checkout-integration?externalCart=%7B"products"%3A%5B%7B"billingPlanId"%3A67%2C"period"%3A%7B"duration"%3A1%2C"unit"%3A"YEARS"%7D%7D%5D%7D&offerCartSelection=true