Getting Started with Microsoft CSP
The system works in two different Panels (Levels): Reseller Panel and the Customer Panel
-
Reseller Panel is where you have an overview of all your customer accounts, you place orders for them and manage your Organization’s Accounts and access
-
Customer Panel is where the customer can have an overview of their own licenses and users. You can log into your Customer’s Customer Panel to view and manage Subscriptions/Licenses for your Customer
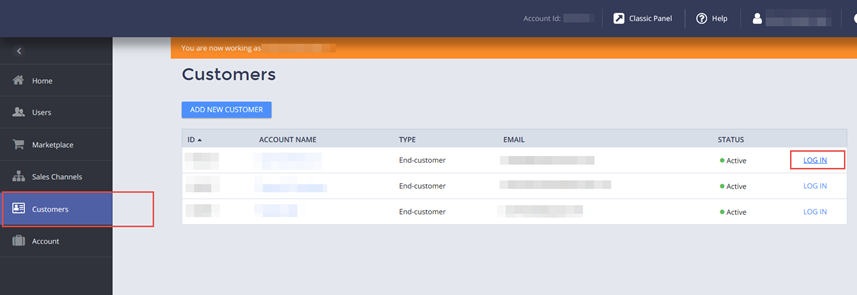
When you first login you are in the Reseller Panel. To get into the Customer Panel you go Customers, and click on Log In on the right
When you first start you need to Create your Customer, then place an order for the required Subscription and only then you can assign the licenses to the users.
If the Customer needs to increase/decrease the number of licenses on a Subscription, you follow section C. If they need more licenses do not place an additional Order for the same service, you just need to increase the number of licences on the existing subscription
Creating a Customer Account
You always need to create a Customer in the platform, even if your customer already has an active Microsoft subdomain and/or already have CSP Services from other Partners.
-
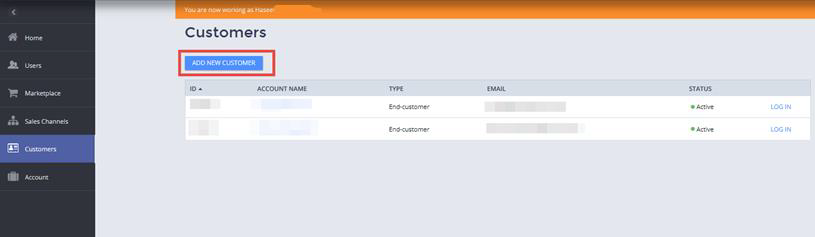
Log to the CSP Platform and select Customers on the menu on the left
-
Click Add New Customer on the top
-
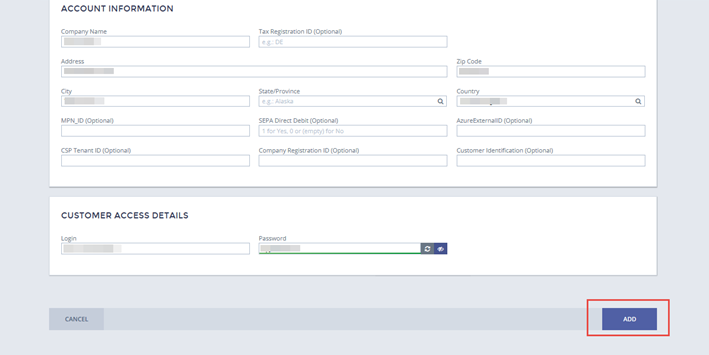
Fill in all the required details for the ‘Administrative Contact’ and ‘Account Information’
Please ensure the Administrative contact is the Customer’s Global Admin
-
The ‘Customer Access Details’ are your Customer’s Credentials to the Customer Panel. The ‘Login’ needs to be unique; we recommend admin-[customername] for the first/main account. Click ‘Generate Password’ to generate a password for the admin user.
-
Once completed select Add at the bottom of the page
-
The Customer will now show on your Customers list.
Ordering Process
You always need to create a customer in the Platform, even if your customer already has an active Microsoft subdomain and/or already has CSP Services from other Partners
Prerequisites - Before you place the first CSP order
Some Customer already have a Microsoft domain, normally from their existing Office365, CRM, Azure, etc:
-
If the customer wants to connect to their existing domain, we need their default domain (.onmicrosoft.com domain).
-
If the customer does not have a domain, or wants a new one, the default domain will be created based on the subdomain mentioned during order process.
Placing an Order (Reseller UX1 – on behalf of customer)
Once you go through the Prerequisites above you are ready to progress:
-
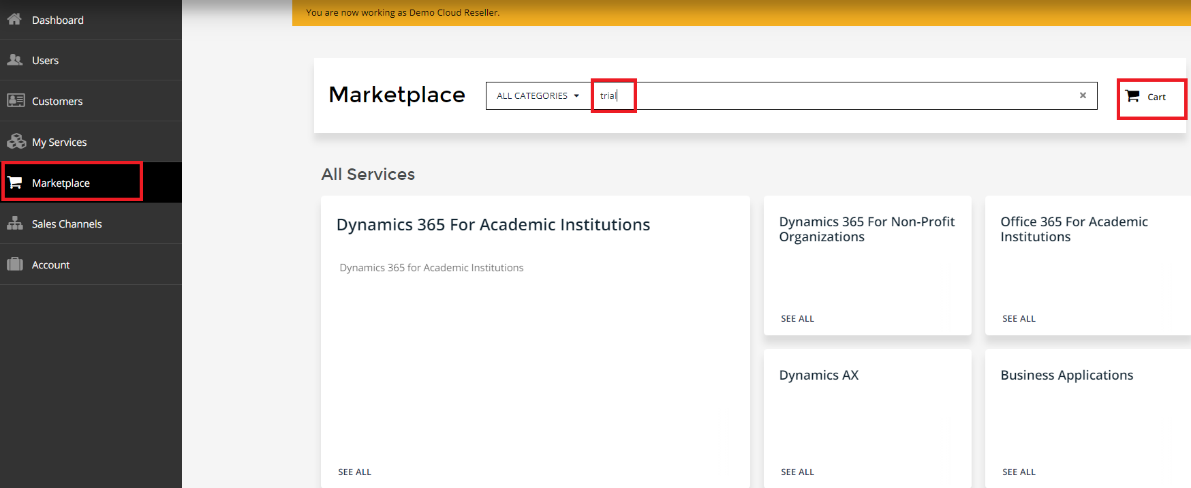
Login to the CSP Platform and select Marketplace on the menu on the left
-
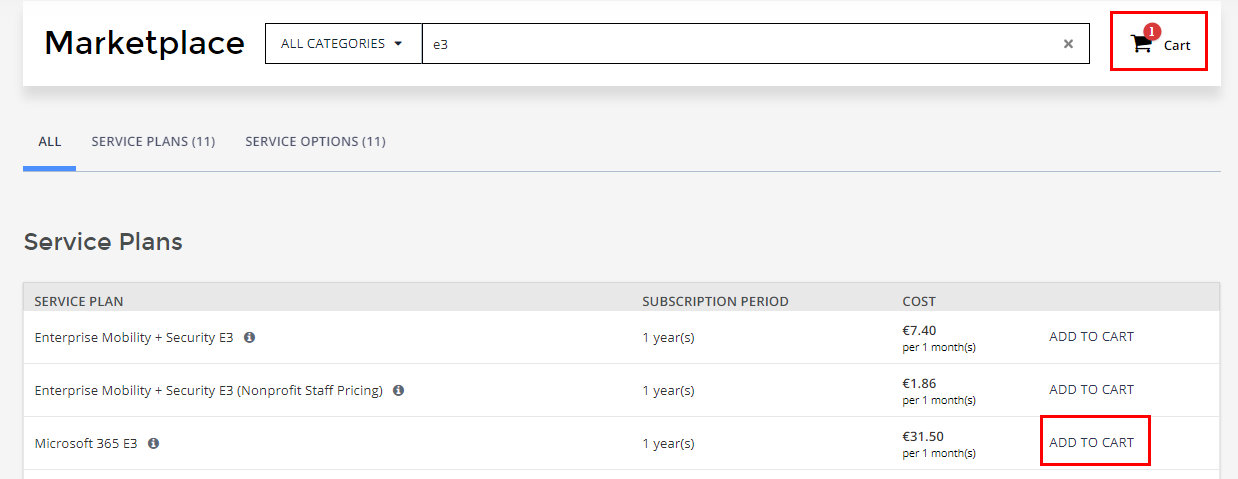
Find the Service Plan you need - you can either click on the tile to see the offering, or use the Search Bar
-
Click Add to cart to add it to the shopping basket
-
Repeat this for all the Services Plans you want to order, once completed click Proceed to Check out on the top right corner
-
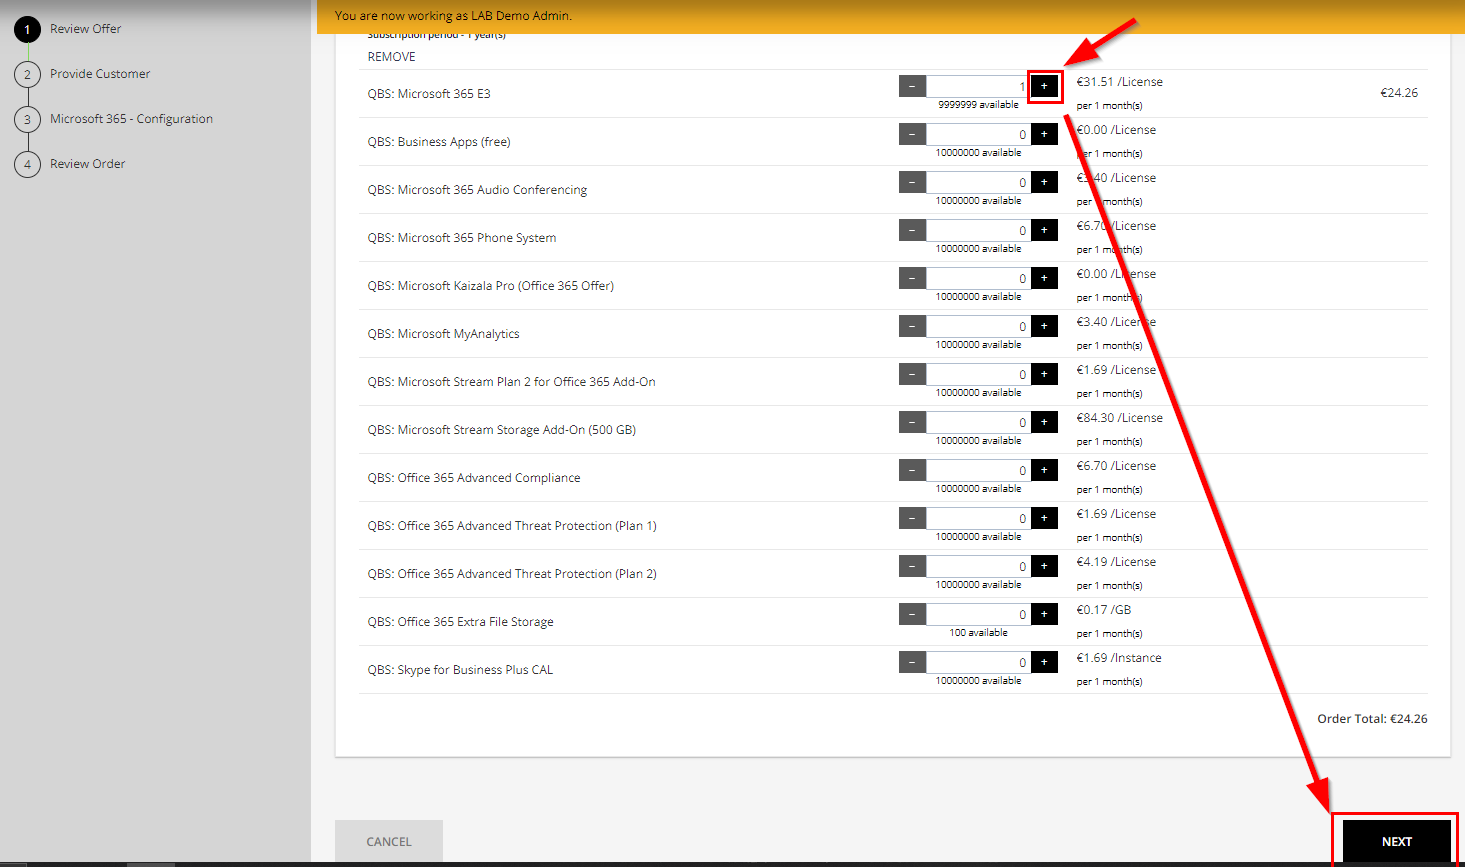
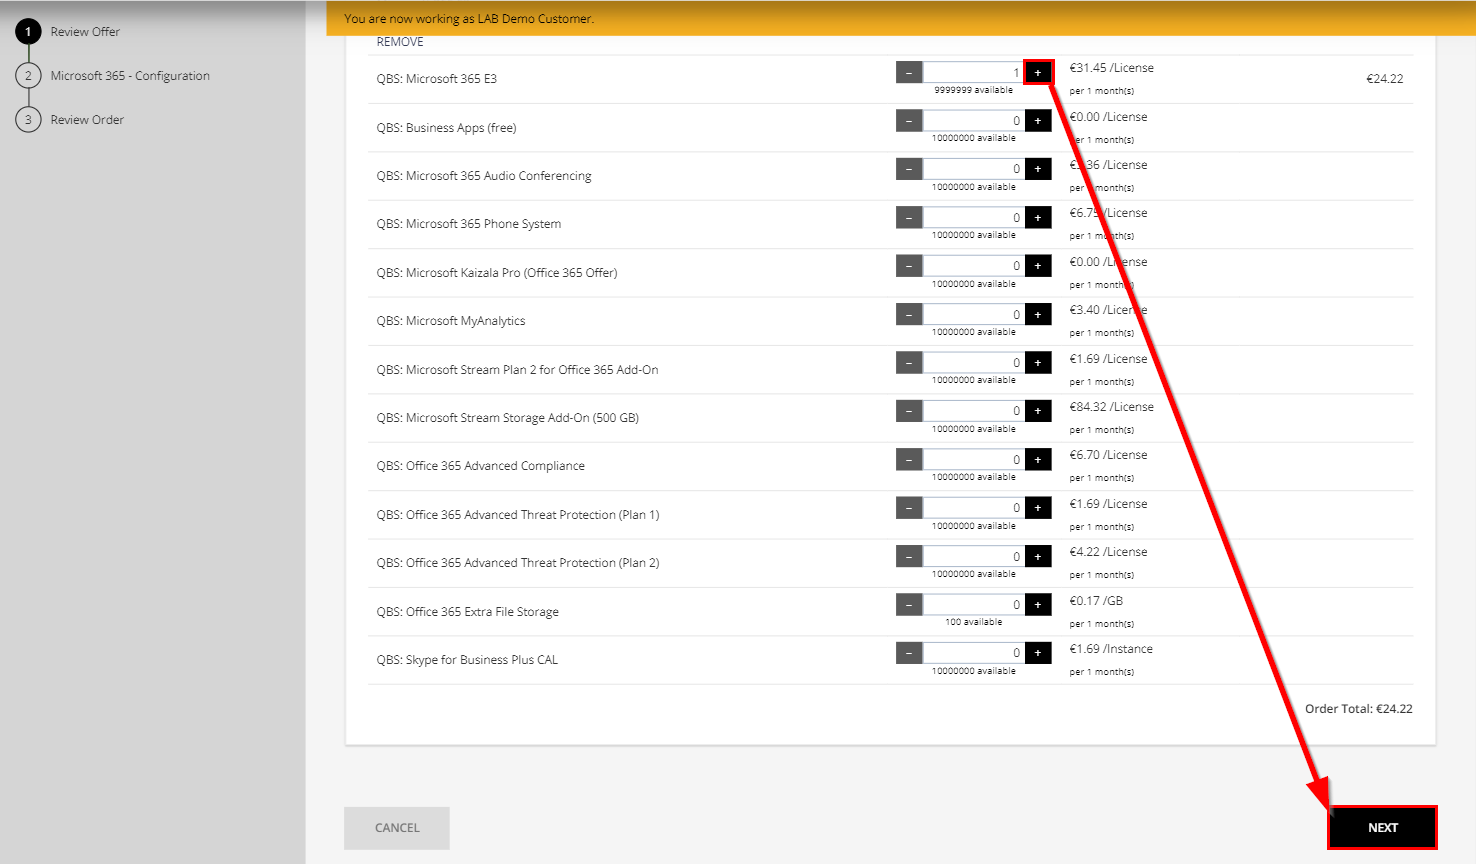
Update the Quantity to match the number of licenses you need, once ready, select Buy
If the plans you selected have add-ons (e.g., additional storage), they will show on this screen
-
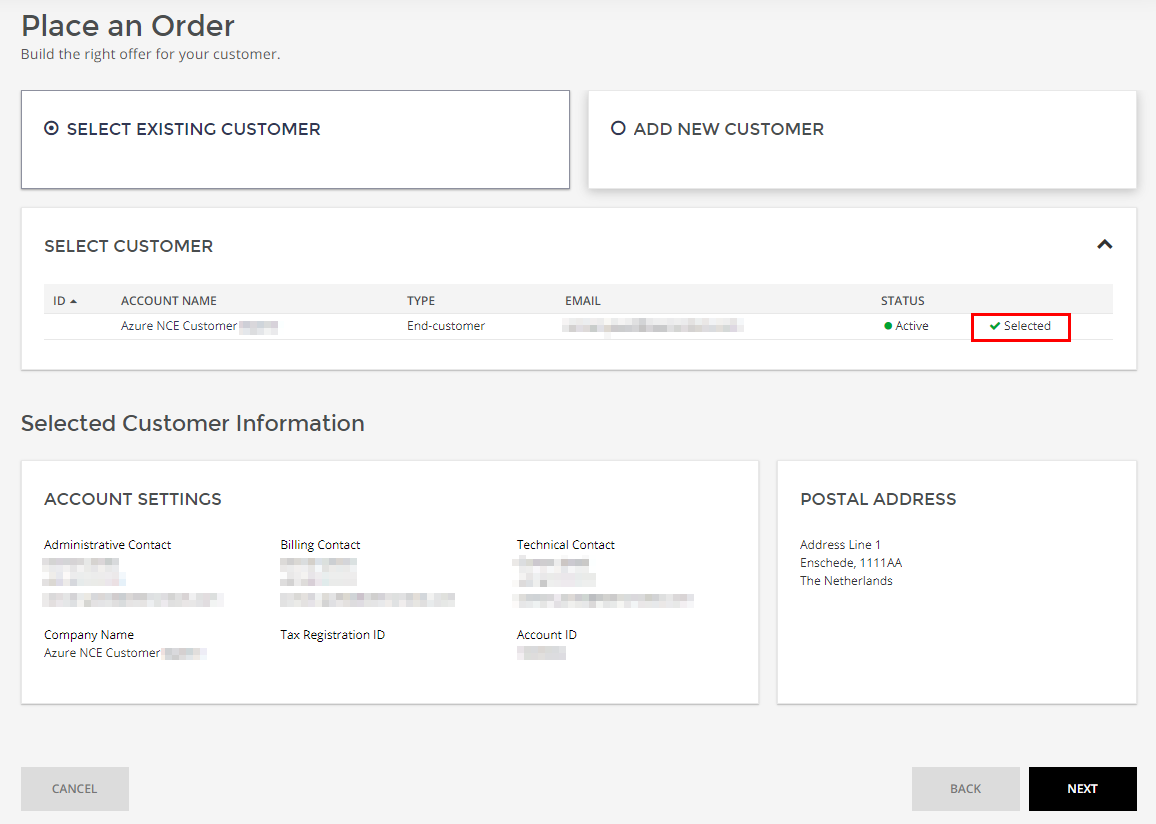
Click on Select Existing Customer and select the Customer from the list underneath
Note: It is possible to create a new customer and a new order at the same time, by selecting Add New Customer on the screen above. We recommend you create the customer and place the order separately (as per this guide), as you might encounter issues if the customer has not accepted the relationship by the time you place the order.
-
Check the Customer details, in case you have customers with similar/same names, when ready, click Next
-
If you are happy with the order, select Buy
-
Your order is completed and ready to be assigned to users.\
Placing an Order (Customer UX1)
Once you go through the Prerequisites above you are ready to progress:
-
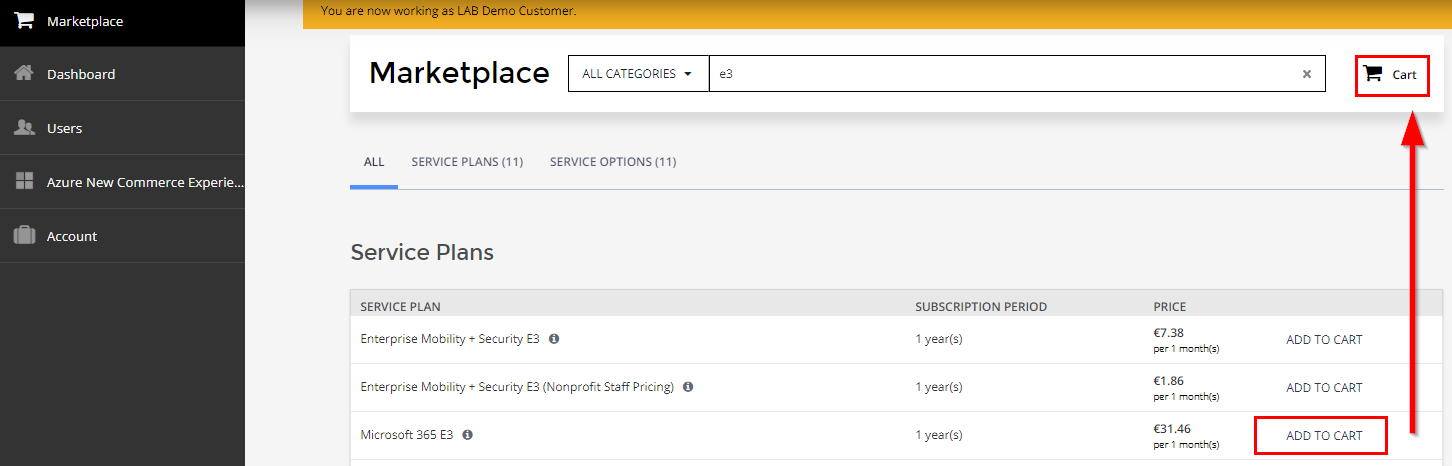
Login to the CSP Platform of the customer and select Marketplace on the menu on the left
-
Find the Service Plan you need - you can either click on the tile to see the offering, or use the Search Bar
-
Click Add to cart to add it to the shopping basket
-
Repeat this for all the Services Plans you want to order, once completed click Proceed to Check out on the top right corner
-
Update the Quantity to match the number of licenses you need, once ready, select Buy
If the plans you selected have add-ons (e.g., additional storage), they will show on this screen
-
If you are happy with the order, select Buy
-
Your order is completed and ready to be assigned to users
Assigning licenses to users
Licenses can be assigned to users via the Customer’s Office 365 Admin Portal or via the Customer Panel.
Platform Customer Level
-
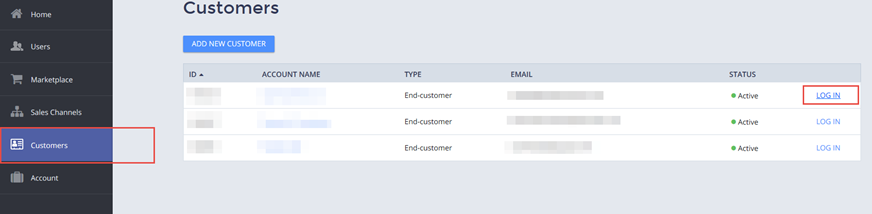
Log to the CSP Platform and select Customers on the menu on the left
-
Find your Customer and Log In on the right to get into the Customer Panel
-
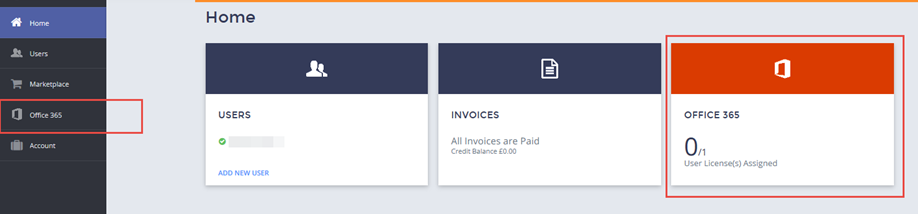
Once the order has been provisioned, you can see the licenses under Office 365 (either the tile or the menu option)
-
Do not forget, all Customers need to have accepted the Microsoft Cloud/Customer Agreement (MCA)
-
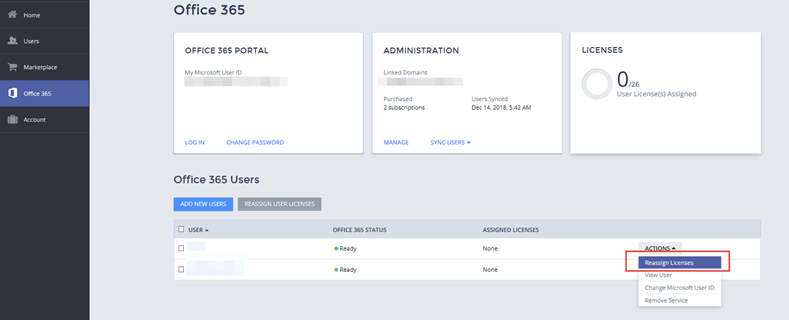
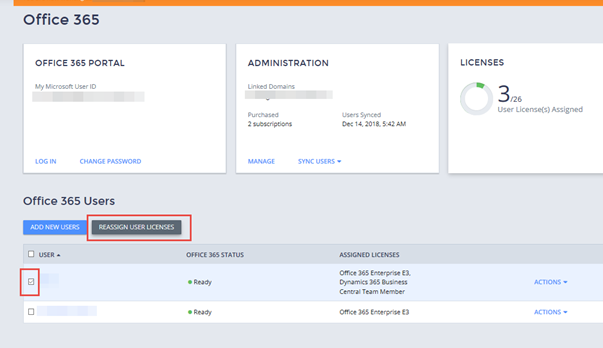
Find and select the User(s) you want to assign the license to, select Actions and Reassign Licenses
-
Select the licenses you want to assign and click Assign
-
The system will update, showing you the number of licenses assigned vs purchased (Licenses tile on the top right corner), and the licenses assigned to each user (list at the bottom)
Unassign user license
Licenses can be unassigned via the Customer’s Office 365 Admin Portal or via the Customer Panel
Platform Customer Level:
-
Log to the CSP Platform and select Customers on the menu on the left
-
Find your Customer and Log In on the right to get into the Customer Panel
-
Go to Office 365 (either the tile or the menu option)
-
Find and select the Users using the boxes and click Reassign Licenses
-
Select Unassign User Licenses and click Next
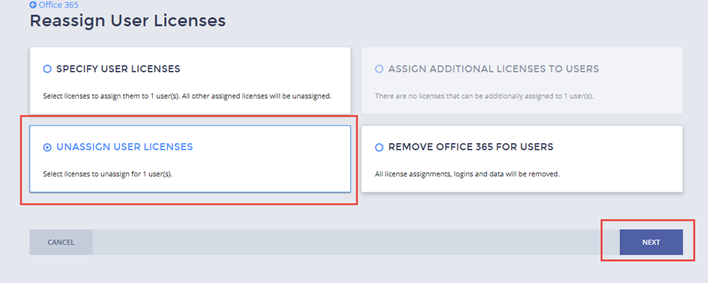
-
Select the license you want to unassign and click Finnish
-
Platform will update, showing you the number of licenses assigned vs purchased (Licenses tile on the top right corner), and the licenses assigned to each user (list at the bottom)
Adding and Removing licenses
As time goes by Customers might need more licenses for a subscription (e.g. new employees) or no longer need as many licenses as initially purchased. Adding or removing customer licenses can be done in the Customer Panel.
Buy More Licenses:
-
Log to the Platform and select Customers on the menu on the left
-
Find your Customer and Log In
-
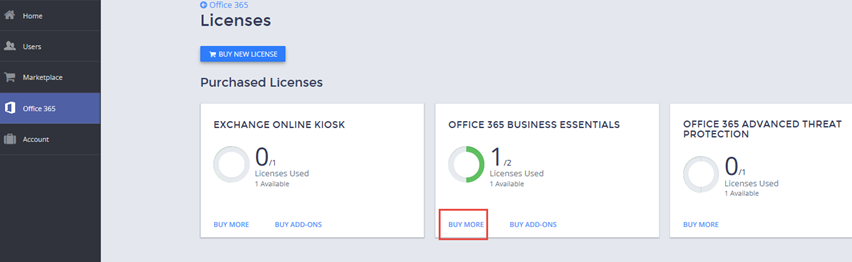
Click on Office 365 > Licenses Tile
-
Find the Subscription and click on Buy More on the bottom left corner of the subscription’s tile
-
Update the number under New Limits and click OK to finalize
Upgrade or Downgrade Licenses:
-
Log to the Platform and select Customers on the menu on the left
-
Find your Customer and Log In
-
Click on Account
-
Select Subscription on the menu on the left, and then click on the Subscription you want to increase/decrease

-
Click Change Resource Limits
Note: If you are reducing the number of licenses, the system doesn’t let you reduce if the licenses are assigned to users. You need to unassign them first, and only then change the resource limits
-
Update the number under New Limits and click OK to finalize
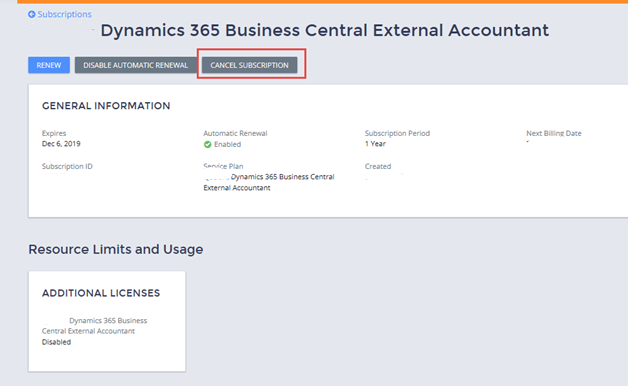
Cancelling a subscription
-
Log to the Platform and select Customers on the menu on the left
-
Find your Customer and Log In
-
Click on Account
-
Select Subscription on the menu on the left, and then click on the Subscription you want to cancel
-
On the top corner click on Cancel Subscription
-
Select the Reason for Cancellation and write a comment, when ready, click Proceed
-
The Subscription Status will then update to Canceled