The Customer's Guide to CloudBlue Platform with UX1 Marketplace
CloudBlue Platform Overview
CloudBlue Platform provides businesses with a turnkey e-commerce storefront. Providers and resellers can use it to launch a digital marketplace to sell their products or services directly to customers or partners.
UX1 for Customers
UX1 stands for “unified experience version 1” and introduces a single UX1 for Customers for various roles that can operate the Platform from providers to resellers and their clients. This document describes how to work with the UX1 for Customers where the following operations are available:
-
Financial status management: account balance, invoices, payments and available payment methods
-
Own account and staff management
UX1 Marketplace (UX1 MP)
UX1 Marketplace (UX1 MP) is an eCommerce solution that delivers outstanding buying and user experience.
User management
User Management in UX1 for Customers
UX1 for Customers allows you to manage the users of your own account and perform the following actions:
- View the list of all users of your account.
- Monitor your users' status.
- Add new users (one or more at once).
- Assign a role to a user (User or Admin).
- Define a user's email address for signing in to the system and receiving notifications. You can define up to two different email addresses: one for signing in to the system, the second one for receiving notifications about the account and system updates.
- Assign and reassign services to new users.
- Send an activation email to users. If you choose to send an activation email, then a user will get an invitation email and their status will be "Not Activated" until activation by following the activation instructions in the email. If you select not to send an activation email, then a user will not get an invitation email and will have the "Ready" status as soon as the user is created.
- Edit a user's information, including the postal address.
- Change a user's password.
- View login history.
- Log in as a user to the panel.
- Delete a user.
- Enable or disable a user.
- Activate a user or resend an activation email.
A user account can be in one of the following statuses:
- Ready: a user account is successfully created and activated.
- Locked: a user account has exceeded the amount of allowed login attempts and is locked out.
- Not Activated: a user has not completed the activation. The email with activation link has been sent to the user and expires in 48 hours.
- Disabled: a user account is disabled and cannot log in to the panel or use any of the assigned services.
How to create staff member users
To create staff member logins, first login as administrator to the UX1 customer portal and follow these steps:
-
Click the Users link in the navigation pane on the left.
-
Click Add new users.
-
Fill in the first name, last name and e-mail information.
For the permissions you can choose:-
“Allow user to manage assigned services only” to assign only service user rights. This means that the user can only retrieve a license and can make use of this license (not an admin).
-
“Assign staff member roles to user” to make the user an admin which is able to assign licenses to colleagues.
Check the box for Send activation email to send an activation e-mail.
-
-
Click Finish to create the user.
Marketplace
How to explore products and plans
In UX1 Marketplace, you can see product and plan details and learn more about them before going to the cart.
Product page
A product page can be opened by clicking a product on a plan page or on the Product tab of the search result page.
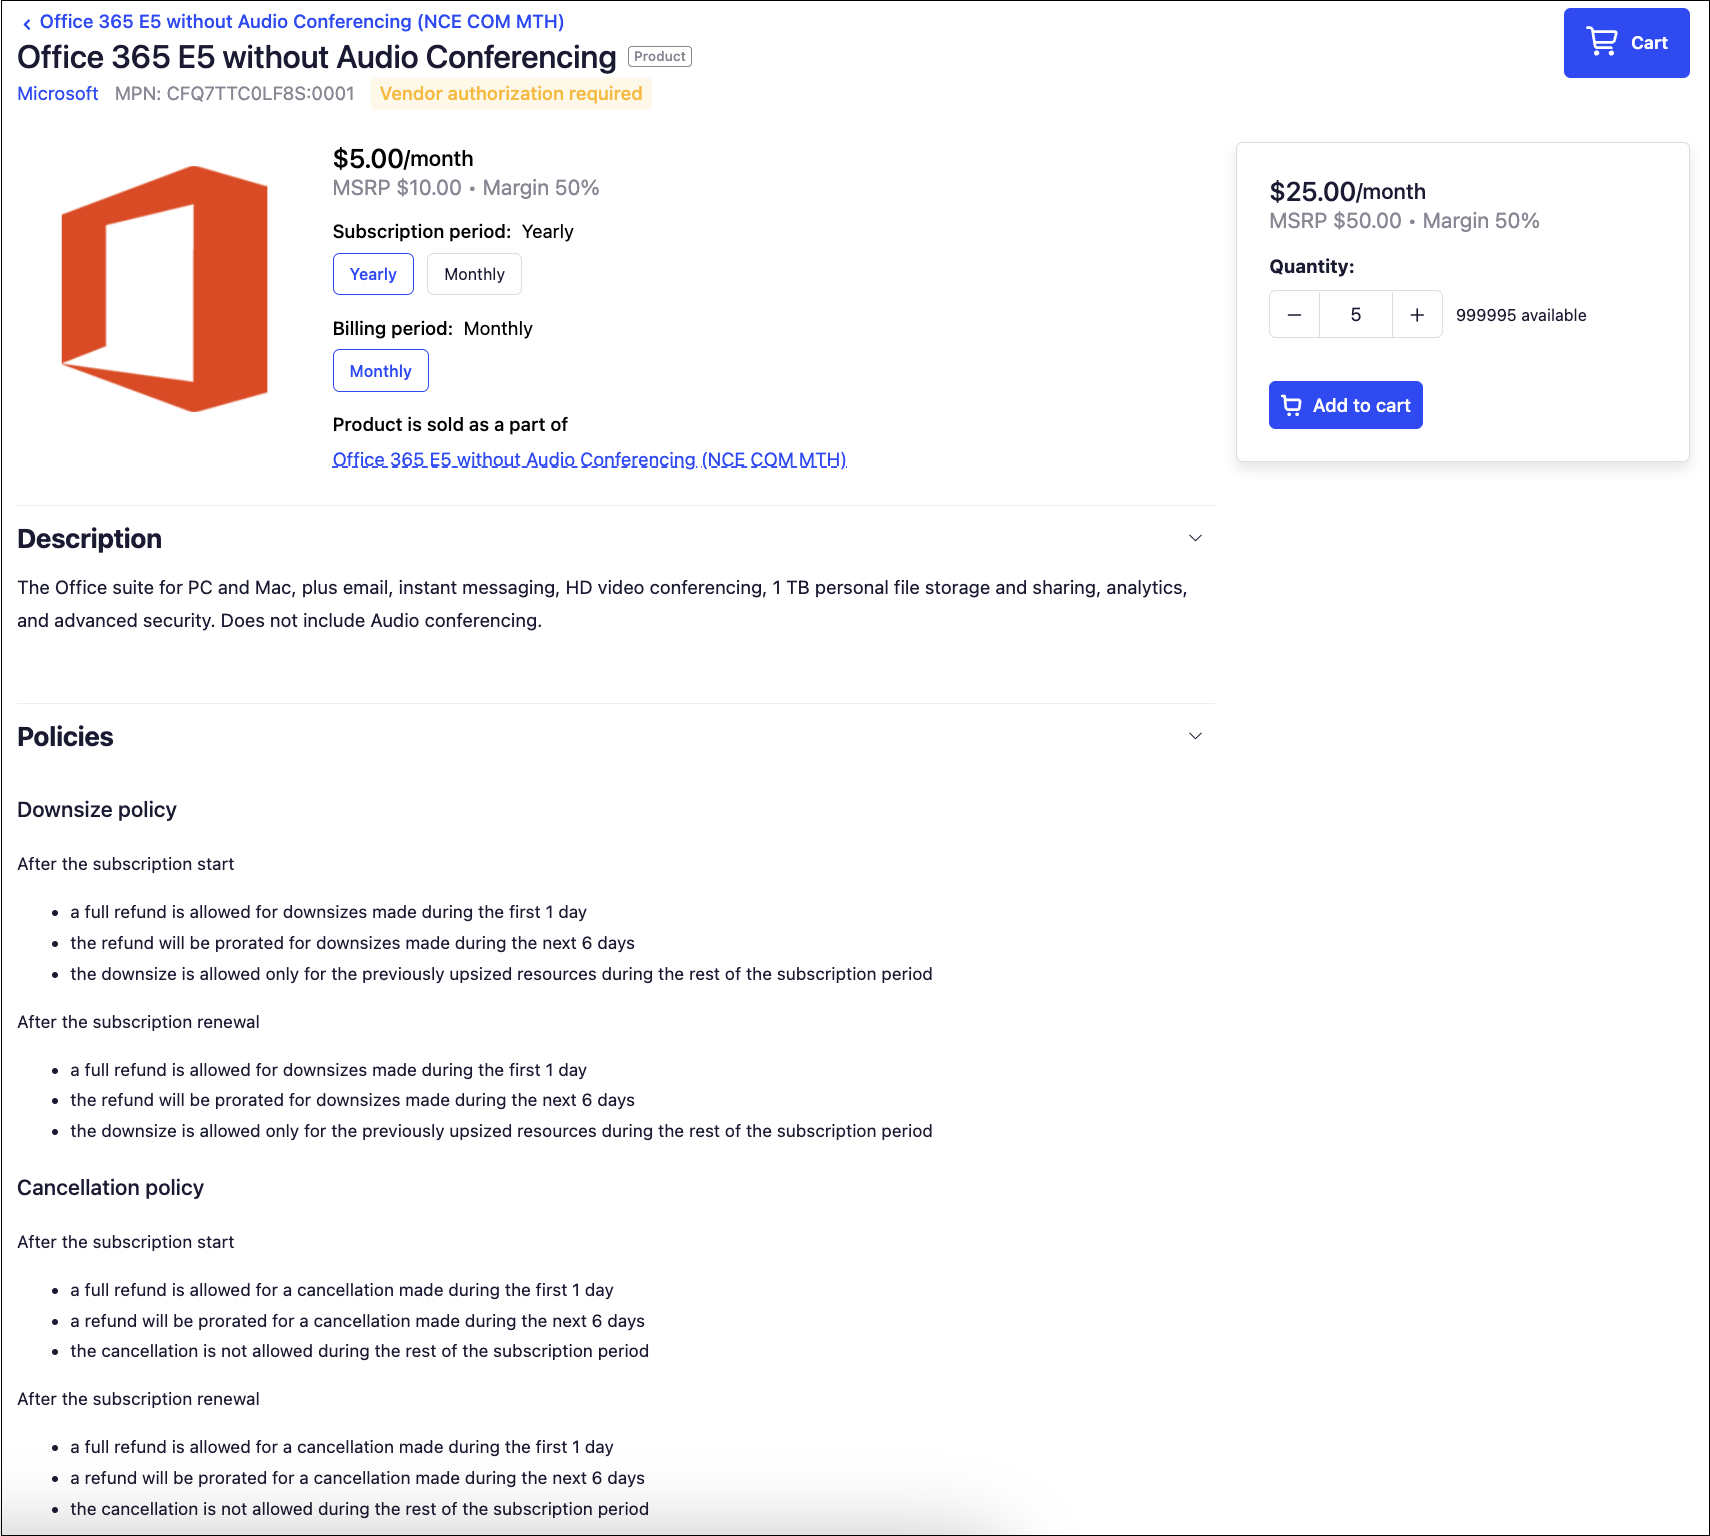
In the main area of the product page you can see the information about the product:
-
Product name
-
Vendor name
-
Product MPN
-
Product logo
-
Product price
-
Available subscription and billing periods
-
Plan that includes this product
-
Product description
-
Cancellation and downsize policies inherited from the plan.
To the right you can find the information about the product offer. There you can see the minimum quantity of the product that can be purchased, and the minimum price of the plan that includes this product.
Note: In some plans, there are products included in that plan and such products can affect the price of the offer.
Clicking Add to cart will add the plan with the product to cart. Later at checkout, if it is available in this plan, you will be able to include more products and change their quantity.
Plan page
To open a plan page, click the plan in the marketplace.
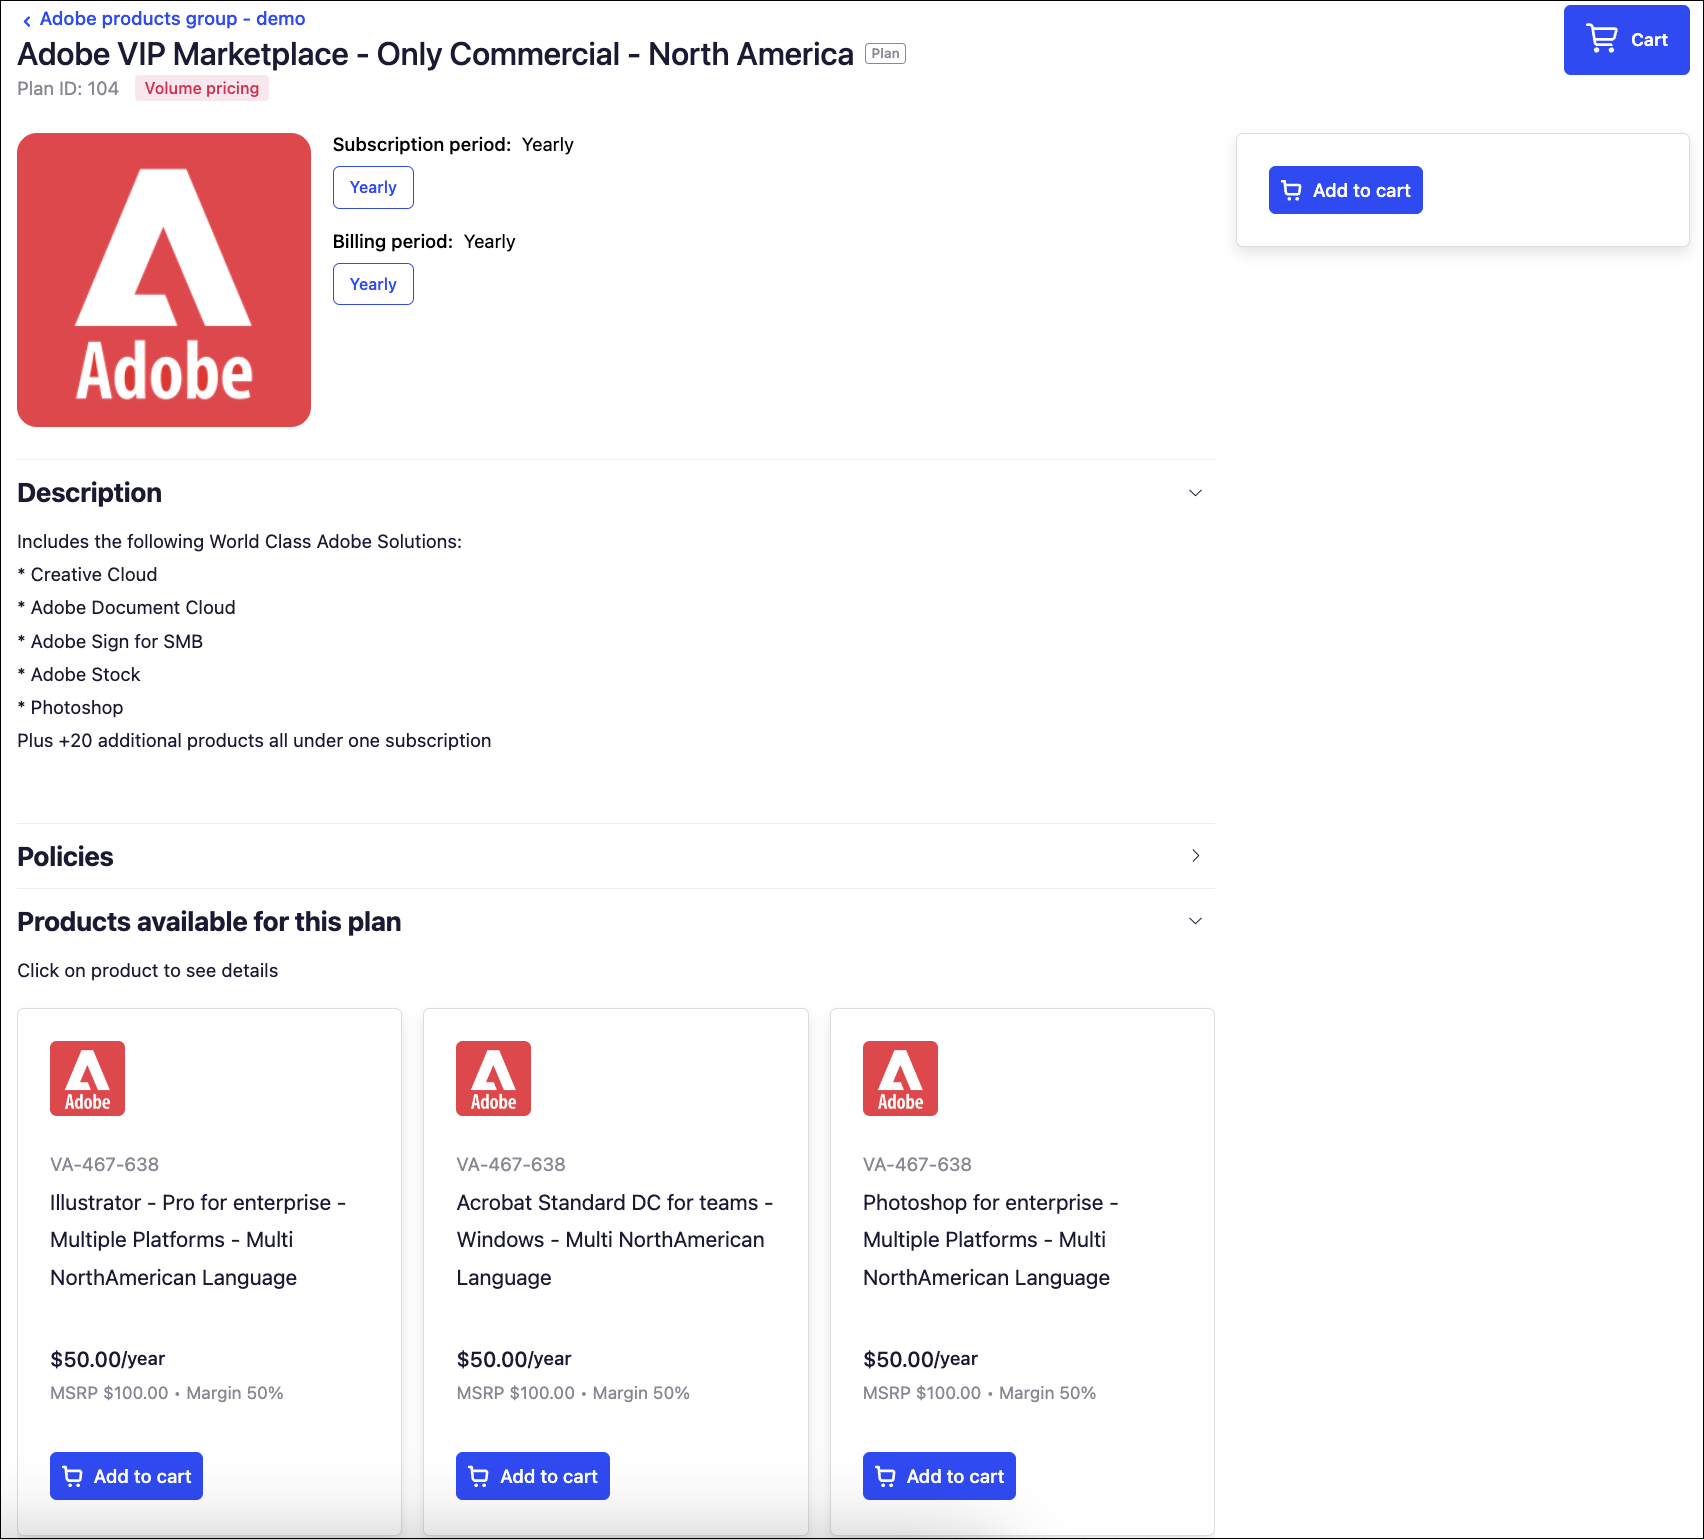
In the main area of the plan page you can see the information about the plan:
-
Plan name and ID
-
Its logo
-
Available subscription and billing periods
-
Plan description
-
Cancellation and downsize policies, if configured
-
The list of products that can be purchased with this plan. Clicking a product tile there opens that product's page.
If the plan is not yet in the cart, when you click Add to cart under a product, the plan will be added to cart with the minimum amount of that product and of the included products.
To the right, there you can find the information about the offer. Clicking there Add to cart will add the plan with minimum amount of the included products. Later at checkout, you will be able to change the amount of the products sold within this plan.
How to buy a service
Let us see how to purchase services from your UX1 for Customers, such as one of the most popular apps among customers, Microsoft Office 365. The steps for purchasing other services or apps might slightly differ.
-
Log in to the UX1 for Customers.
-
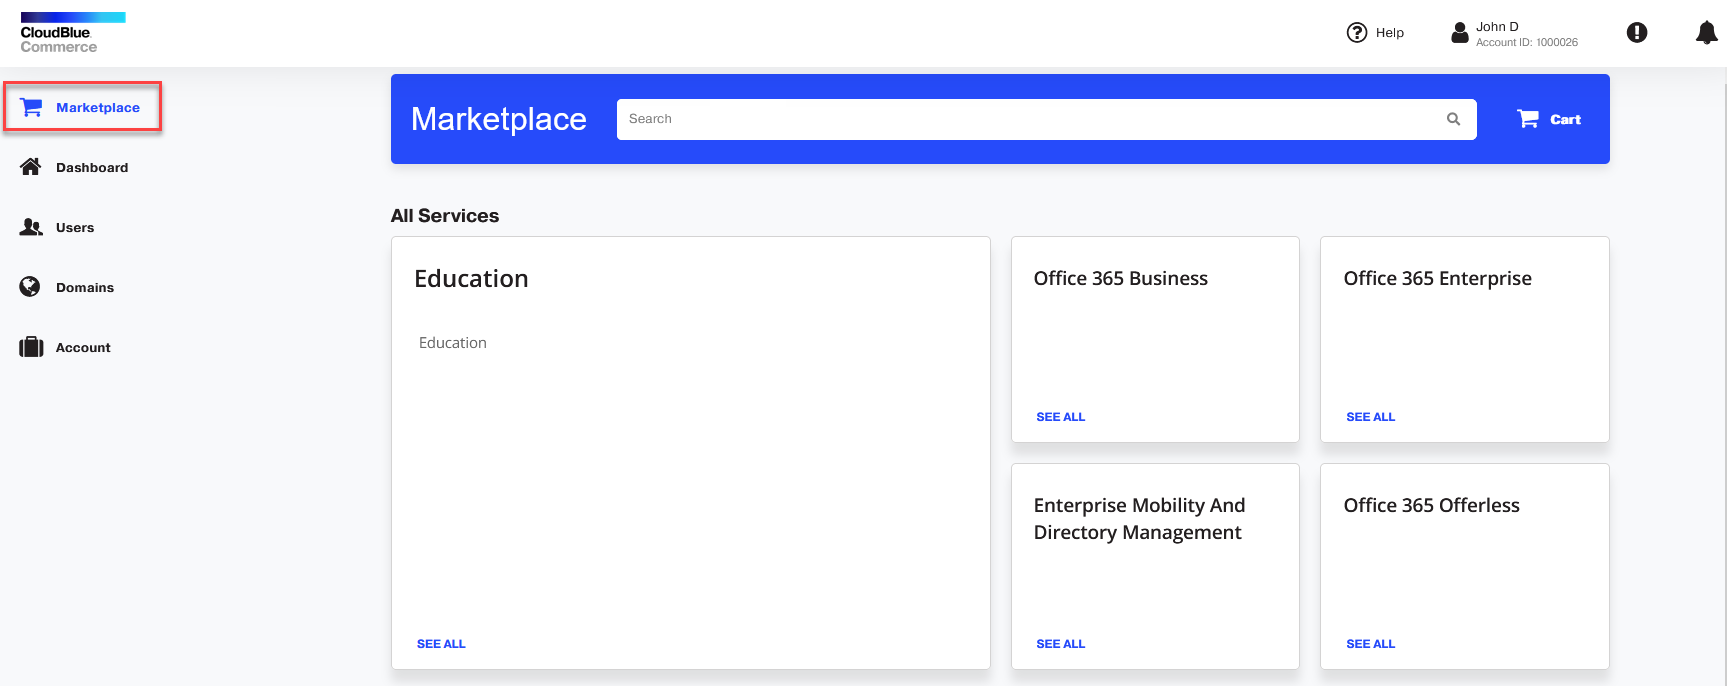
Click the Marketplace link in the navigation pane on the left.
-
Search for an application or service by using the search bar or browse all applications under All Services.
You can also select the products by searching with product names in marketplace.
-
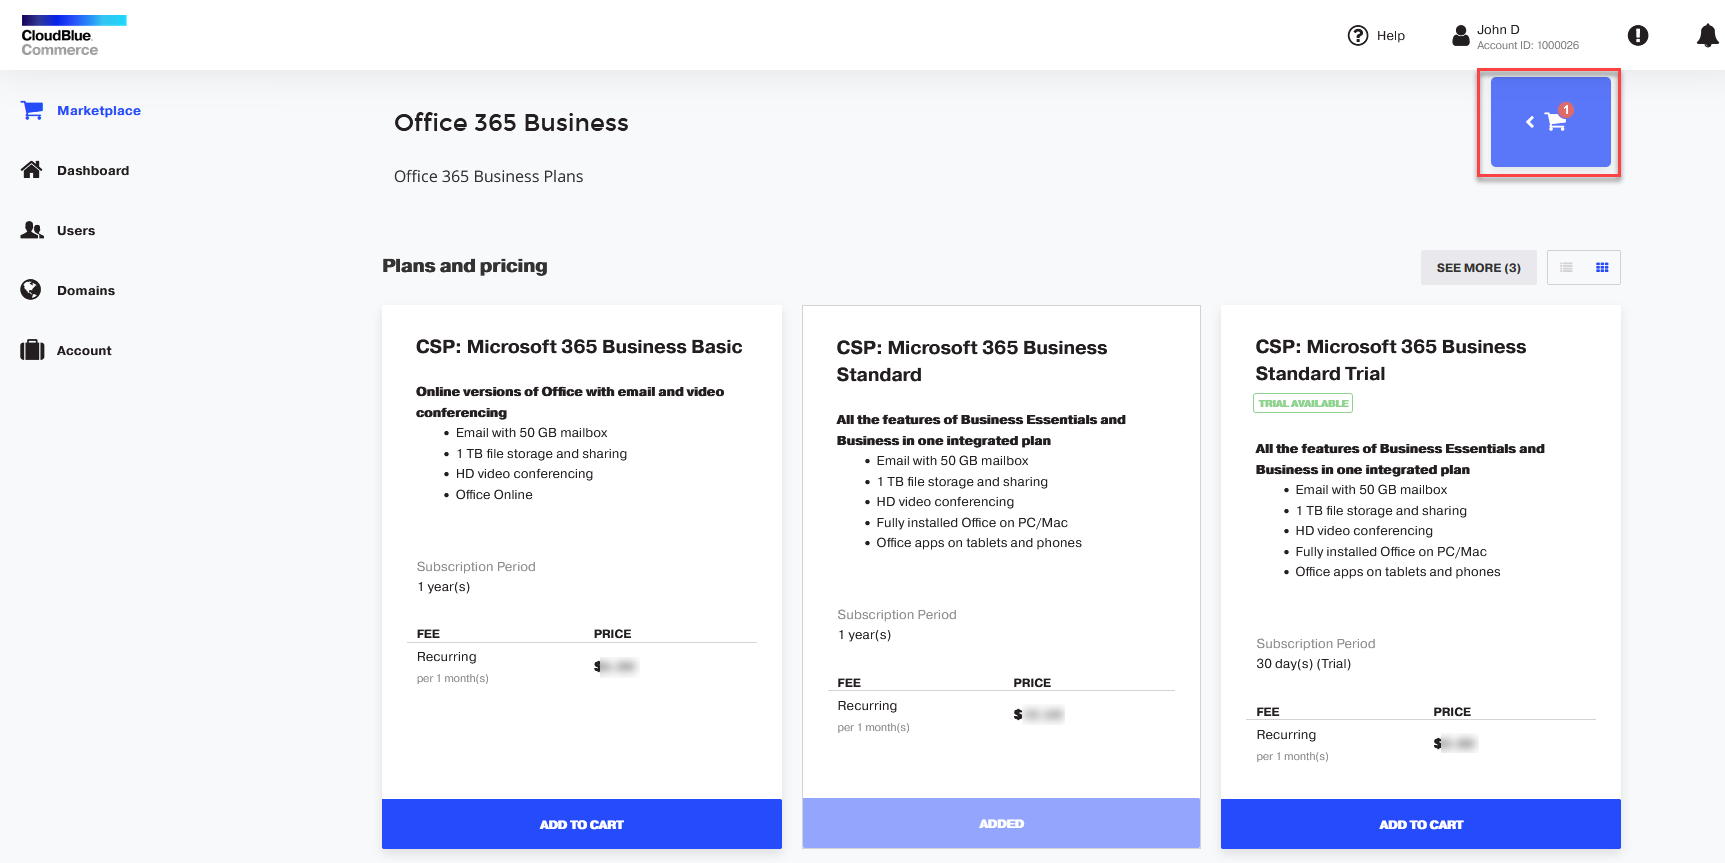
Click the tile with the application name. For example, select Office 365 Business.

-
Under Plans and pricing, select the option you need and click Add to cart.

Note: For NCE Microsoft 365 products, you have 3 options to select for each product.
-
Annual billing period with Annual subscription period.
-
Monthly billing period with Annual subscription period.
-
Monthly billing period with Monthly subscription period.
-
-
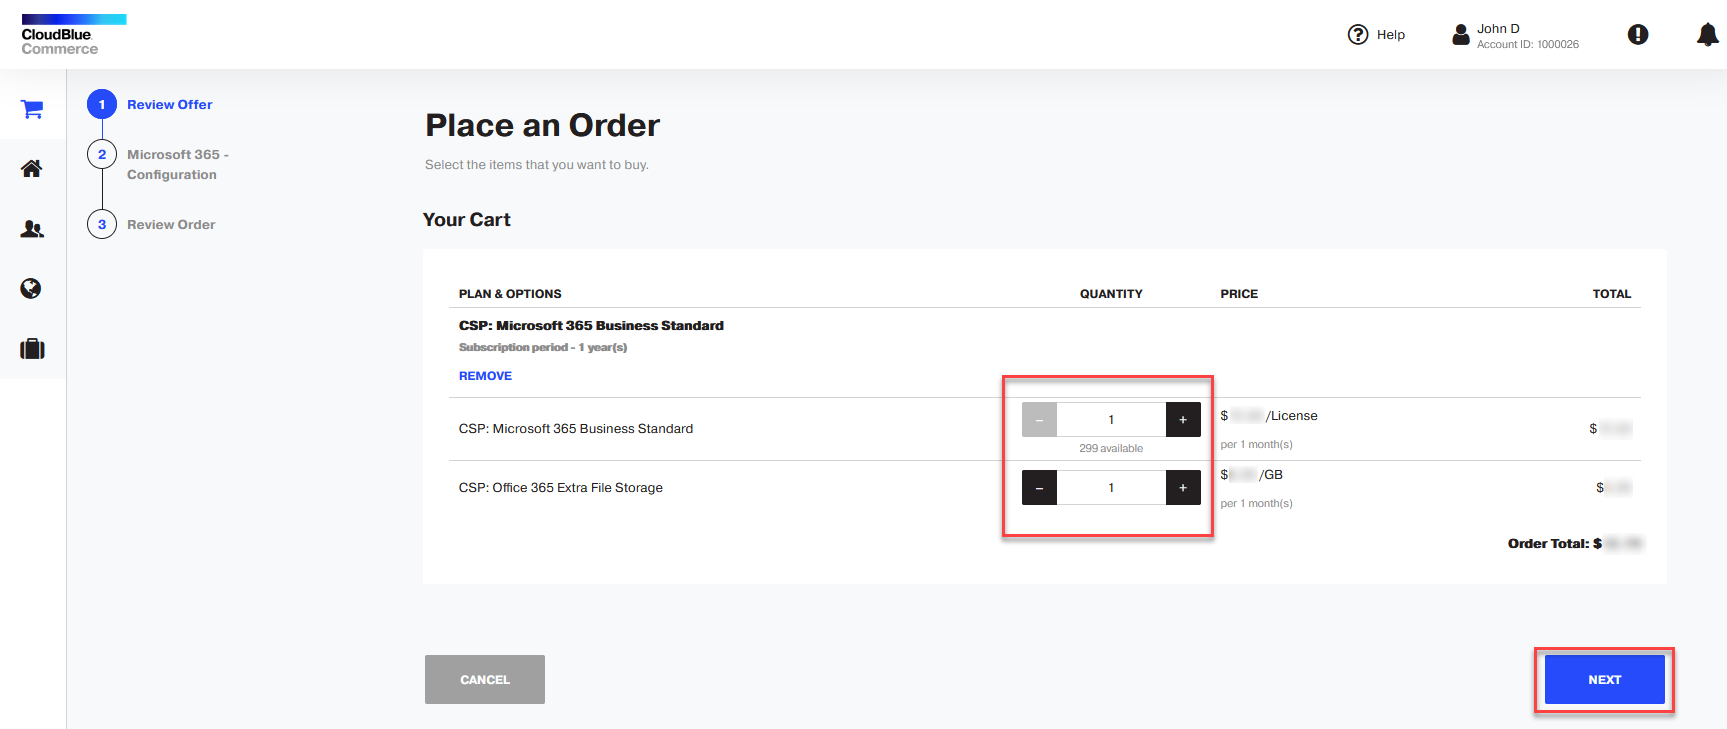
When ready to complete your purchase, click the shopping cart.
-
Select the options that you want and click Next.
-
If you are purchasing a Microsoft product or service for the first time and you do not have a Microsoft Online account yet, complete these steps:
-
Select the option Sign up for new Microsoft online account click NEXT.
-
Specify Microsoft domain name (also referred to as a tenant name) that you will use with Microsoft services. Also select the special qualifications and click NEXT.
-
Fill the requested details and click NEXT.

-
-
If you are purchasing a Microsoft product or service and you have a Microsoft Online account, complete these steps:
-
Select the option Use an existing Microsoft CSP end customer account and specify the subdomain name (also referred to as a tenant name). Click NEXT.
-
Specify your existing Microsoft tenant domain name (.onmicrosoft.com domain name) and click NEXT.
-
-
Select the payment method that you want to use and click Buy.

-
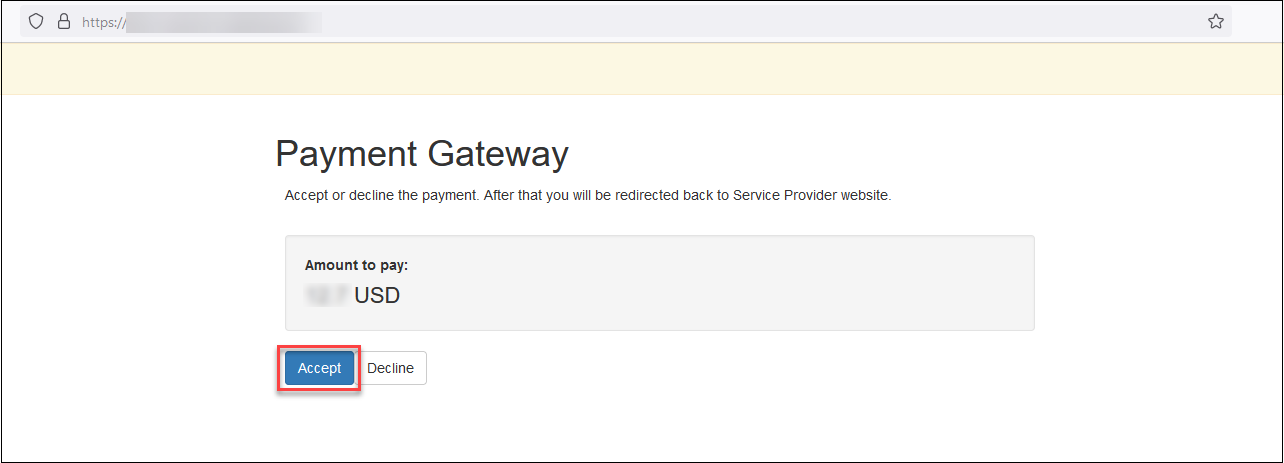
Confirm the purchase on your bank’s website or your seller's payment system.
-
To view the status of your order, click Track order.
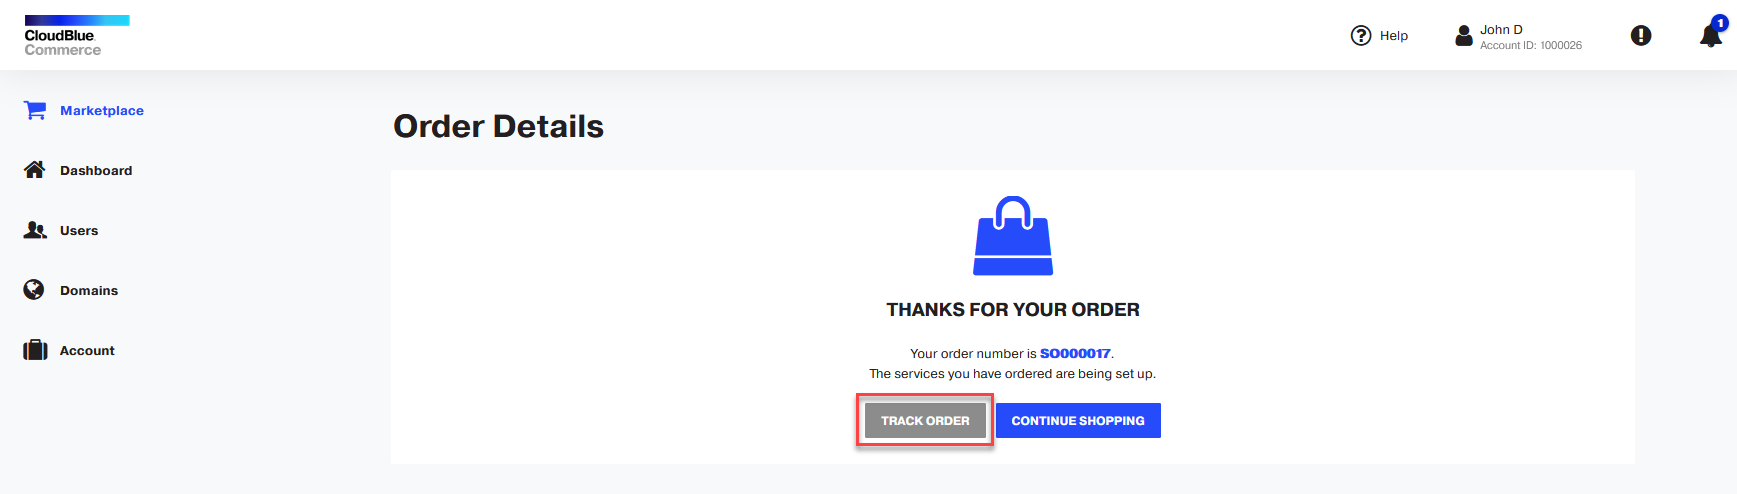
It might take a few minutes to complete your order. At this moment, you can log out of your UX1 for Customers.
When your service is provisioned and ready for use, you will receive notifications by email. Log in to your UX1 for Customers again.
For each service that you purchase (except for one-time fee products), there is a link in the left navigation pane and on the Dashboard.

How to buy a plan with prices fixed in a different currency
If you buy a plan in one currency, but the prices are fixed for this service in a different currency, your UX1 Marketplace buying experience will be as follows:
-
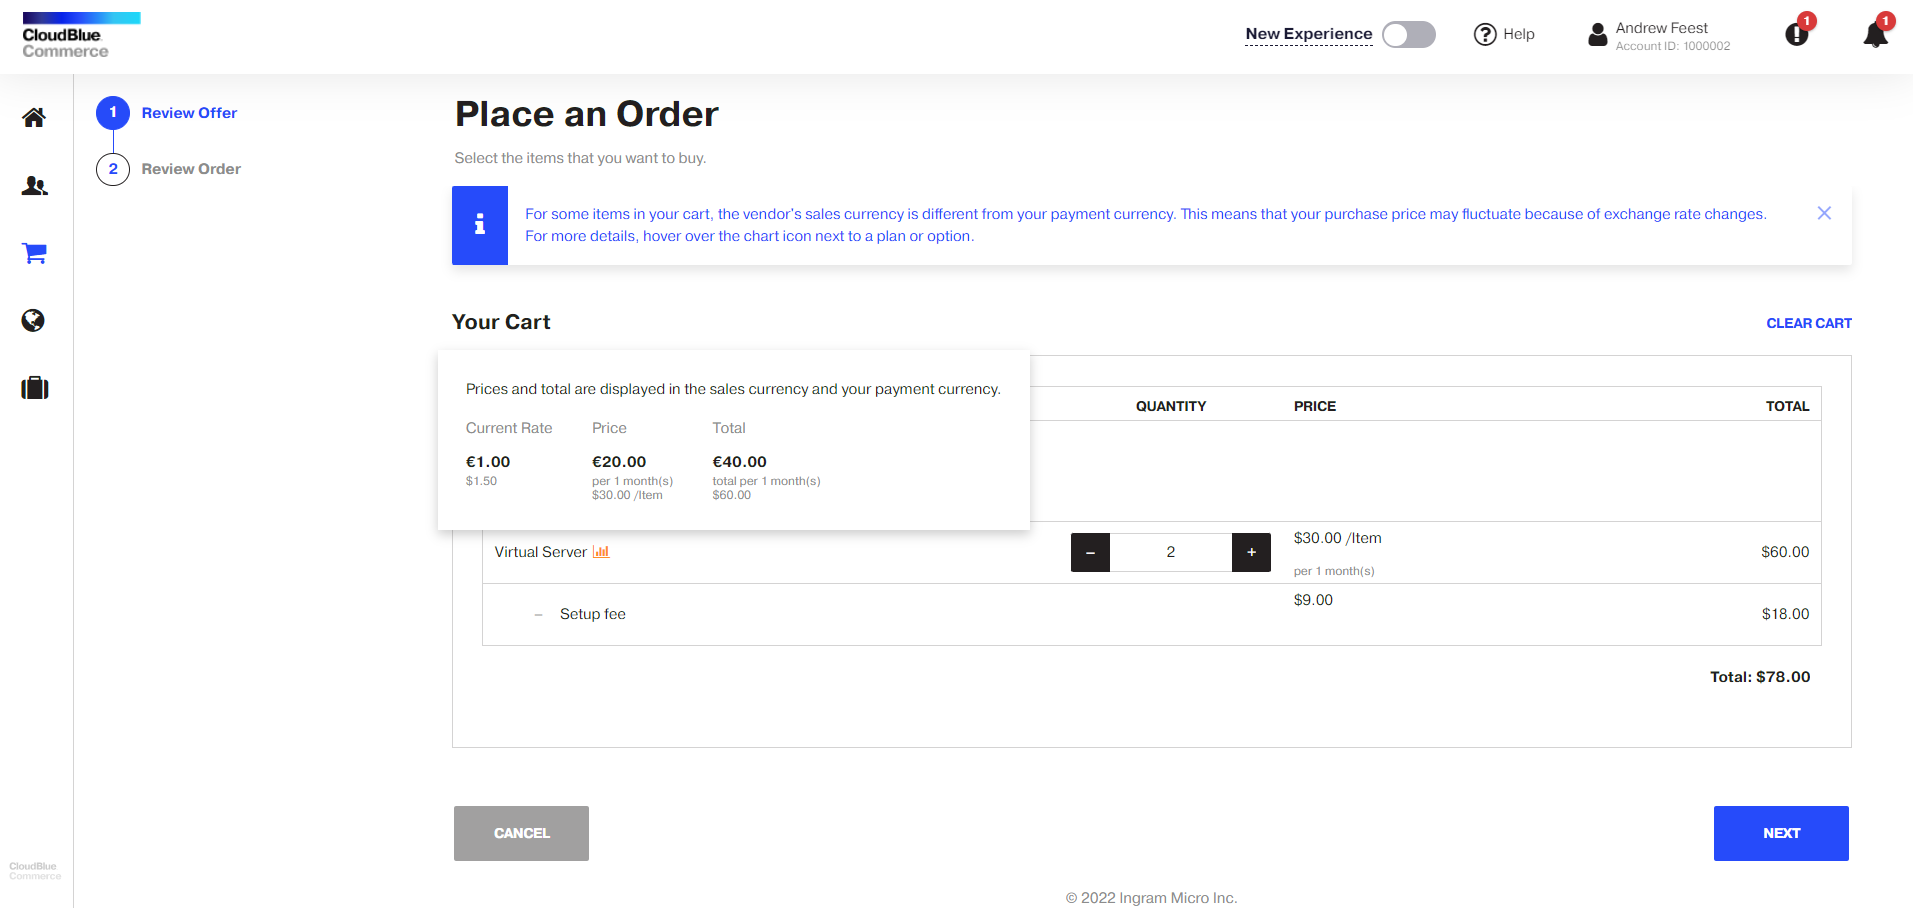
When you add a product to the cart and proceed to the checkout wizard, you will see a notification that your payment price may be different because of the exchange rate changes. The following message will appear at the top of the screen:
-
If you hover over the chart icon next to a plan, you will be able to preview prices both in the currency in which prices are fixed for this plan and in your payment currency and see the current exchange rate used for price calculation.
-
If you increase the quantity of items in your cart, the total in the price preview window will be recalculated automatically.
Note: You can preview prices in the pop-up window for your convenience and pricing transparency. This price may be different on your next billing or subscription renewal date according to the exchange rate.
Subscription management
Subscription may be considered as a services contract between the vendor and the customer. Subscription provides information on the service plan that the customer has subscribed to, vendor's and customer's personal and billing contacts, as well as technical and service provisioning terms information. The customer can enroll for multiple subscriptions. The subscription is valid within a period of time called “subscription period”.
How to upsize or downsize a subscription
A service plan contains different resources; each resource can have a defined amount range, defining the minimum and maximum amount of a resource available to a customer within that particular plan. For example, a hosting service plan, which includes the disk space resource that can vary from 50 GB to 100 GB. It means that a customer will be able to purchase an amount of disk space within this range. You can increase or decrease the amount of the resource included in the subscription on behalf of a customer.
How to review resource usage
To view information about the resources that you purchased with a subscription, go to your Control Panel > subscription name (in the navigation pane) > Administration tile > Manage > Purchased subscriptions tile > Manage > subscription name > Resource Limits and Usage.

To view information about the resources used by your subscription, visit the app or service vendor’s portal.
How to change resource quantity in your subscription
-
Log in to the Control Panel.
-
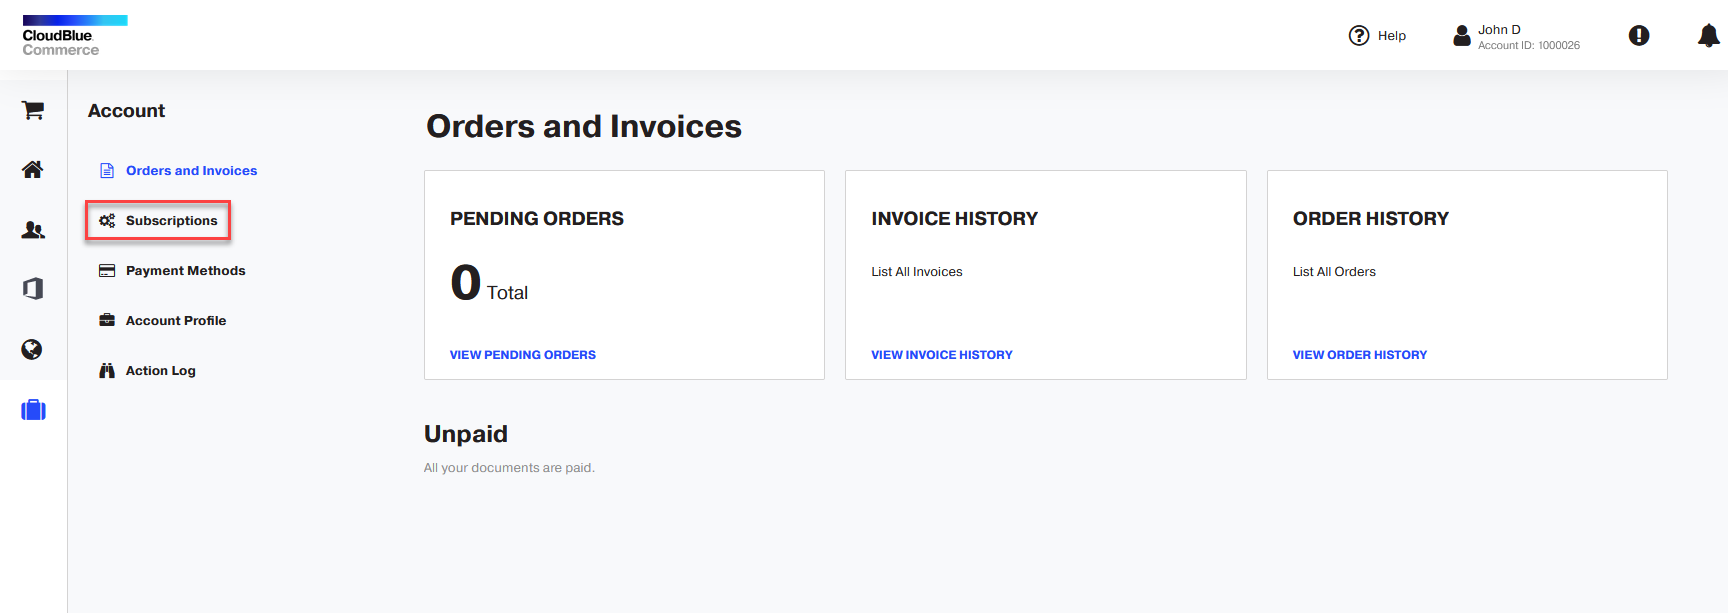
Click the Account link in the navigation pane on the left.

-
Click Subscriptions.
-
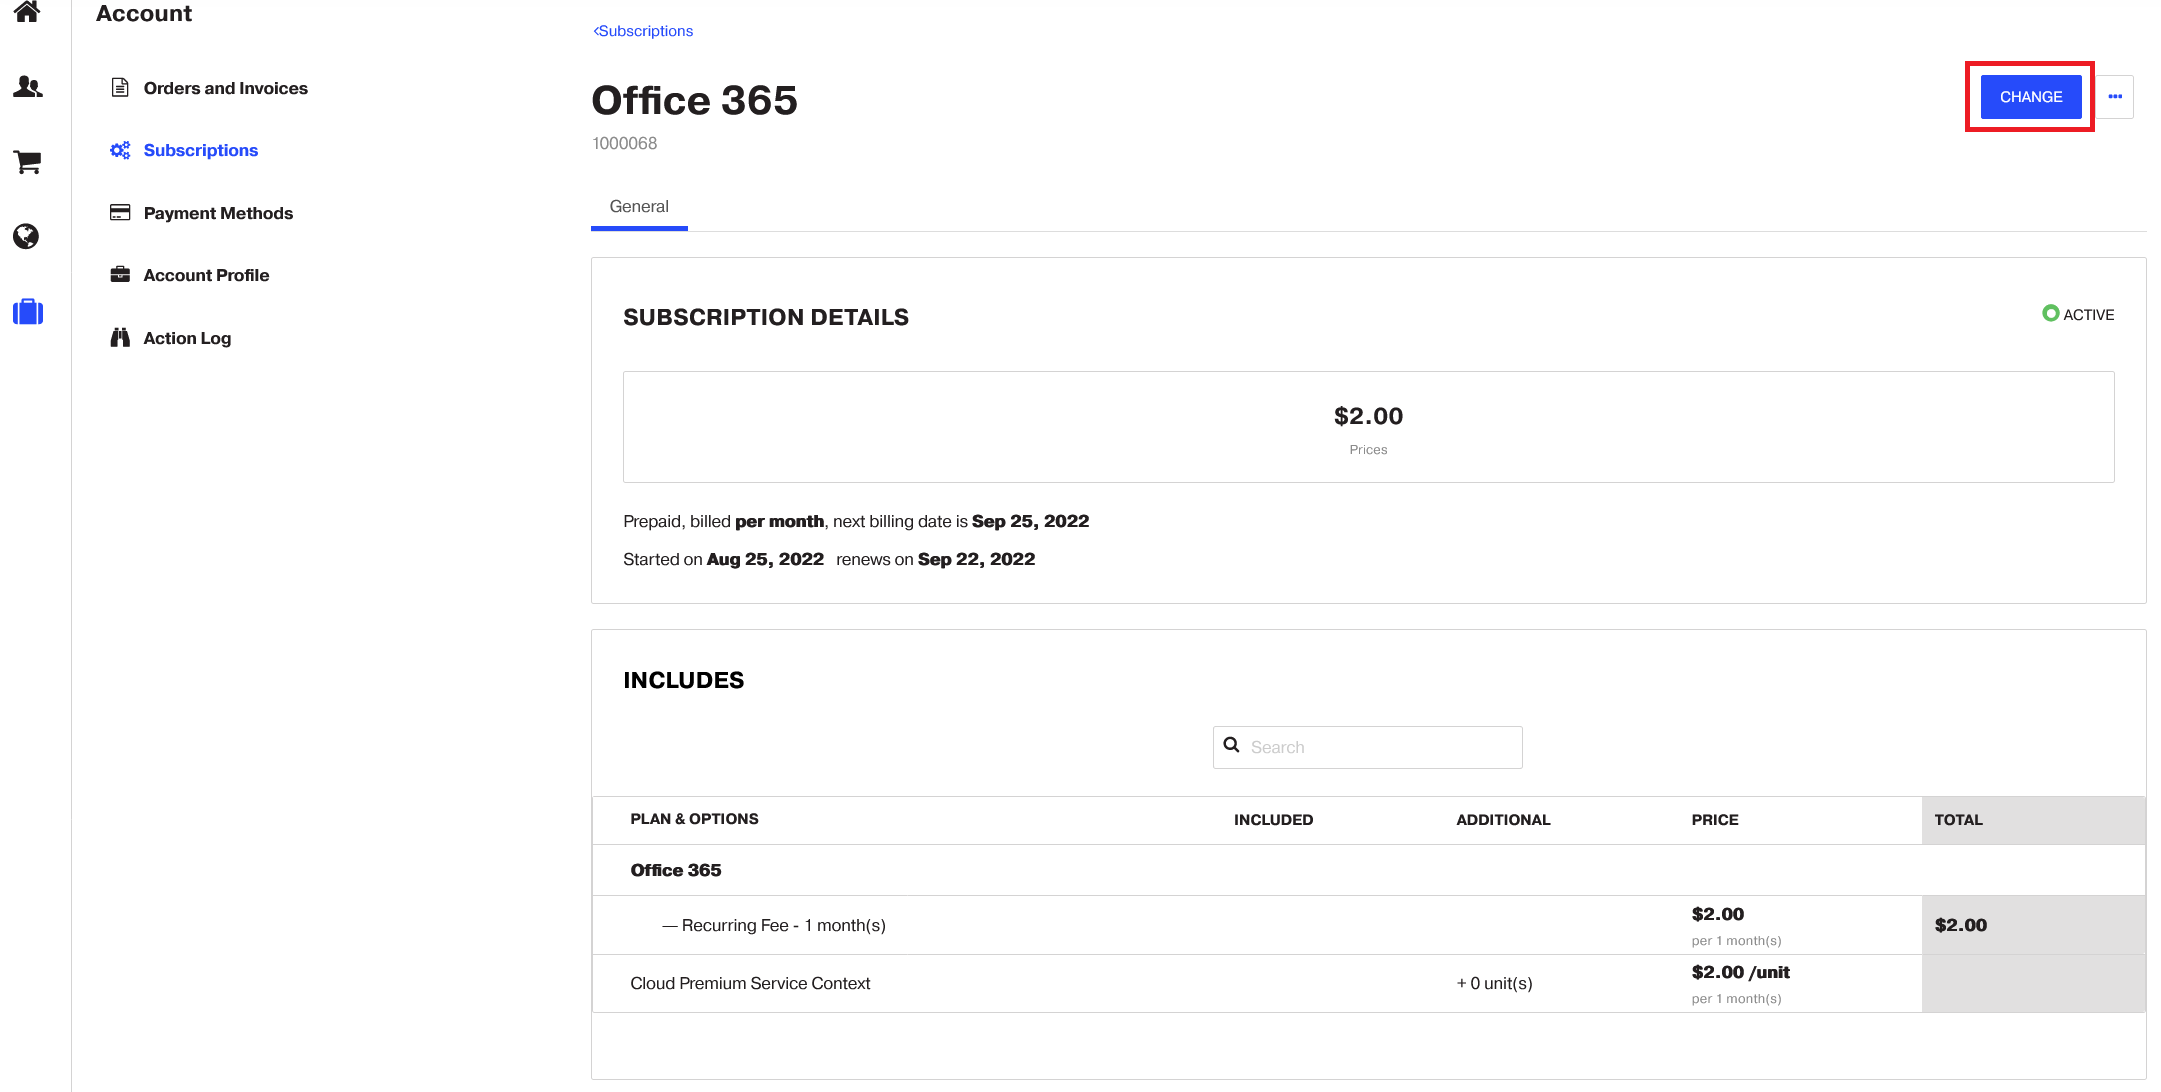
Click the subscription name.

-
Click Change.
-
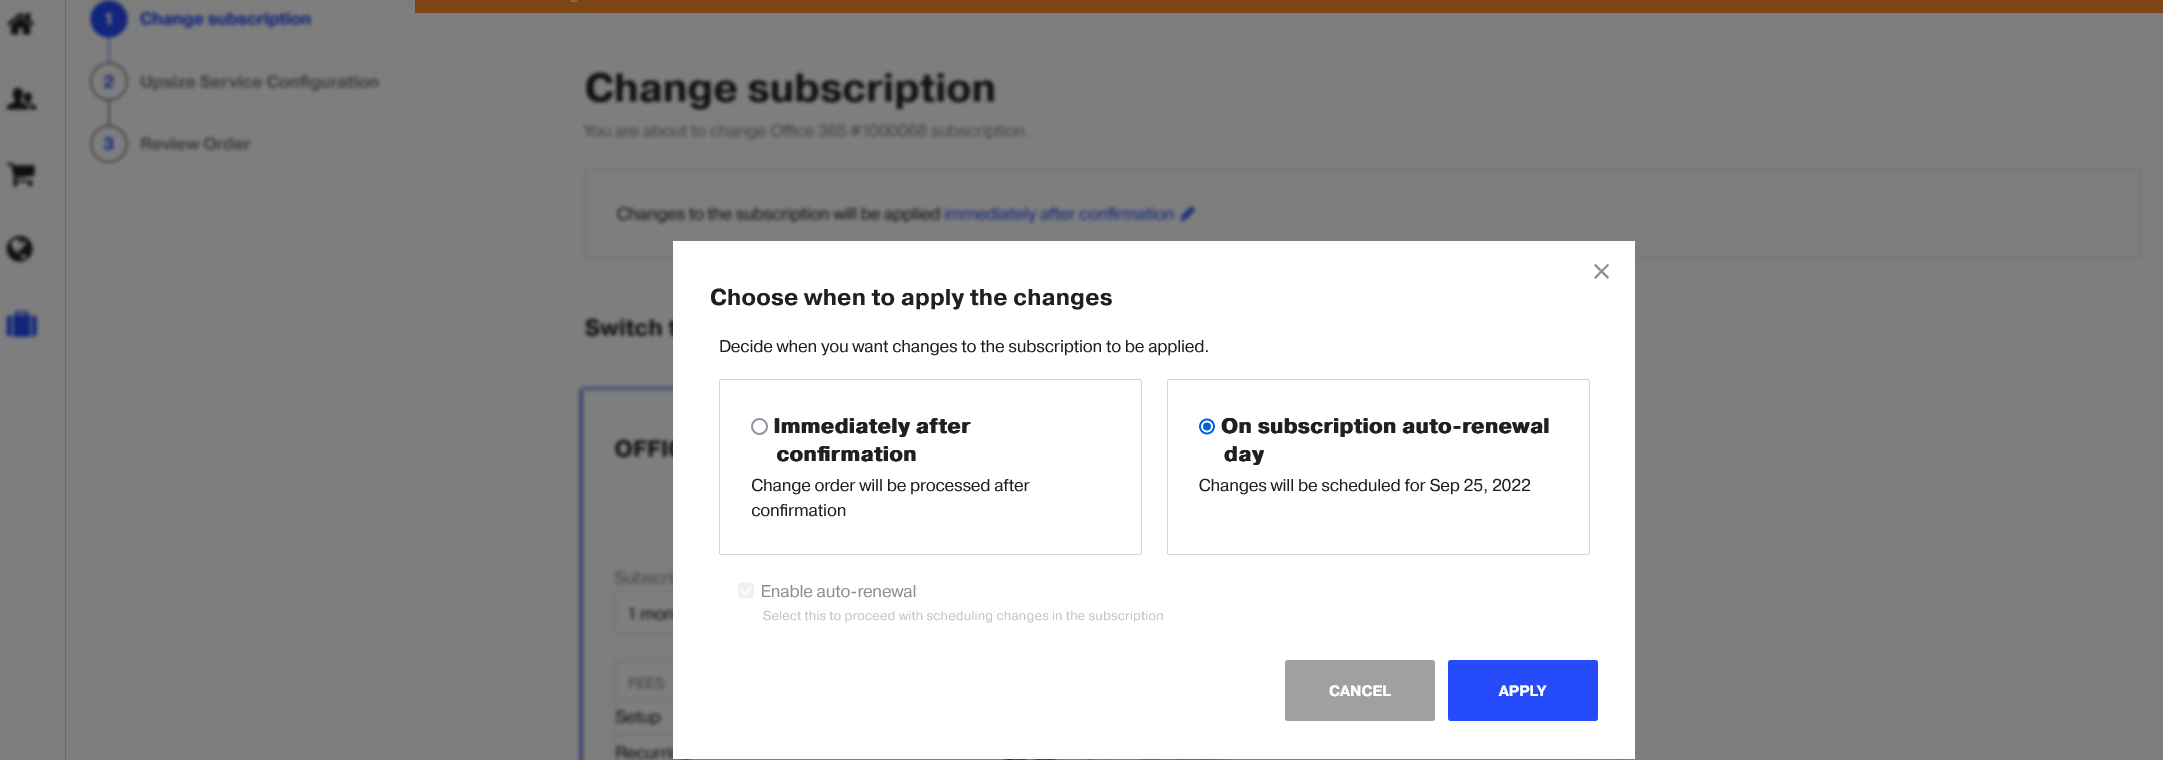
Select when changes to the subscription will be applied. You can select from the two options:
-
Immediately after confirmation, or
-
On subscription auto-renewal day.
Important: A subscription auto-renewal must be enabled for this option.

-
-
To adjust the resource amounts scroll down to the Adjust options pane, adjust the number of resources and click Next.

-
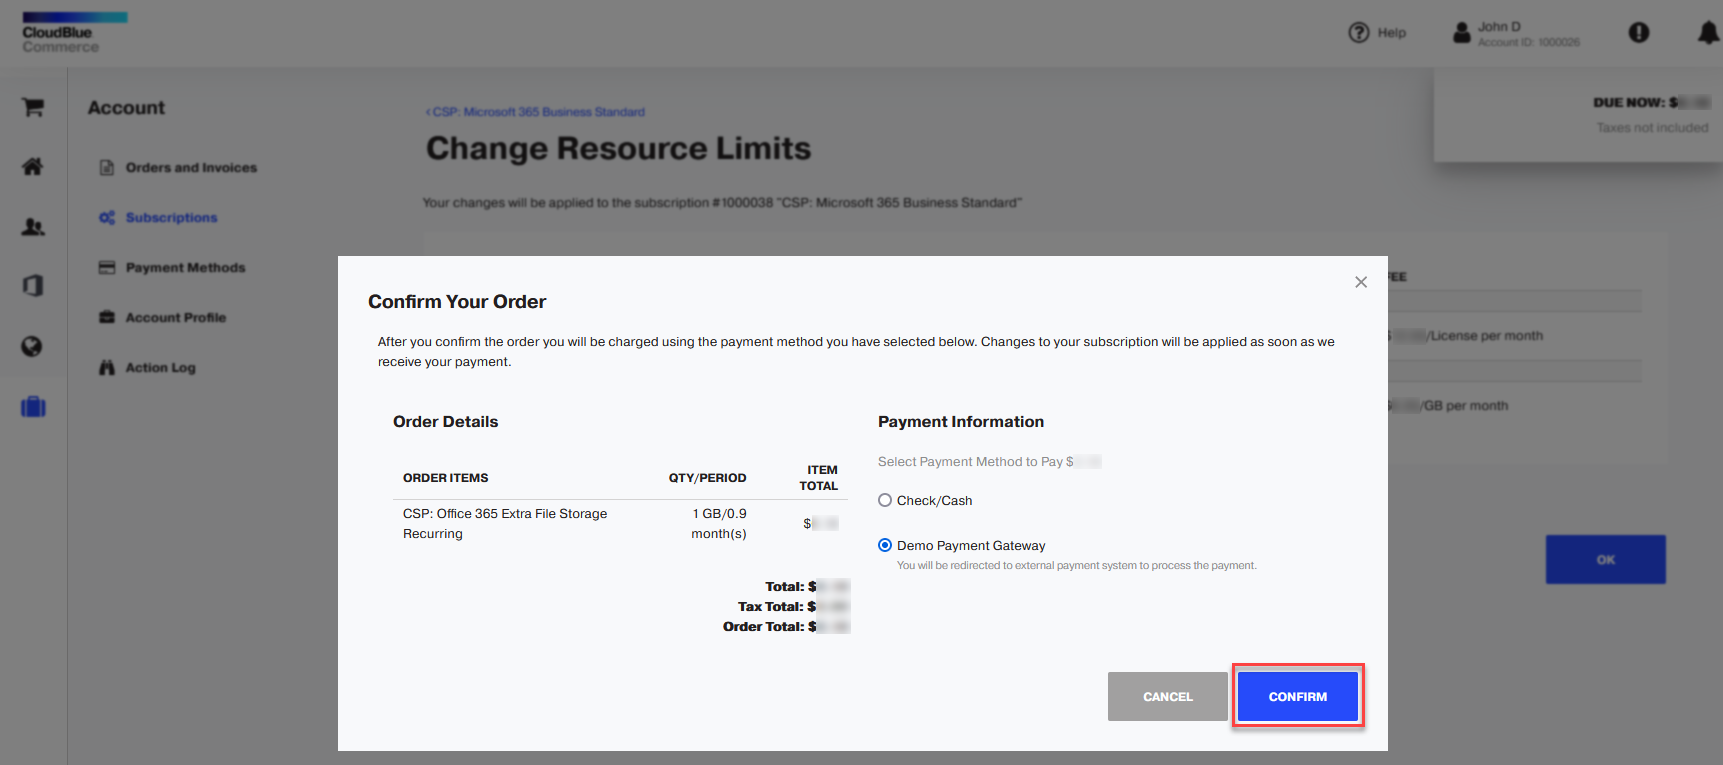
Review your changes and click Place order.
If you selected the Immediately after confirmation option, your order will be processed immediately. If you selected the On subscription auto-renewal day option, your order will be scheduled to be processed on the auto-renewal day.
-
Select the payment method that you want to use and click CONFIRM.
How to disable automatic renewal of subscriptions
By default, all the subscriptions are set to auto renew after the current subscription period. If you do not wish to renew an existing subscription, please follow these steps:
-
Log in to the Control Panel.
-
Click the Account link in the navigation pane on the left.
-
Click Subscriptions.
-
Click the subscription name.
-
Click the three dots and then Disable auto-renew.

Subscription renewal status is now disabled, and it will expire after the current subscription period.
How to switch to another subscription period
Switching to another subscription period means that the current subscription period is changed to one of those available within the service plan. For example, available subscription periods for a service plan are a month, a year, and three years. You purchased a service with a one-year subscription period, and after some time, you want to change the subscription period to three years.
-
Log in to the UX1 for Customers.
-
Click the Account link in the navigation pane on the left.
-
Click Subscriptions.
-
Click the subscription name.
-
Click Change.
-
Select when changes to the subscription will be applied. You can select from the two options:
-
Immediately after confirmation, or
-
On subscription auto-renewal day.
Important: A subscription auto-renewal must be enabled for this option.
-
-
Select a new subscription period in the Subscription Period field of your current plan.

-
Click Next.
-
Review your changes and click Place order.
If you selected the Immediately after confirmation option, your order will be processed immediately. If you selected the On subscription auto-renewal day option, your order will be scheduled to be processed on the auto-renewal day.
How to switch to another service plan
You can specify a list of allowed upgrades and downgrades for each service plan. This list defines service plans that customers can switch to.
A service plan can have a list of allowed upgrades and downgrades specified. Generally, both upgrade and downgrade procedures are the switching of a subscription's service plan to another. The difference is that when you switch to a more expensive service plan, you are billed for services that were added to the subscription. If you switch to a cheaper plan, you may be refunded an appropriate sum of money.
Upgrading or downgrading causes the following changes in a subscription:
-
Resources and their limits
-
Billing period
All the other subscription settings and options remain unchanged.
To switch to another service plan, complete the following steps:
-
Log in to the UX1 for Customers.
-
Click the Account link in the navigation pane on the left.
-
Click Subscriptions.
-
Click the subscription name.
-
Click Change.
-
Select when changes to the subscription will be applied. You can select from the two options:
-
Immediately after confirmation, or
-
On subscription auto-renewal day.
Important: A subscription auto-renewal must be enabled for this option.
-
-
Сlick Switch to this plan.

-
Click Next.
-
Review your changes and click Place order.
If you selected the Immediately after confirmation option, your order will be processed immediately. If you selected the On subscription auto-renewal day option, your order will be scheduled to be processed on the auto-renewal day.
-
Select the payment method that you want to use and click CONFIRM.
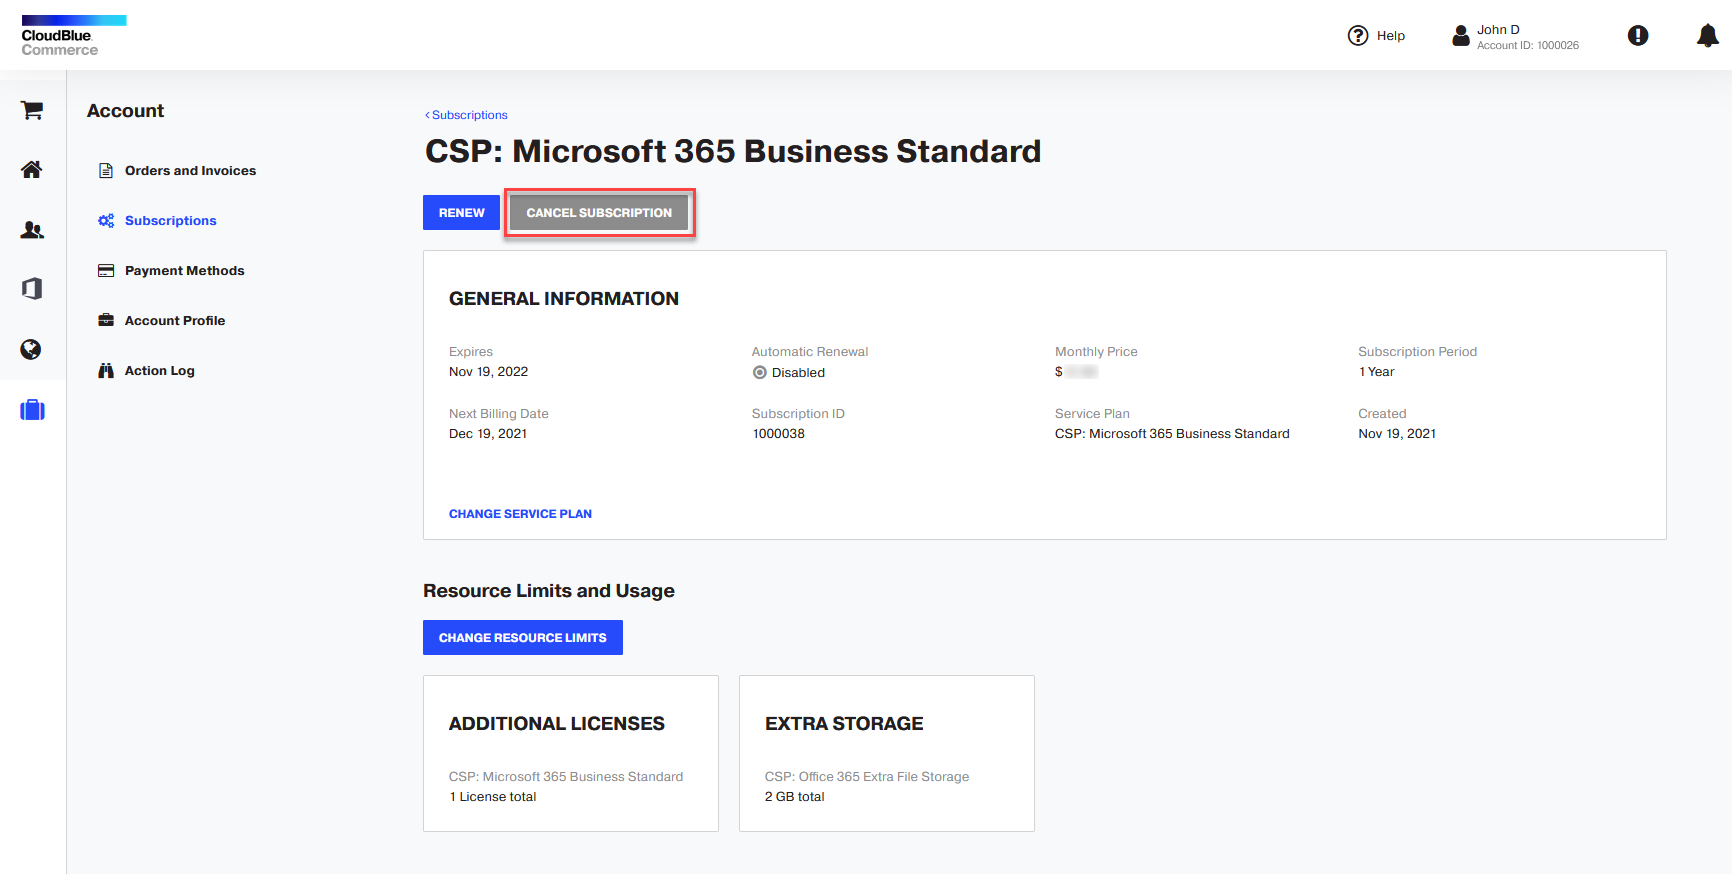
How to cancel a subscription
To cancel a subscription, follow these steps:
Important: When you cancel a subscription all Change Orders related to the subscription will be canceled, including the delayed orders which contain downgrade items.
-
Go to your Control Panel > subscription name (in the navigation pane) > Administration tile > Manage > Purchased subscriptions tile > Manage > subscription name > Cancel subscription.
-
Select the reason for cancellation, provide your comments, and click Proceed.

-
Click Confirm.

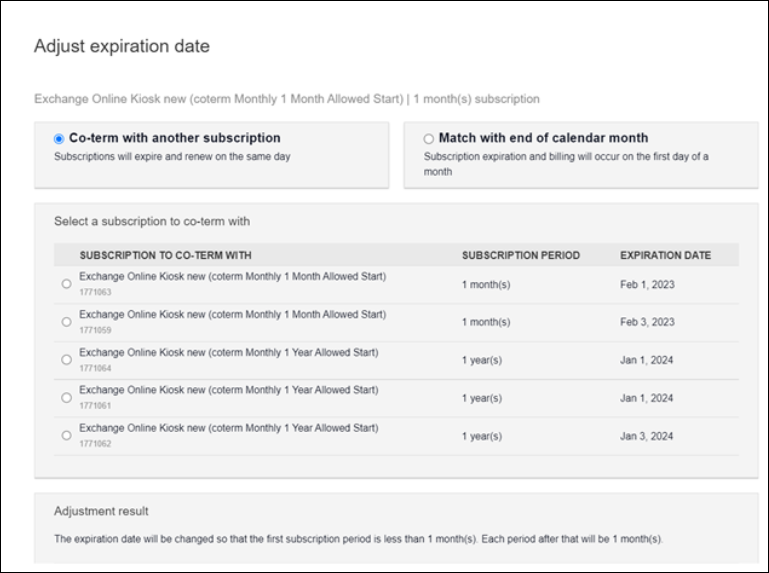
How to co-term subscriptions
Co-terming subscriptions essentially means aligning their expiration dates and, optionally, their billing periods. This makes it possible to cancel the main subscription and supplementary ones on the same date and can help optimize accounting efforts.
In UX1 Marketplace you can co-term a new subscription on the last step of order creation by clicking the link with subscription expiration date in one of the following ways:
-
With another subscription
-
With the end of the calendar month
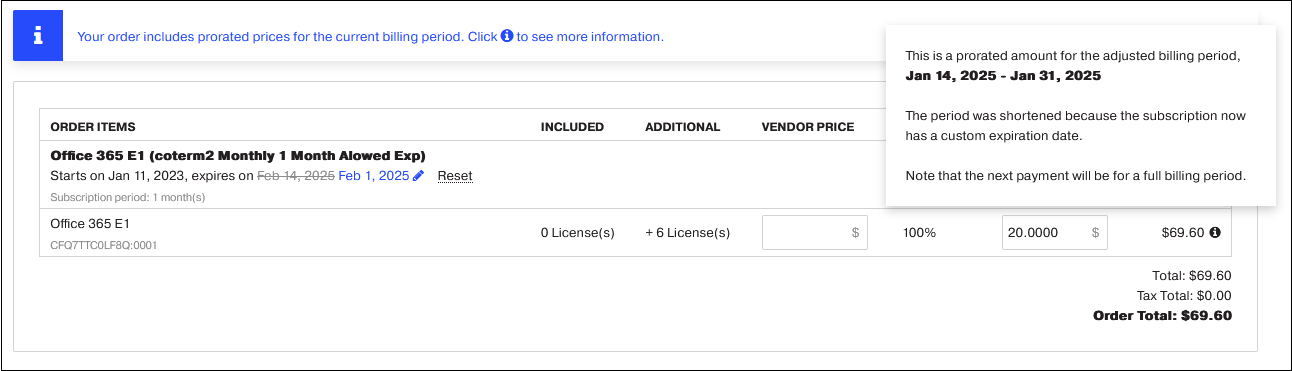
You will be prompted on the Review Order screen of the Place an order wizard with a notification on the top and when you hover over the information icon next to a price that the order includes prorated prices for the current billing period.
How to partially upgrade a Microsoft NCE subscription
Customers can perform a partial upgrade of Microsoft NCE subscriptions to a new or existing subscription while managing subscriptions in the UX1 Panel.
To perform a subscription partial upgrade, follow these steps:
-
Log in to the UX1 for Customers
-
Choose Account in the left navigation menu and go to Subscriptions
-
In the list of subscriptions, click the subscription for which you want to perform a partial upgrade
-
Click the three dots and select Partial upgrade.
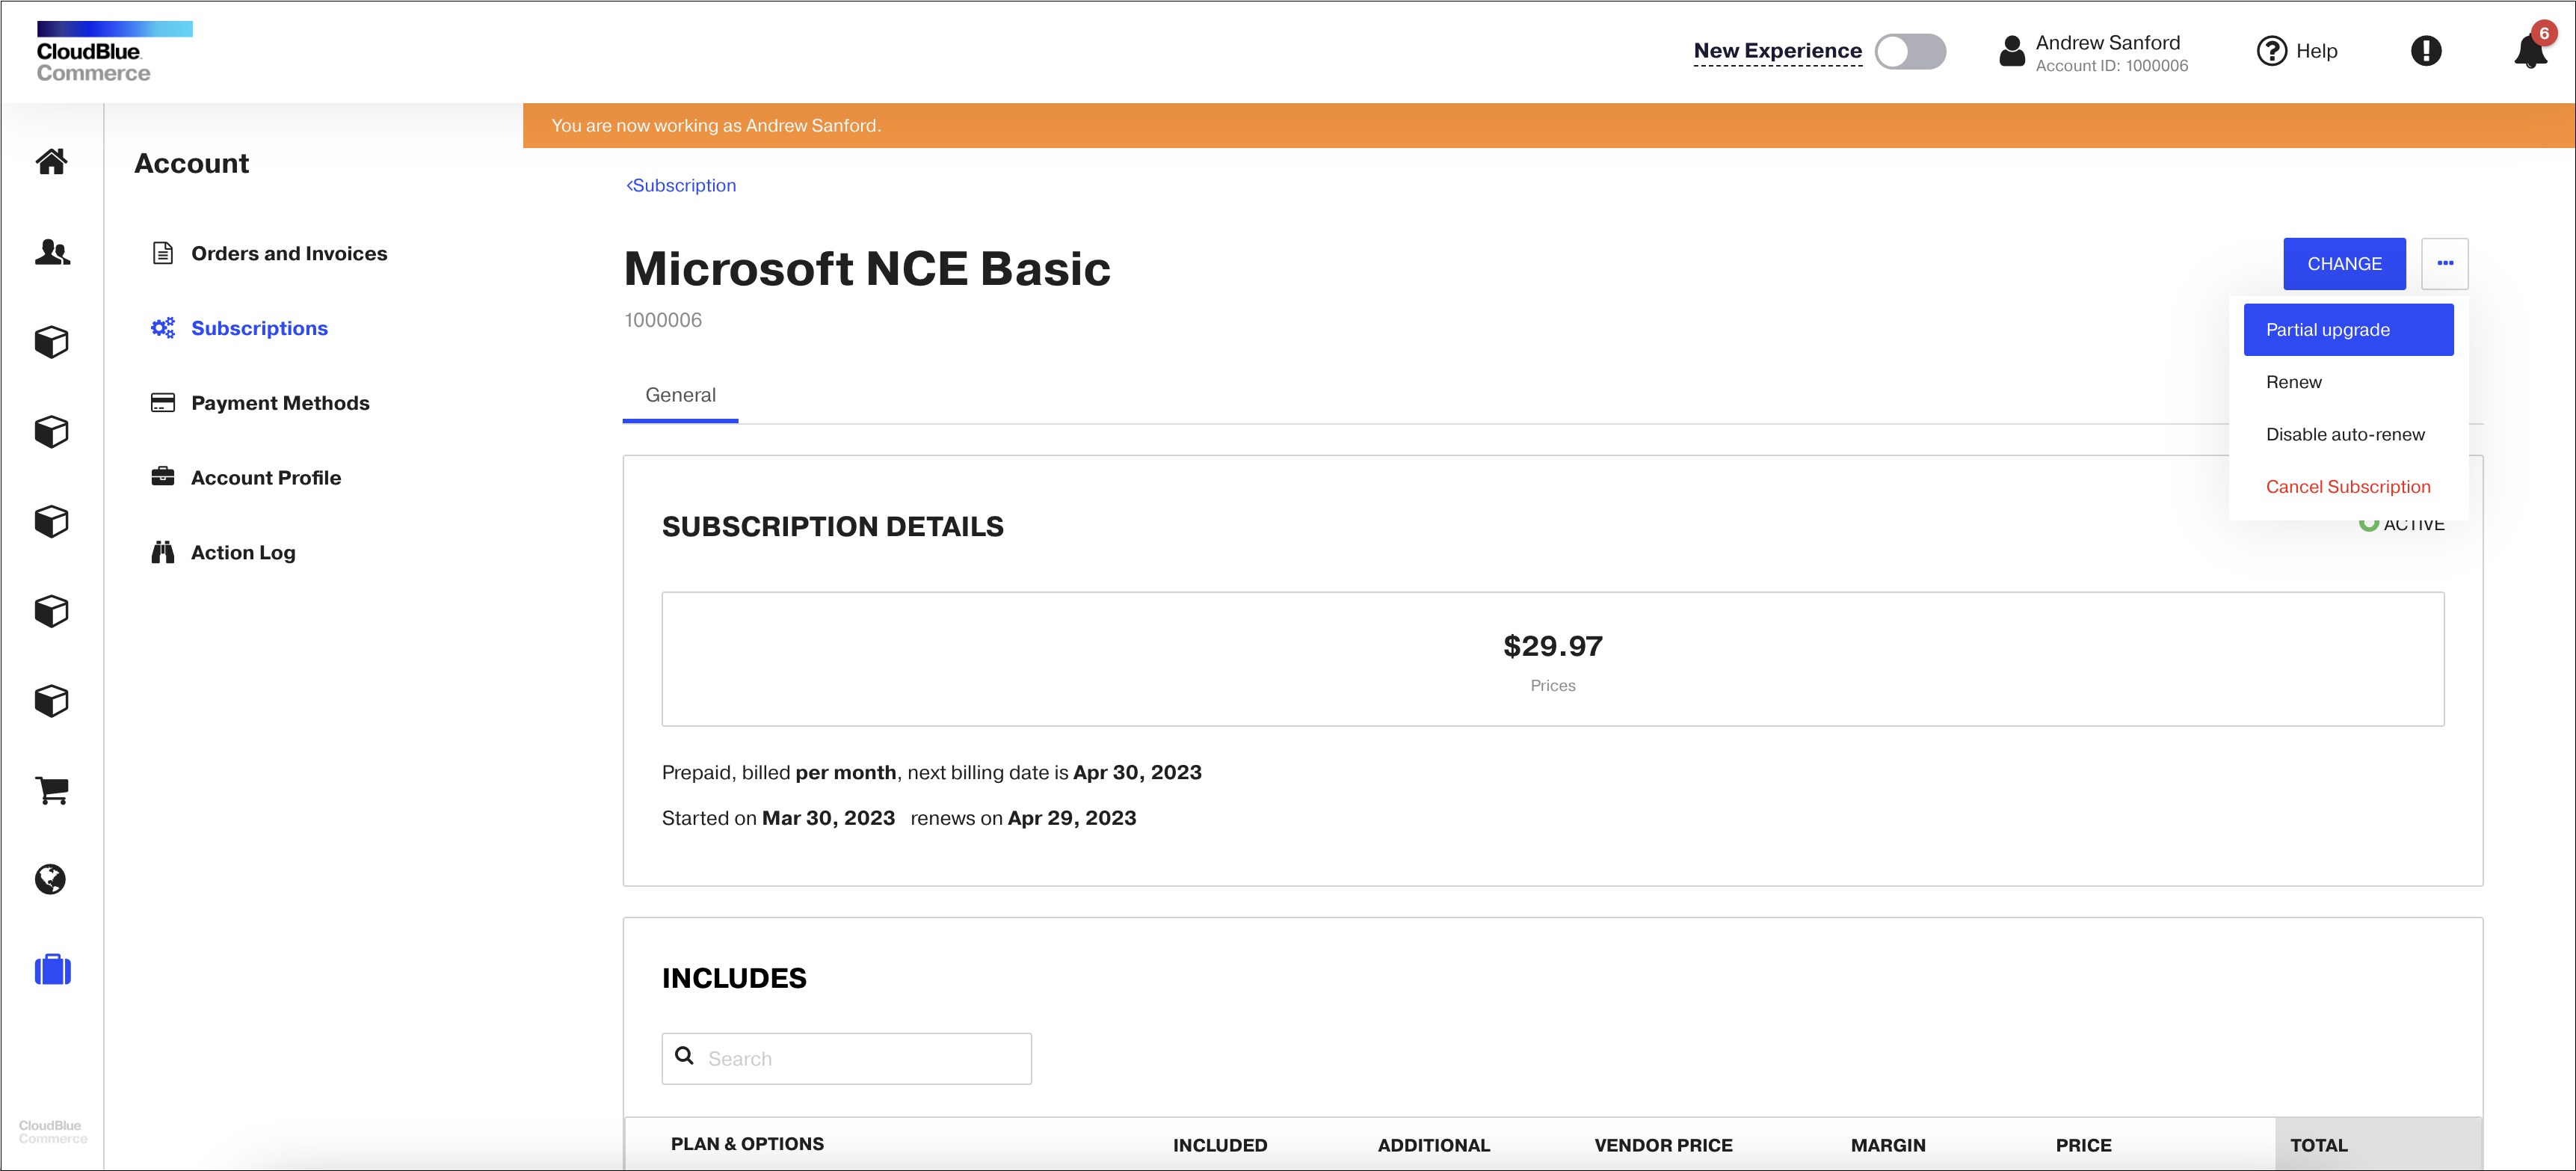
Note: If a subscription does not have the Active status, it has pending orders, or number of seats is equal to the value set in Min Units, the Partial upgrade button on the Subscription screen and the Partial upgrade wizard will be unavailable.
-
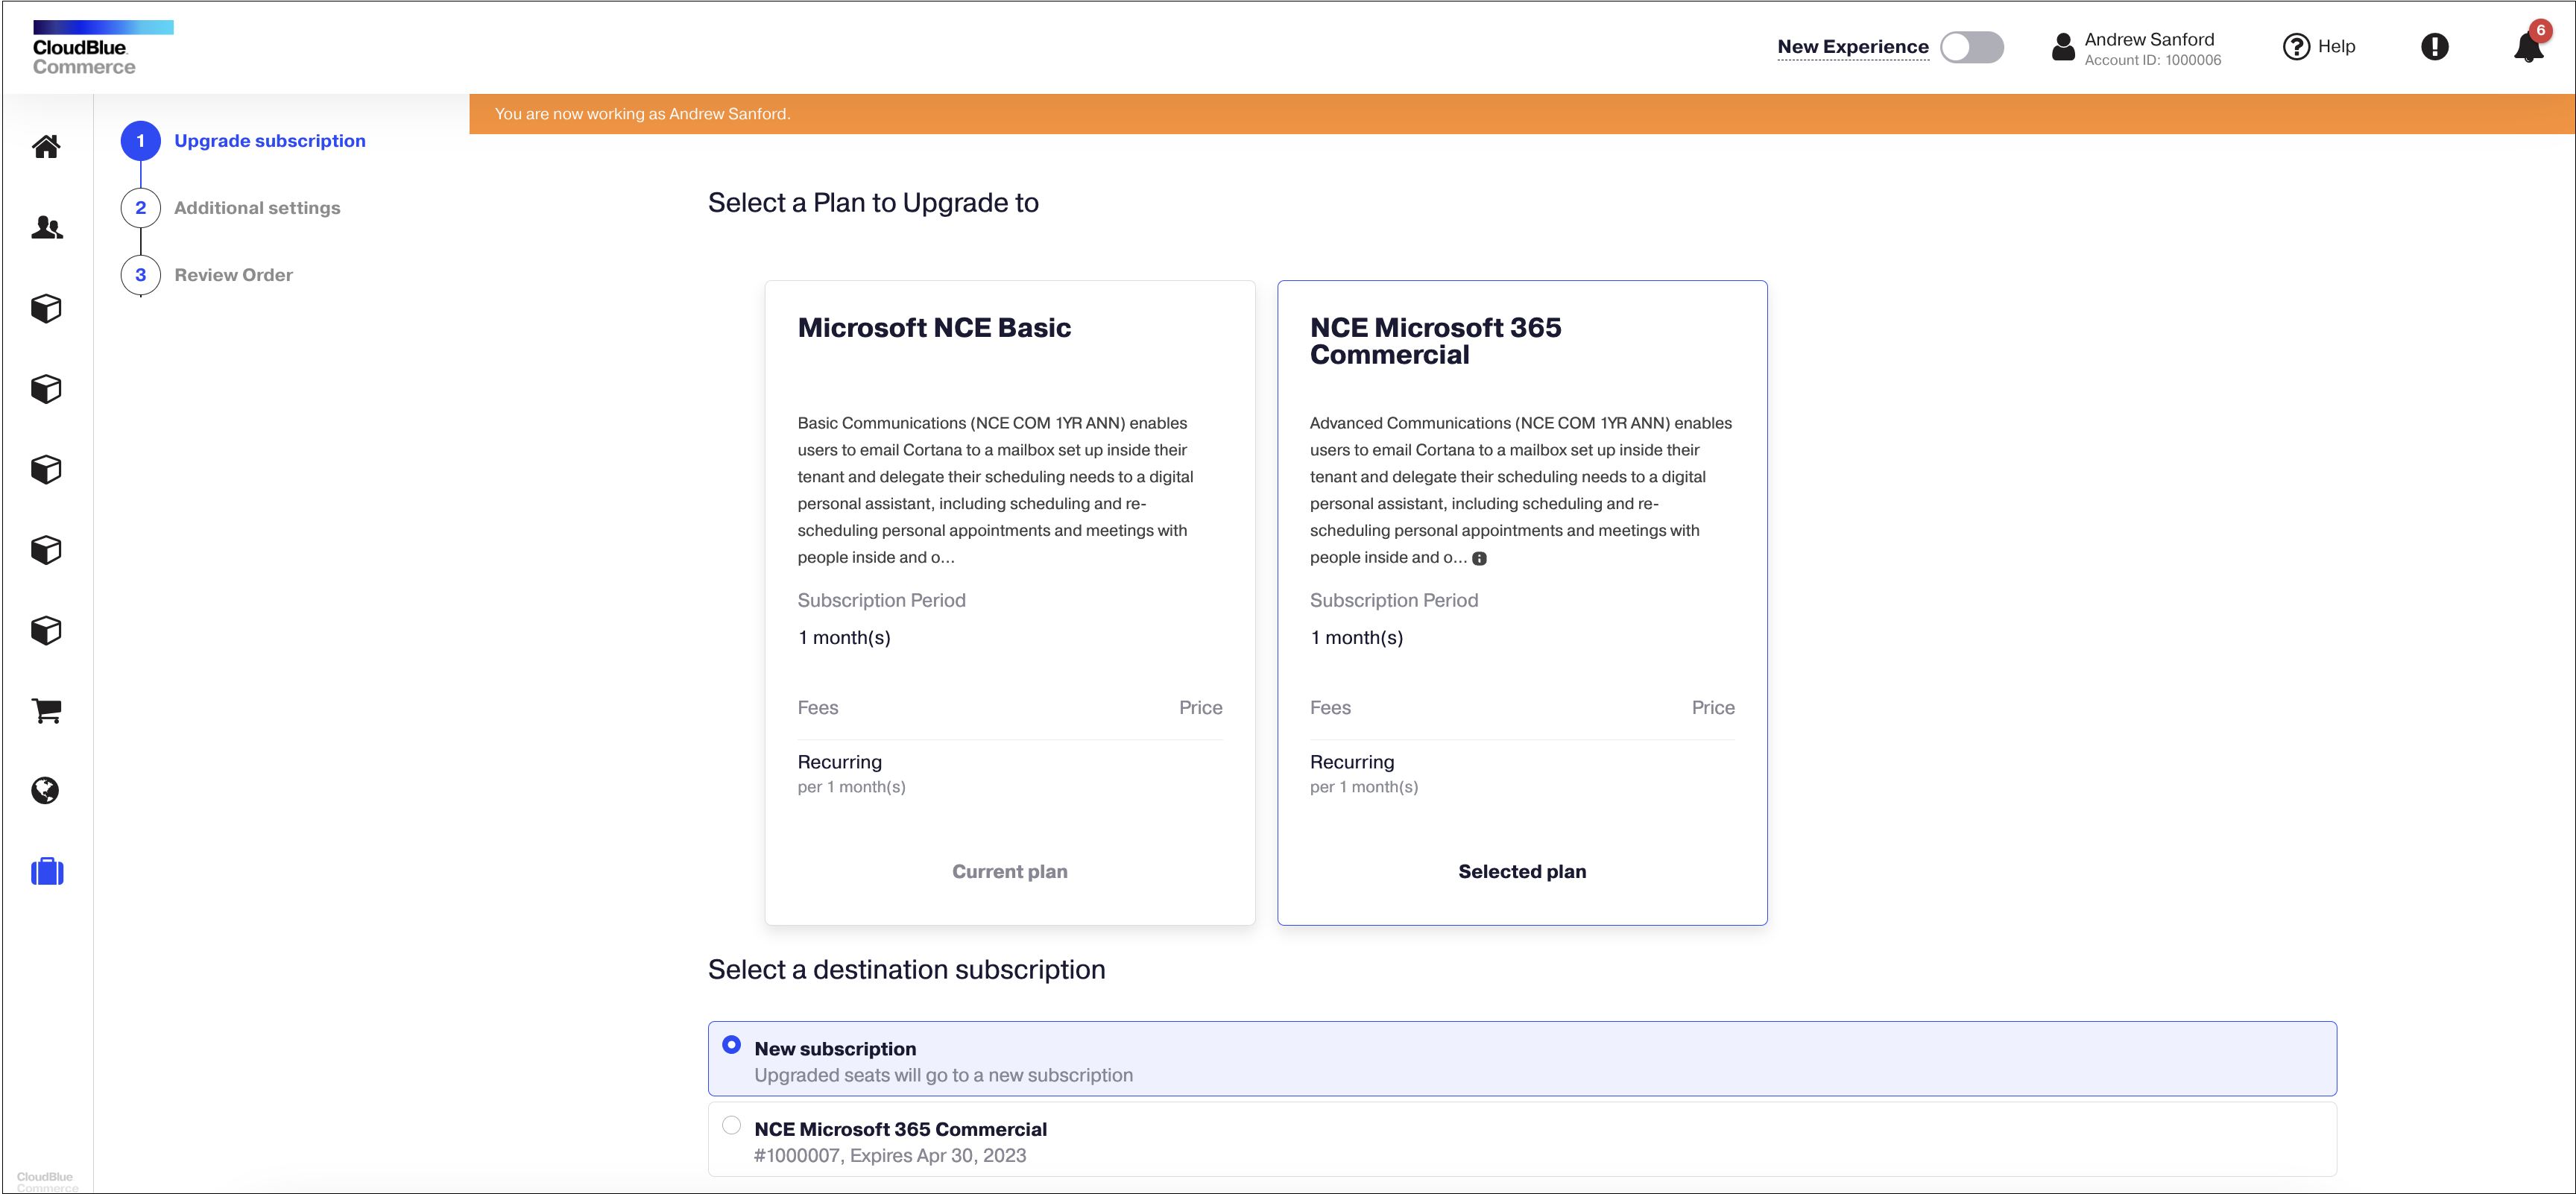
Select a plan to upgrade to:
-
Choose whether you want to upgrade and move seats to a new or existing subscription and click Next:

Note: The Partial upgrade wizard displays only those existing destination subscriptions that have their expiration date later than the one of the source subscription, have the same Microsoft tenant as the source subscription, are not in the cancellation window, and do not have any pending orders. The Next button will become active at the first step of the wizard only if the number of units selected to be moved is more than the current number of units in the existing destination subscription.
-
Review the order details and click Place order:

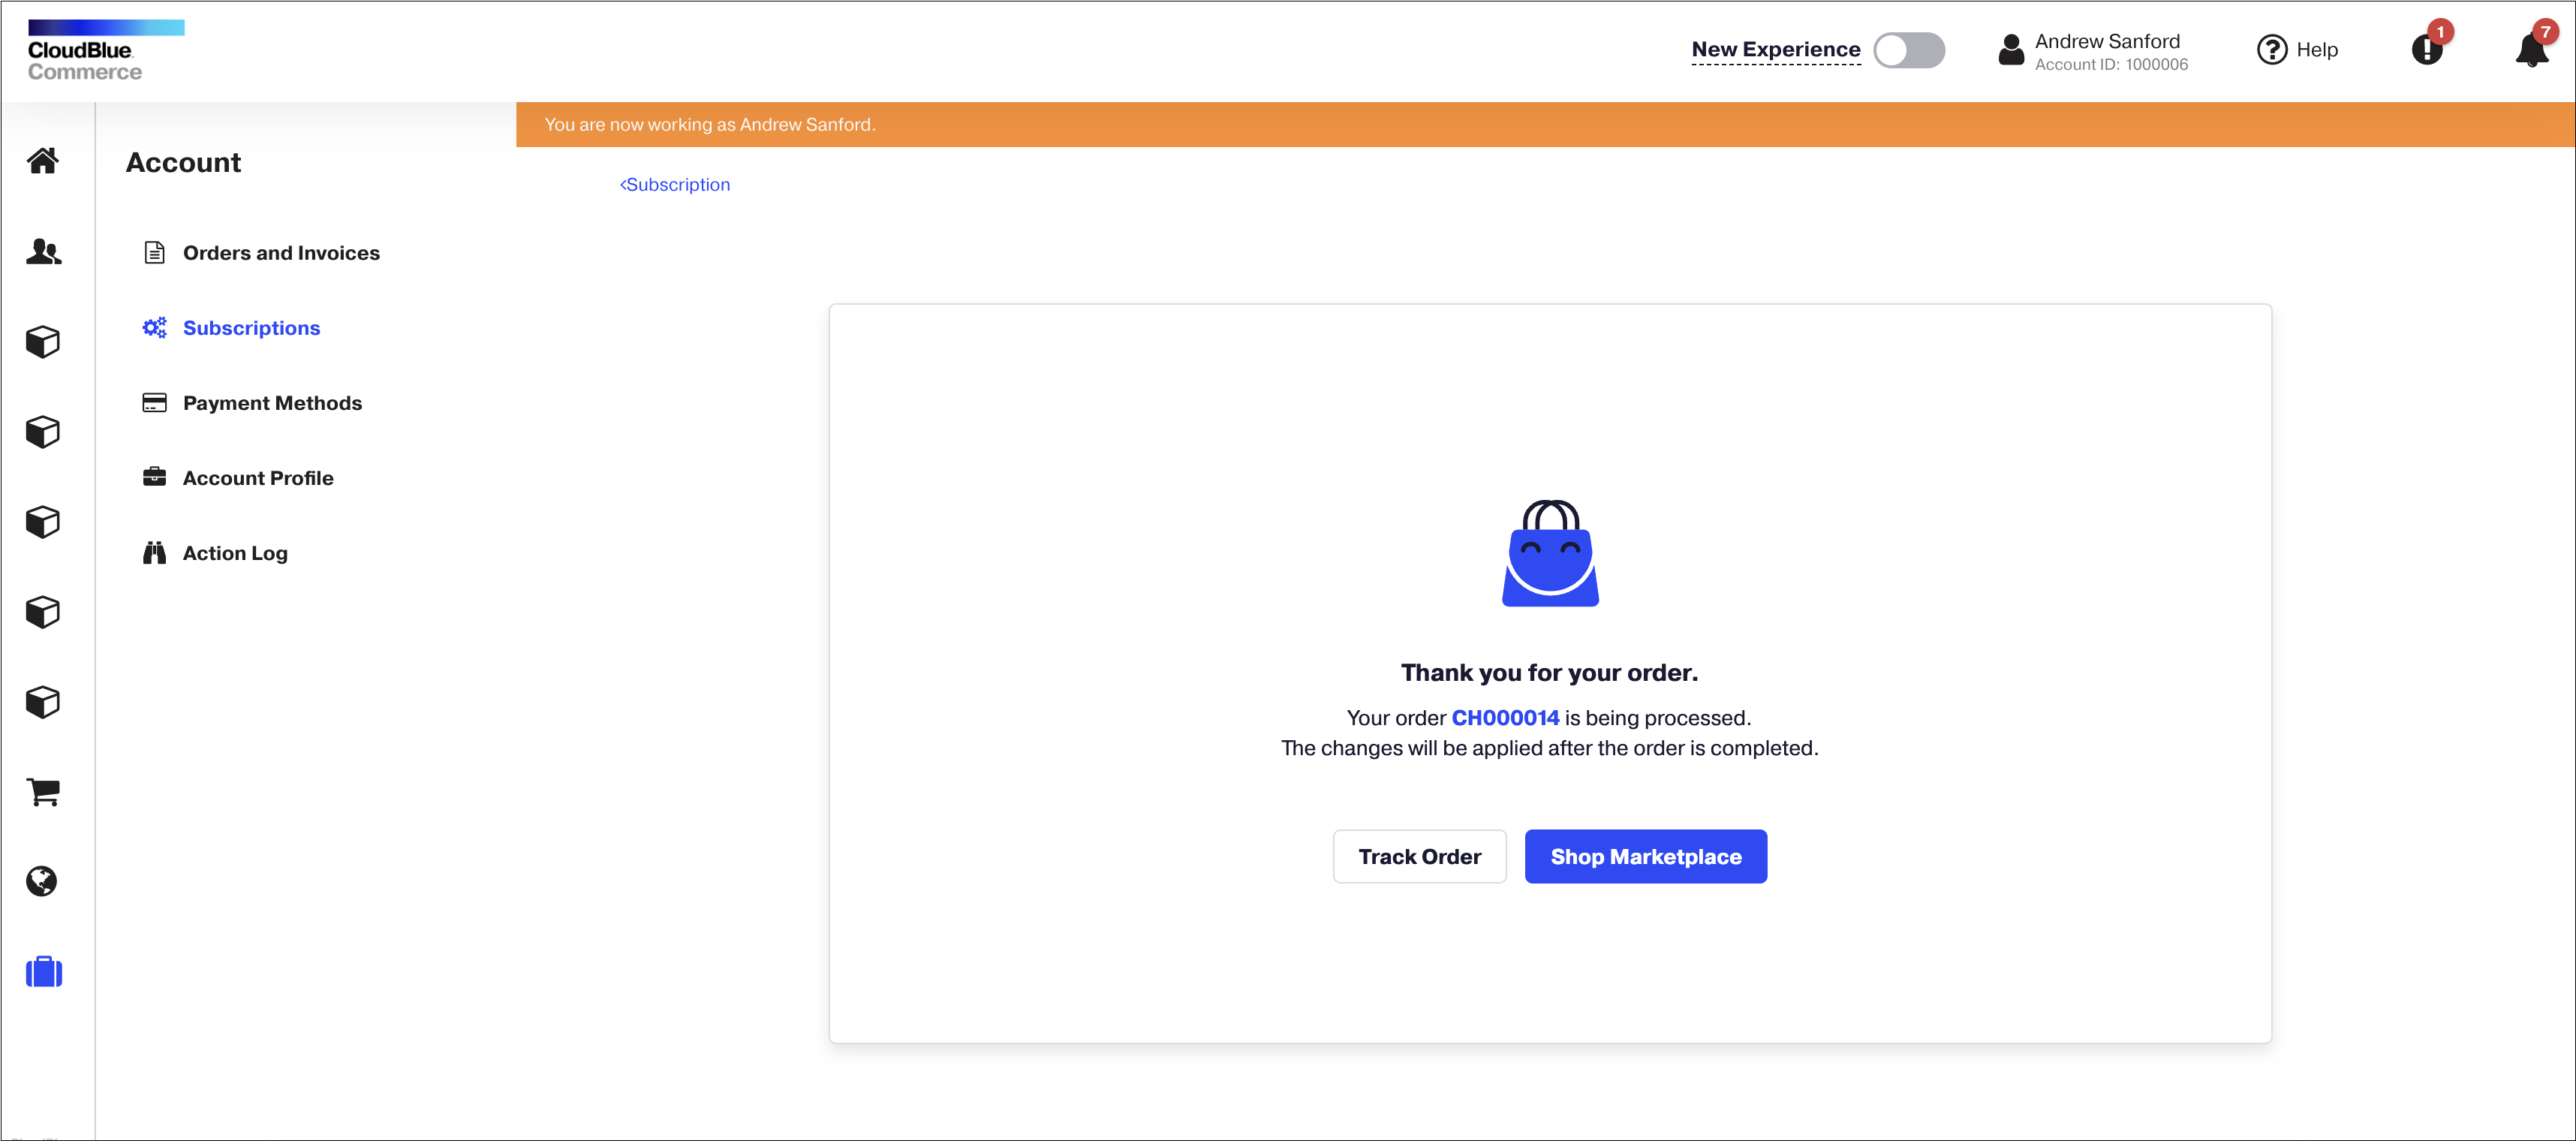
To ensure that the source and destination subscriptions' seats were updated correctly, go to the UX1 panel, choose Account, Subscriptions, select the required subscription in the list and check the subscription details.
Invoices
How to pay invoices
If you paid with a bank card earlier, and allowed the system to remember your card information, all your purchases are automatically paid with that card.
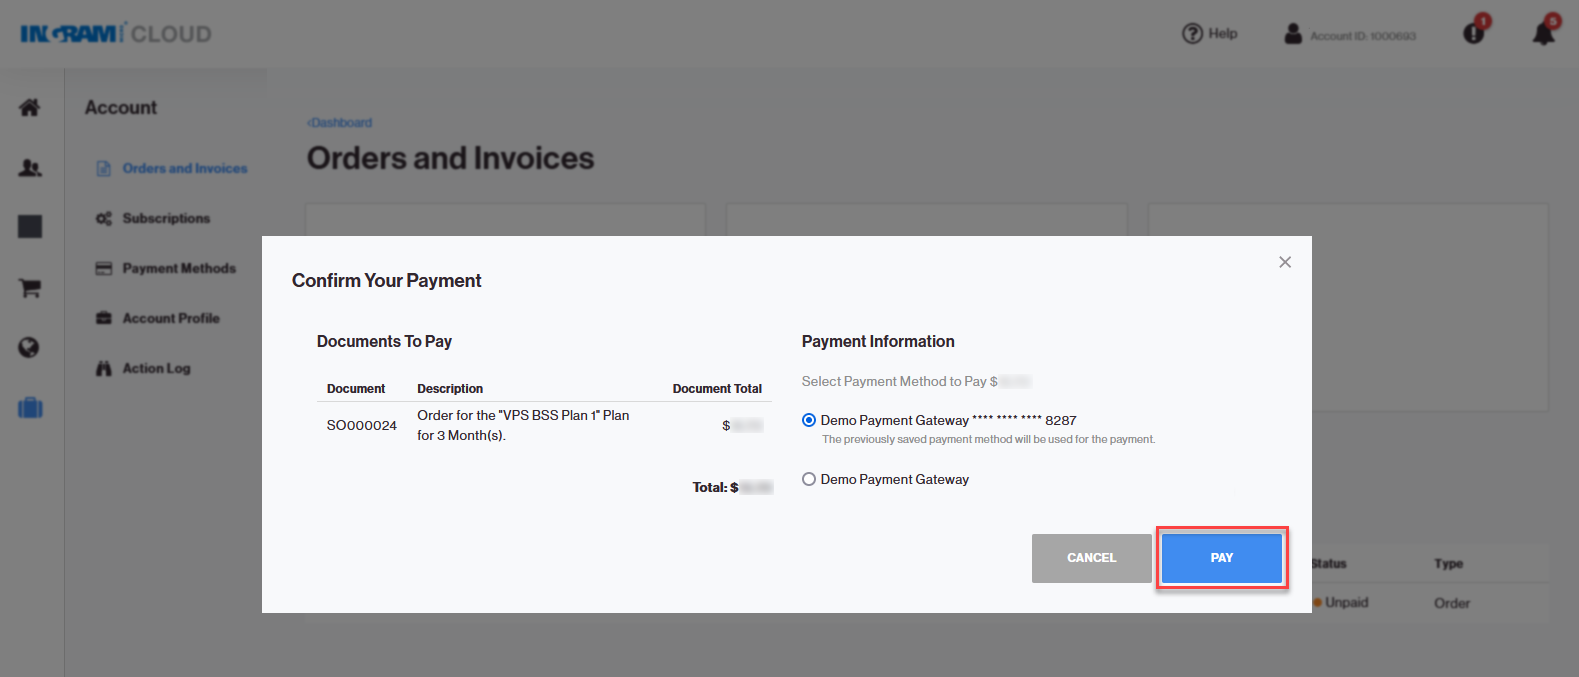
If you chose not to use automatic payments, complete the following steps to pay for your order:
-
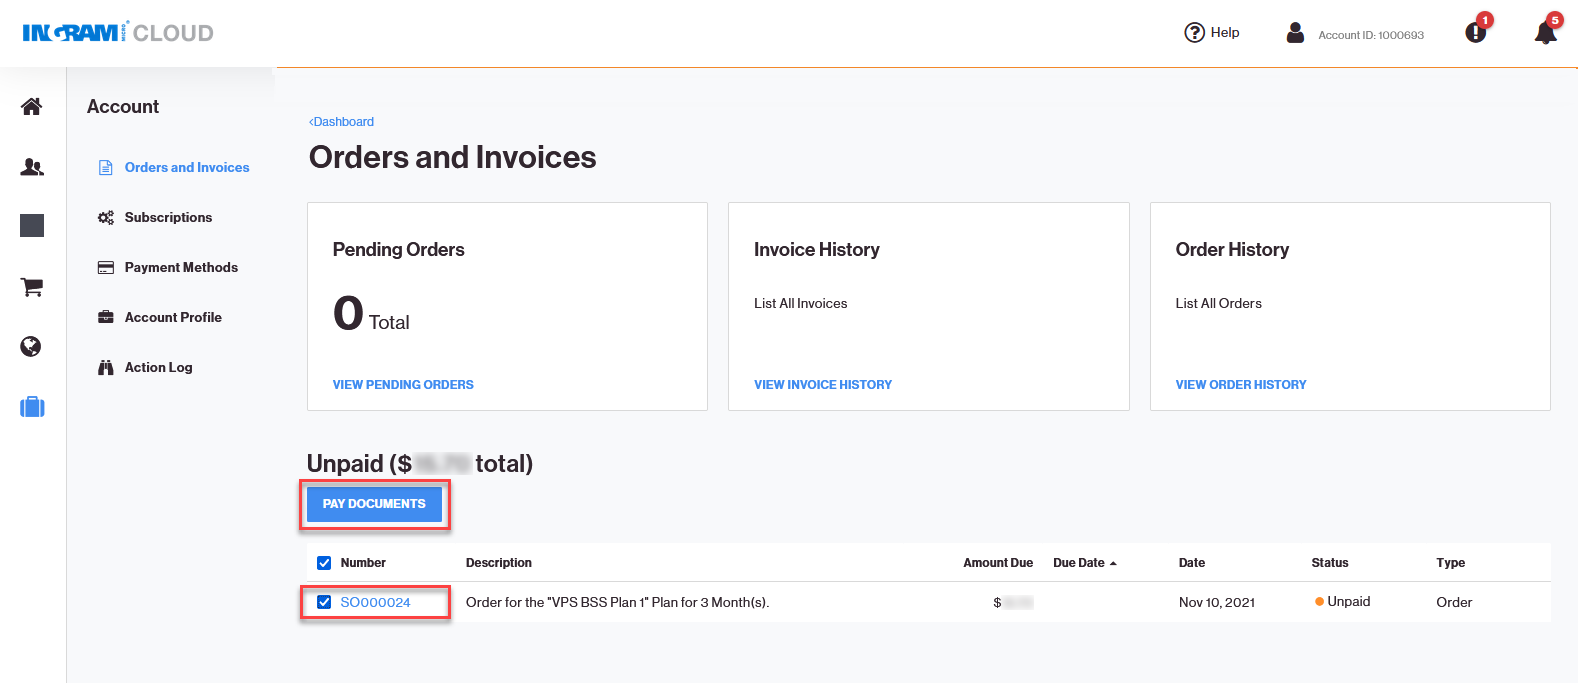
Go to your UX1 for Customers > Dashboard > Invoices. Unpaid orders are listed under Unpaid.

-
Select the checkbox next to the order number and click Pay documents.
-
Select the payment method that you want to use and click Pay.