Internationalization (optional)
This document helps you show notifications translated into various languages as explained in the Internationalization in Notifications document.
In this document:
Translated Strings
For each language you wish to support, create a PO file and add the translated string to each of them. For example, the following steps add support for German.
Create the
de_DE.pofile as explained in the Development Workflow section:$ aps msgmake -l de_DE async1pn
Open the newly created file in any text editor, then add the
msgidlines for themessagestrings used in notifications, and then for eachmsgidadd the respectivemsgstrwith the translated string.msgid "VPS Creation" msgstr "Die Bildung des Servers" msgid "VPS __name__ is provisioned" msgstr "Der VPS __name__ ist geschaffen" msgid "VM Creation" msgstr "Die Bildung des Servers" msgid "Provisioning of VM __name__ is started" msgstr "Die Bildung des Servers __name__ hat angefangen" msgid "Provisioning of VM __name__ is in progress" msgstr "Die Bildung des Servers __name__ dauert" msgid "Provisioning of VM __name__ is completed" msgstr "Der Server __name__ ist geschaffen" msgid "Server Removal" msgstr "Die Entfernung des Servers" msgid "Server __name__ is removed" msgstr "Der Server __name__ ist entfernt" msgid "The last server __name__ is removed" msgstr "Die Aufmerksamkeit: es ist der letzte Server entfernt - __name__" msgid "View Servers" msgstr "Die Übersicht der Server" msgid "View or edit VM" msgstr "Die Übersicht oder die Editierung des Servers" msgid "View or edit VPS" msgstr "Die Übersicht oder die Editierung des Servers"
Repeat the above steps for each language your application must support.
Deployment
Update the APS application as follows:
In the
APP-META.xmlfile, increase the packagerelease.Build the updated package:
$ aps build async1pn
Import the updated package to the system as you did in the Deployment step.
In the provider control panel, update the APS application instance:
In the list of applications, open the updated application.
On the Instances tab, open the application instance and click Upgrade.
The application instance will be upgraded to the new version.
Ensure the system supports the required languages as follows.
Provisioning
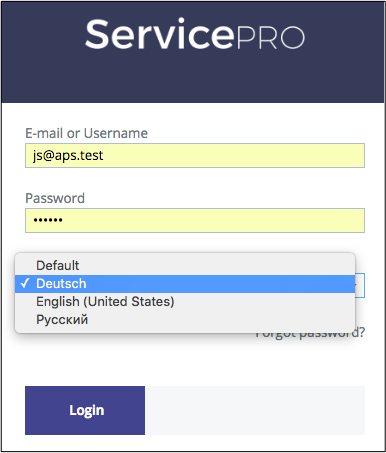
Login to the customer control panel as the user created earlier. In the Login panel, select a language your application supports:

Repeat the testing steps described earlier.
Notice the notification messages you have translated:


