Table Of Contents
Application Packaging Standard
Last updated 18-Mar-2019Meta Declaration
The APP-META.xml file must define general data about the application
and declare its main components.


In this document:
General Data
General data presents an application in the Application Catalog and in the provider control panel (PCP).
Assign an APS application ID by the
idelement in the form of URI that must be unique among all packages published in the Application Catalog and imported to an APS-compatible platform.Note
Once you started using the
idfor an APS application published in the catalog and installed on some platforms, do not change it unless you wish to clone the application to another one.Enter the application name using the
nameelement.If necessary, change the package version by means of the
versionandreleaseproperties used together to specify a unique APS package (APS application) version. Usually, theversionfollows the version of the integrated application, and thereleaseis the internal property of the APS application that changes more often than the applicationversion. For example, if your application current version is 5.0.1, start with version=5.0.1 and release=0.In the
vendorsection, specify the properties of the application owner.In the
packagersection, specify the properties of yourself or your company whoever is responsible for the APS integration of the application.
Generally, the upgrade section is required not during the development,
but rather in the application upgrade process.
However, even during the development steps, you may need to improve the APS application and increase the package release.
In this case, you can add temporarily the section that allows any upgrades:
<upgrade match="version=ge=1.0, release=ge=0"/>
This allows you to upgrade any version higher than 1.0.0 to any newer version.
Navigation in UI
In accordance with the scenario, only customers will need to manage the application services.
In this project, let us consider the following UX (user experience) design:
- Declare a custom UI navigation tree plugged into UX1,
that is to the
http://www.parallels.com/ccp/2placeholder. Customers will use it to view a list of servers and to run the editor to update a server profile. - Split the server creation process into two steps. For this, use a custom wizard with two views, one to configure the VPS properties and the other to overview those properties and to confirm the VPS provisioning.
Server Creation Wizard
A wizard is declared inside an item similar to a view. In addition, it must contain a declaration of a placeholder to plug views into.
Combined Navigation Structure
With two navigation items and all the views and the wizard mentioned above, the tree will look as follows:
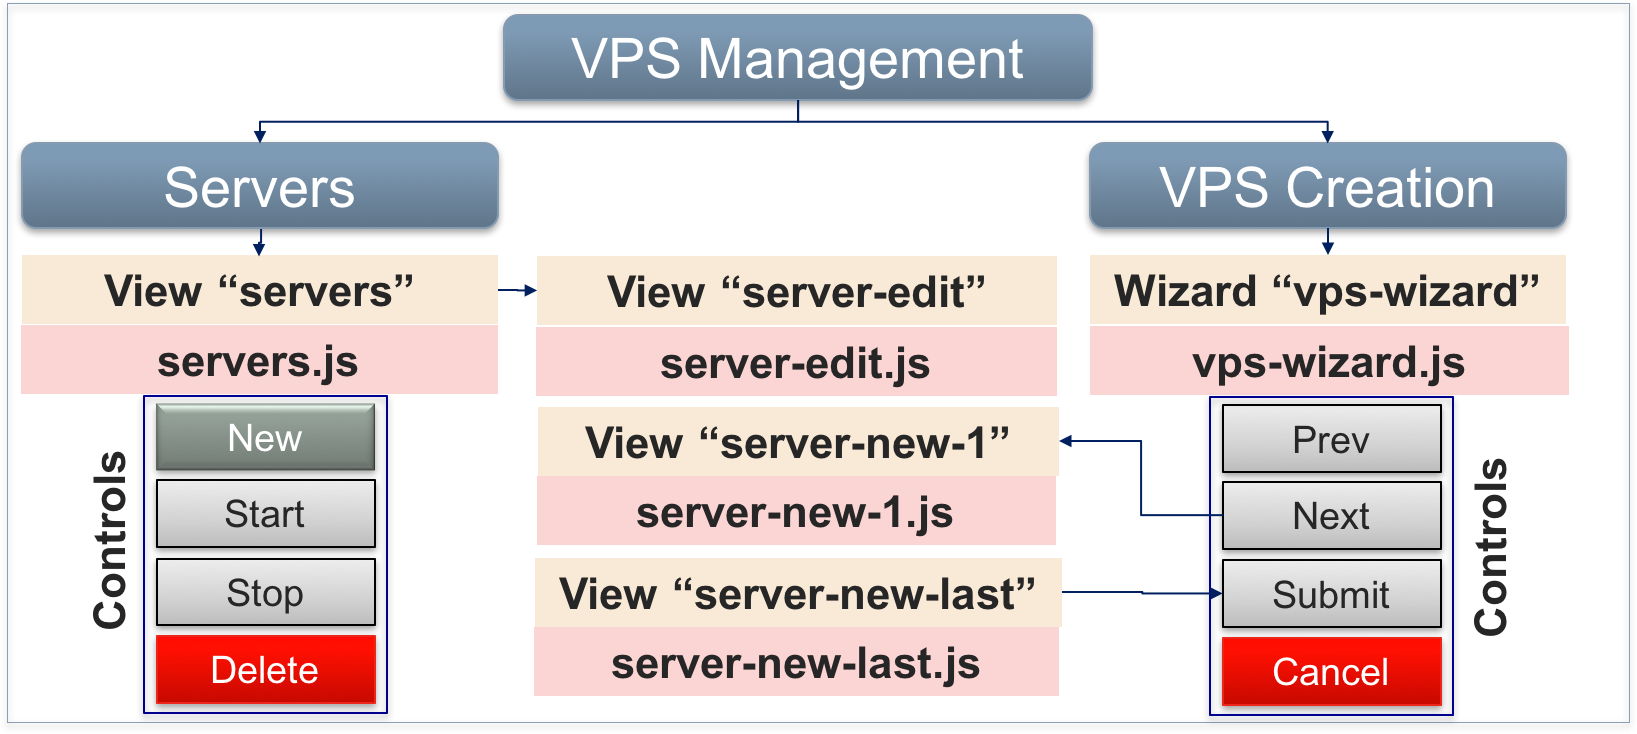
Keynotes:
- In the UX1, a customer will find the “VPS Management” navigation tree with two items in it. The first item
opens the
serversview with the list of VPSes, and the second one opens the wizard for creating a new VPS. - The
serversview shows a list of VPSes and provides some action buttons. The New button calls thevps-wizard. - When a customer clicks on a VPS, the respective handler must call the
server-editview to start editing the VPS properties. - The
server-new-1andserver-new-lastviews must plug into the wizard. A customer will navigate between the views using the Prev and Next buttons. In the last view, the Submit button allows to start provisioning of a new VPS.
The demo project illustrates the declaration of the navigation tree as presented in the above diagram.
Services
The resource model contains three APS types. Each of them requires declaration of a service.
In a service declaration, you need to specify a source file that contains the APS type definition and an executable file
that defines the service management (provisioning) logic.
In case of using the APS PHP framework on your endpoint host,
the best way is to define both parts in one PHP file. The following example illustrates the vpses service declaration:
<service id="vpses">
   <code engine="php" path="scripts/vpses.php"></code>
   <presentation>
      <name>Virtual Private Server</name>
      <summary>Cloud virtual private server</summary>
   </presentation>
</service>
The code element specifies that the scripts/vpses.php file declares the APS type and defines the service provisioning logic.
Note
Typically, we assign a name in plural form to a service, for example, vpses, and a name in singular form
to the respective APS type, for example, vps. The reason is that a service is a factory of many resources.
Continue Your Demo Project
This section continues the demo project started in the previous step.
Enter General Application Data
Fill in the empty general elements in your initial APP-META.xml file following this example:
<id>http://aps-standard.org/samples/vpsdemo</id>
<name>Basic VPS Demo</name>
<version>1.0</version>
<release>0</release>
<homepage>http://doc.apsstandard.org/apps/proc</homepage>
<vendor>
   <name>Your team name</name>
   <homepage>http://dev.apsstandard.org/</homepage>
</vendor>
<packager>
   <name>Your team name</name>
   <homepage>http://dev.apsstandard.org/</homepage>
</packager>
<presentation>
   <summary>Simplest multi-tenant application</summary>
   <description>This is a demo application to demonstrate how to develop APS apps step by step.
      It also shows how to use GRID column types and filters.
   </description>
   ...
</presentation>
...
<upgrade match="version=ge=1.0, release=ge=0"/>
Note
The <upgrade> section must be below the <license-agreement> section.
Declare Services
Make sure in the APP-META.xml file every APS type has a corresponding service declared:
<service id="clouds">
   <code engine="php" path="scripts/clouds.php"/>
   <presentation>
      <name>VPS cloud globals</name>
      <summary>VPS cloud application global service</summary>
      <infolinks>
         <link href="http://doc.apsstandard.org/apps/proc/generic/" class="deployment-guide">
            Demo project description
         </link>
         <link href="http://dev.apsstandard.org/develop/rt/tickets/new/" class="support">
            APS support
         </link>
      </infolinks>
   </presentation>
</service>
 <service id="contexts">
   <code engine="php" path="scripts/contexts.php"/>
   <presentation>
      <name>VPS Management</name>
      <summary>VPS management environment</summary>
   </presentation>
</service>
<service id="vpses">
   <code engine="php" path="scripts/vpses.php"></code>
   <presentation>
      <name>Virtual Private Server</name>
      <summary>Cloud virtual private server</summary>
   </presentation>
</service>
Conclusion
You have completed the project declarations in the file APP-META.xml that is similar to the respective file in the
sample package.