Table Of Contents
Application Packaging Standard
Last updated 18-Mar-2019Update
Like in the case of the initial development, the application update phase usually includes updates of the same three parts: metadata, provisioning logic, and presentation logic.


In this document:
Purposes
This document demonstrates how to update both the provisioning logic and presentation logic in a package as well as how to update the APS application deployed and provisioned on your platform.
Let us assume that we need to add one more property to the VPSes and it will be the “Operating System (OS)”, for example, “CentOS-7” or “Windows-2012”. The subscribers will be able to select one of them when they request provisioning of a VPS.
This requires the following updates in the APS package:
- In the provisioning logic:
- In the
vpsAPS type, add one more property calledos. - In the
vpsID, increase the minor part of the version. - In the other APS types, update the links to the
vpstype to specify the newvpsversion.
- In the
- In the presentation logic:
- In the resource model and store, update the
vpsversion. - In the list of servers, add the new property as a column to the table.
- In the server creation view, require a subscriber to select an OS.
- In the resource model and store, update the
- In the metadata:
- Increase the package version.
- Specify the older versions of the APS application that the package is able to update.
Provisioning Logic
Declare the new os property in the vps APS type and then increase the type version.
Follow these steps.
In the
scripts/vpses.phpfile, add a new section to define the new property:/** * @type("string") * @title("OS") * @description("Operating System") */ public $os;
In the
scripts/vpses.phpfile, increase the minor part of the APS type version. For example, if it was1.0, make it1.1or higher:/** * @type("http://aps-standard.org/samples/starter1p/vps/1.2") * @implements("http://aps-standard.org/types/core/resource/1.0") */ class vps extends APS\ResourceBase { ... }
In the
scripts/managements.phpfile, update thevpseslink to comply with the updated version of thevpstype:/** * @link("http://aps-standard.org/samples/starter1p/vps/1.2[]") */ public $vpses;
You can compare the new contents with the sample file.
Presentation Logic
Server List
The ui/servers.js file must show the new os property in a separate column.
Also, you should take into account the updated version of the vps type.
Follow these steps.
Update the VPS store to comply with the new version of the
vpstype:var vpsStore = new Store({ apsType: "http://aps-standard.org/samples/starter1p/vps/1.2", target: "/aps/2/resources/" });
In the
columndefinition of theaps/Grid, add the definition of the new “Operating System” column:columns: [{ field: "name", name: "Name" }, { field: "os", name: "Operating System" } ]
This completes the update of the view.
You can compare your file contents with the sample servers.js file.
Server Creation
The ui/server-new.js file must request a customer to select one of operating systems from a list.
Follow these steps to update the script.
In the array of the defined modules, add the
aps/Memorymodule and add the correspondingMemoryattribute to the main callback function:define([..., "aps/Memory", ... ], function(..., Memory, ... )
Create an aps/Memory object and inside it define a list of operating systems that a customer can use for a new VPS:
var oses = new Memory({
   idProperty: "value",
   data: [
      { value: "centos7",      label: "CentOS 7" },
      { value: "windows2012",  label: "Windows 2012 Server" }
   ]
});
Add the new property to the VPS model and define the default value for it as follows:
this.vpsModel = getStateful({
      "aps": {
         "type": "http://aps-standard.org/samples/vpsdemo/vps/1.2"
      },
      "name": "",
      "os": "centos7"
});
Note
Pay attention to the updated version of the
vpstypeIn the widget definition, add one more input aps/Select widget that will allow a customer to select one of operating systems from the selection list. Sync the selected value with the VPS model as follows:
["aps/Select", {
   id: this.genId("srvNew_os"),
   label: "Operating System",
   store: oses,
      value: at(this.vpsModel, "os"),
      required: true
}]
In the
onSubmithandler, update the version of thevpstype:var vpsStore = new Store({ apsType: "http://aps-standard.org/samples/vpsdemo/vps/1.2", target: "/aps/2/resources/" + aps.context.vars.management.aps.id + "/vpses" });
This completes the update of the view.
You can compare your file contents with the sample server-new.js file.
Metadata
To update an APS application on the platform from an APS package, you should increase the package version to make it higher than the version of the current APS application you wish to update. In addition, you must specify in the metadata a range of the old versions that the package can update.
Open the APP-META.xml file in an editor and follow these steps.
Increase the
versionproperty:<version>2.0</version>
Allow upgrade of all previous versions by adding the <upgrade> element just above the first <service> element as explained in the Upgrade Section:
<upgrade match="version=ge=1.0, release=ge=0"/>
Testing
Update the deployment image, build the updated APS package and then use it to update the APS application on the platform as explained in the next sections.
Update Deployment Image
Every time you update the package version, you must create a new image with the updated tag.
If the folder name is project-starter, enter inside it and execute the same commands
you run during the deployment:
Create an image with the tag equal to the new APS package version:
# docker build -f deploy-image/Dockerfile\
 -t platform-docker-repo.ap.int.zone/odin/starter:2.0-0 .
Push the image to the Docker registry:
# docker push platform-docker-repo.ap.int.zone/odin/starter:2.0-0
Build Package
Use one of the methods to build the APS package from the updated projects, for example:
$ aps build project-starter
The name of the output file must reflect the new version, for example:
Simplest_demo_project-2.0-0.app.zip
Update APS Application Instance
In the PCP, use the following actions to update the deployed and provisioned APS application.
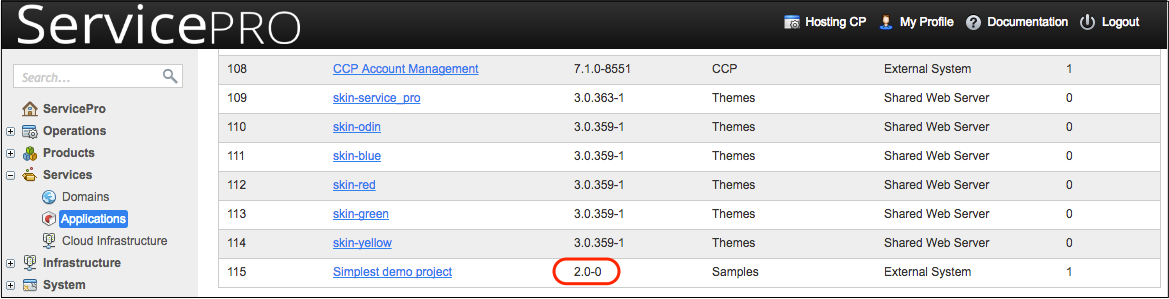
Navigate to Services > Applications.
Click Import Package, select local file, and click Choose File to browse for the updated APS package on your local computer.
Click Submit to complete the import.
In the list of applications, wait for update of the application version to the new one by clicking the refresh icon on top right of the screen.
Open the updated application.
On the Instances tab, select the instance you want to update.
Click Upgrade.
Click the refresh icon on top right of the screen to ensure the application version was successfully updated for the instance.
Test Application
Verify the updates in the customer control panel.
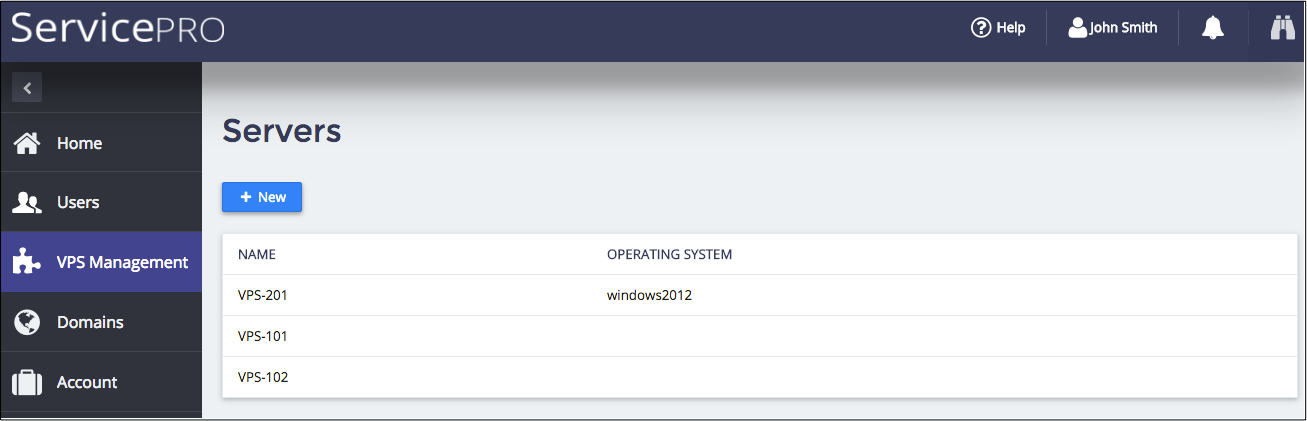
In the list of servers, notice the new OPERATING SYSTEMS column:

Evidently, it must be empty for the servers created before the update.
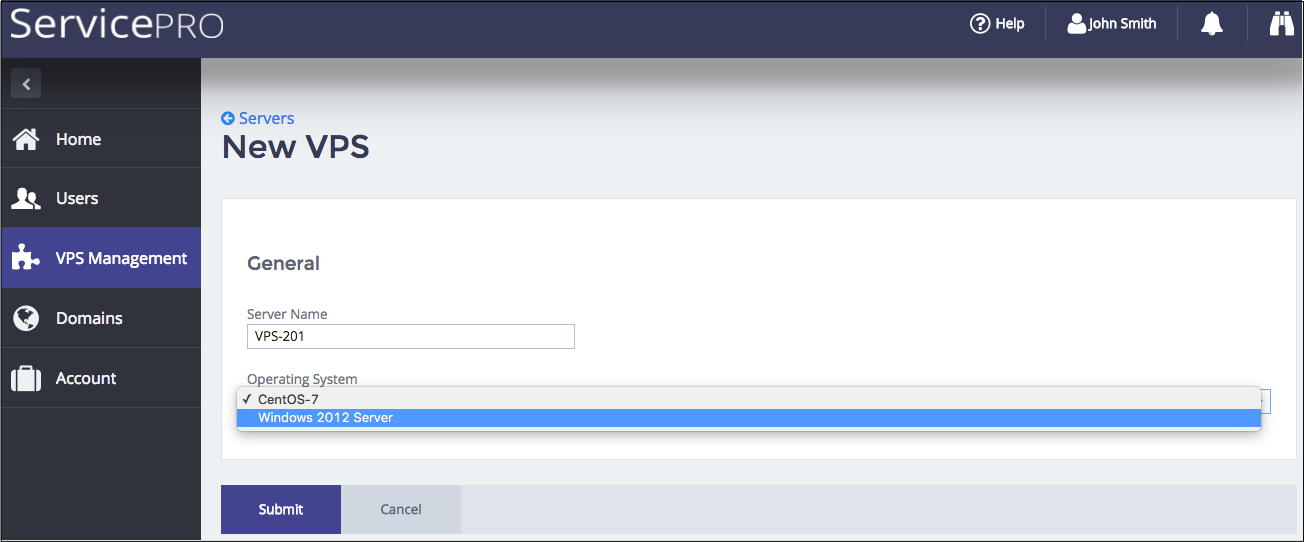
Add a new VPS and select an OS for it:
The list of servers will show the assigned OS for the new VPS:
Conclusion
You went through the main APS application life cycle steps, including the simple project planning, development, deployment, and provisioning. After that, you got skills in the application update process.
If you experienced any issues in the APS application development, or wish to compare your package with a functional package, or for any other test and training reasons, download the sample packages:
The Integration Procedures document provides more complex scenarios illustrating the main integration points of the platform. Most probably, you will find out there some solutions that help you integrate your cloud applications.