CloudBlue Commerce API (DRAFT)
Table Of Contents
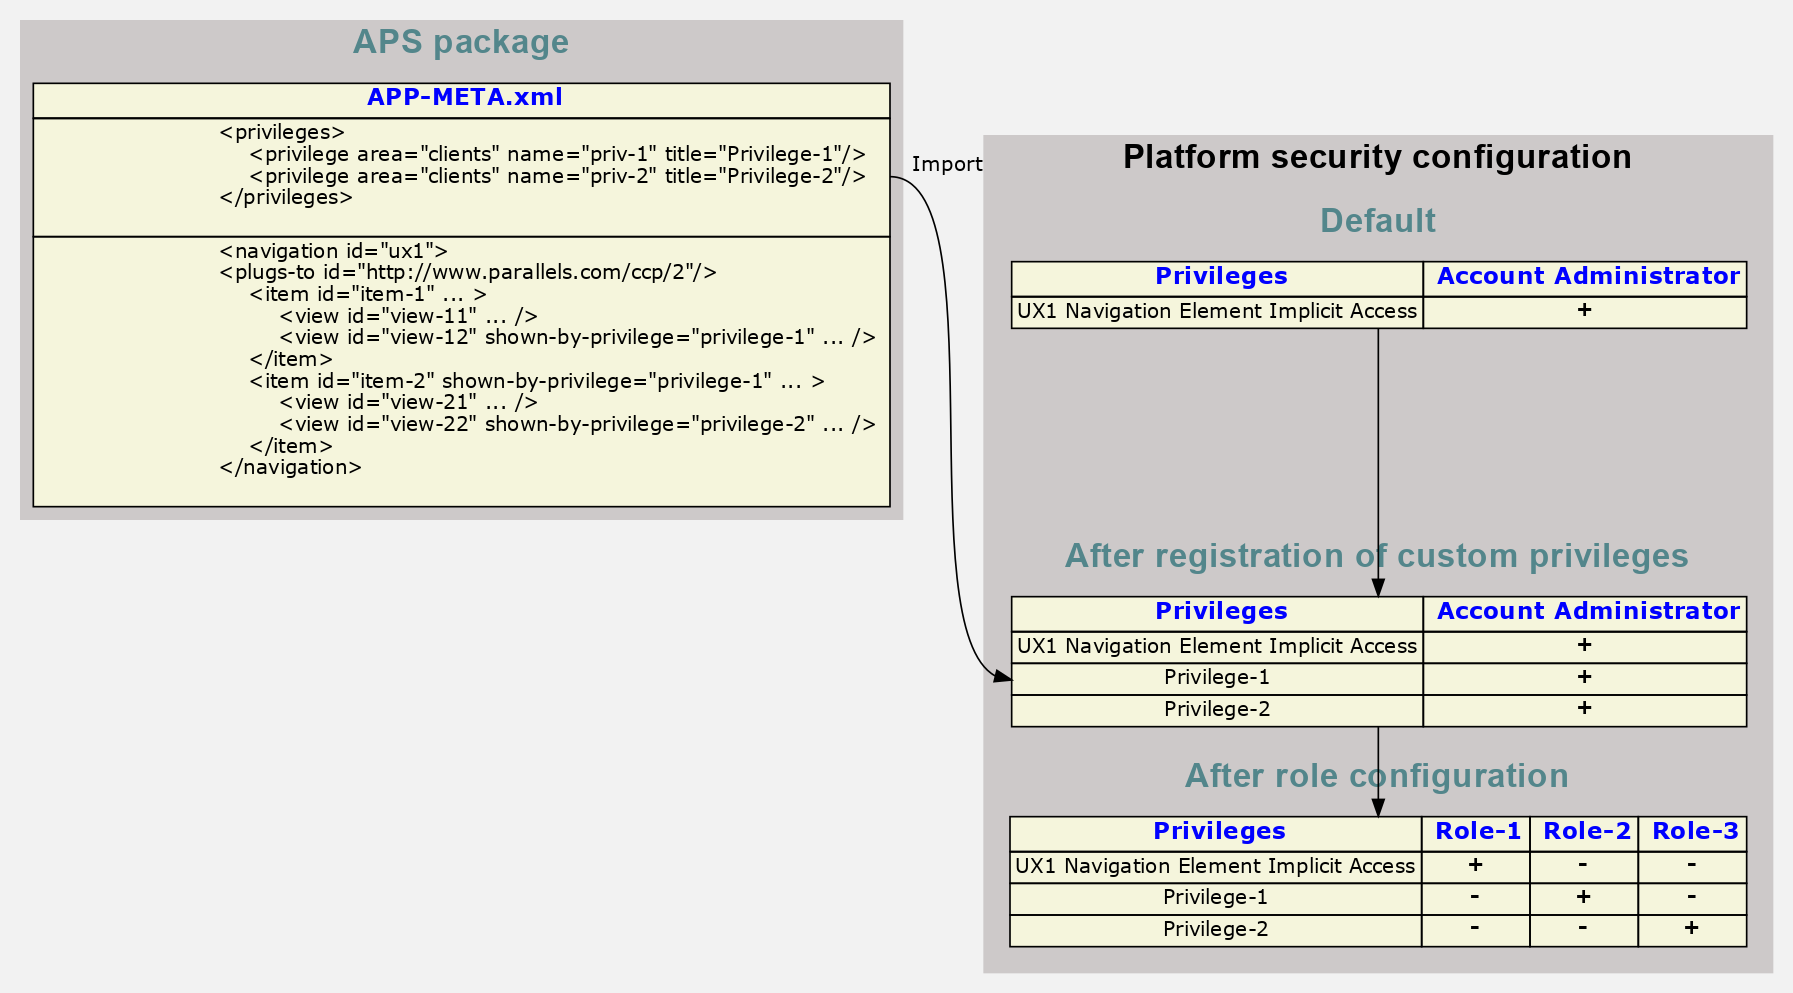
Navigation Element Access Management
The platform provides a security mechanism to regulate access to navigation elements. This enables an application to have its own UI security policy that defines which application UI views and navigation branches to show to a user depending on the security privileges granted to that user.
In this document:
Default Access
When a customer subscribes to an application that does not declare any special access requirements in its navigation elements, the default platform security configuration grants access to all those application navigation elements for any customer’s staff member assigned the built-in Account Administrator role. The following rules make this effective:
There is a built-in UX1 Navigation Element Implicit Access privilege enabled in the default security role Account Administrator of all security areas.
When creating a new staff member in a customer or a reseller with the default Account Administrator role, that staff member is granted the UX1 Navigation Element Implicit Access privilege.
Any UI navigation element that does not have the
shown-by-privilegeattribute is visible to all users who are granted the UX1 Navigation Element Implicit Access privilege.
Similarly to UX1 Navigation Element Implicit Access, the platform also provides the UX1 Notification Implicit Access privilege that defines whether a user receives notifications raised in UX1. This privilege is also enabled by default in all Account Administrator built-in roles.
Configuration
Access to the navigation elements is configured on the application side and then in the platform.
Meta Definition
On the application side, the entire access configuration is declared in the APP-META.xml file using two sections:
The <privileges> section defines new custom privileges that will be added to the list of platform privileges during the application package import.
In the <navigation> section, the application can additionally protect certain views (<view> and <view-plugin> elements) or navigation branches (<item> and <navigation> elements) by adding the
shown-by-privilegeattribute to those elements.
Note
In a navigation branch (<item> or <navigation>), the most restrictive configuration is on top of the branch. This means that a user who is not granted the privilege required by the top element (whether implicitly or explicitly) cannot access any elements in that branch, regardless of other privileges.
Role Configuration
The role configuration is a typical procedure in the platform. Before you start this, you must have a clear understanding of your UI access policy. The platform enables you with various approaches, as in the following two edge examples:
For each navigation access privilege, create a separate role. In that role, only one navigation access privilege is enabled, and all others are disabled. For every user, assign one or more roles depending on the scope of views the user must have access to.
Define all possible view scopes and create a separate role for each. In that role, enable all navigation access privileges that make this scope effective. For every user, assign one of the roles.
Note
When you assign more than one role to a user, the “enabled” privilege value in one role takes precedence over the “disabled” value of the same privilege in another role.
The configuration consists of the following steps:
In the system security settings, select the security area and create a role or identify the role you need to edit. When creating a role, the platform adds all privileges of the area, all set to “disabled”. You must enable the needed privileges explicitly.
For every user, add or delete the roles to comply with your navigation access policy.
Example
To practice setting an access policy, modify one of the sample packages, for example,
Basic Sample Application (download),
to protect one of its navigation elements. In the following procedure, you will explicitly restrict access to the VPS
editor.
Development
Update the APP-META.xml file as follows:
At the bottom of the file, above the closing </application> tag, add the <privileges> section that declares a custom privilege, like this:
<privileges>
   <privilege area="clients" name="cloud-vps-edit" title="Edit cloud VPSes"/>
</privileges>
In the server-edit <view> element, add the
shown-by-privilegeattribute referring to the newly declared privilege:<view id="server-edit" label="Edit VPS" src="ui/server-edit.js" shown-by-privilege="cloud-vps-edit"> <controls> <cancel /> <submit /> </controls> <var type-id="http://aps-standard.org/samples/vpsdemo-access/vps/1.0" name="vps" /> </view>
Build the APS package. Before building the package, ensure that your test platform does not have an imported application with the same application ID. If it does, change the application APS ID, its name, and the APS IDs of all APS types in the package.
Deployment
Import the new APS package to your test platform.
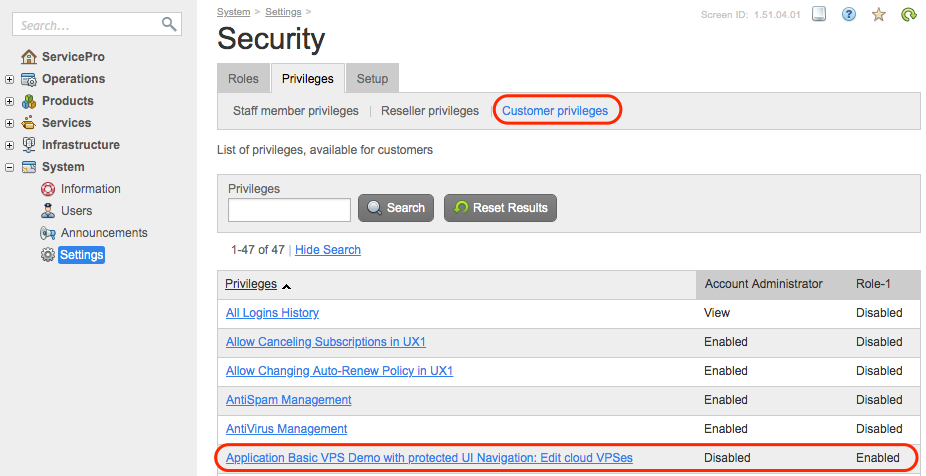
In the provider control panel, navigate to System > Settings, click the Security link, and then, on the Privileges tab, verify that the new custom privilege is in the list.

Switch to the Roles tab, then select the Customer roles sub-tab, and add a role which has the custom privilege Edit cloud VPSes enabled and all other privileges disabled. Then, disable this custom privilege in the Account Administrator role. After this configuration, the list of privileges in the Customer privileges area must look as follows:
Note
This configuration helps us verify that the Account Administration role does not grant access to the VPS editor. To edit a VPS, a staff member will need both roles.
Install the APS application instance and configure a service template and service plan.
Provisioning
Subscribe a customer to the new service plan.
Log in to the UX1 panel as the customer administrator, for example, as jsmith@aps.test.
Using the application custom wizard, create at least one VPS and open the list of VPSes after that:
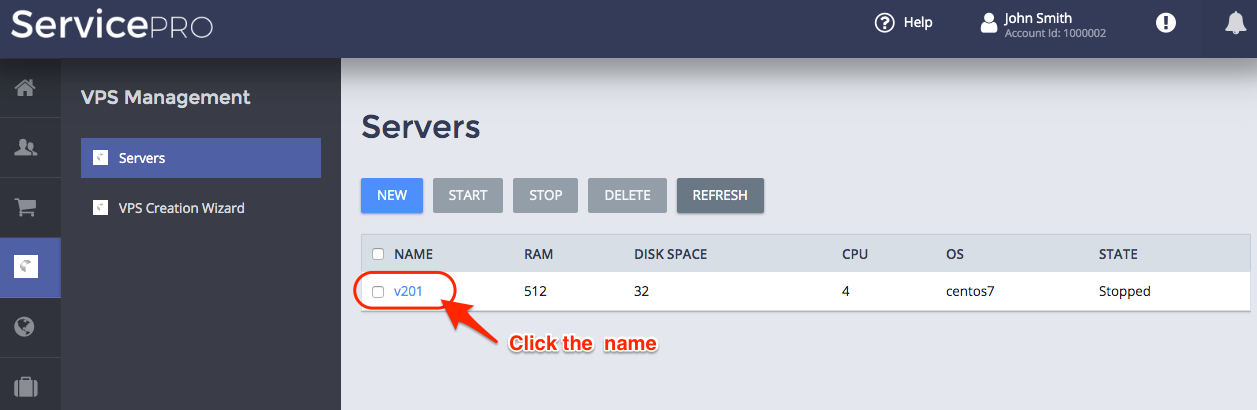
To open the VPS in the editor, click on the VPS name. You will get the “Error 404” message saying that the requested view exists, but cannot be displayed for the user.
In the Users section of UX1, add the Role-1 security role to the user’s profile.

This grants the user the custom privilege that allows the user to access the VPS editor.
To check the changed configuration, log out and log in with the same name. Try to open the VPS again for editing. This time, the editor works fine for the user.
Avoiding the 404 Error
To avoid showing 404 error messages to a user, it is best to hide or disable the elements
that lead to those messages for the current user. For this purpose, the onContext() method in the ui/servers.js
script must be modified in such a way that the link to the protected view (server-edit in our case) be disabled.
In ui/servers.js, access to the server-edit view is allowed by the apsResourceViewId:"server-edit"
assignment in the corresponding grid. The following updated onContext() method changes this grid property to its
default value “” if the user is not granted the privilege to access the server-edit view:
self.grid = this.byId("srv_grid");
self.page = this.byId("apsPageContainer");
if(!aps.apsc.checkPrivilege("http://aps-standard.org/samples/vpsdemo-access#cloud-vps-edit"))
   self.grid.apsResourceViewId="";
self.grid.refresh();
aps.apsc.hideLoading();
This update of the view source avoids the 404 error illustrated earlier. Instead of replacing
the self.grid.apsResourceViewId property with an empty string, you can substitute it with the ID of another
view that explains why the user cannot open the VPS editor.