Configuring Node Resources
When you register a node in the Cloud Infrastructure, the node configuration is read and saved to a special database. The Cloud Infrastructure then uses this information to check whether a node has enough resources to host new virtual servers. The configuration information includes the following:
- CPU power available on the node
- Amount of RAM installed on the node
- Amount of disk space on the node
- Bandwidth rate available to the node
To host more virtual servers on a hardware node, you can allocate more hardware resources than is actually available on the node by increasing the values of the parameters listed above. But be aware that it should be done within reasonable limits.
You can configure the resources that can be seen by the Cloud Infrastructure as available on a node by doing the following:
- Go to Services > Cloud Infrastructure > Virtualization Nodes.
- Click the name of the node whose configuration you want to change.
- Click Make "Inactive" to lock the node, if it is not locked yet.
- In the Node Hardware section, click Configure.
- Enter the desired parameters in the fields and click Ok.
- Click Make "Active" to unlock the node.
Virtual CPU Configuration Specifics
CPUs of a virtual machine are called virtual CPUs (vCPUs). When customers create new virtual servers or change the configuration of the existing ones, they define how many virtual CPUs they need and at what frequency these CPUs should work.
Follow the guidelines below when deciding on how many physical CPUs your server should have:
- The number of vCPUs in a virtual server cannot exceed the number of physical CPU cores installed on the node. So if a node has 16 physical CPU cores, customers will not be able to assign more than 16 vCPUs to their virtual servers.
Note: The maximum number of vCPUs a virtual machine can have cannot exceed 32 even if a node has more than 32 CPU cores installed.
- The total frequency of all vCPUs in all virtual servers cannot exceed the total frequency of physical CPUs on the node. So if a node has 16 physical CPU cores, 3 GHz each, the total CPU frequency equals 48 GHz. This, for example, allows your customers to create
- 48 servers, each having one 1 GHz virtual CPU, or
- 16 servers, each having one 3 GHz virtual CPU, or
- 16 servers with 3 virtual CPUs, 1 GHz each
- If necessary, you can overcommit a node by selling more CPU power than is really available on it, for example, when you are sure that customers will not use all CPU power allocated to their virtual servers. To do this, increase the total CPU power in the node configuration.
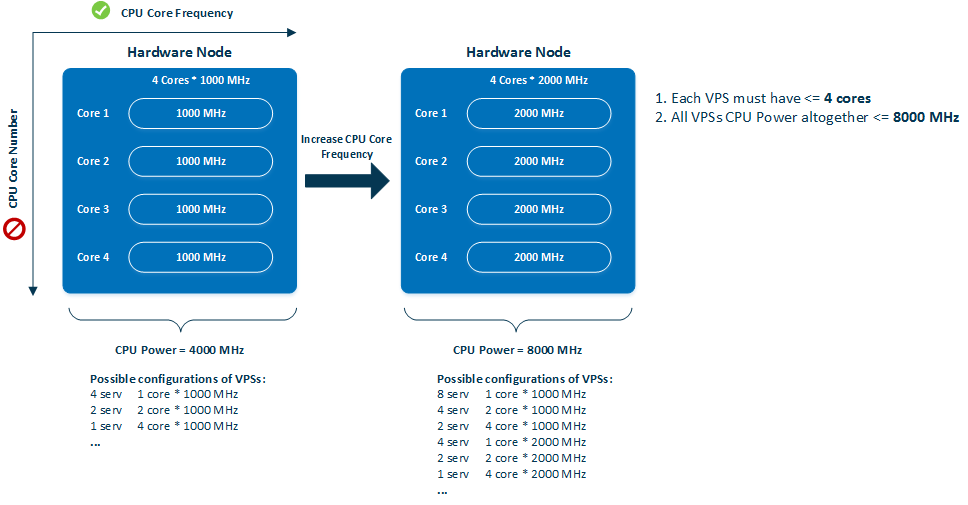
Increasing Total CPU Power (Overcommitting the Hardware Node CPU Power) Example
Let's consider an example how we can overcommit a virtualization node CPU Power. You can use overcommitting for provisioning more virtual servers on the virtualization node. We have a hardware node with the following parameters of CPU: total CPU Power is 4000 MHz, CPU Core Number is 4 cores, CPU Core Frequency is 1000 MHz. We want to increase CPU Power from 4000 MHz to 8000 MHz to suggest our customers more virtual servers. We can increase CPU Core Frequency from 1000 MHz to 2000 MHz, so the total CPU Power will increase to 8000 MHz. The CPU Core Number can't be increased. The following scheme shows the possible VPS configurations that we can get as a result of increasing CPU Power.
Disk Space Configuration
Cloud Infrastructure Automation considers provisioned subscription limits as the disk space usage rather than actual disk space usage at the moment though it may happen that the allocated disk space is not actually fully used. This mechanism ensures that a customer will always get all resource amount that was paid.
As a provider you may configure overselling of the disk space resource but it can be risky in case of unproper monitoring of free disk space while the node runs out of space. It may lead to the following failures: failed provisioning, guest OS errors, customers application/sites will stop running and will be not able to write logs, data to database and so on.
To oversell the disk space resource, do the following:
- Estimate average diskspace consumption rate before changing the hardware node capacities to avoid possible issues in case of running out of free physical disk space (using any 3rd party tools).
- Mark a virtualization node as Inactive.
- Click Configure in the Node Hardware section of virtualization node, then increase Disk Space to the desired value which should be figured out at step 1.
- Continuously monitor free capacities using any 3rd party, host OS tools.
- In advance, when still enough space is left on hardware node for the existing VMs to grow, mark the node as Inactive in Cloud Infrastructure Automation.