CloudCheckr and AWS Management Console
Preparing Your AWS Organization
In order to use your AWS Master Partner account with AWS Distribution Consolidated with CloudCheckr (2-Tier), it is required to create an AWS Organization and to enable all features for this organization.
Note: This step is only necessary the first time you need to configure the AWS Master Partner Account in order to make it work with the AWS Distribution Consolidated with CloudCheckr (2-Tier) package.
Important: The customer's name in AWS will have the following format: Connect_Asset_ID + CBC_Account_ID + CBC_Account_Name. However, it is important to note that the account name in CloudBlue Commerce may only contain alphanumeric characters and the following special characters: ().,-&_: If the account name in CBC contains letters with special characters different from the ones specified (for example, letters with accents), such letters will not be displayed in AWS.
Create AWS Organization
-
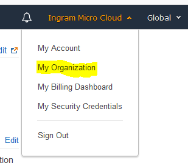
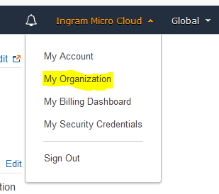
Log in to the AWS Management Console and click My Organization.
- On the introduction page, choose Create organization.
- Enable all features for the AWS Organization.
-
Confirm the creation.
Note: Please refer to AWS Organizations documentation for more information.
Enable All Features in Existing AWS Organization
If you already have an AWS Organization created and you want to provision, suspend or unprovision policies in the application settings, it will be necessary to verify that it has all features enabled. To do it, please follow these steps:
-
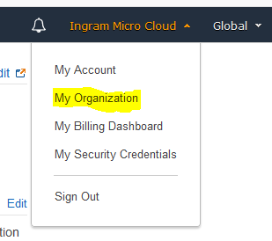
Log in to the AWS Management Console and click My Organization.

- On the top-right side, select Settings.
- Click Begin process to enable all features.
-
Confirm the action.
Note: Please refer to the AWS Organizations documentation for more information.
Verify your master account email address
Before you can invite existing AWS accounts to join your organization, you must verify your email address.
Note: Please refer to the AWS Organizations documentation for more information.
To do so, please follow these steps:
-
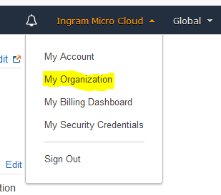
Log in to the AWS Management Console and click My Organization.
- On the top-left side, click Send verification request.
- Verify your email address within 24 hours.
Enable Service Control Policy Type for Organization’s Root
In case you want to provision, suspend or unprovision policies in the application settings, it is important to make sure that Service Control Policy type is enabled on the AWS Organization’s root. To do so, please follow these steps:
-
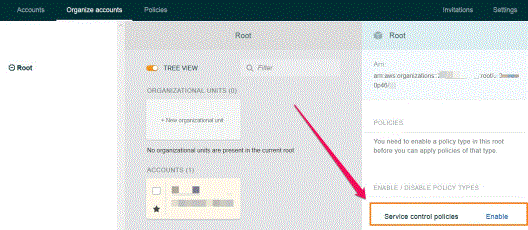
Log in to the AWS Management Console and click My Organization.
- On the top-right hand side, choose Organize accounts.
- Click Root to open the organization’s root object.
-
Click Enable under the ENABLE / DISABLE POLICY TYPES section.
How to create Service Control Policy inside the AWS Organization
An AWS Organization provides a way to apply specific Service Control Policies on the organization level to the organization members. To create a new Organization’s Service Control Policy, please follow these steps:
-
Log in to the AWS Management Console and click My Organization.
- Select Policies in the tab bar.
- Click Create policy.
- Configure the access restrictions as required.
-
Click Create policy to complete the action.
Note: Please refer to the AWS documentation for detailed information on how to configure policies in the AWS Organizations Management Console.
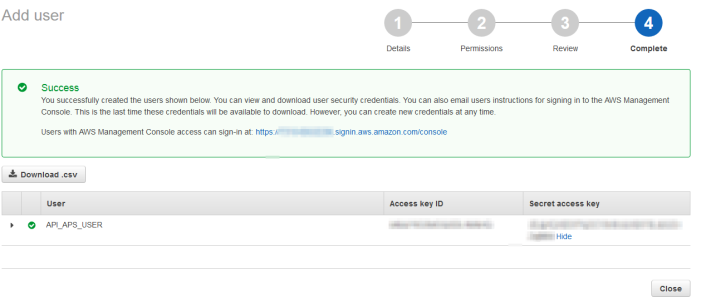
How to Obtain an AWS Access Key ID and a Secret Access Key
When configuring AWS settings and credentials, you will be asked to provide an AWS Access Key ID and a Secret Access Key. In this section, you will find the steps to obtain this information:
-
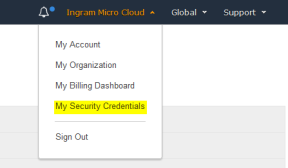
Log in to the AWS Management Console and click My Security Credentials.
-
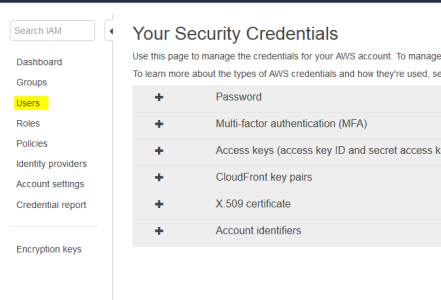
Click Users.
-
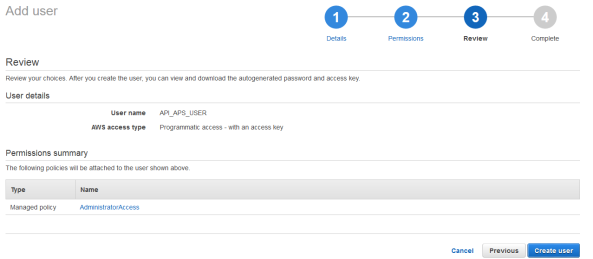
Click Add User, enter the user name "API APS USER" and select the Programmatic access checkbox.

-
Now set administrator access permissions for the user that you have just created. To do this, select the AdministratorAccess checkbox.

-
Now, review the options you selected and click Create User.
-
Copy the Access Key ID and the Secret Access key for the user you have created and paste this information into the AWS API Access Key and AWS API Access Key Secret fields when configuring the settings and credentials for Resellers L2 under Reseller L1.
Preparing Your CloudCheckr Master Partner
About CloudCheckr
CloudCheckr is a multi-cloud management platform that enables enterprises and distributors to save money, reduce risk and ensure governance at scale. The CloudCheckr CMP offers a single pane of glass view to help modern enterprises to manage and optimize their public cloud. DevOps, SecOps, and FinOps teams from hundreds of global enterprises and distributors rely on CloudCheckr to manage their Azure, AWS and Google Cloud investments to quickly optimize spend, eliminate waste and improve security and compliance throughout their cloud journey.
Note: Please be aware that it may take about 24 hours for the newly provisioned CloudCheckr account until all of the statuses and corresponding IDs propagate on CloudCheckr side and it is visible in the user interface.
Please refer to the https://cloudcheckr.com/ for more information.
Important: The customer's name in CloudCheckr will have the following format: Connect_Asset_ID + CBC_Account_ID + CBC_Account_Name. However, it is important to note that the account name in CloudBlue Commerce may only contain alphanumeric characters and the following special characters: ().,-&: If the account name in CBC contains letters with special characters different from the ones specified (for example, letters with accents), such letters will not be displayed in CloudCheckr.
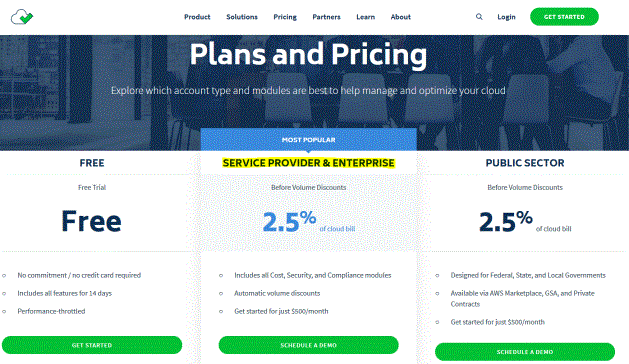
Which CloudCheckr Plan to select
More information about available CloudCheckr plans is at https://cloudcheckr.com/pricing/. It is required to select the SERVICE PROVIDER & ENTERPRISE plan.
Understanding the Best Practices Report
Once you have your Distributor’s access to CloudCheckr, one the first things which you might see after logging in and opening your AWS Master Payer project is the best practices report. For example:
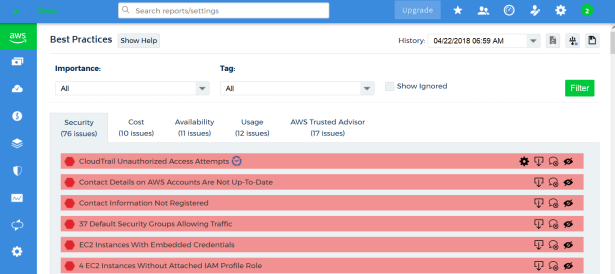
Please refer to the CloudCheckr documentation for further information on how to interpret the data presented in this report:
- https://support.cloudcheckr.com/reports/best-practice-report/using-cloudcheckr-to-check-aws-account-for-best-practices/
- https://support.cloudcheckr.com/reports/best-practice-report/hundreds-of-best-practice-checks-covering-security-availability-cost-and-usage/
- https://support.cloudcheckr.com/reports/best-practice-report/
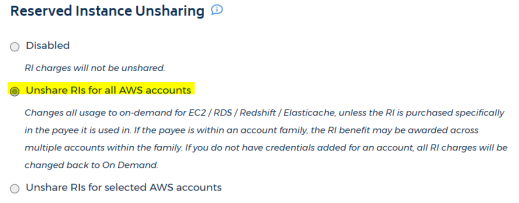
Configuring Reserved Instances Unsharing
To make CloudCheckr properly calculate the AWS Reserved Instances benefits distribution, it is recommended to change the Reserved Instances Unsharing under Master Partner. This is a one-time step. Please follow these steps:
-
Log in to CloudCheckr as a Master Partner and click on your Master Payer account.
- Navigate to Cost > AWS Partner Tools > Configure > Configure Custom Cost.
-
Under the Reserved Instance Unsharing section, select Unshare RIs for all AWS accounts.
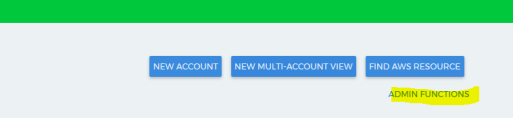
Creating a CloudCheckr New Access Key
When configuring AWS settings and credentials, you will be asked to provide a CloudCheckr API Access key. In this section, you will find the steps that you will need to follow to obtain this information:
-
Log in to CloudCheckr as a Master Partner and click Admin Functions.
-
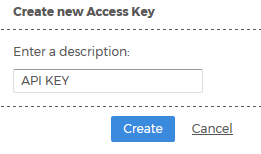
Click Admin API Keys > New Admin Access Key.

-
Enter a description and click Create. The API access key will be automatically generated and displayed on the screen. Copy this key and paste it into the CloudCheckr API Access Key field when configuring settings for AWS Reseller L2 under Reseller L1.
Moving from Access Keys to CloudCheckr CMx Access Tokens to manage existing API calls
The AWS Distribution Consolidated with CloudCheckr (2-Tier) can now be configured to move from using Access Keys to CloudCheckr CMx Access Tokens in order to manage existing CloudCheckr API calls.
The values for the ccApiMasterClientIdCmx and ccApiMasterSecretCmx parameters must be created by Distributors in order to implement this. For more information on this topic and steps that need to be followed to create these parameter values, please view the CloudChekr resource on how to "Use CloudCheckr CMx Access Tokens to Manage Existing API Calls".
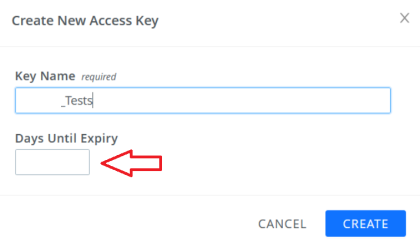
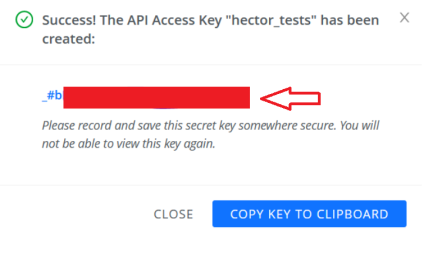
Important:Please remember that while creating the Access Key, it is highly recommended to not set any value for the field "Days Until Expiry" as shown below. Otherwise, once the Access Key expires, you will need to create another one and configure it again on the Connect platform.
The ccApiMasterClientIdCmx is the client ID created on CloudCheckr, as shown below:
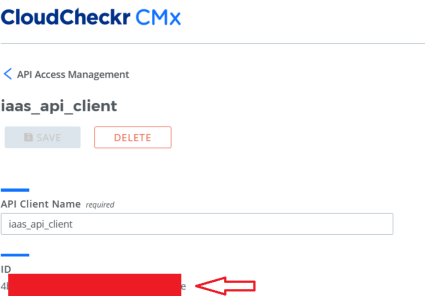
The ccApiMasterSecretCmx is the ID value from the created Access Key.
Important:Be careful when copying this because you only have once chance to copy the value.
The ccApiMasterSecretCmx parameter value needs to be encrypted when being entered in Connect, and must be encrypted by using the public key as shown below. Use the following command to encrypt API Master Secret with the provided public key:
echo -n $TOKEN_PLAIN_TEXT | openssl rsautl -encrypt -pubin -inkey pbkey.pem | base64
The resulting value is a base64 string which you must use along with the private/public key pair version to construct a string with the following format:
keyVersion:ApiMasterSecretEncryptedWithPublic
For example:
key_v1:{encrypted secret}
Finally, use the resulting string to configure the ccApiMasterSecretCmx parameter.

Increasing API timeout for get_invoice_v2 call
The AWS Distribution Consolidated with CloudCheckr (2-Tier) package uses the get_invoice_v2 API call to collect invoices and month-to-data information from CloudCheckr. At some point, the amount of data under your master payer, which CloudCheckr needs to process, becomes so large that the get_invoice_v2 API call returns a timeout (according to our observations, the default timeout is 5 minutes). It is recommended to contact CloudCheckr via https://support.cloudcheckr.com/help/contact-us/ and request the timeout for get_invoice_v2 API call to be increased for your Master Payer AWS ID up to at least 15 minutes.
Allowing AWS Credits to be Sent to the Reseller
Once the asset for the reseller has been provisioned successfully, it is necessary to configure CloudCheckr to send AWS Credits to the reseller. To do this, complete the steps below:
-
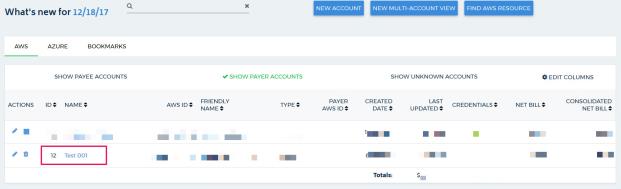
Log in to CloudCheckr as a PartnerSysAdmin and find the project ID specified in the
ccPartnerProjectIDparameter. For example: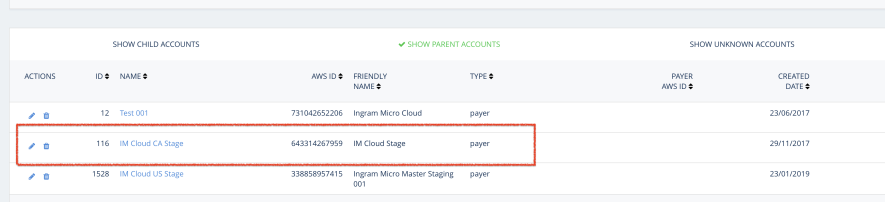
- Once opened, go to Cost > AWS Partner Tools > Configure > Account Families.
-
Find the account family of the reseller in the list and click on it.
Note: The account family of the reseller will have the AWS ID in its name.
- Select the Send AWS Credits to Reseller checkbox and click Save.