Table Of Contents
Application Packaging Standard
Last updated 18-Mar-2019Custom Operations
In this document:
Definition
It is possible to perform various custom operations beyond the standard CRUD (create, read, update, and delete) set of operations. The conventions on calling custom operations are defined in the Custom Operations section of the Type Definition document.
If an initiator needs to run an {operation} exposed by an application service on /{service-id}, it must send the REST request to /aps/2/resources/{resource-id}/{operation}, where {resource-id} is the ID of the resource that must be processed by the application service. APS controller will forward the request to /{service-id}/{resource-id}/{operation} to make the application apply the custom operation to the resource.
| APS Controller endpoint | APS application endpoint |
|---|---|
| /aps/2/resources/{resource-id}/{operation} | /{service-id}/{resource-id}/{operation} |
In the following example, the custom start operations is declared in the VPS schema as follows:
"start": {
   "verb": "GET",
   "path": "/start",
   "response": {
     "contentType": "application/json",
     "type": "string",
     "items": null
   },
   "access": {
     "referrer": true
   }
}
It means, the vpses service will expect a GET request with the start suffix in the URI.
APS controller works as a proxy for all custom calls to the API of a service. If the VPS resource ID is 01c6ab47-9715-430d-817e-89eff8c3112f, the initial request addressed to the APS controller and the request forwarded to the application endpoint look as follows:
GET /aps/2/resources/01c6ab47-9715-430d-817e-89eff8c3112f/start
GET /vpses/01c6ab47-9715-430d-817e-89eff8c3112f/start
For both requests, the response code in case of success is “HTTP/1.1 200 OK”.
Since the response contentType is defined as “application/json”, the function must return either an empty string, or a string in the JSON format.
Execution
Overview
Not all services are able to guarantee reasonable timings of processing requests. When an application operates a request with a very short delay (real time processing, usually not longer than several seconds), the APS controller can wait for the completion of the operation and then return its response to the initiator of the operation immediately.
However, sometimes, it may require several hours or so, especially when manual operations are involved. When this happens, the APS controller should not wait for the completion of the request. Instead, it must be aware that the application started the operation and must complete it in a certain period of time. This information must be forwarded to the initiator of the operation immediately. Once the time-out passed, the controller would request the application for the operation status again and repeat it until it is completed or failed. We will call it asynchronous execution of an operation.
APS proposes two different ways of synchronizing a resource operation: synchronous and asynchronous. The APS controller explicitly specifies it in the APS-Request-Phase header of a REST request assigning respectively sync or async to it.
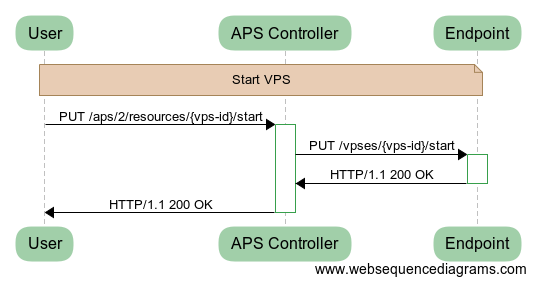
Synchronous Execution
By default, the APS controller calls an operation using the APS-Request-Phase:sync header.
If the application executes it synchronously, as requested, it returns a response code,
different from 202 Accepted, as illustrated in the following diagram.
Asynchronous Execution
If the application considers a requested operation as long-running, it can require the APS controller to switch to the asynchronous execution as explained here.
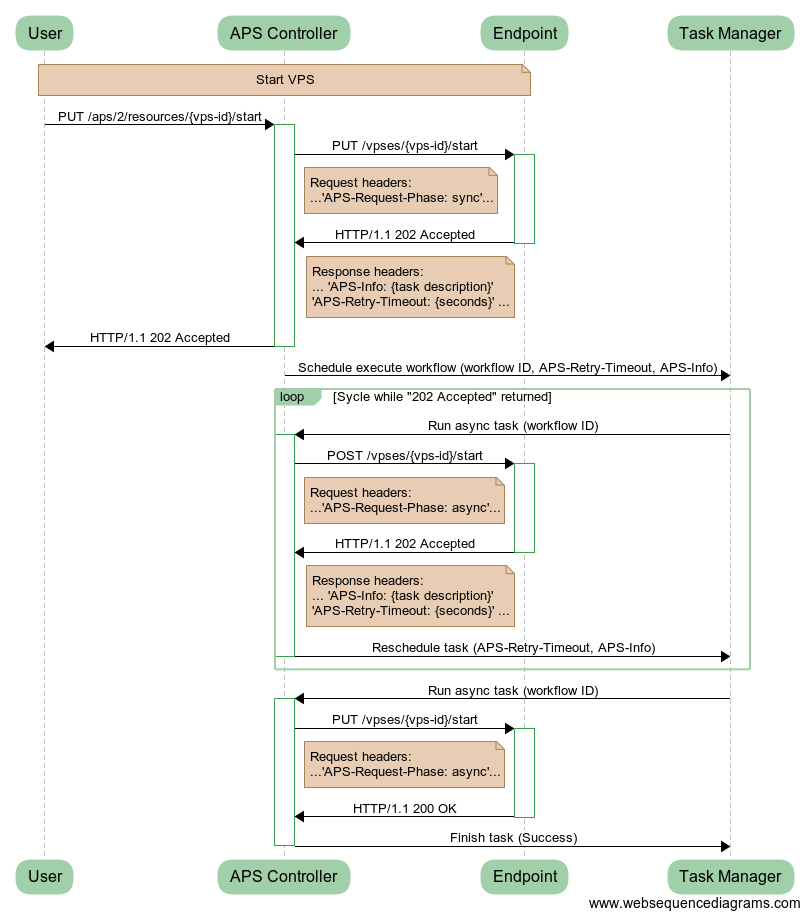
- A user starts a custom operation that might require async execution.
- As usually, the APS controller calls the needed operation using the
APS-Request-Phase:syncheader. - The application returns the 202 Accepted code meaning the operation has started and the APS controller should switch to the async phase.
- The APS controller schedules a task on the hosting platform that must wake up the APS controller for calling the operation again.
- The first time, the hosting platform triggers the scheduled task immediately, which makes the APS controller
to call the operation using the
APS-Request-Phase:asyncheader. - Since the application, most probably, has not completed the operation yet, it returns
the same 202 Accepted code with the following headers:
- The APS-Retry-Timeout header requires the APS controller to call the same operation
not earlier than in time specified by the header. For example,
APS-Retry-Timeout:30means, the timeout should be 30 s. - The APS-Info header carries a message that must be displayed in the task log.
- The APS-Retry-Timeout header requires the APS controller to call the same operation
not earlier than in time specified by the header. For example,
- The APS controller reschedules the same task that must awake the APS controller in the required time to call the operation again.
- Once the task awakes the APS controller, the latter calls the operation using the
APS-Request-Phase:asyncheader.
This cycles until the application returns a code different from 202 Accepted, but not longer than 1 day. Once the APS controller PUTs such a response, it completes the task with the respective return code.
In the following example, the APS controller called the same custom operation three times until the application executed it successfully.

Note
To identify one sync/async process (consisting of many requests) from others, the APS controller assigns a unique ID to the process and sends the same APS-Request-ID:{UUID} header in each sync/async request of the process until the controller and application accomplish the process as demonstrated above.
Implementation in PHP Runtime
In most cases, an APS application endpoint runs in the PHP runtime environment that considerably helps to implement sync and async execution of an operation, no matter CRUD or custom:
When the PHP runtime environment processes a request for an operation with header
APS-Request-Phase:sync, it calls the required method by its name. For example, if it gets the request GET /vpscloud/vpses/{vps-id}/start, it calls the method using the name of the operation whosepathis /start. In accordance with examples above, the method name is start.When the PHP runtime environment processes a call of an operation with header
APS-Request-Phase:async, it calls the method whose name consists of the required operation name with the Async suffix. For example, when it gets the request GET /vpscloud/vpses/{vps-id}/start, it calls the method named as startAsync if the operation name is start.Note
This means, you need to define a pair of methods for an operation, one for the sync execution and the other for the async execution. The name of the latter must have the Async suffix.
PHP runtime library provides a method to throw an exception that makes the PHP runtime environment return the 202 Accepted code. Its systax looks as follows:
throw new \Rest\Accepted($this, {APS-Info header}, {APS-Retry-Timeout header});
When the following sample code runs, the APS controller will receive the 202 Accepted return code and APS-Info:Starting VPS and APS-Retry-Timeout:30 headers:
throw new \Rest\Accepted($this, "Starting VPS", 30)
Walkthrough
Following this demo, you will modify custom start VPS and stop VPS custom operations in a demo APS application to test their async execution.
Let us suppose these two custom operations are defined in the scripts/vpses.php file.
To simulate an application behavior, let us require the async execution several times by adding the retry
counter property. All you need is to modify the vps class definition in scripts/vpses.php as follows.
Add the
retryproperty to the class:/** * @type("integer") * @title("Counter for async operations") * @description("Counts number of retries in the Async operations") */ public $retry;
Update the existing custom operations to make them force the async execution:
// Custom sync function called on pressing the *Start* button in custom UI:
/**
 * @verb(PUT)
 * @path("/start")
 * @return(string,text/json)
 */
 public function start() {
   $this->state = 'Starting';
   $this->retry = 0;
   $apsc = \APS\Request::getController();
   $apsc->updateResource($this);
   throw new \Rest\Accepted($this, "Starting VPS", 30); // Return code - 202 Accepted
 }

// Custom sync function called on pressing *Stop* button in custom UI:
/**
* @verb(PUT)
* @path("/stop")
* @return(string,text/json)
*/
public function stop() {
   $this->state = 'Stopping';
   $this->retry = 0;
   $apsc = \APS\Request::getController();
   $apsc->updateResource($this);
   throw new \Rest\Accepted($this, "Stopping VPS", 30); // Return code - 202 Accepted
}
Add the methods responsible for the async execution of the respective custom operations.
// Custom async function of the *start* operation invoked through Task Manager:
public function startAsync() {
   if($this->retry++ < 2) {
      \APS\Logger::get()->info("Retry count: ".$this->retry);
      $apsc = \APS\Request::getController();
      $apsc->updateResource($this);
      throw new \Rest\Accepted($this, "Starting VPS", 30); // Return code - 202 Accepted
   }
   $this->state = 'Running';
   $apsc = \APS\Request::getController();
   $apsc->updateResource($this);
}

// Custom async function of the *stop* operation invoked through Task Manager:
public function stopAsync() {
   if($this->retry++ < 2) {
      \APS\Logger::get()->info("Retry count: ".$this->retry);
      $apsc = \APS\Request::getController();
      $apsc->updateResource($this);
      throw new \Rest\Accepted($this, "Starting VPS", 30); // Return code - 202 Accepted
   }
   $this->state = 'Stopped';
   $apsc = \APS\Request::getController();
   $apsc->updateResource($this);
}
Once you modified the script, proceed with the Deployment and Provisioning steps. When you test the user control panel, verify if the custom start and stop operations are executed in the async mode, that is:
- When you start a VPS, it will first show the intermediate Starting state, and then in a minute will change it to Running. You need to refresh the grid to notice it.
- In the provider control panel, navigate to Operations > Tasks to ensure the task log shows the respective task scheduled 3 times.