Important:
- Performing an Odin Automation database pre-check is a mandatory manual procedure, which is not launched automatically during an upgrade of an Odin Automation installation.
- An Odin Automation database pre-check must be performed by each customer before upgrading an Odin Automation installation.
- An archive file, which includes logs and reports, automatically generated by the Odin Automation database pre-check must be attached to each post-upgrade issue when a customer contacts the support team.
Before upgrading Odin Automation Premium 7.4 or later to 8.3, you need to make sure that your OSS and BSS databases of a current Odin Automation installation can be upgraded. We provide a special utility which lists errors to be fixed on your current Odin Automation installation. Note that this tool will not fix these errors.
Ensure you launch the database pre-check procedure in advance, as it can take a substantial amount of time for your installation to be ready to upgrade.
To perform the database pre-check, do the following:
- Prepare a Docker Host node according to Database Pre-check Requirements.
- Prepare input data according to Database Pre-check Input Data and put it to the
/opt/db_precheck_datadirectory on the Docker Host node.Note: Use the
--precheck-data-dir <PATH>parameter to specify a custom location for input data. - Download the pre-check archive from https://download.automation.odin.com/oa/db_precheck/precheck-latest.tar and extract all files from the archive to any directory on the Docker Host node.
- Run this command:
python db_precheck.py
Note: If you use a proxy server, ensure that your proxy server is configured correctly to be used by the Docker service. For additional information, refer to the Docker documentation: Control Docker with systemd.
- The database pre-check script may return various errors which must be fixed before beginning the upgrade process.
- When the database pre-check is finished, it shows the location of the
db_precheck.tgzarchive file, which includes logs and reports, in the/var/log/padirectory on the Docker Host node. The archive file contains all errors found by the utility and a summary report in thedb_precheck_report.jsonfile. - If the database pre-check script finds errors and shows them in the summary report, please refer to the KB article: https://kb.cloudblue.com/134312. If this KB article does not help you, please send the
db_precheck.tgzfile to the support team to investigate before upgrading Odin Automation Premium.
Database Pre-check Requirements
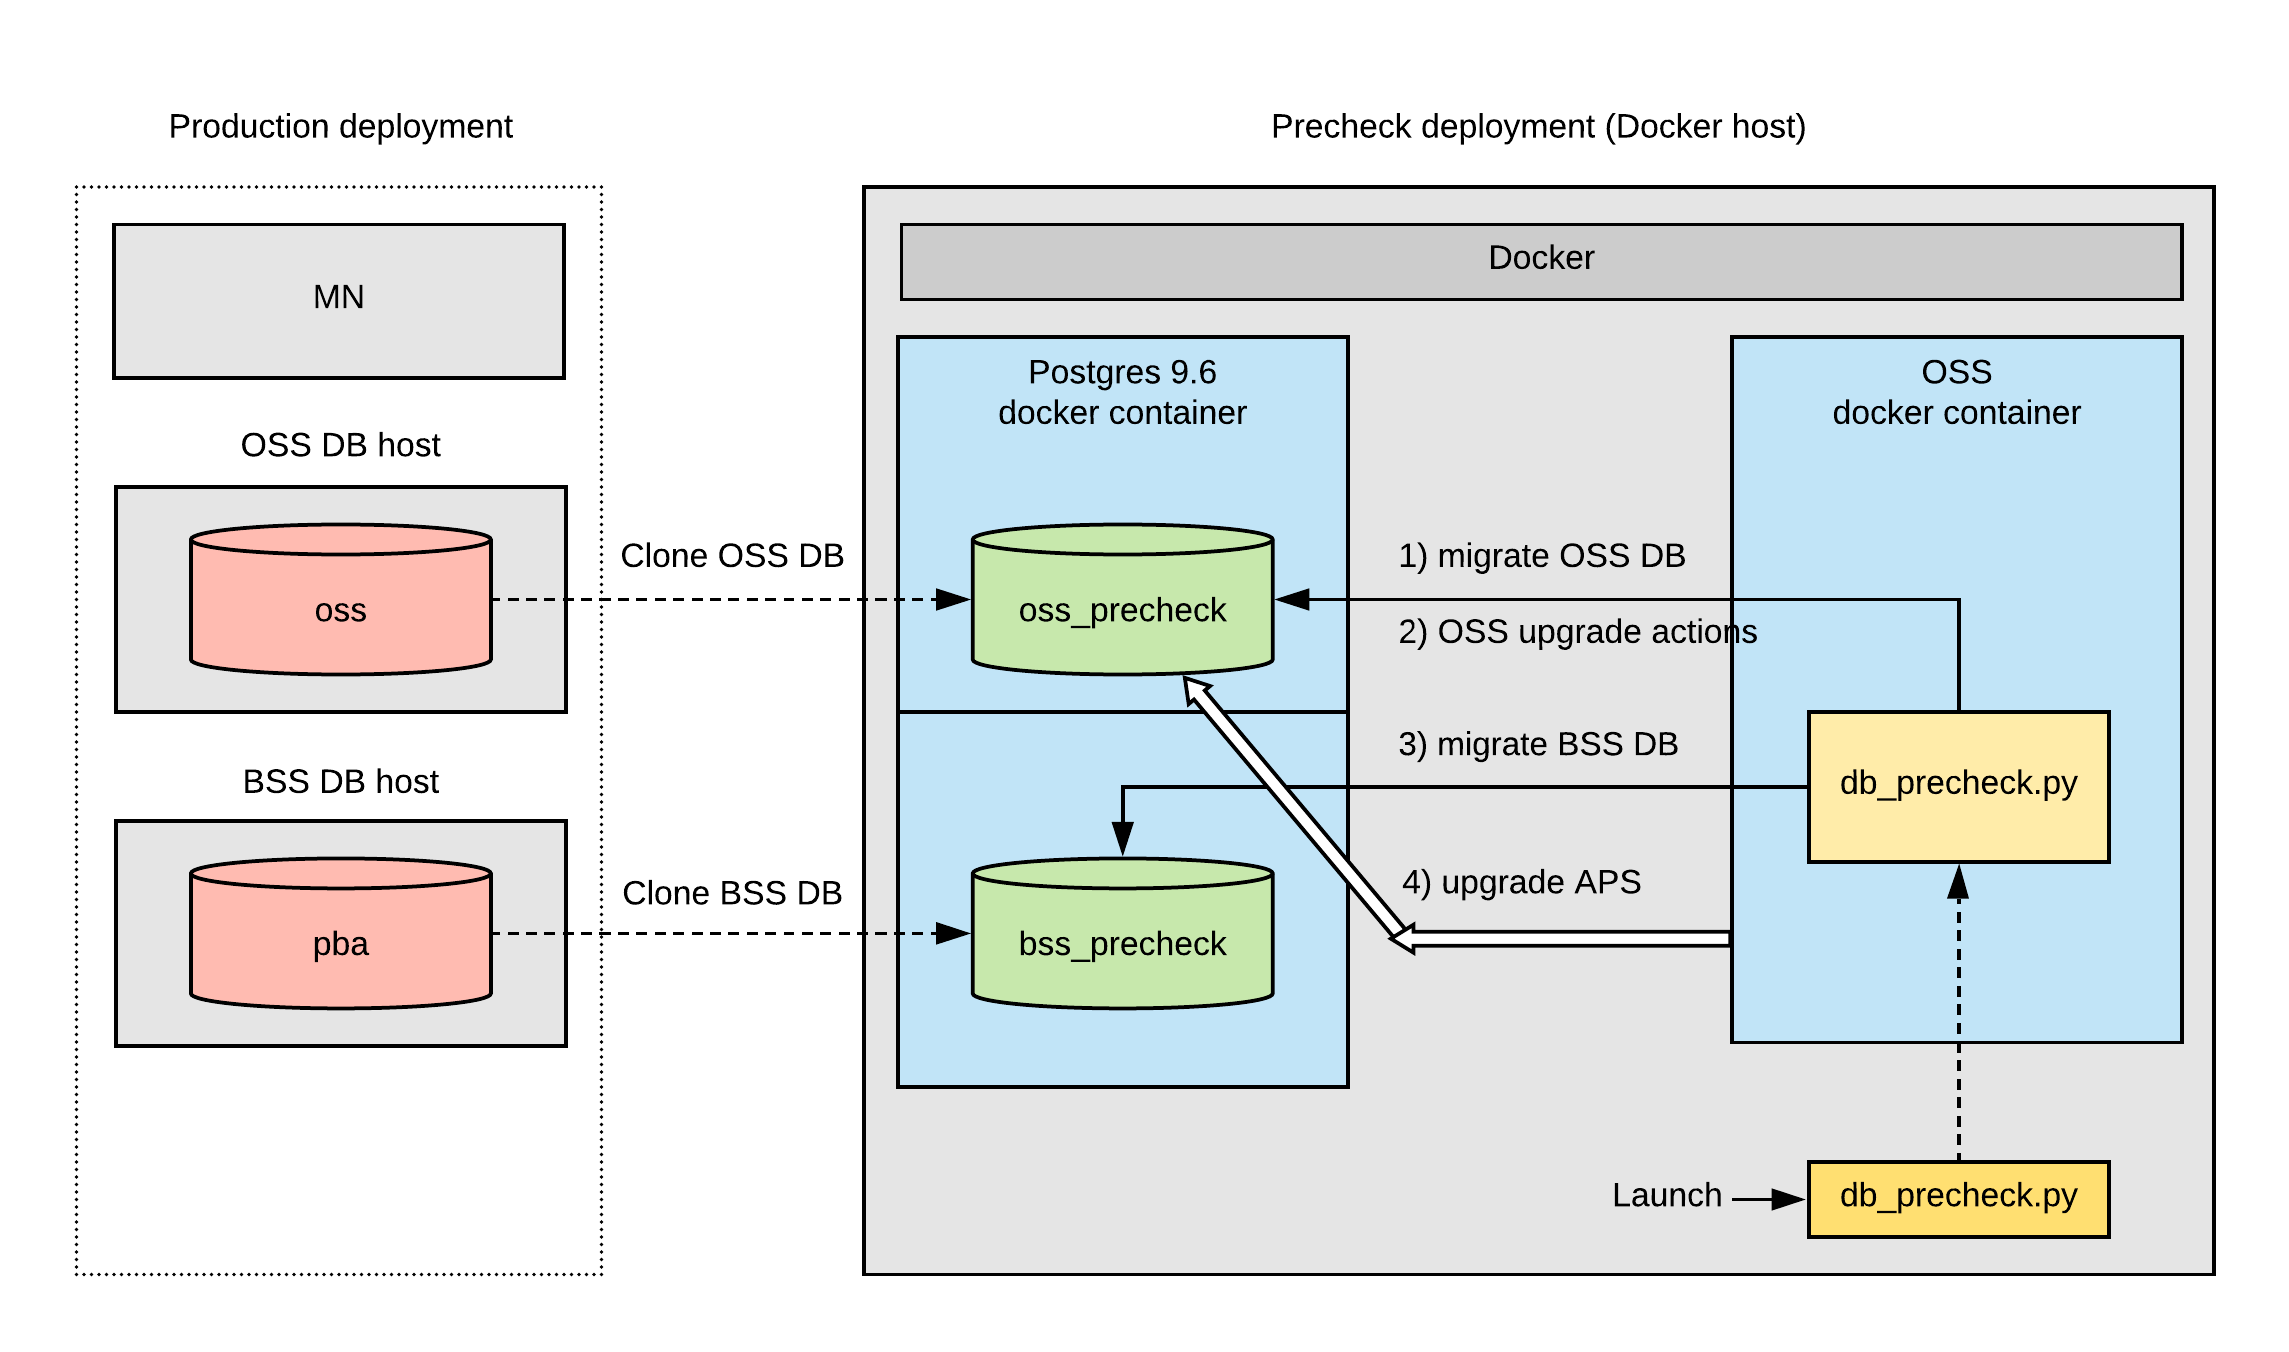
According to the working model of the database pre-check tool (see Database Pre-check Model), one VM node with Docker (Docker Host node) and access to internet is required outside a production network. Internet access is required to download Docker images from repositories to use in the pre-check model.
Note: The database pre-check tool uses iptables to isolate the database checking process from the external environment. Also, the database pre-check tool uses special names for databases clones:
- oss_precheck for the OSS database clone
- bss_precheck for the BSS database clone
The Docker Host node OS requirements are:
- CentOS 7.4 (x64)
- RHEL 7.4 (x64)
The Docker Host node software requirements are:
- Python 2.7
- Docker 17.0.7 (or later); please refer to the Docker documentation for more details.
- iptables
The Docker Host node hardware minimum requirements are:
- CPU: 4 core or more (with 2.4 GHz or higher)
- RAM: 16 GB or more
- Disk: 1 TB or more
Note: The disk must be capable of storing OSS and BSS databases with their dumps.
The Docker Host node hardware maximal requirements are:
Database Pre-check Model
Database Pre-check Input Data
Important:
- All files in the input data directory must have the following access permission: “read” (including “other” users)
- All directories in the input data directory must have the following access permissions: “read” and “execute” (including “other” users)
- For PostgreSQL version 9.6 database, use the pg_dump 9.6 utility. To run the pg_dump 9.6 on OSS DB and BSS DB nodes, use the /usr/pgsql-9.6/bin/pg_dump utility.
- The OSS database dump named:
pg_dump-oss.dump. On the OSS DB host, run the following command to create the dump:su - postgres -c 'pg_dump --format=directory --no-owner --jobs 4 -U postgres oss -f pg_dump-oss.dump'
- The OSS database dump of global objects named:
pg_dump-oss.globals.dump. On the OSS DB host, run the following command to create the dump:su - postgres -c 'pg_dumpall --globals-only --no-owner -U postgres > pg_dump-oss.globals.dump'
- The BSS database dump named:
pg_dump-bss.dump. On the BSS DB host, run the following command to create the dump:su - postgres -c 'pg_dump --format=directory --no-owner --jobs 4 -U postgres pba -f pg_dump-bss.dump'
-
The BSS database dump of global objects named:
pg_dump-bss.globals.dump. On the BSS DB host, run the following command to create the dump:su - postgres -c 'pg_dumpall --globals-only --no-owner -U postgres > pg_dump-bss.globals.dump'
- A copy of the
APSdirectory located in the/usr/local/pemdirectory on the MN node. - A copy of the
credentialsdirectory located in the/usr/local/pemdirectory on the MN node.