Calendar Billing
Calendar billing is the ability to align billing date of subscriptions within an account to a specific day of month.
In CloudBlue Commerce, calendar billing is enabled per reseller account and has effect only on subscriptions to the plans configured in a specific way.
This is an alternative to other billing date alignment options in CloudBlue Commerce:
Requirements and Limitations
-
BSS of version 21.9 or higher is required for calendar billing.
-
Calendar billing can be enabled only in plans with Align Billing Orders with Statement Day option disabled.
-
Calendar billing only works for plans with monthly billing periods.
-
Calendar billing works only for plans with billing model Before Billing Period.
Enabling Calendar Billing for a Reseller
To enable calendar billing for a reseller, complete these steps:
-
Log in to the provider control panel.
-
Switch to Billing.
-
Click Operations > Resellers.
-
Locate the required reseller and click its name.
-
In the Financial Information section, click Edit.
-
Change Calendar Billing Alignment to one of these:
-
Disabled
-
To Calendar Month. With this option selected, billing periods will match calendar months.
-
To Custom Day. This option requires that you select the day of month that will be used as the billing period start date.
-
-
Click Save to apply the changes.
After you enable calendar billing for a reseller, it will have effect on subscriptions to service plans with calendar billing enabled starting from the next day. Subscriptions of both direct and indirect customers will be affected by that change as follows:
-
Existing subscriptions will keep their current billing period unchanged.
-
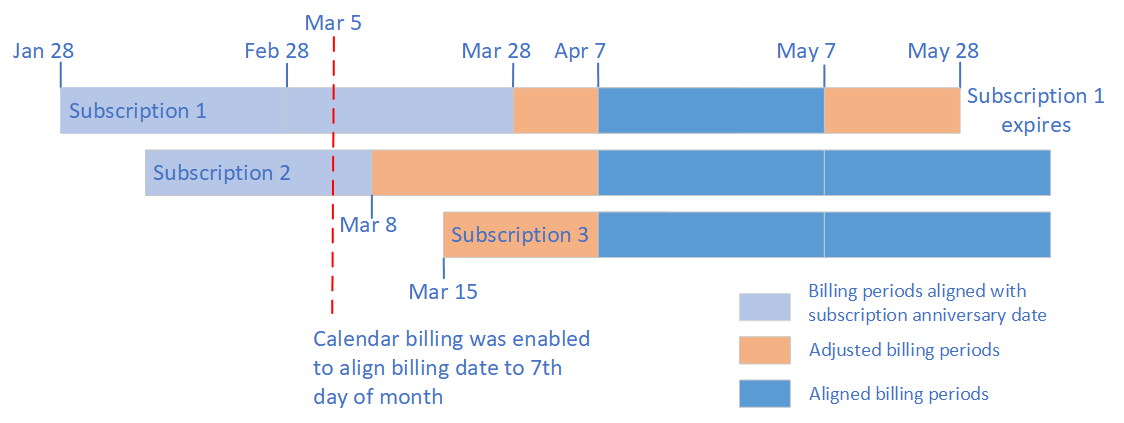
The next billing period of an existing subscription will be updated. If the subscription was purchased on February 8, calendar billing is enabled on March 5 and the 7th day is selected as the statement day, the next billing period will be from March 8 to April 7 and the billing order will be prorated. See Subscription 1 in the picture below.
-
Newly purchased subscriptions will have their first billing period from the purchase date to the closest day configured in calendar billing for the reseller. For example, if the 7th day of a month is configured in calendar billing as the statement day and the subscription is purchased on March 15, the first billing period will be from Mar 15 to April 7th. The sales order will be prorated. See Subscription 3 in the picture below.
- All further billing periods will start on 7th of each month.
-
The last billing order will also be prorated. If, for example, subscription expiration date is May 28, and calendar billing is set to 7th, then the last billing period will be from May 7 to May 28. See Subscription 2 in the picture below.
Enabling Calendar Billing in a Plan Managed by PLM
To enable calendar billing in a service plan, complete these steps:
-
Log in to UX1.
-
Open Portfolio > Plans.
-
Click on a required plan and find the Billing terms section.
-
Click Manage and enable the Resellers can enable calendar billing option.
Note: If there is no Manage button in that section, then either monthly billing is not configured for the plan or billing orders are not aligned with subscription anniversary date.
Click Apply.
To enable calendar billing in a service plan using the Excel file, set the BillingAlignmentResellerRedefineAllowed field in the ServicePlan section to True.
Enabling Calendar Billing in a Common Service Plan
To enable calendar billing in a service plan, complete these steps:
-
Log in to provider control panel and switch to Billing.
-
Go to Products > Service Plans.
-
Find the service plan you want to update and click its name.
-
Click Edit.
-
Set the Reseller can enable calendar billing option to Yes.
-
Save the changes.