Creating Product Packages
Product package is a plan type that allows you to combine vendor product and your own products and sell them strictly together as a single solution. Products that are included into a product package must have the same billing model, subscription period, billing cycle and the same policies. In a product package the vendor's product is considered a main one and its cancellation and downsize policies are applied to other products in the package.
The vendor's product is also provisioned first and only after it is successfully provisioned, provisioning of the other products from the package start.
Important: You must not allow failures in provisioning of your own products as it can result in critical errors in the system.
Currently, you can combine the products as follows:
-
A vendor's Connect-based product plus one or more your own PLM in-house products, your own Connect-based products, or both. For example, a service that vendor provides plus support for that service provided by your company.
A product package requires a specific type of a product line: product line for packages. They are displayed on a dedicated tab in Portfolio and are created differently.
Note: Before creating a product package, you must create a product line for packages first.
Optional Products
It is also possible to offer products as optional in a product package. Optional products are added to product packages with the minimum amount set to 0. Customers can add such products when purchasing a subscription, or when changing the subscription later.
If an optional product is not added to the initial subscription purchase, the purchase request must not be sent to Connect. If later such a product is purchased within a change order, a purchase request must be sent to Connect. Once an optional product is purchased, downsizing it to 0 is not allowed.
Ordering parameters are captured for optional products during purchase even if the optional products are not ordered. If an optional product supports editable ordering parameters, you can modify the parameters when placing a change order.
Limitations
-
Tier configuration is only supported for the vendor's product in the package.
-
Product packages can only be created by the provider.
-
The following operations are currently not supported for subscriptions based on product packages: scheduling changes, co-terming subscriptions or transferring resources to another subscription (performing partial upgrade).
-
Currently, the Create product packages wizard allows to add only one own product to product packages. There is no such restriction when creating product packages through configuration file import.
Enabling Product Packages Functionality
Before you can use product packages functionality, first, you need to enable it in the CloudBlue Store.
To do this, complete these steps:
-
Log in to the UX1 panel as a provider.
-
Go to CloudBlue Store and click Product packages.
-
In the opened window, click Install.
Creating a Product Line for Packages
Product line for packages must be created before you can create product packages. To create a product line for packages, complete these steps:
-
In UX1, open Portfolio and switch to the Product line for packages tab.
-
Click Add product line for packages.
-
In the opened window, name your product line for packages and select the product lines to include.
The products from the included product lines will be provisioned sequentially, in the specified order. This order cannot be changed later through UI.We recommend that you specify the vendor's product line first.
Note: Though starting with PLM 2.2 there is no limit on how much own products you can bundle together with a vendor's product, you need to consider their total provisioning time as all products in the product line for packages will be provisioned individually, one by one.
-
Click Create to save your changes.
The newly product line for packages will appear in the list.
Creating Product Packages
After you create a product line for packages, you can create a product package. Starting with PLM version 2.1, you can do this both by importing an Excel configuration file or through a wizard in UX1.
Creating Product Packages Using Wizard
The Create Product Packages wizard allows you to create product packages based on the existing plans. As a result, for each plan you specify another plan will be created, containing the product from the original plan plus your own product you specify.
Note: Currently, the Create product packages wizard allows to add only one own product to product packages. There is no such restriction when creating product packages through configuration file import.
Newly created plans will inherit the following information from the base plan:
-
Plan description
-
Icons
-
Billing and renewal settings
-
Plan period configuration
-
Downsize and cancellation policies
-
Switch paths. This requires that all plans that are a part of a single switch path are selected for product package creation as base plans.
Note: If necessary, this can be done later by exporting product configuration, making necessary adjustments and importing it back.
-
Resource dependencies. The exception of the "Requires" type will not be inherited, which means that there must not be composite products in the base plan.
To create product packages based on the existing plans, complete the following steps:
-
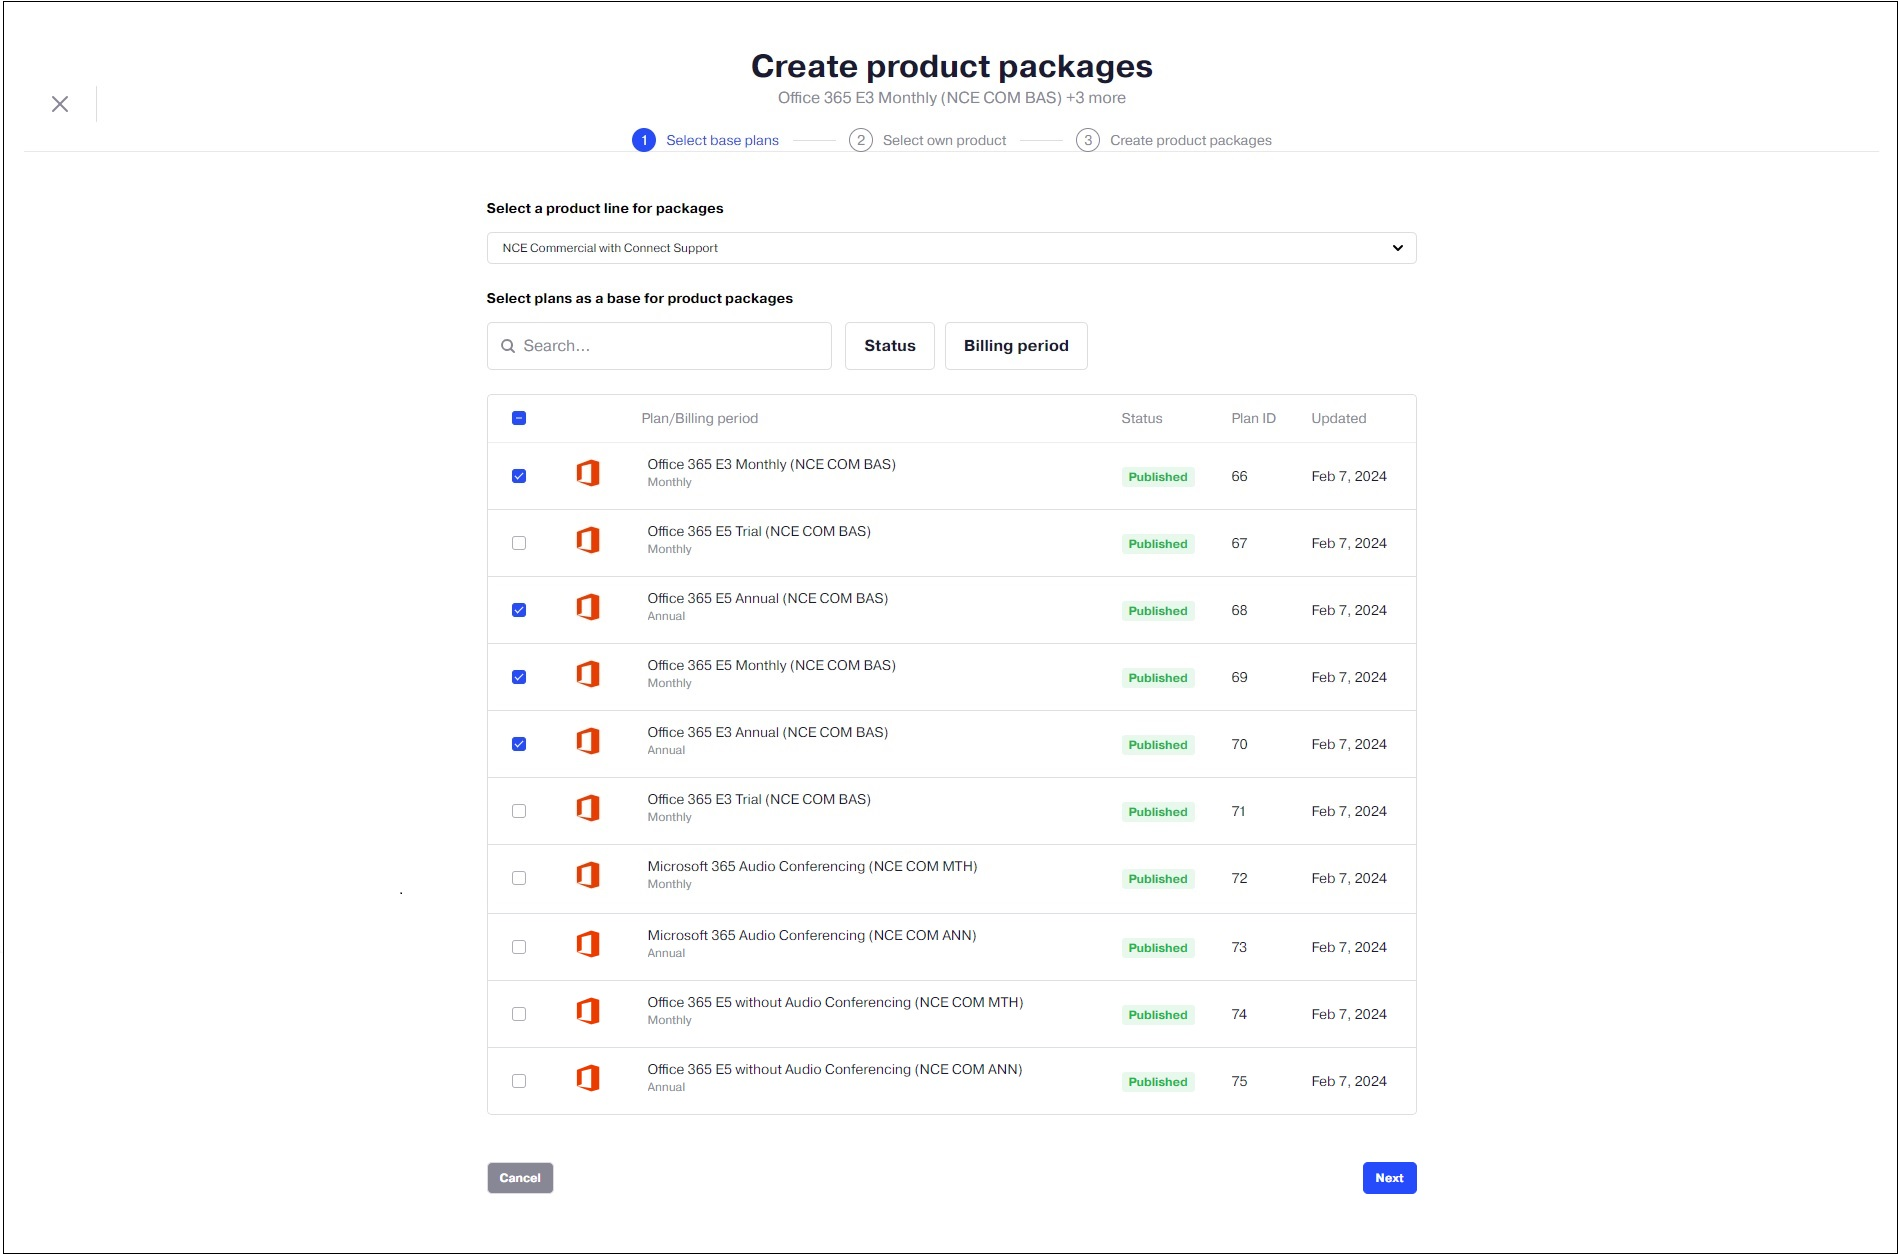
In UX1, go to Portfolio, click Add plan and choose the Portfolio-based option.
-
Select a product line for packages that includes both products that you are going to offer together.
-
Mark the plans based on which you want to create product packages. If necessary, you can filter the plans by status and billing period.
-
Click Next.
-
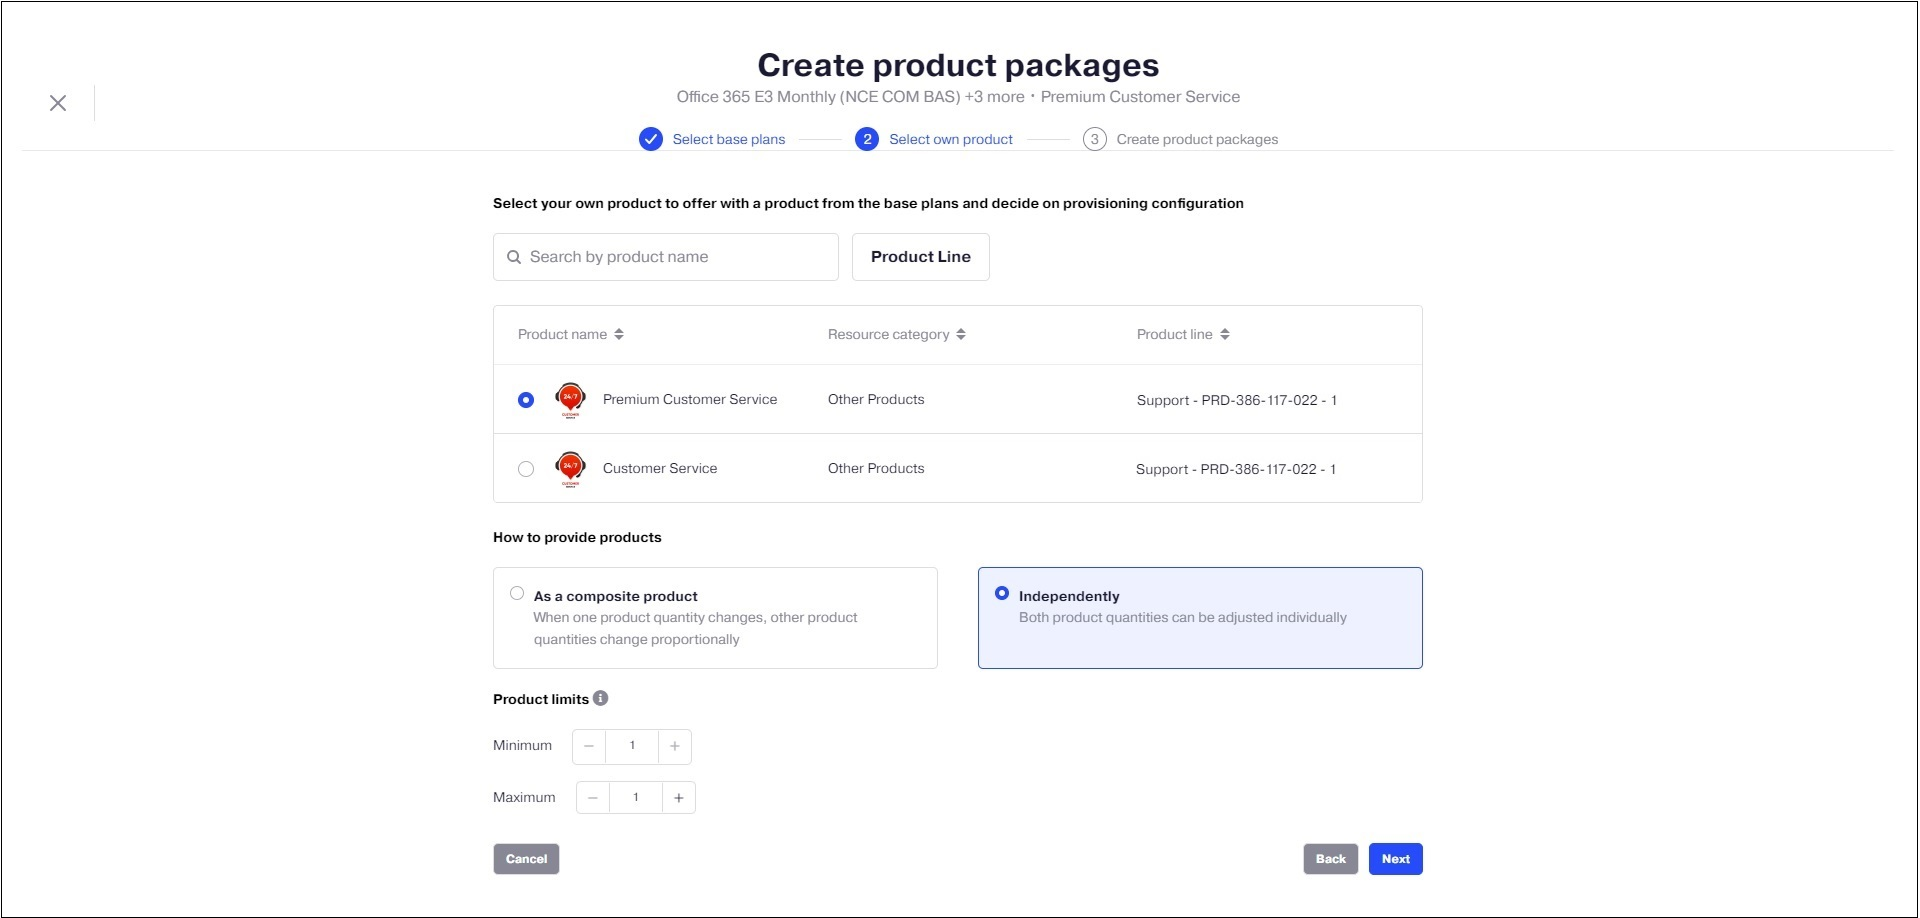
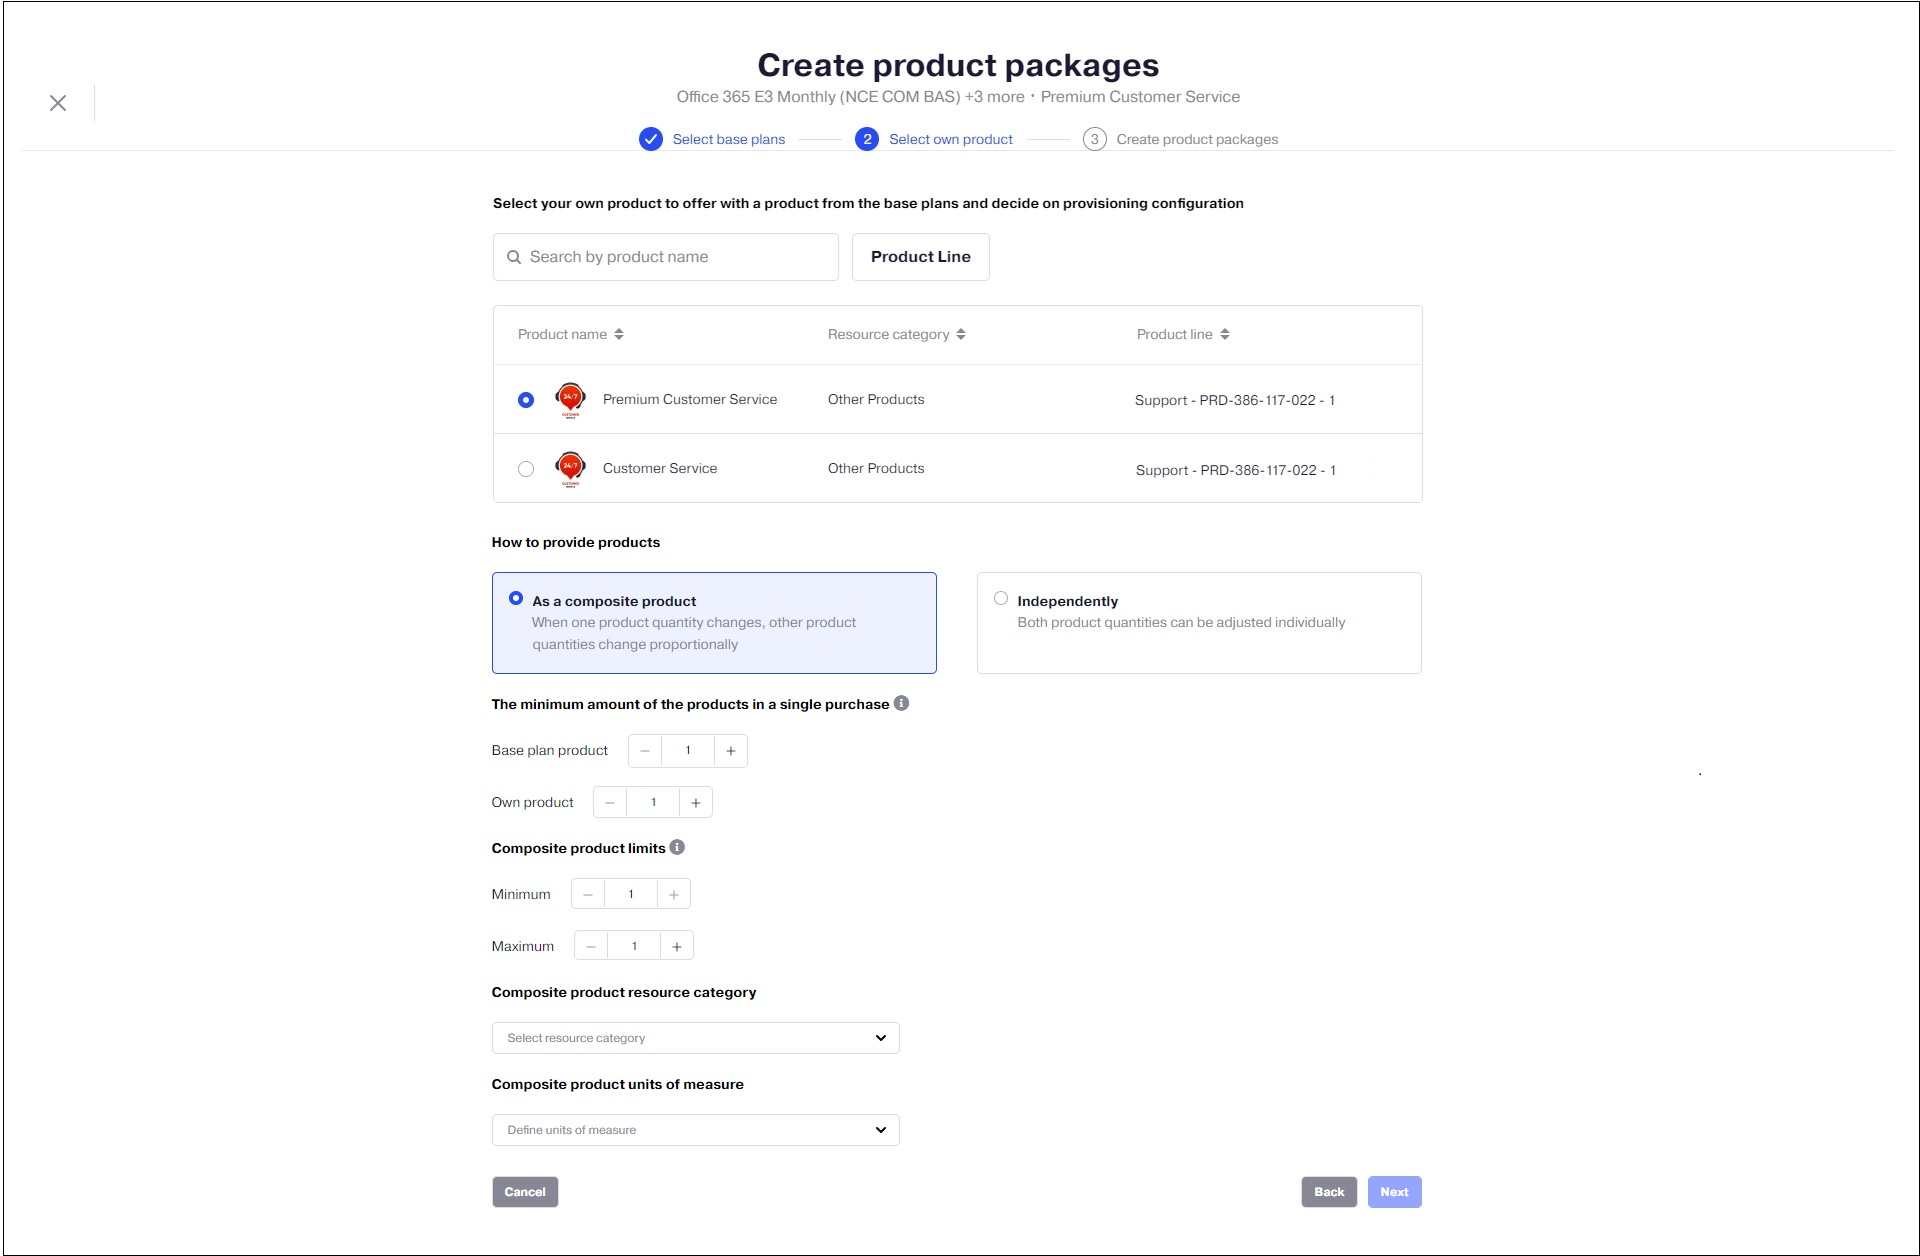
Select your own product to be offered together with the product from the base plan.
-
Decide whether to create dependency between product quantity in the new plan by selecting How to provide products:
-
As a composite product. If this is selected, the products will be represented as one product and their quantity will change in the proportion you define below.
-
Independently. With this option selected, there will not be additional dependency between the products and their quantity can be changed separately.
-
-
Define the product limits.
Important: In case of a composite product, you also need to define The minimum amount of the products in a single purchase. These amount will define one unit of the composite product.
-
If you choose to create a composite product, you also need to define its category.
-
Click Next.
-
Define the plan name. The new plan name starts with a full base plan name plus the part that you define. By default this part matches your own product name you selected.
-
Review the list of plans that will be created. Note, that these plans will be created at provider level only. Later, you can delegate the plans manually.
-
Decide whether to Publish plans after creation.

-
Click Create product packages. This will initiate validation of the product package configuration. If the configuration is valid, a task with "Execute operation '/applyConfig' ..." to apply the configuration will be created. Otherwise, an error message will be displayed.
You can use this task to track the progress of product package creation.
-
(Optional) If you need to adjust configuration, for example delegate the created plans or add a product to product package, do the following:
-
In UX1, go to Portfolio > Products and switch to the Product line for packages tab.
-
Find the product line for packages, click the Three dots and click Export products and plan.
-
Adjust the configuration as needed. See Configuration file requirements section for more information on how to configure products and plans.
-
Click Import, select the necessary product line and import the updated file.
-
-
Now, you can set the prices for the created plans.
Importing Product Packages from Excel Configuration File
You need to select a product line for packages when importing the file.
Note: To create a product package, you need to select a product line for packages when importing an Excel configuration file.