Wizard
UI wizard allows arranging ordinary views in a chain. For example, when a customer adds or updates a service related to other services, a wizard will help the customer to configure related services by walking them through application specific views. A wizard collects and processes data from the plugged views.

A wizard can have views plugged from the same or from different applications.
In this document:
Meta Declaration
A wizard and views must be declared in respective applications. A wizard host is an application that declares a wizard in its metadata and defines the source code of the wizard.
Wizard Host
A wizard can be added to any branch of a usual navigation tree along with other views.
Warning
To have a wizard compatible with mobile devices, plug the wizard into a first level item as in the meta declaration of the demo project. The other option is to call the wizard dynamically.
Wizard declaration is similar to view declaration. However, it also implements a master logic. It must have own placeholder that views from various applications can plug to. A wizard can control events coming during wizard process.
<navigation id="createVPS" label="VPS Creation">
   ...
   <wizard id="myWizard" label="My Wizard" src="ui/myWizard.js">
     <placeholder id="my-wizard-placeholder" />
     <var name=... />
     <controls>
         ...
         <submit label="Finish creating the user" />
     </controls>
   </wizard>
</navigation>
Key points:
A wizard has its own ID that must be unique in scope of all views.
There are predefined navigation controls available in a wizard and plugged views. There is no need to declare them in metadata, although you can do it, for example, to change the label:
CONTROL
SHOWN IN
HANDLED IN
ACTION EXAMPLE
Cancel
ViewWizardWizard
Cancel the whole process by redirecting a user to a separate view.
Prev
View
View
In the first view - return to the wizard.In another view - return to the previous view .Next
ViewWizardViewWizardGo to the next view and pass own data to it.Go to the first view and pass own data to it.Submit
Last view
In the last view -onNexthandlerIn the wizard -onSubmithandlerIn the last view - pass the control to the wizard and send the collected data to it.In the wizard - process the collected data, update the APS DB, and leave the wizard for a separate view.
Wizard Views
The views you need to plug into a wizard should be added to a navigation tree. You can either plug the whole tree with all its views into a wizard or plug each view separately.
<navigation>
    <plugs-to id="mywizard-placeholder" />
    <view id="myView1">
        <params spec="version=ge=2.1" >
             <param name="myParam" required="true" type="boolean" />
        </params>
    </view>
    ...
</navigation>
Step Labels
Compared with regular views, it is recommended to
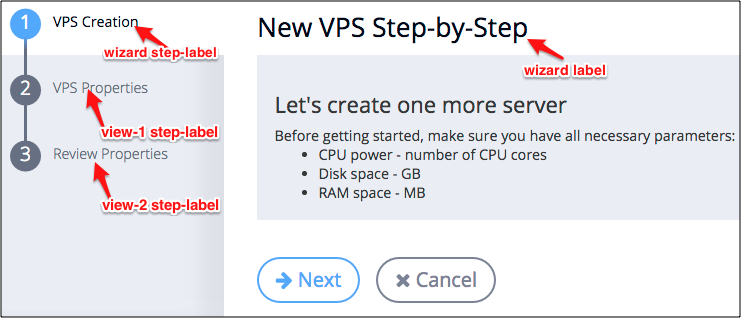
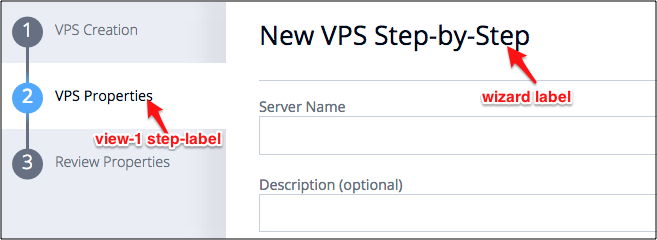
declare a step-label for a wizard host (in addition to the label property) and for wizard views
(instead of the label property). Their functionality is summarized in the following table.
PROPERTY |
DECLARED IN WIZARD HOST |
DECLARED IN WIZARD VIEW |
|---|---|---|
|
Displayed on top of each wizard view |
Not displayed anywhere |
|
First item in the wizard navigation chain |
View label in the wizard navigation chain |
Note
In a wizard host, a label or step-label substitutes each other if one of them is not declared.
A wizard is started:

First plugged view is active:

Wizard Processing
Wizard Call
An application UI can call a wizard by means of the aps.apsc.gotoView method that is also used when calling ordinary views:
aps.apsc.gotoView(<wizardId>);
Source Code
Wizard Host
The structure of a wizard source JavaScript code is similar to the structure of a view and may look as follows.
define([
   "dojo/_base/declare",
   "aps/View",
   // Other Modules
   ...
], function (declare, View, ...) {
   return declare(View, {
      init: function() {
         /* Initialize widgets in the wizard */
      },

      onContext: function() {
         /* Process aps.context.wizardState:
            - Change view visibility in aps.context.wizardState[i].visible
            - Send update to UX1 - aps.apsc.wizardState(aps.context.wizardState);
         */
      },

      onNext: function() {
         /* Perform some actions on transfer to the first view:
            - Prepare the service data
            - Go to the first view - aps.apsc.next(data);
          */
      },

      onCancel: function() {
         /* Cancel the whole wizard processing by leaving the wizard for a separate view.
            Use aps.apsc.gotoView(<viewId>);
         */
      },

      onSubmit: function() {
         /* Process aps.context.wizardData
            Go to a separate view - gotoView(<viewId>);
         */
      }

   });
});
Key notes:
The wizard has its own set of widgets visualized when a user comes to the widget.
The
onContexthandler makes needed views visible. This makes the final chain of views synced with the user panel.The
onNexthandler processes the wizard’s own Next button. Its main goal is to start the first view.The
onCancelhandler processes the Cancel button in each view.The
onSubmithandler processes the Next button in the last view. This button is actually visualized as the Submit button defined in the widget. It is handled first by theonNexthandler in the last view, and only after this theonSubmithandler in the wizard processes it.
Wizard Views
In addition to a usual view structure, the definition of a view plugged to a wizard
contains the onPrev and onNext handlers.
The
onPrevhandler usually calls theaps.apsc.prevmethod to return back to the previous view. When called in the first view, it returns back to the wizard.The
onNexthandler usually calls theaps.apsc.nextmethod to forward a user to the next view in the wizard. In the final view, theonSubmithandler in the wizard follows thisonNexthandler to compete data processing in the wizard.
Demo Projects
Generic Services - illustrates the whole process of creating a wizard and plugging views into it.
User Management - illustrates the process of plugging a view into the system built-in User Creation wizard.
