Table Of Contents
Application Packaging Standard
Last updated 18-Mar-2019Deployment
This step helps you install and prepare the demo application on your test system for providing the application services to customer.


In this document:
Continue the demo project from the previous step.
Prepare Product Deployment Configuration
As explained in the Product Initialization concepts and implemented in the Product Deployment Assistance step of the Offer Management demo project, to simplify creation of the products for sale you should prepare the product deployment configuration inside the APS package.
If you cloned the package from the User Management demo package following the Start Your Demo Project instructions, you already have the product deployment configuration.
Extend this configuration by adding the event resource type and including the latter to a service template.
For this purpose, open the scripts/wizard_data.json file and follow these steps.
In the
resourceTypesarray, add the following section to create the Event Manager resource type:{ "name": "Event Processing demo - Event Manager", "id": -500006, "resClass": "rc.saas.service", "required": false, "actParams": { "service_id": "events", "autoprovide_service": 1 } }
Use the above
idto add the required resource to theserviceTemplate/resourcesarray as in the following example:{ "limit": 1, "unlimited": false, "rtID": -500006 }
In the
contextresource type, change theautoprovide_serviceproperty from1to0:{ "name": "Event Processing demo - Management Environment", "id": -500004, "resClass": "rc.saas.service", "required": true, "actParams": { "service_id": "contexts", "autoprovide_service": 0 } }
Note
1. In accordance with the Resource Model, the
eventresource type must be auto-provisioned. So, you set the"autoprovide_service":1property.2. Since the auto-provisioned
eventresource requires a link with acontextresource, the latter will be provisioned along with theeventresource. To avoid creation of twocontextresources in a subscription, thecontextresource type cannot be auto-provisioned.Optionally, change the names of product components to reflect the application name.
Prepare APS Connector Image
To create a Docker image from your package and use it later, do the following.
In the
deployment.xmlfile, enter a unique image name that will be used in the Docker image tag, for example:<?xml version="1.0" encoding="UTF-8"?> <deployment> <imageName>isv1/events</imageName> <applicationPort>1443</applicationPort> <applicationUrlPath>endpoint</applicationUrlPath> </deployment>
Note
The “isv1” prefix in the above configuration is a placeholder for your actual account in the Docker official hub. The value you assign to the <imageName> element must be used later as the prefix in the image tag when creating an image.
Copy the project folder to the node where you have the Docker service for creating Docker images, for example:
$ scp -r event-mgmt root@docker-endpoint.a.isv1.apsdemo.org:
Build the image on that node, for example:
$ ssh root@docker-endpoint.a.isv1.apsdemo.org
# cd event-mgmt
# docker build -f deploy-image/Dockerfile -t isv1/events:1.0-1 .
Note
In the above command, ensure the following:
Do not miss the final point (
.).Instead of the “isv1” placeholder, use your login name registered at the Docker hub.
The tag name, for example, “isv1/events”, is the same as in the
deployment.xmlfile.The tag version is the same as the combined version and release in the
APP-META.xmlfile. For the above example, the latter must be:<version>1.0</version> <release>1</release>
Log in to the Docker hub using the login name as in the image tag prefix.
# docker login
Push the new image to the Docker hub, for example:
# docker push isv1/events:1.0-1
Build Package
Build the package from the project folder event-mgmt/ using APS IDE or the following command:
$ aps build event-mgmt
Import Package
Import the package to your lab platform as described in the Package Import section.
Install Application Instance
Follow the steps in the Deploy APS Application Instance section of the Get Started project to install the application instance from the Docker image you have created earlier.
Deploy Product
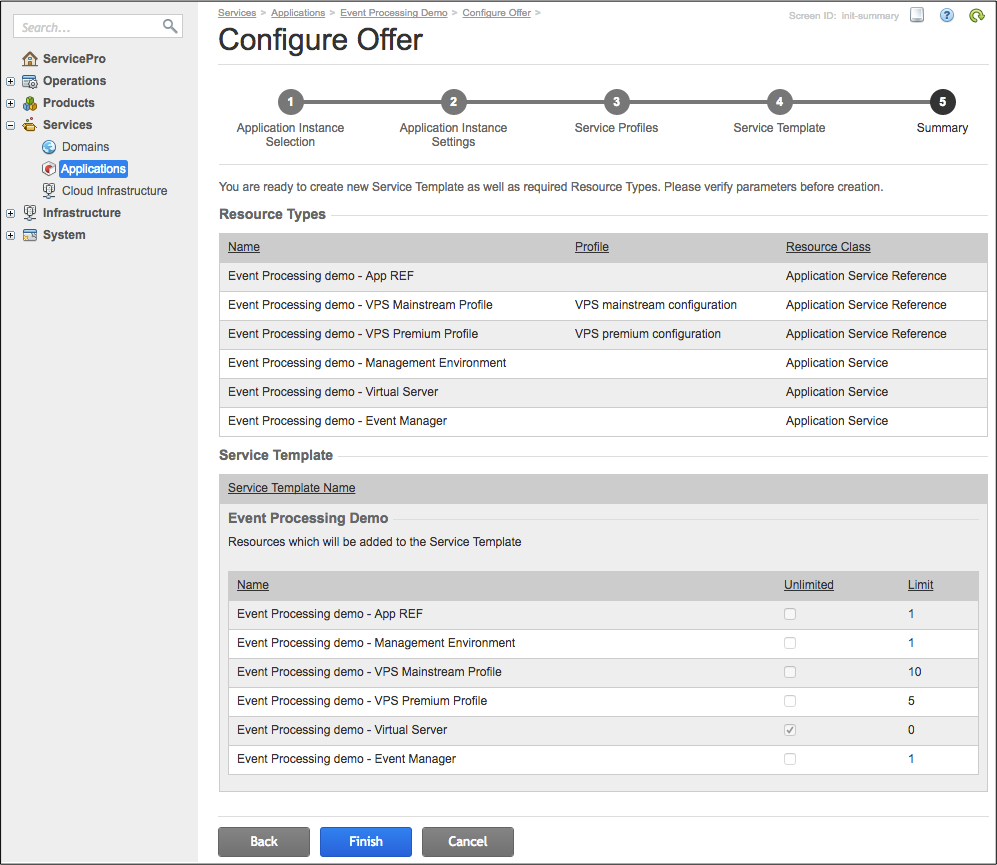
The goal of the product deployment step is to create a service template (for OSS) and service plan (for BSS) to provide the application services to customers. If you followed the Prepare Product Deployment Configuration step, the application allows you now to use the wizard to create the application products. In this case, start the product deployment right from the Instances tab of the imported application as explained in the Create Service Template section of the Get Started project. You can follow the wizard steps if you need to view and change the default configuration. Otherwise, you can jump to the Summary step.
The following configuration presents the final set of the resource types and the service template for deployment when the platform consists of the OSS only:
Conclusion
On completion of the deployment steps, your platform has an installed APS application instance and a service template to provide the application services to customers.