CloudBlue Commerce API (DRAFT)
Table Of Contents
Deployment
At this phase, you will make the application service available for customers of the platform.


Although the APS Biz API demonstrated in this project works in either configuration of the platform, containing the OSS only or containing integrated OSS and BSS, the deployment instructions in this document are based on the latter case as the most comprehensive.
If your platform consists of the OSS only, the deployment is similar to one explained in the Offer Management demo project.
In this document:
Deployment Configuration
Get ready Lab Platform
Ensure your platform is configured as follows:
Both, OSS and BSS are installed and integrated.
There is a CentOS-7 host registered in the platform as an endpoint host as explained in the Deployment Schema, Prerequisites, and Register Endpoint Host sections.
Prepare Product Deployment Configuration
As explained in the Product Initialization concepts and implemented in the Product Deployment Assistance step of the Offer Management demo project, to simplify creation of the products for sale prepare the product deployment configuration inside the APS package.
If you cloned the package from the Offer Management demo package following the Start Your Demo Project
instructions, you already have the product deployment configuration. However, it is important to
also have a resource rate for the VPSes in the service plan.
For this purpose, open the scripts/wizard_data.json file and follow these steps.
Find the
idof the resource type presenting the VPSes. You can find it by the “service_id”: “vpses” string. The respective section presenting that resource type may look as follows:{ "name": "User Management demo - Virtual Server", "id": -500005, "resClass": "rc.saas.service", "required": false, "actParams": { "service_id": "events", "autoprovide_service": 0 } }
Use the discovered
idto add the required resource rate to the service plan section as in the following example:{ "id": -700005, "rtID": -500005, "inCP": true, "instore": true, "incl": 100, "min": 100, "max": -1, "sFeePerUnit": true, "rFeePerUnit": true, "setupFee": 0, "recFee": 0, "overFee": 0, "measurable": false }
Prepare Connector Image
To create a Docker image from your package and use it later, do the following.
In the
deployment.xmlfile, enter a unique image name that will be used in the Docker image tag, for example:<?xml version="1.0" encoding="UTF-8"?> <deployment> <imageName>isv1/suwizard1p</imageName> <applicationPort>1443</applicationPort> <applicationUrlPath>endpoint</applicationUrlPath> </deployment>
Note
The “isv1” prefix in the above configuration is a placeholder for your actual account in the Docker official hub. The value you assign to the <imageName> element must be used later as the prefix in the image tag when creating an image.
Find the Docker registry host used by your platform and ensure it is available for you.
In the provider control panel, navigate to System > Settings and click the Docker Registry Settings link in the Integration section.
Ensure the Docker Registry Hostname refers to the host available for you. It means you have an account to save images there and the host is available for the platform.
If necessary, change the Docker registry settings to satisfy the conditions.
Note
If want to use the Docker official hub, change the host name for
docker.io. You do not need to provide any certificate in this operation.Ensure your package is in the host with installed Docker service. For example, copy the package to to the registered endpoint host and log in there:
$ scp -r suwizard1p root@docker-endpoint.a.isv1.apsdemo.org:
$ ssh root@docker-endpoint.a.isv1.apsdemo.org
Enter inside the package and run the Docker image build command. You must assign an image tag consisting of:
Probably, the host name of the Docker registry if you use a Docker registry other than the Docker official hub, for example,
docker-repo.isv1.testThe unique image name set in the
deployment.xmlfile (see the step #1), for example,isv1/suwizard1pAPS package version set in
APP-META.xml, for example,1.0-1:<version>1.0</version> <release>1</release>
With the above sample values, if you use the Docker official hub do the following:
# cd suwizard1p
# docker build -f deploy-image/Dockerfile -t isv1/suwizard1p:1.0-1 .
Note
Do not miss the point (
.) at the end of the last command.Push the image to the Docker registry. If you use the Docker official hub do the following:
# docker login
#### You will have to provide the login name ("isv1" in our example)
#### ... and password for the Docker hub

# docker push isv1/suwizard1p:1.0-1
Now, the image of the APS application connector is stored in the Docker registry and any platform connected with that registry can use the image.
Build Package
Build the package from the project folder suwizard1p using the APS CLI tools:
$ aps build suwizard1p
Import Package
Make sure, the platform is switched to using UX1. Import the package as described in the Import APS Package section.
Install Application Instance
Follow the steps in the Deploy APS Application Instance section of the Starter project to install the application instance from the Docker image you have created earlier.
Deploy Product
The goal of the product deployment step is to create a service plan to sell the application services to customers. The Prepare Product Deployment Configuration step allows you to use the wizard for this.
Open the imported APS package and on the Instances tab, click the Configure Product button.
In the Application Instance Selection step, ensure, your demo application instance is selected.
In the Service Profiles step, find the two offers configured in the package.
In the Service Template step, find the configuration of the service template.
In the Billing Configuration step, find the three categories configured in the package.
In the Service Plans step, open the service plan configured in the package. You will find the general plan configuration and configuration of the resource rates.
The final step Summary presents all configured product components:
Resource Types
Service Template
Service Plans
Click Finish to complete the product deployment.
Customize Resource Rates (optional step)
Definition of Term
This section is optional. It illustrates the use of composite resources in BSS. A composite resource is used when it makes sense to sell a bunch of regular resources. For example, a provider can sell a composite resource containing 10 mailboxes and 100 GB of disk space for the mailboxes:
mailresource = 10 mailboxes + 100 GB of disk space
Configure Composite Resources
For testing the composite resources, let us configure the following list of the composite resources to sell various bundles of the regular offers. Earlier, you have configured two regular resources:
User Management demo - VPS Mainstream Profile based on the
MainstreamAPS resource (also known as offer or service profile)User Management demo - VPS Premium Profile based on the
PremiumAPS resource
Follow these steps to create a composite resource containing 1 premium and 3 mainstream regular resources.
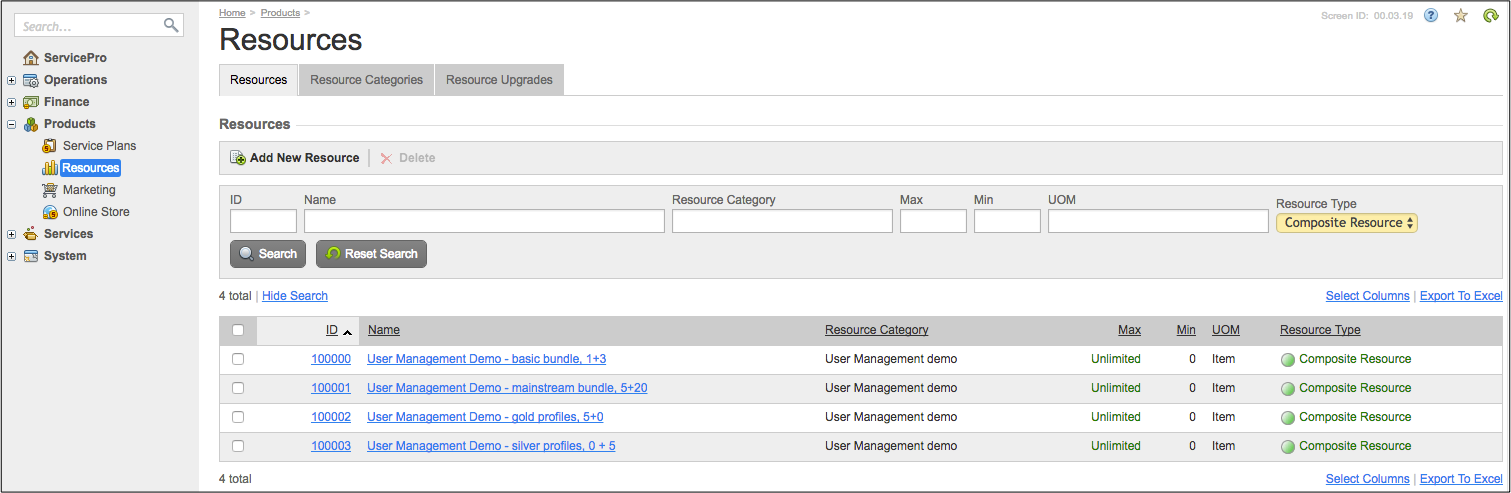
In the BSS provider control panel, navigate to Products > Resources.
Click Add New Resource and configure the resource:
In the Name field, enter the resource name, for example, “User Management Demo - basic bundle, 1+3”.
In the Resource Category field, select the same category as used for the regular resources of this application, that is “User Management demo”.
In the “Description” textbox, enter any description.
In the Unit of Measure field, select item.
In the Max field, enter -1, which means unlimited.
In the Min field, enter 0, which means the resource is not included in the subscription by default.
In the set of Controlled by options, select Billing System.
In the set of Type options, select Composite Resource.
Click Save.
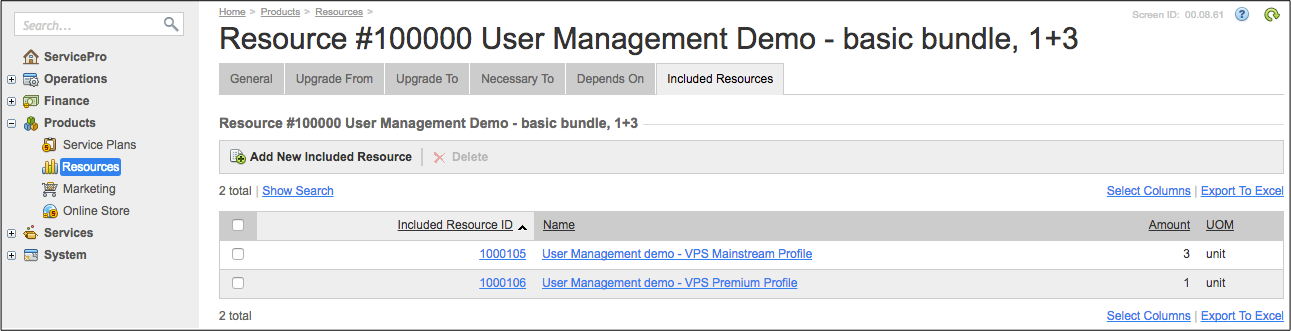
Open the newly created composite resource and switch to the Included Resources tab.
Add the two regular resources, assign the amounts to the resources, and then save the configuration:
Following the above steps, create more composite resources:
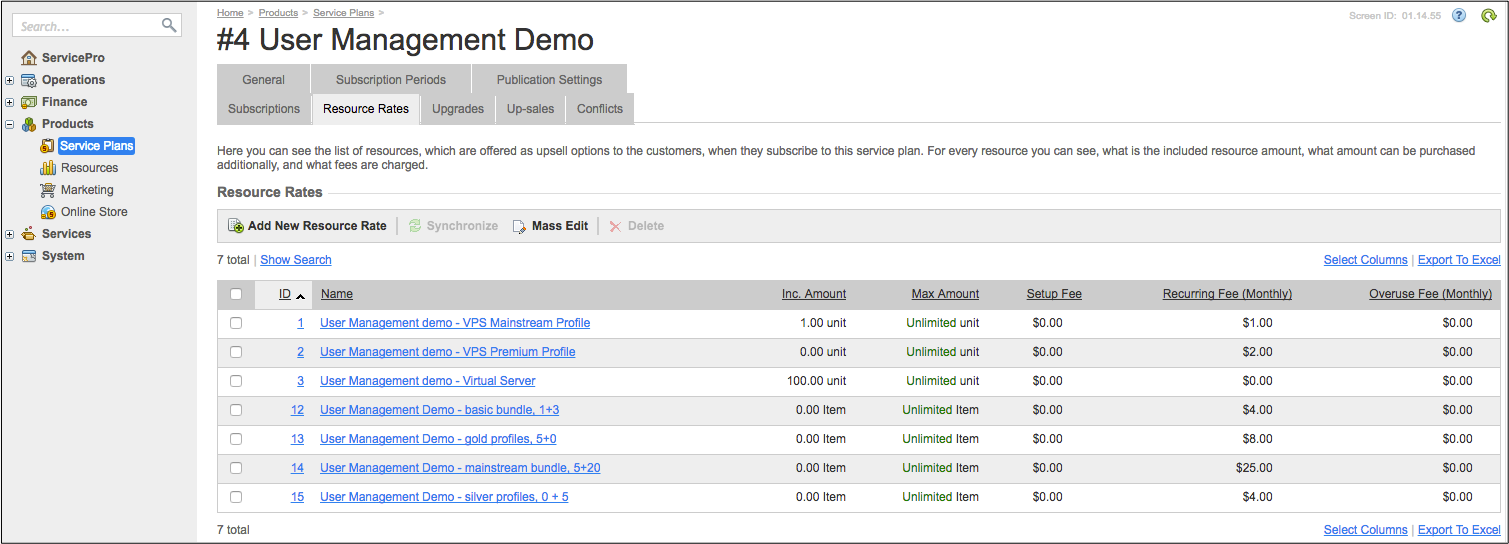
Add Resource Rates
Add all the resources of both types, regular and composite, as resource rates to the new service plan created earlier. For this purpose, open the service plan on the Resource Rates tab and expand the list of resource rates to make it look as follows:
Conclusion
On completion of the deployment steps, your platform has an installed APS application instance and a service plan to sell the application services to customers.