The Reseller's Guide to CloudBlue Commerce with UX1 Marketplace
This quick start guide is intended for resellers. It explains how to set up the Customer Marketplace where your customers will purchase products and services. It also explains how to purchase on behalf of your customers.
Contents:
-
How to Fill In Your Product Catalog and Get Ready for Selling
-
Building a catalog from scratch
-
Step 1: Prepare sales categories and service plans in Billing
-
Step 3: Import the product catalog from Billing to the End-Customer Marketplace and adjust it
-
Step 4: Promote services on the landing page (Home page) of the Customer Marketplace
-
Step 5 (Optional): Customize the Marketplace tile on the Dashboard
-
- Exploring products and plans
-
Purchasing an Adobe plan with 3-year commit on behalf of customers
Becoming Familiar with Sales Channels and Marketplace
To configure the offers that will be available to your customers and enable customers to purchase those offers through their Customer Panels, use the Sales Channels area in your CloudBlue Commerce reseller panel.

When your customers log in to their Customer Panels, they can browse and purchase your offers in the area called Marketplace.
To sum up, what you configure through Sales Channels is what your customers purchase through their Marketplaces.
How to Fill In Your Product Catalog and Get Ready for Selling
Depending on your contract, you can either resell the product catalog offered by your provider, or you can build your own catalog from scratch.
Using the catalog offered by the provider
If your contract provides the option to resell the catalog offered by the provider, complete the following steps to configure the End-Customer Marketplace.
Step 1: Enable access to the Customer Marketplace
-
Log in as a reseller to CloudBlue Commerce and go to UX1 > Sales Channels > End-Customer Marketplace.
-
In the General section, click On.
-
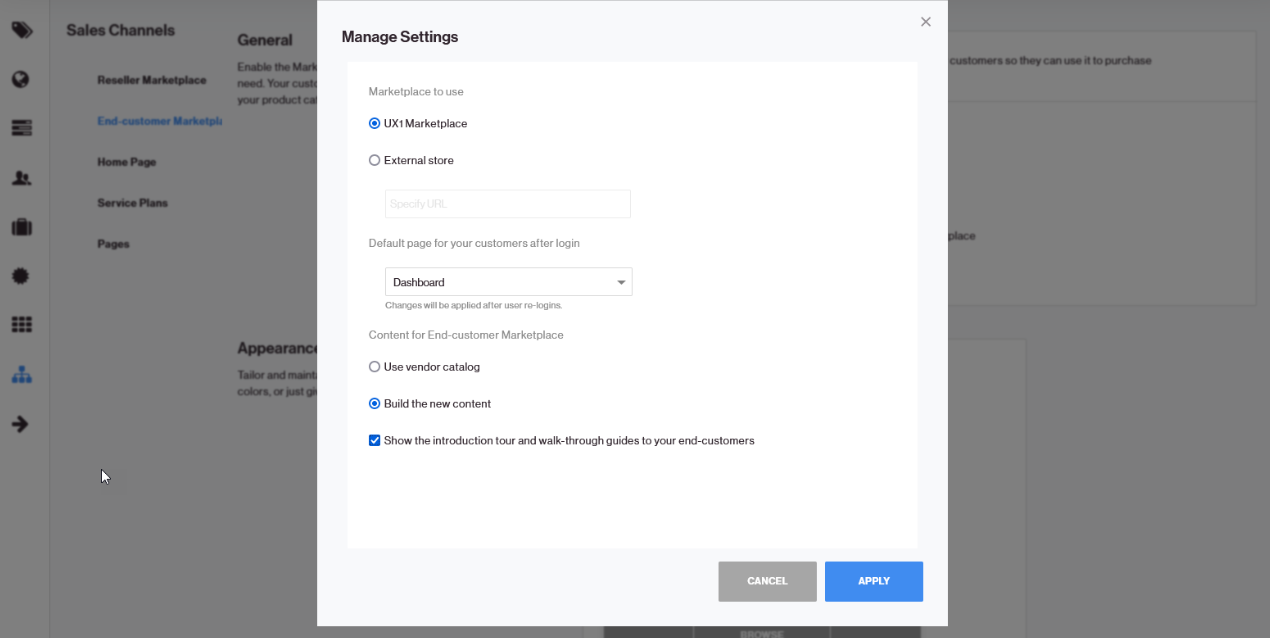
Click Configure and specify the following settings:

-
Which Marketplace to use. Select UX1 Marketplace.
-
The default page for your customers after login (Marketplace or Dashboard).
-
What to offer in the Customer Marketplace. Select Use vendor catalog.
-
Whether to display the introduction tour and walk-through guides to your end customers. Select this option for your customers to see a brief presentation on first login.
-
-
Click Apply to save the changes.
Step 2: Retrieve the catalog, review it, and adjust it
-
Go to Reseller Panel > UX1 > Sales Channels, click Home page in the left navigation pane, click END-CUSTOMER MARKETPLACE at the top, and then click Import Catalog.
When the import is finished, take a few moments to review the service plans and product pages that will be available in the Marketplace. These are the building blocks of a product catalog. Providers prepare service plans first, and then they prepare product pages that include service plans.
While working with the catalog from your provider, you cannot add or edit products, services, or service plans. You can only make them unavailable to your customers.
-
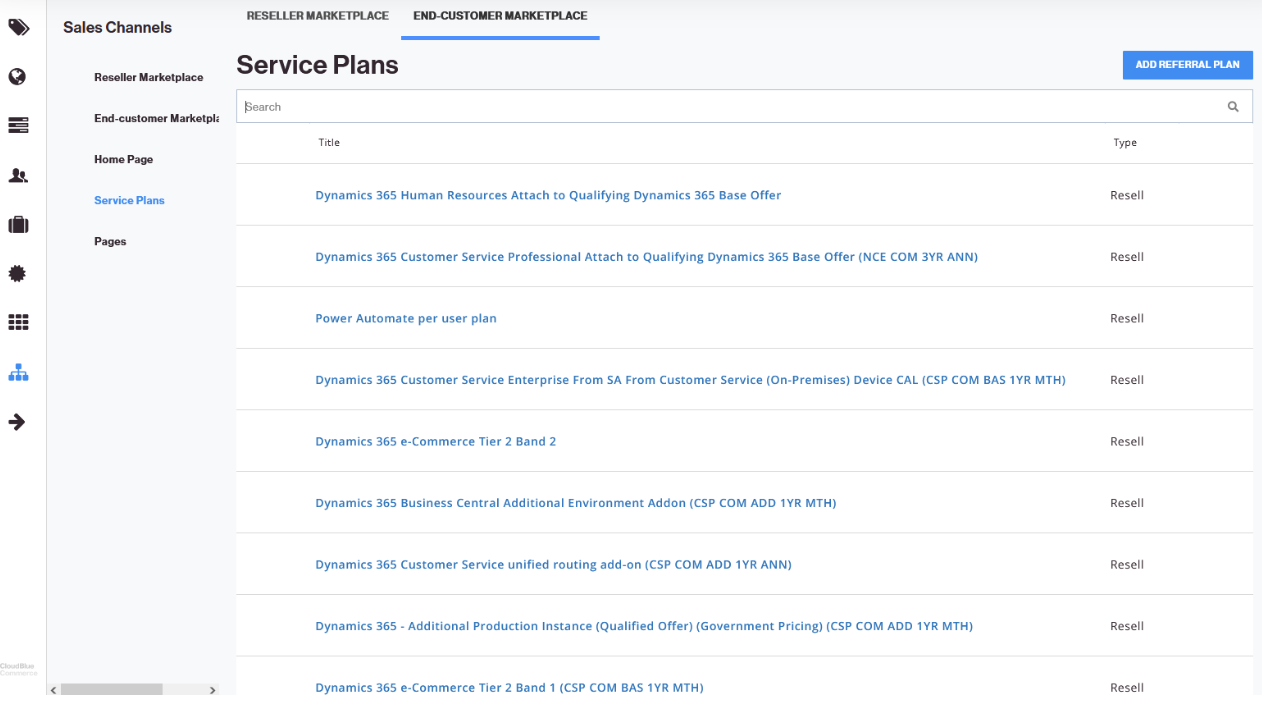
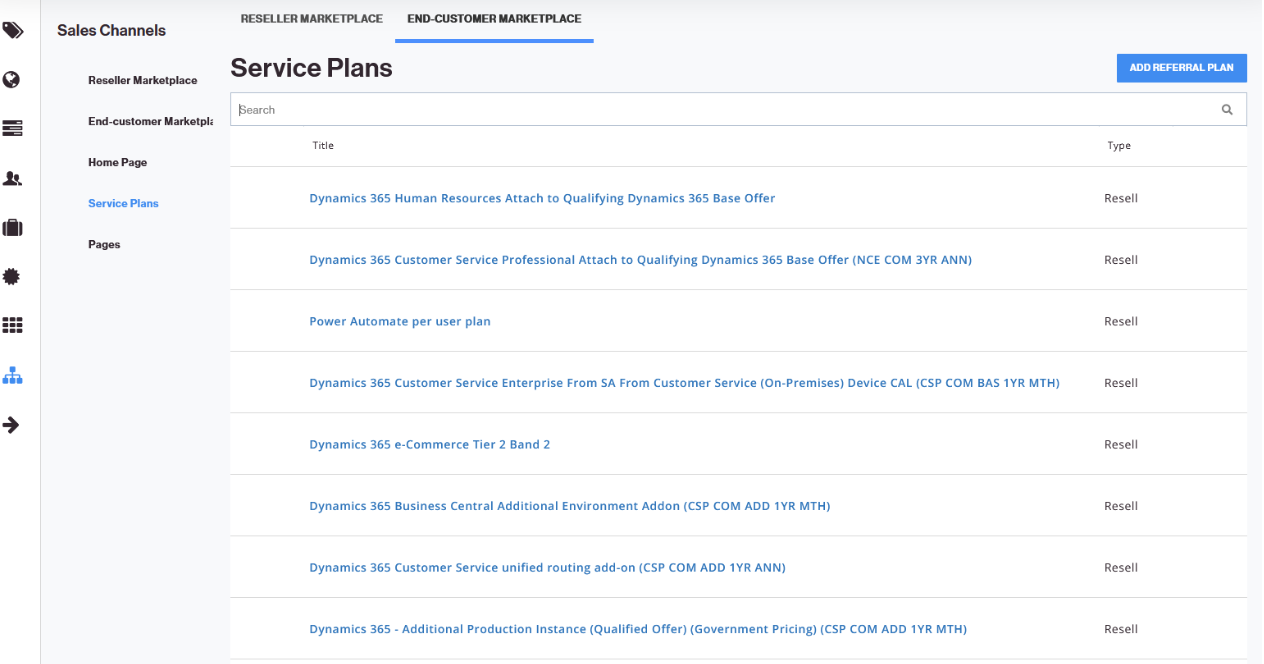
Go to Service plans (Reseller Panel > UX1 > Sales Channels > Service Plans > END-CUSTOMER MARKETPLACE). This is a list of all service plans offered by your provider.
-
To make a plan temporarily unavailable to users, hover the mouse pointer over the plan’s name and click the
 icon.
icon.When finished with plans, move on to pages.
-
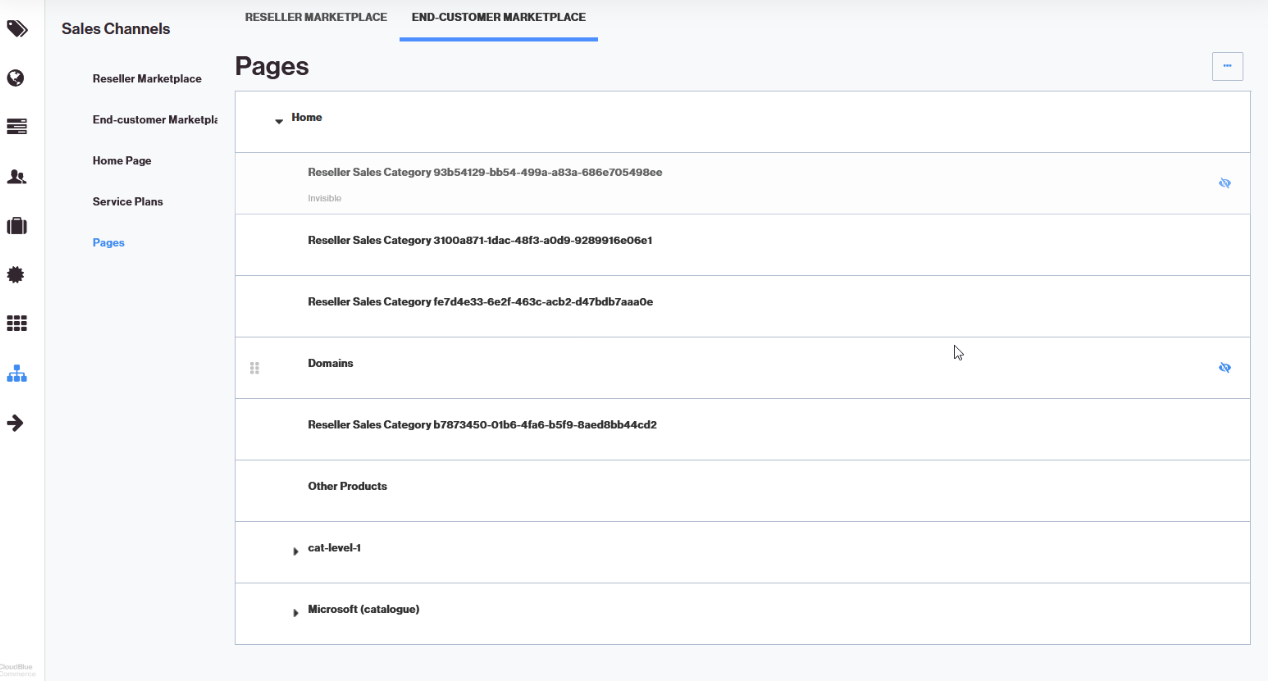
Go to Categories (Reseller Panel > UX1 > Sales Channels > Categories > END-CUSTOMER MARKETPLACE). This is a list of all product pages that were created by the provider for their catalog. The pages are organized in a top-down structure starting with Home.
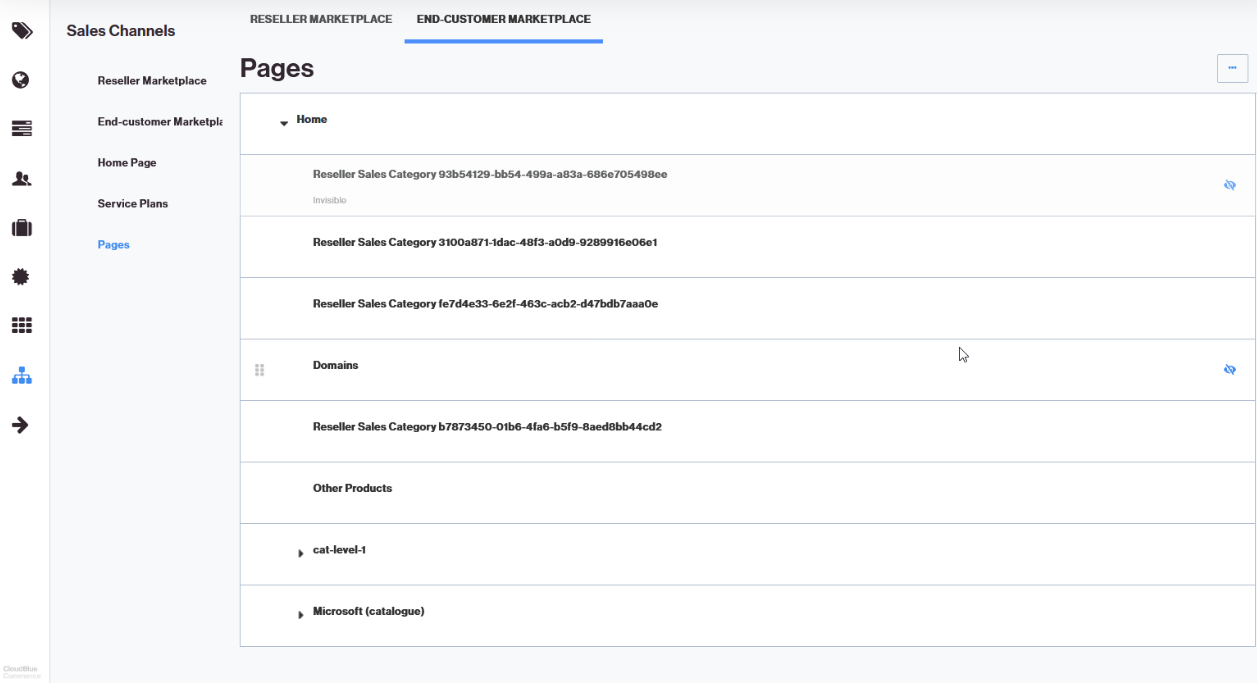
-
To make a product page or a category page unavailable to users, hover the mouse pointer over the page name, and click the
 icon.
icon.Now that you removed all pages that you do not want to display in your catalog, let’s move on to configuring the Home page, which is the landing page of the Customer Marketplace for your customers.
Step 3: Configure the landing page (Home page) of the Customer Marketplace
The landing page includes the following items:
1. A search by products and services.
2. A banner. You can add several pictures and make a slide show.
3. A list of featured products or services, also referred to as promo pages or promotions.
4. A product catalog. It consists of product pages and sub-pages with service plans.
We already configured the product catalog (4) in the previous steps, so let’s now configure the banners (2) and the promo section (3).
To configure the banners:
-
Go to Reseller Panel > UX1 > Sales Channels > Home Page > END-CUSTOMER MARKETPLACE.
-
Specify what you want to display in the banner area by clicking the
 icon.
icon. -
You can choose to upload one banner or make a slide show out of multiple banners.
-
Specify the URL to the banner image. The image must be available elsewhere on the internet. The image dimensions must not exceed 1300 by 375 pixels, and the file size must not exceed 100 kilobytes. We recommend using images in PNG format.
-
If you want to redirect users to a website when they click the banner, type a link in the Link box and select the Open link in new window checkbox.
-
To make a slide show, click the navigation icons
 and
and  to switch between image slots and upload more images.
 -
If you want to rearrange images in the slide show, select the order of each image in the Position menu.
-
If you want to delete an image, click DELETE.
-
Click SAVE.
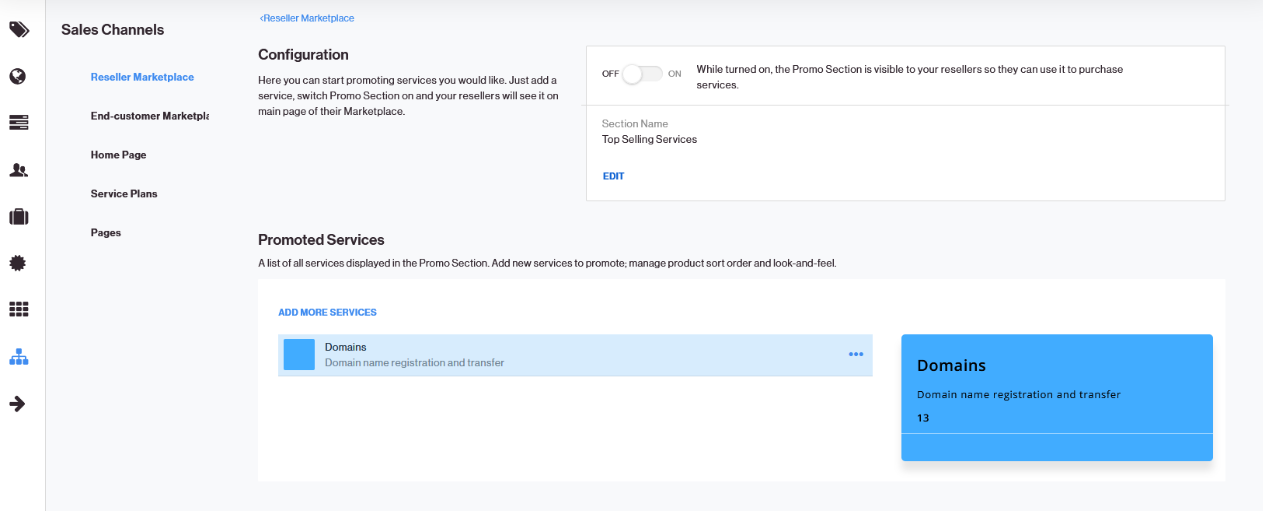
To specify which items or offers to display on the landing page of the Customer Marketplace, in the Top Selling Services area below the banner:
-
Go to Reseller Panel > UX1 > Sales Channels > End-customer Marketplace (in the left navigation pane) > Content > Promo Section > LAUNCH.
-
Click SELECT.
-
Specify the following:
-
Title. Up to 50 characters.
-
Description. Up to 150 characters.
-
Promo price. The price that will be in effect during the promotion period. Up to 20 characters.
-
Button label. The button label, such as Buy Now. Up to 20 characters.
-
Under Appearance, select the colors to use for the tile name and button label. Select an icon for the tile (150 by 150 px, PNG or SVG format). Select a background image to fill in the entire Top Selling Services area. We recommend using an image of 400 by 1000 px for a background.
-
Under Promotion Period, specify when and for how long the promoted items will appear in the Customer Marketplace.
-
-
Click ADD.
-
To launch the promotion campaign, click the On button under Configuration.
-
If you want to edit or remove an item from the Top Selling Services area: Go to Reseller Panel > UX1 > Sales Channels > End-customer Marketplace (in the left navigation pane) > Content > Promo Section > MANAGE, click the
 icon, and click Customize or Delete.
Building a catalog from scratch
If your reseller subscription does not include any apps or services for reselling, prepare your own catalog and make it available to your customers through the End-Customer Marketplace.
By default, the product catalog is empty, and you need to fill it in. To do this, create sales categories and service plans in the Billing area of the CloudBlue Commerce Reseller Panel, and then import them into the Customer Marketplace. When the import is completed, select which of your offers will be available to users, specify pricing, and prepare visually appealing tiles, called product pages, to showcase your offers in the Marketplace.
Step 1: Prepare sales categories and service plans in Billing
-
Go to Reseller Panel > Classic Panel (in the top navigation pane) > Billing.
-
Configure service plans and sales categories as described in Creating and Managing Service Offers.
Step 2: Enable access to the Customer Marketplace
-
Log in as a reseller to CloudBlue Commerce and go to UX1 > Sales Channels > End-Customer Marketplace.
-
In the General section, click On.
-
Click Configure and specify the following settings.
-
Which Marketplace to use. Select UX1 Marketplace.
-
The default page for your customers after login (Marketplace or Dashboard).
-
What to offer in the Customer Marketplace. Select Build new content.
-
Whether to display the introduction tour and walk-through guides to your end customers. Select this option for your customers to see a brief presentation on first login.
-
-
Click Apply to save the changes.
Step 3: Import the product catalog from Billing to the End-Customer Marketplace and adjust it
-
Go to Reseller Panel > UX1 > Sales Channels, click Home page in the left navigation pane, click End-Customer Marketplace at the top, and then click Import Catalog.
When the import is finished, take a few moments to review the service plans and product pages that will be available in the Marketplace. These are the building blocks of a product catalog. Prepare service plans first, and then prepare product pages that include service plans. You can also create category pages if you want to group your offers into categories.
-
Go to Service plans (Reseller Panel > UX1 > Sales Channels > Service Plans > End-Customer Marketplace). This is a list of all the service plans you have.
-
To review or change the plan information and adjust how it will appear in the Marketplace, complete the following steps:
-
Click the plan name. Specify the location of an image to use as a plan icon (it should be located elsewhere on the internet), specify a title and a description.
While editing, you can use these items in the toolbar:

-
Change the font style to bold, italics, or underlined.
-
Align text to the left, center, or to the right.
-
Add a bullet list or a numbered list.
-
Insert a link to a webpage, an image, or a video clip.
-
Change the layout of a block by adding columns.
-
-
Click Save.
-
If your customers speak languages other than English, select a language from the menu, specify a title and a description in the other language and click Save.
-
To return to the list of service plans, click the < Service Plans < End-customer Marketplace link in the top navigation.
-
-
To redirect users to an external store for purchase, click Add Referral Plan. Specify the location of an image to use as a plan icon (it should be located elsewhere on the internet), specify a title, a description, and a link (URL) to the store. Click Save. If you want to add a name and description in another language, select a language from the menu, specify a title and a description in the other language and click Save.
-
To add a new service plan, go to the Billing panel, add a service plan there, and then repeat the import as described in step 1.
-
To make a plan temporarily unavailable to users, hover the mouse pointer over the plan’s name and click the
 icon.
icon. -
To remove a plan from the Marketplace, click the plan name, click the
 icon, and then click Delete. Note that this does not delete the service plan from Billing. It only removes the record about this plan and all your customizations to the plan from the Marketplace.
Now, the service plans are ready. Let’s create pages.
-
Go to Categories (Reseller Panel > UX1 > Sales Channels > Categories > End-Customer Marketplace). This is a list of all product pages that were created from sales categories during the import from Billing in Step 1. The pages are organized in a top-down structure starting with Home.
-
Let’s configure the Home page first. This is the landing page that your customers see when they visit the Customer Marketplace.
-
A search by products and services.
-
A banner. You can add several pictures and make a slide show.
-
A list of featured products or services, also referred to as promo pages or promotions.
-
A product catalog. It consists of product pages, sub-pages with service plans, and category pages.
-
Click Home.
-
Specify what you want to display in the banner area. Click the
 icon.
icon. -
You can choose to upload one banner or make a slide show out of two or three banners.
-
Specify the URL to the banner image. The image must be available elsewhere on the internet. The image dimensions must not exceed 1300 by 375 pixels, and the file size must not exceed 100 kilobytes. We recommend using images in PNG format.
-
If you want to redirect users to a website when they click the banner, type a link in the Link box and select the Open link in new window checkbox.
-
To make a slide show, click the navigation icons
 and
and  to switch between image slots and upload more images.
 -
If you want to rearrange images in the slide show, select the order of each image in the Position menu.
-
If you want to delete an image, click Delete.
-
Click Save.
The banner on the Home page is ready. Let’s configure the pages of your product catalog that will showcase your offers.
-
-
To edit a page with your offering, complete the following steps:
-
Go to Categories (Reseller Panel > UX1 > Sales Channels > Categories > End-Customer Marketplace).
-
Click a page name. All items on the page must be editable by now. If you previously visited this area of the Marketplace settings and selected the Preview mode, click Edit to switch back to the editing mode.
-
Click the title and description to edit them.
-
Click the
 icon to specify the URL to the icon that will accompany the product page in the showcase. You can select a background color to fill the transparent portions of the image with it.
 -
On the Pricing tab, under Service Plans, select the plans that you will offer for users to purchase when they view the product showcase.
-
To add a plan from the list of all plans created earlier, click in the Add plan box, find the plan by name, and select it.
-
To rearrange plans in the showcase, drag plans by the
 icon.
icon. -
To remove a plan from the showcase, click the
 icon.
icon. -
On the Pricing tab, under Frequently Bought Together (this may also appear as Cross-Sell, depending on your Marketplace version, but it is customizable), select the complementary plans that you want to offer.
-
Go to the Overview tab. Provide more information about the solution that you offer. Add screenshots, video clips, and other marketing materials.
-
Go to the Support tab. Provide information about the ways to contact the technical support of the service vendor.
-
-
To add a page, go to Categories (Reseller Panel > UX1 > Sales Channels > Categories > End-Customer Marketplace), click the
 icon, and click Add Category Page or Add Product Page. A category page is a container that you can use to group similar product pages together.
 -
To rearrange pages, hover the mouse pointer over a page name, point at the
icon, and drag the page to another location. Note that by default, all pages are added without any particular order, and the order might change after you edit a page. If you want a specific order of pages, drag the pages within the structure. -
To make a page unavailable to users, hover the mouse pointer over the page name, and click the
 icon.
icon.
The product catalog is now configured in the Customer Marketplace.
Step 4: Promote services on the landing page (Home page) of the Customer Marketplace
To specify which items or offers to display on the landing page of the Customer Marketplace, in the Top Selling Services area below the banner:
-
Go to Reseller Panel > UX1 > Sales Channels > End-customer Marketplace (in the left navigation pane) > Content > Promo Section > LAUNCH.
-
Click SELECT.
-
Specify the following:
-
Title. Up to 50 characters.
-
Description. Up to 150 characters.
-
Promo price. The price that will be in effect during the promotion period. Up to 20 characters.
-
Button label. The button label such as Buy Now. Up to 20 characters.
-
Under Appearance, select the colors to use for the tile name and button label. Select an icon for the tile (150 by 150 px, PNG or SVG format). Select a background image to fill in the entire Top Selling Services area. We recommend using an image of 400 by 1000 px for a background.
-
Under Promotion Period, specify when and for how long the promoted items will appear in the Reseller Marketplace.
-
-
Click ADD.
-
To launch the promotion campaign, click On under Configuration.
-
If you want to edit or remove an item from the Top Selling Services area: Go to Reseller Panel > UX1 > Sales Channels > End-customer Marketplace (in the left navigation pane) > Content > Promo Section > MANAGE, click the
 icon, and click Customize or Delete.
Your Customer Marketplace is now ready.
Step 5 (Optional): Customize the Marketplace tile on the Dashboard
There are two items in the Customer Panel that lead to the Marketplace: the Marketplace link in the left navigation pane and the Marketplace tile on the Dashboard.
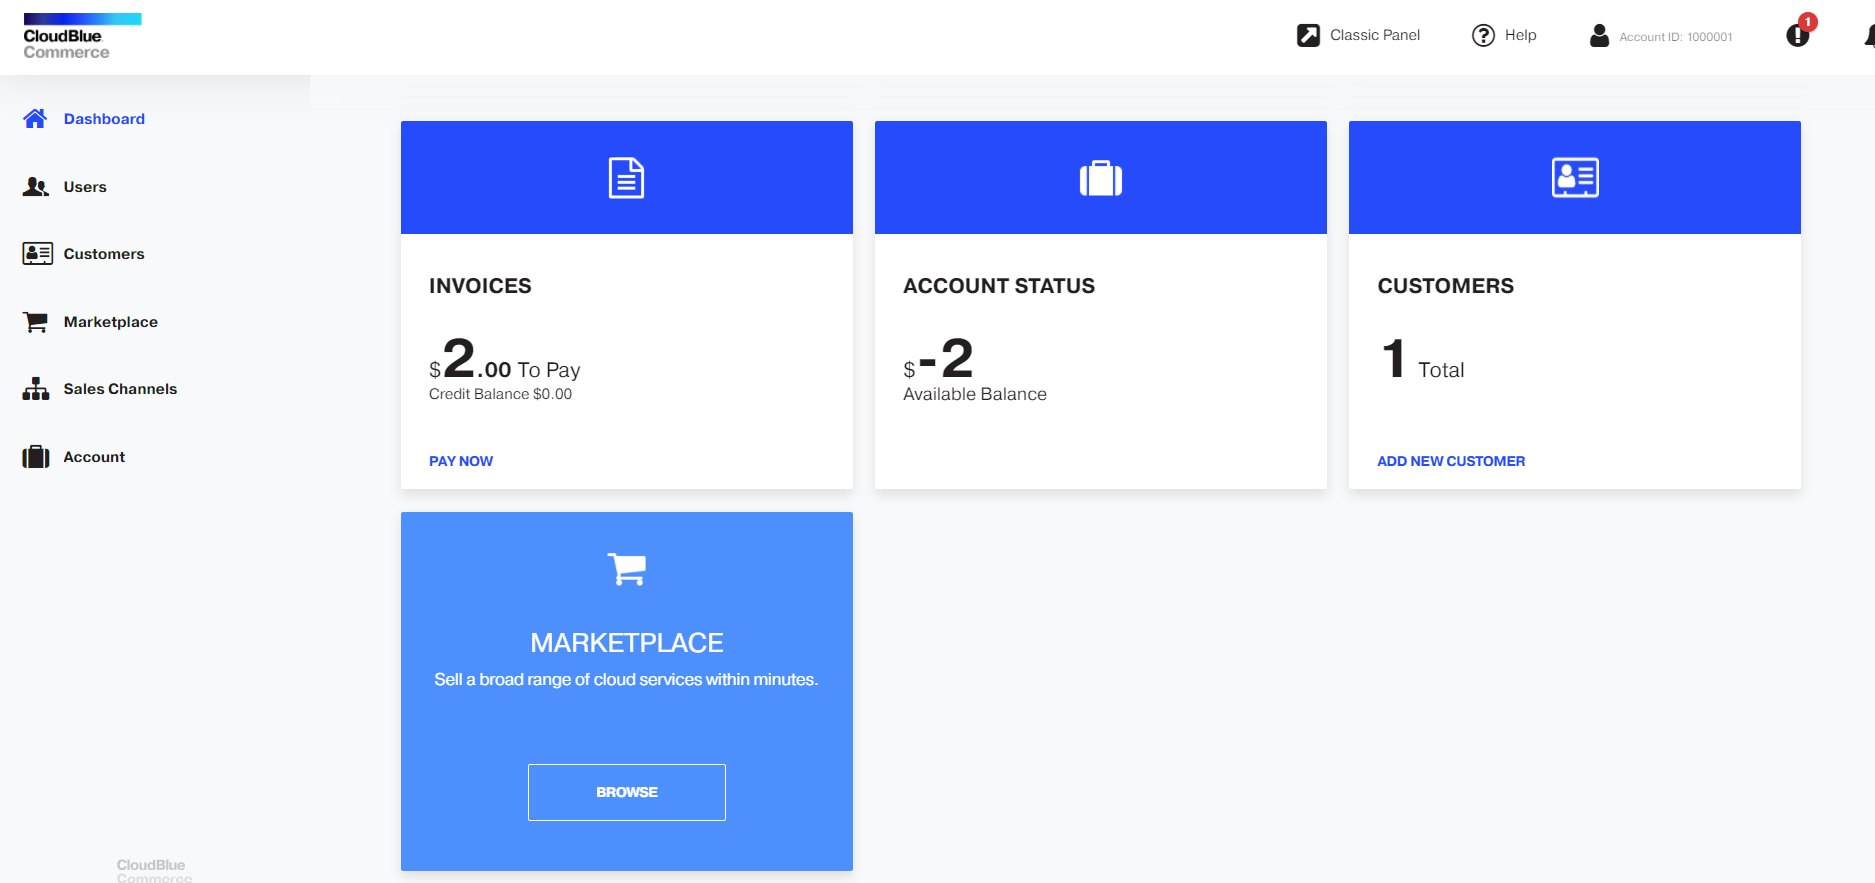
If you want to adjust the appearance of the Marketplace tile on the Dashboard, go to Reseller Panel > UX1 > Sales Channels > End-Customer Marketplace (in the left navigation pane) > Appearance > Preview > CUSTOMIZE.
Exploring products and plans
In UX1 Marketplace, you can see product and plan details and learn more about them before going to the cart. This can be done on a product and plan page that were introduced in UX1 Marketplace version 7.3.
Note: To ensure these pages are displayed correctly, re-import the catalog after the upgrade to version 7.3 for both reseller and customer marketplaces. To do this, go to Sales Channels > Home Page > Reseller Marketplace or End-customer Marketplace tab and click Import catalog. This is only required to be done once.
Product Page
A product page can be opened by clicking a product on a plan page or on the Product tab of the search result page.
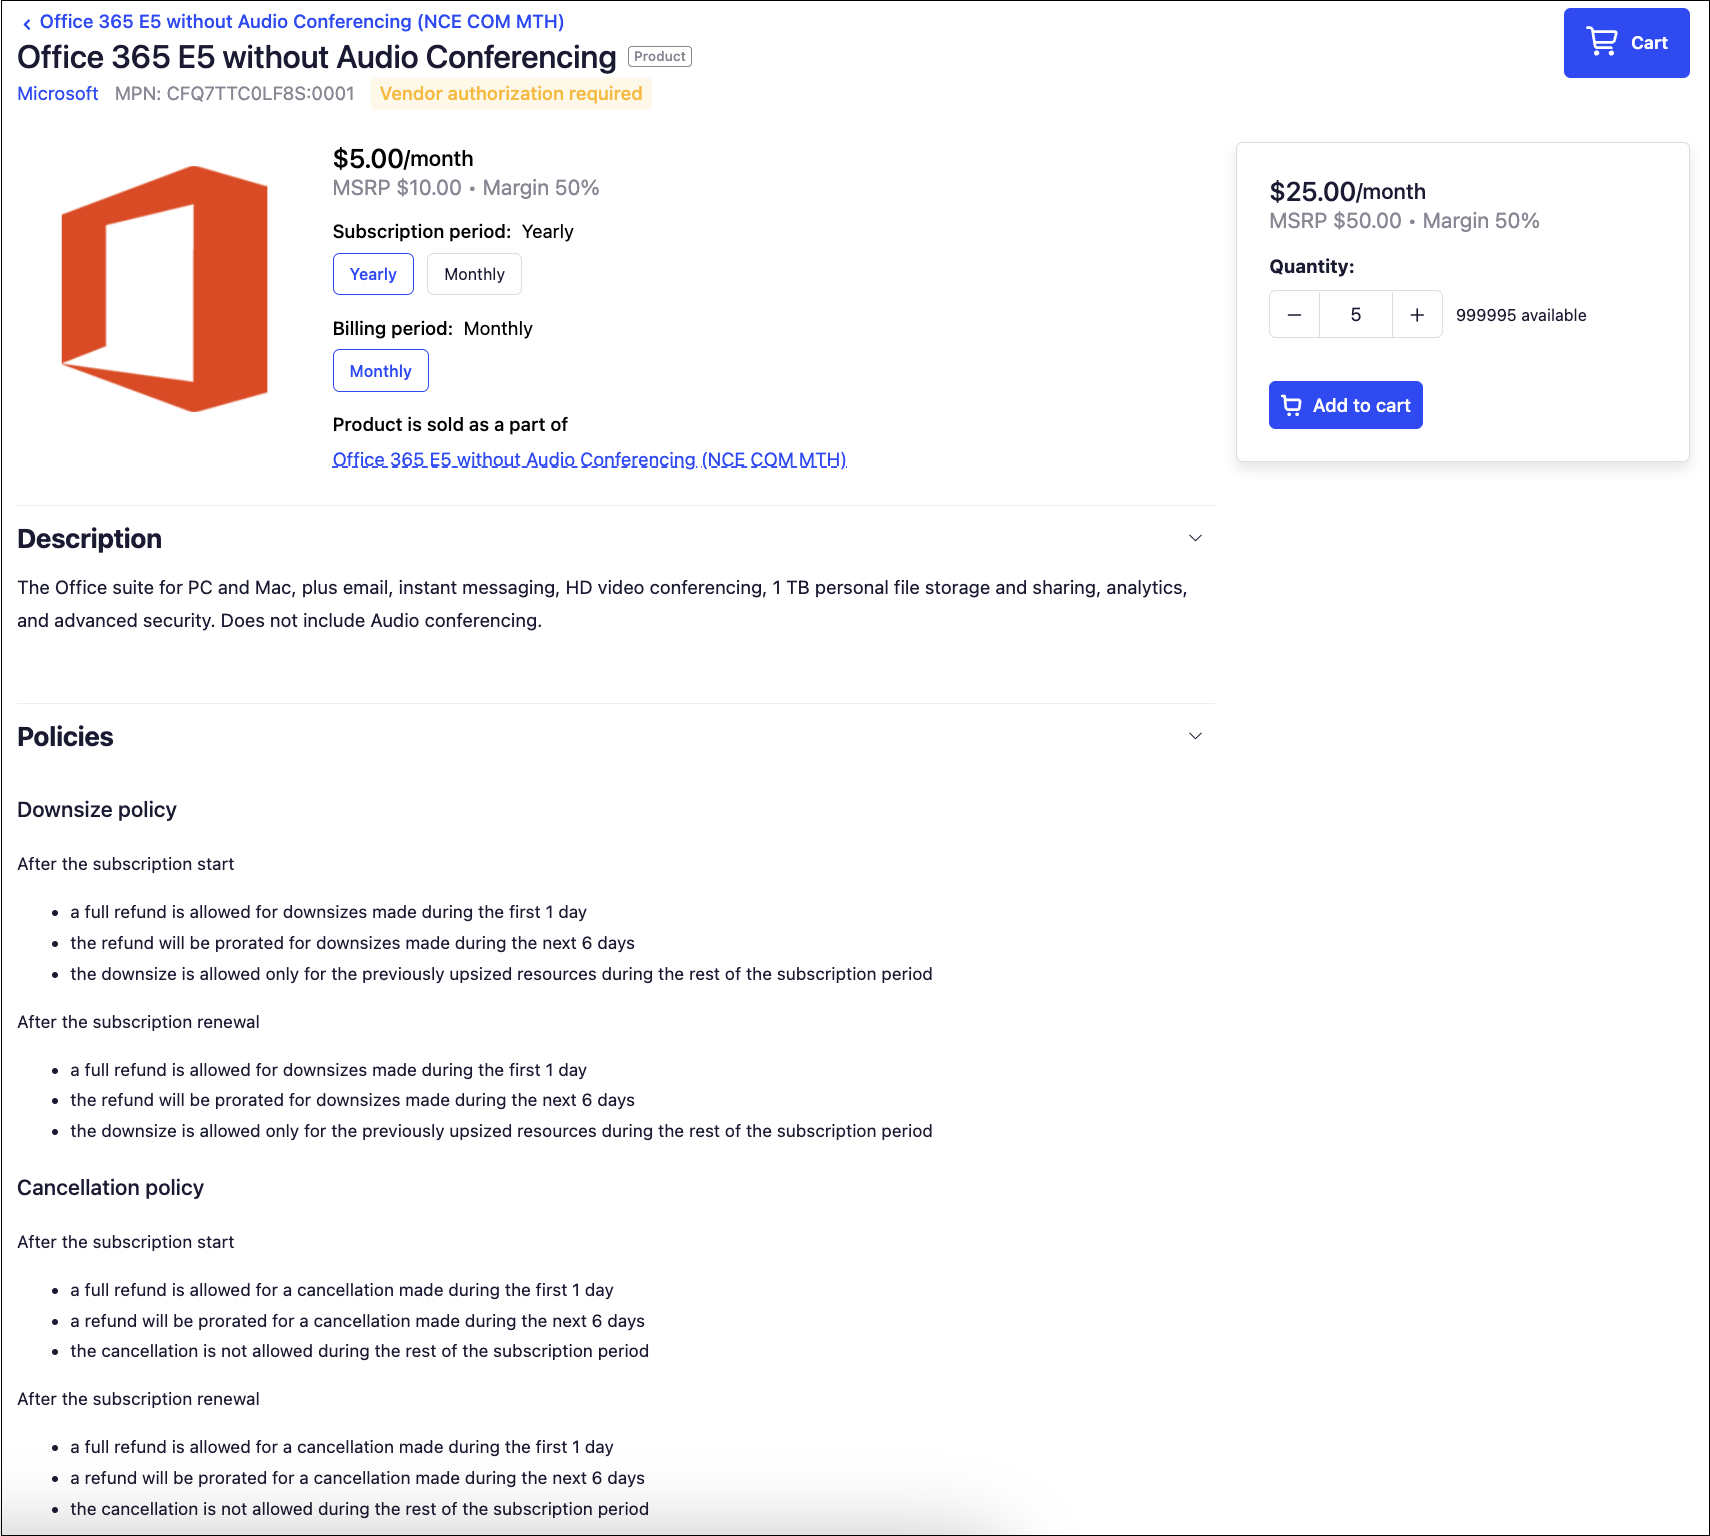
In the main area of the product page you can see the information about the product:
-
Product name
-
Vendor name
-
Product MPN
-
Product logo
-
Product price
-
Available subscription and billing periods
-
Plan that includes this product
-
Product description
-
Cancellation and downsize policies inherited from the plan.
To the right you can find the information about the product offer. There you can see the minimum quantity of the product that can be purchased, and the minimum price of the plan that includes this product.
Note: In some plans, there are products included in that plan and such products can affect the price of the offer.
Clicking Add to cart will add the plan with the product to cart. Later at checkout, if it is available in this plan, you will be able to include more products and change their quantity.
Plan Page
To open a plan page, click the plan in the marketplace.
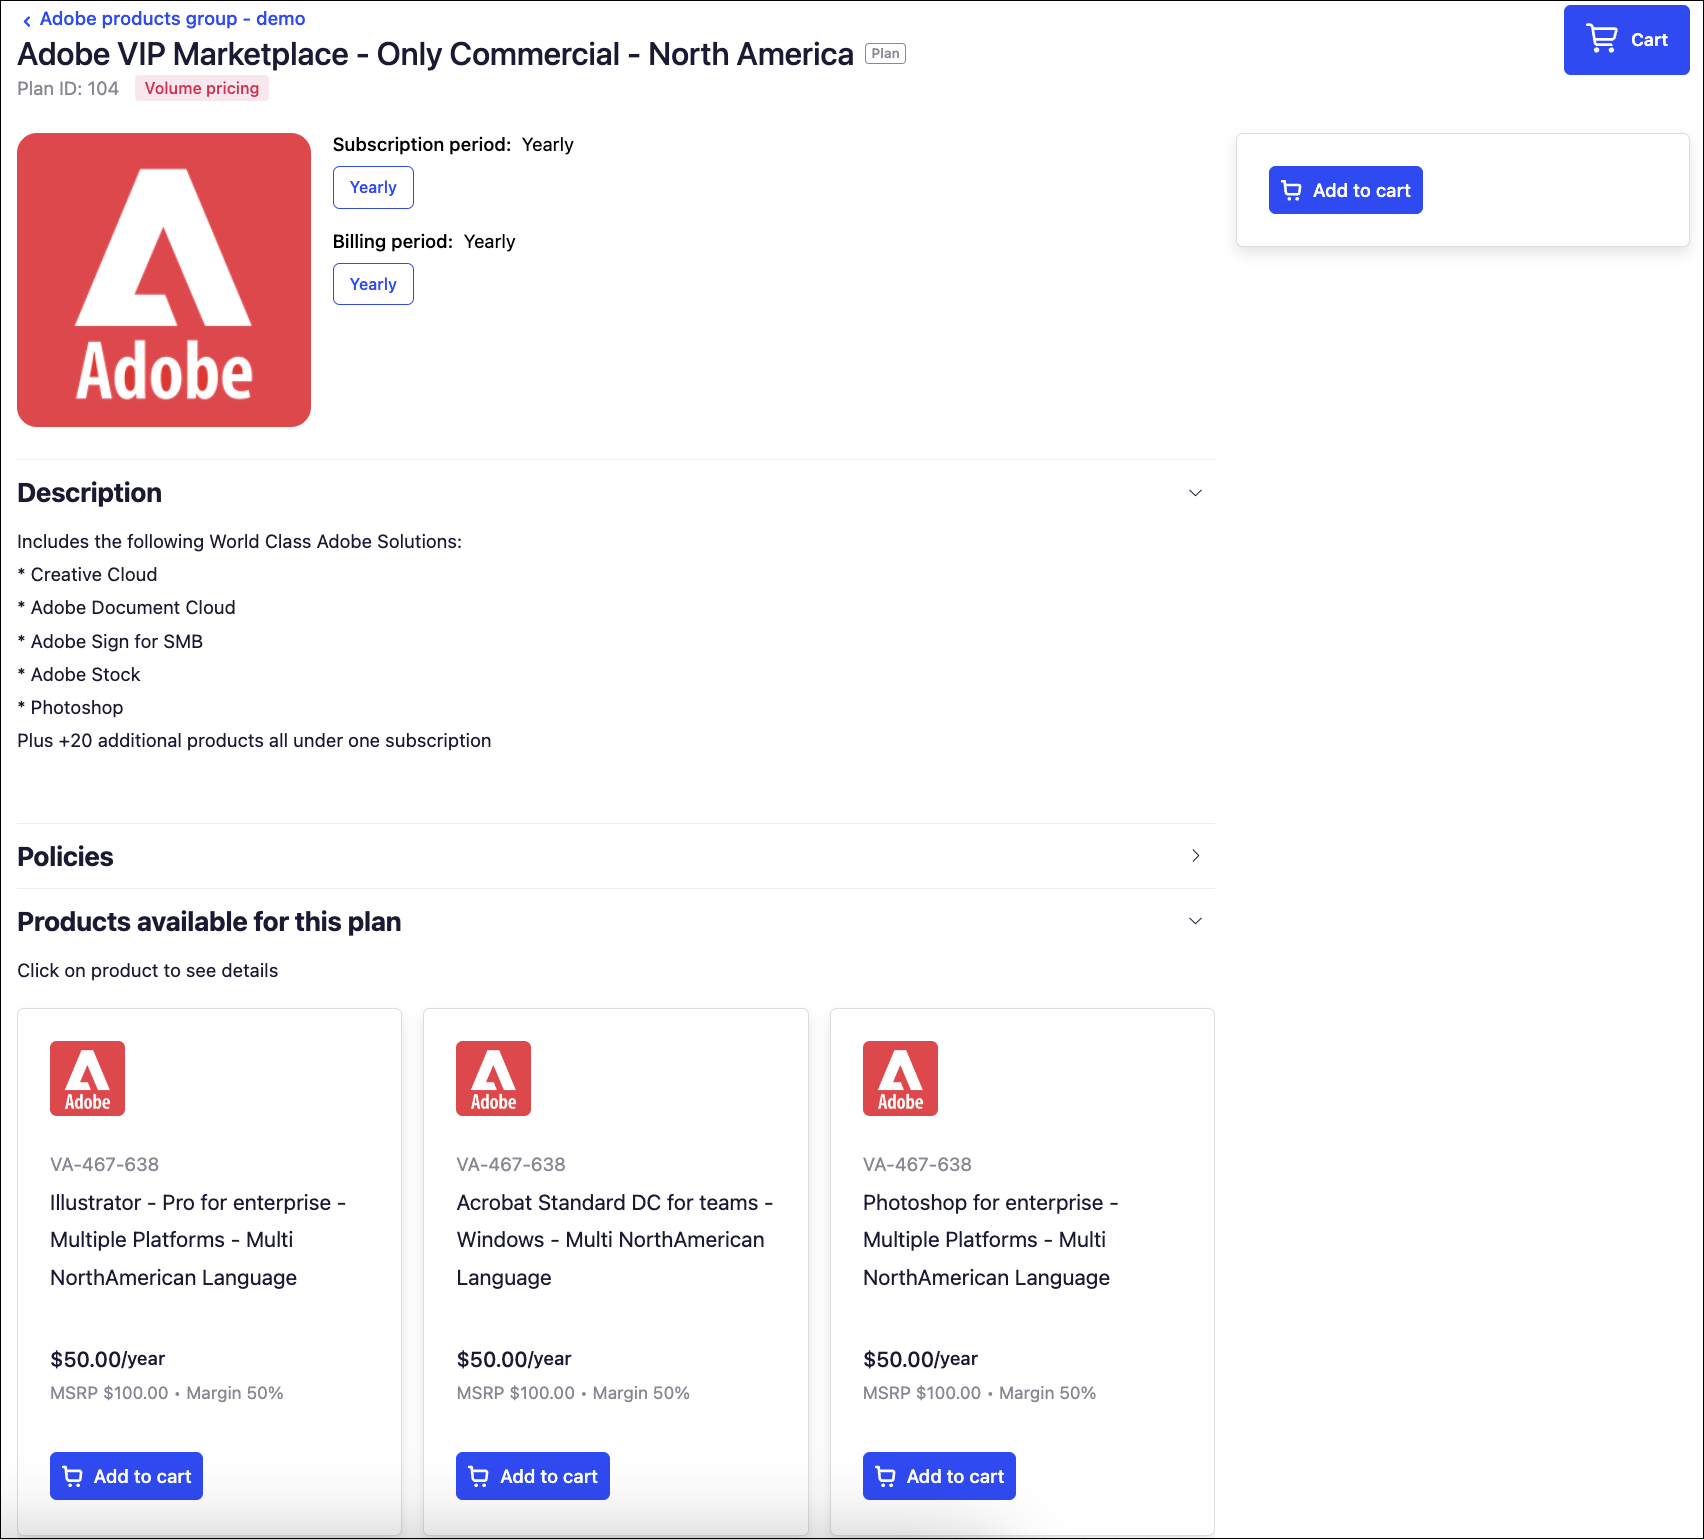
In the main area of the plan page you can see the information about the plan:
-
Plan name and ID
-
Its logo
-
Available subscription and billing periods
-
Plan description
-
Cancellation and downsize policies, if configured
-
The list of products that can be purchased with this plan. Clicking a product tile there opens that product's page.
If the plan is not yet in the cart, when you click Add to cart under a product, the plan will be added to cart with the minimum amount of that product and of the included products.
To the right, there you can find the information about the offer. Clicking there Add to cart will add the plan with minimum amount of the included products. Later at checkout, you will be able to change the amount of the products sold within this plan.
Purchasing on Behalf of Customers
This section explains how to purchase services on behalf of a customer. As one of the most popular apps among users is Microsoft Office 365, let’s see how to buy it. The steps for purchasing other services or apps might slightly differ.
-
Go to the Reseller Panel > Operations > Customers, click the
 (Log in as a customer administrator) icon, and then click Customer CP in the top navigation pane.
 -
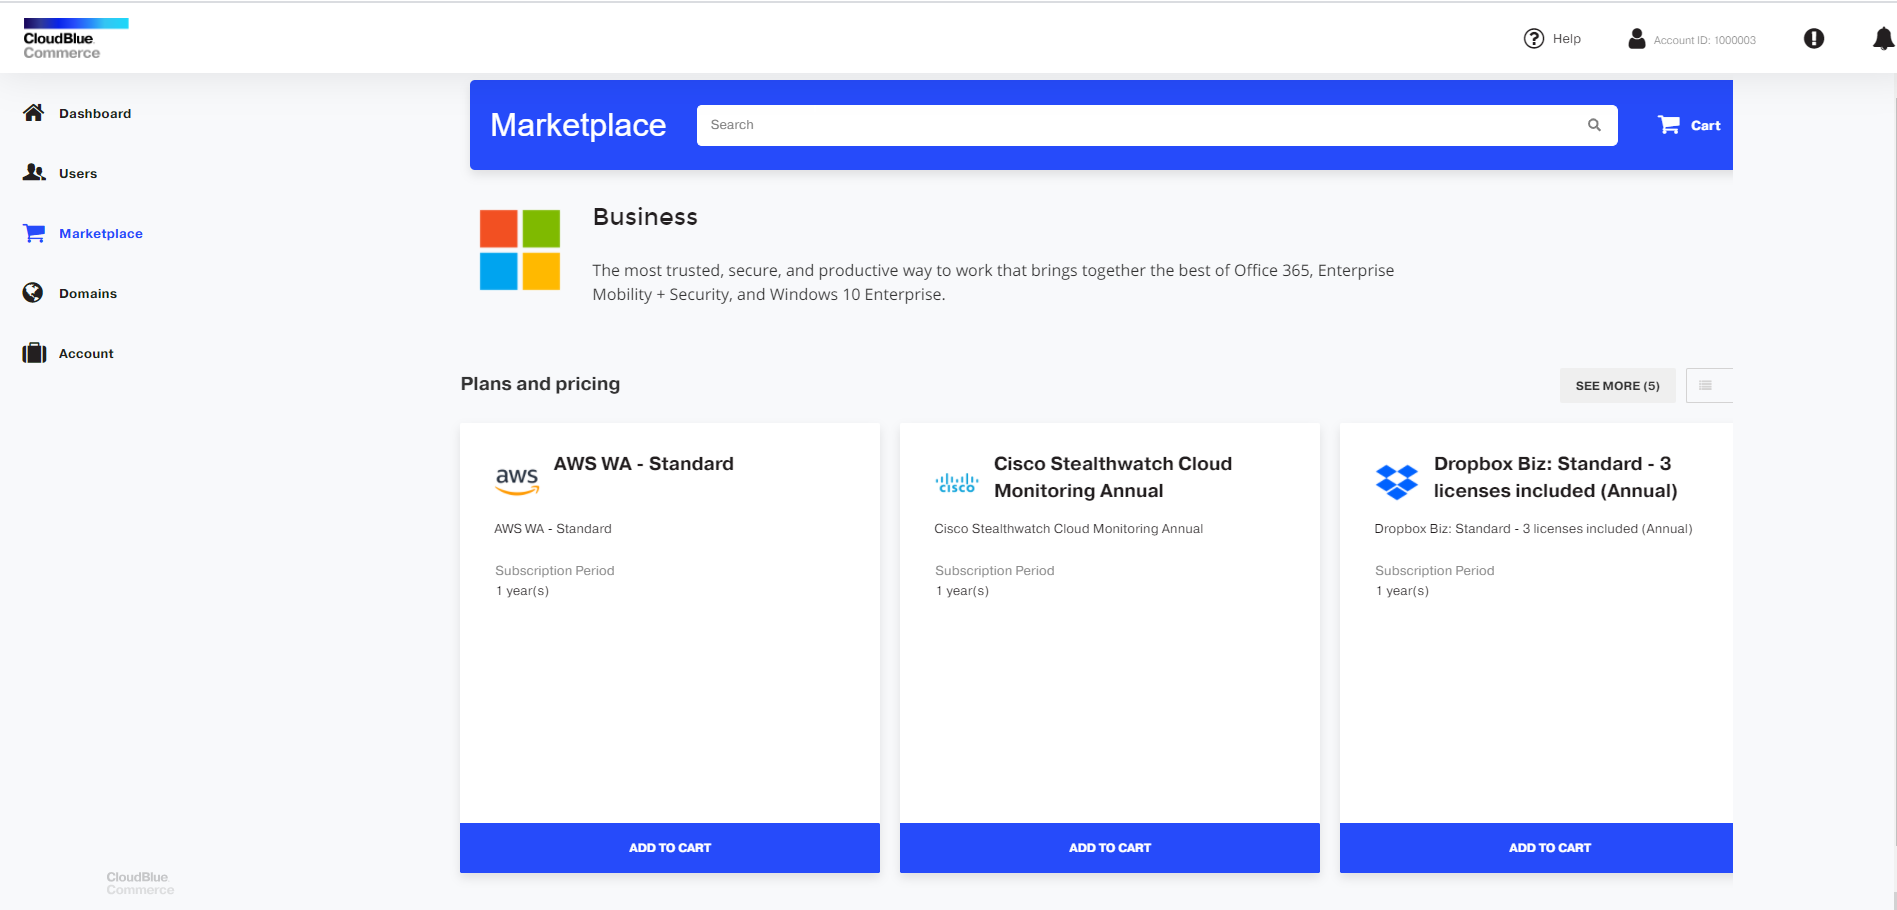
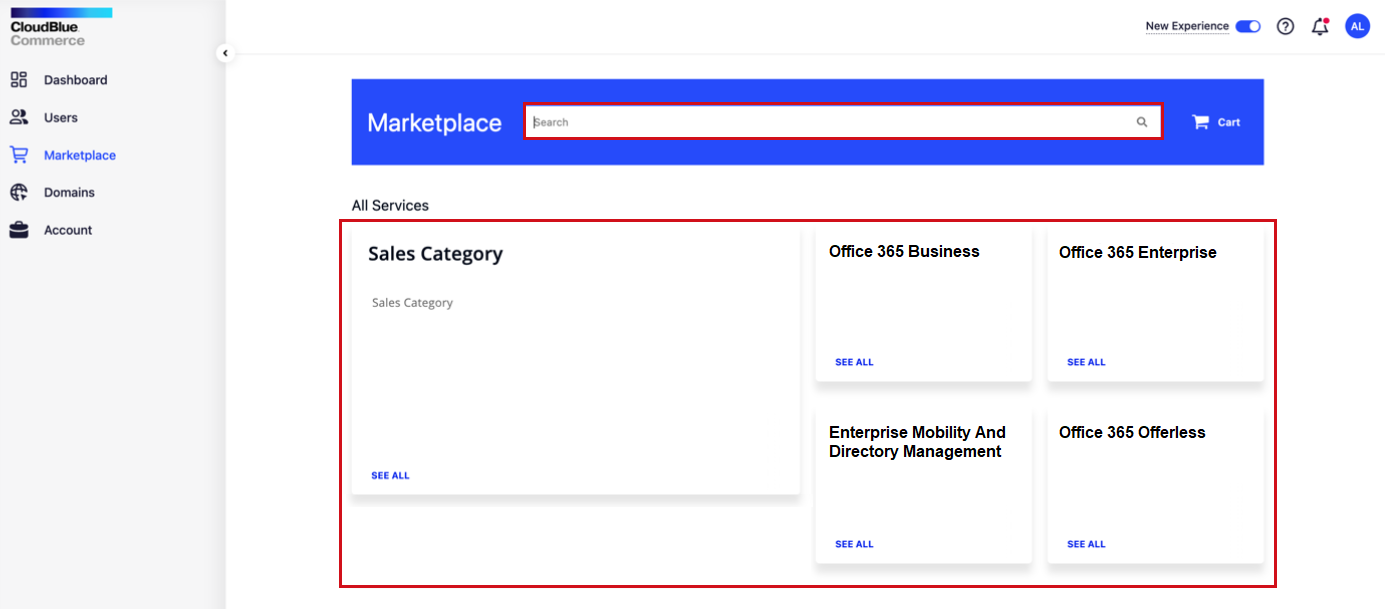
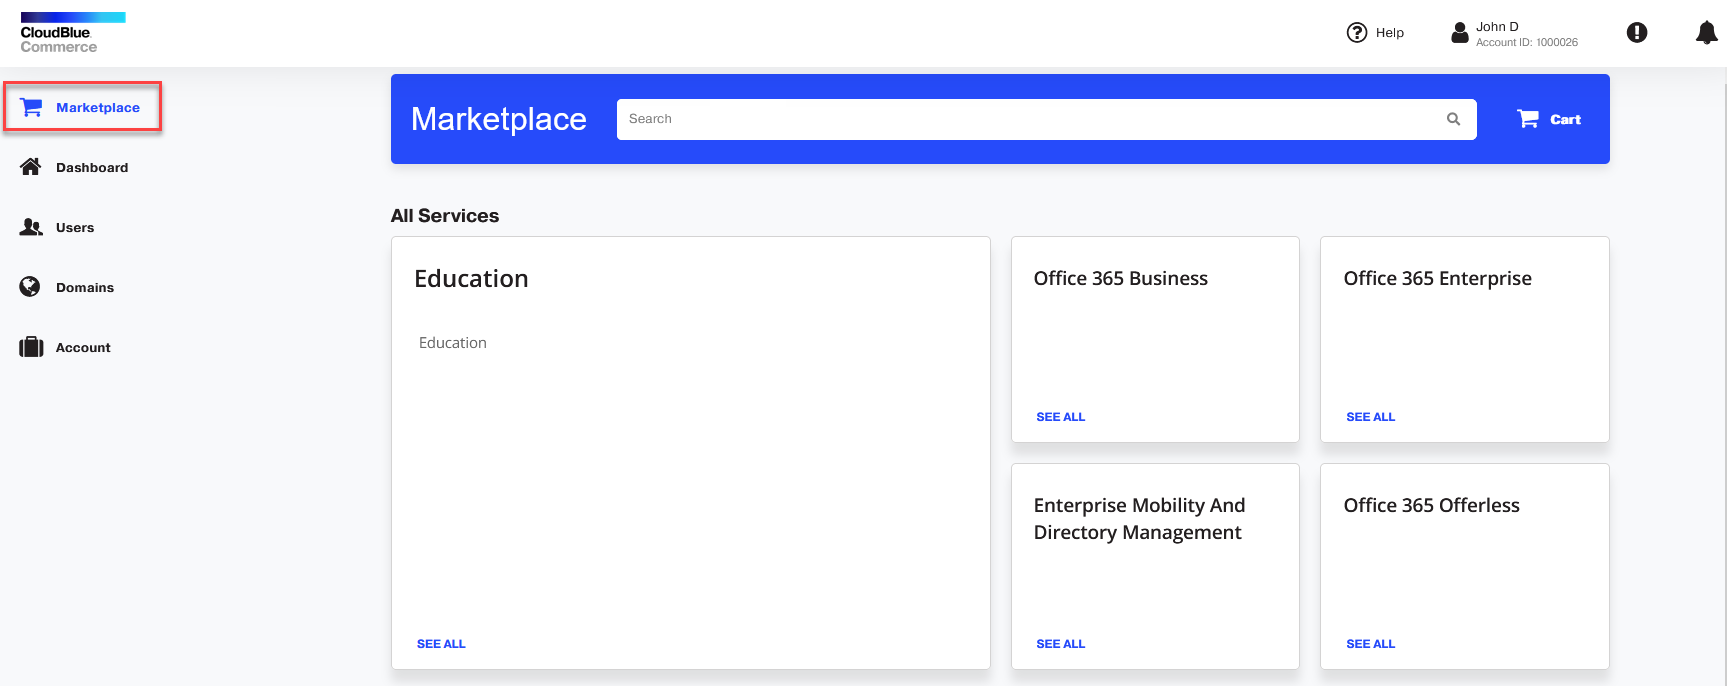
Click the Marketplace link in the navigation pane on the left.

-
Search for an app or service by using the search bar or browse all apps under All Services.
-
Click the tile with the app name. Let’s select Office 365 Business.

-
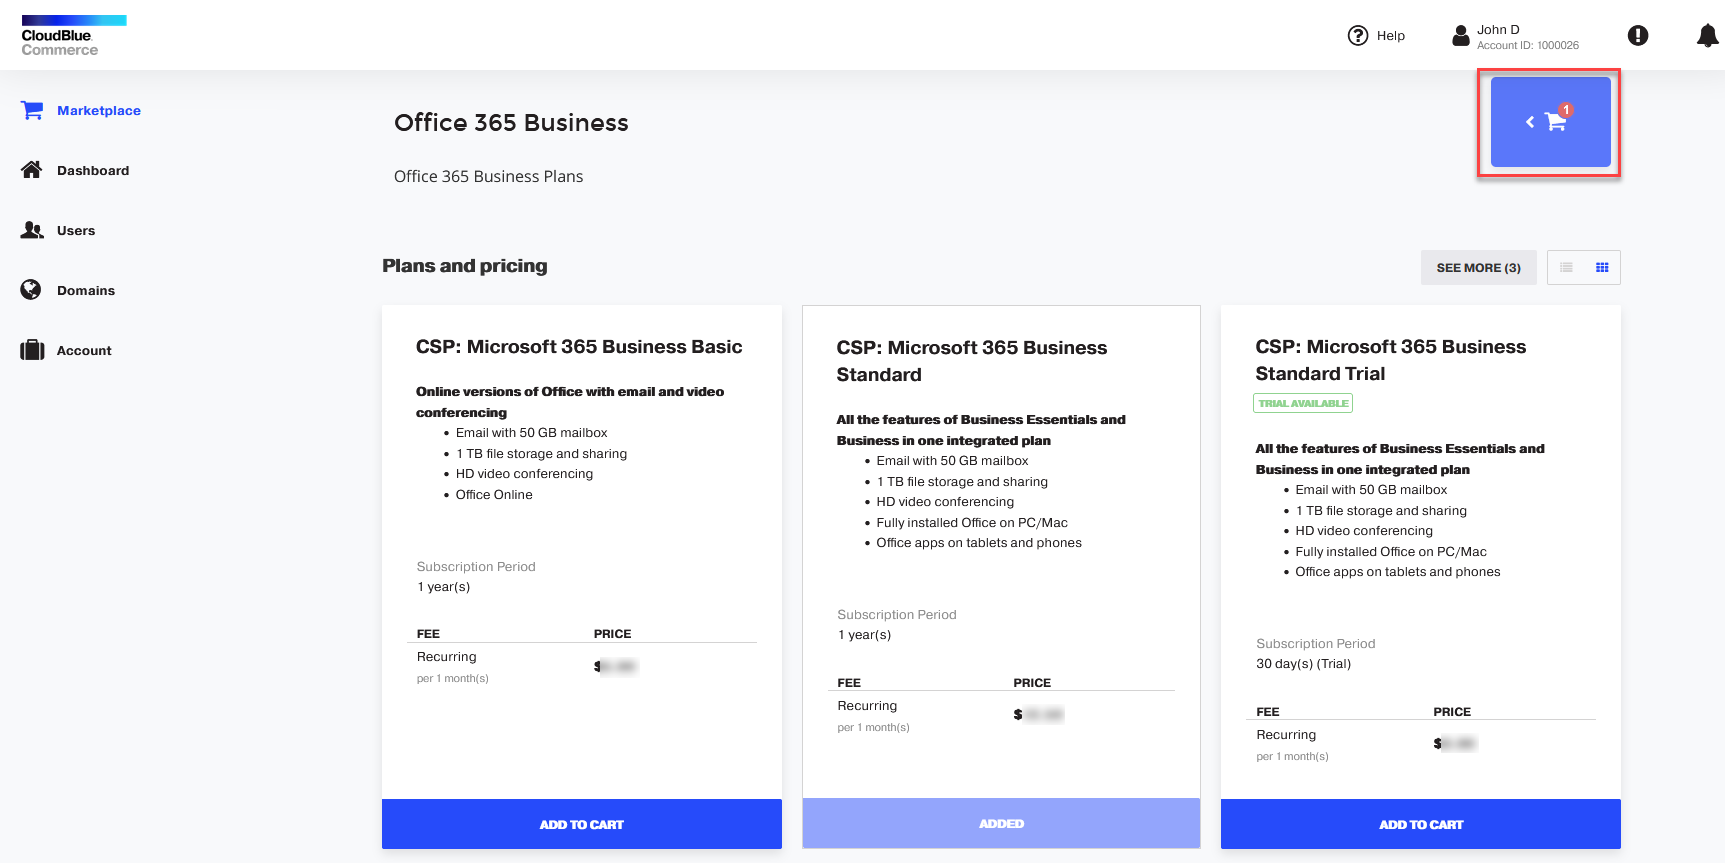
Under Plans and pricing, select the option you need and click ADD TO CART.

-
When ready to complete your purchase, click the shopping cart.
-
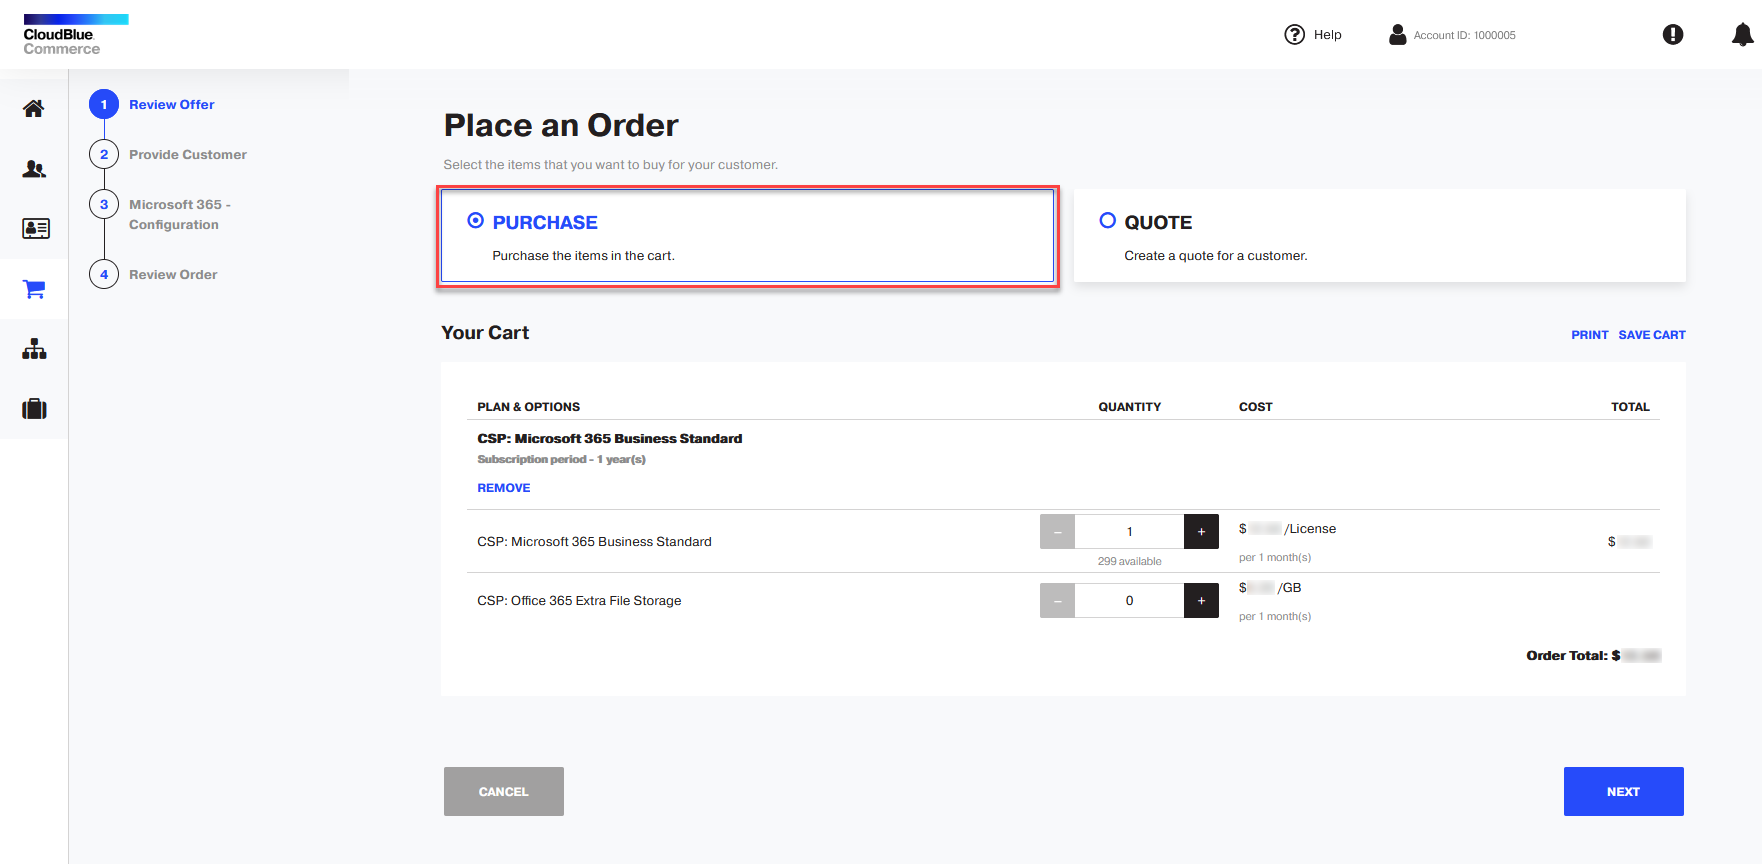
Select PURCHASE.
-
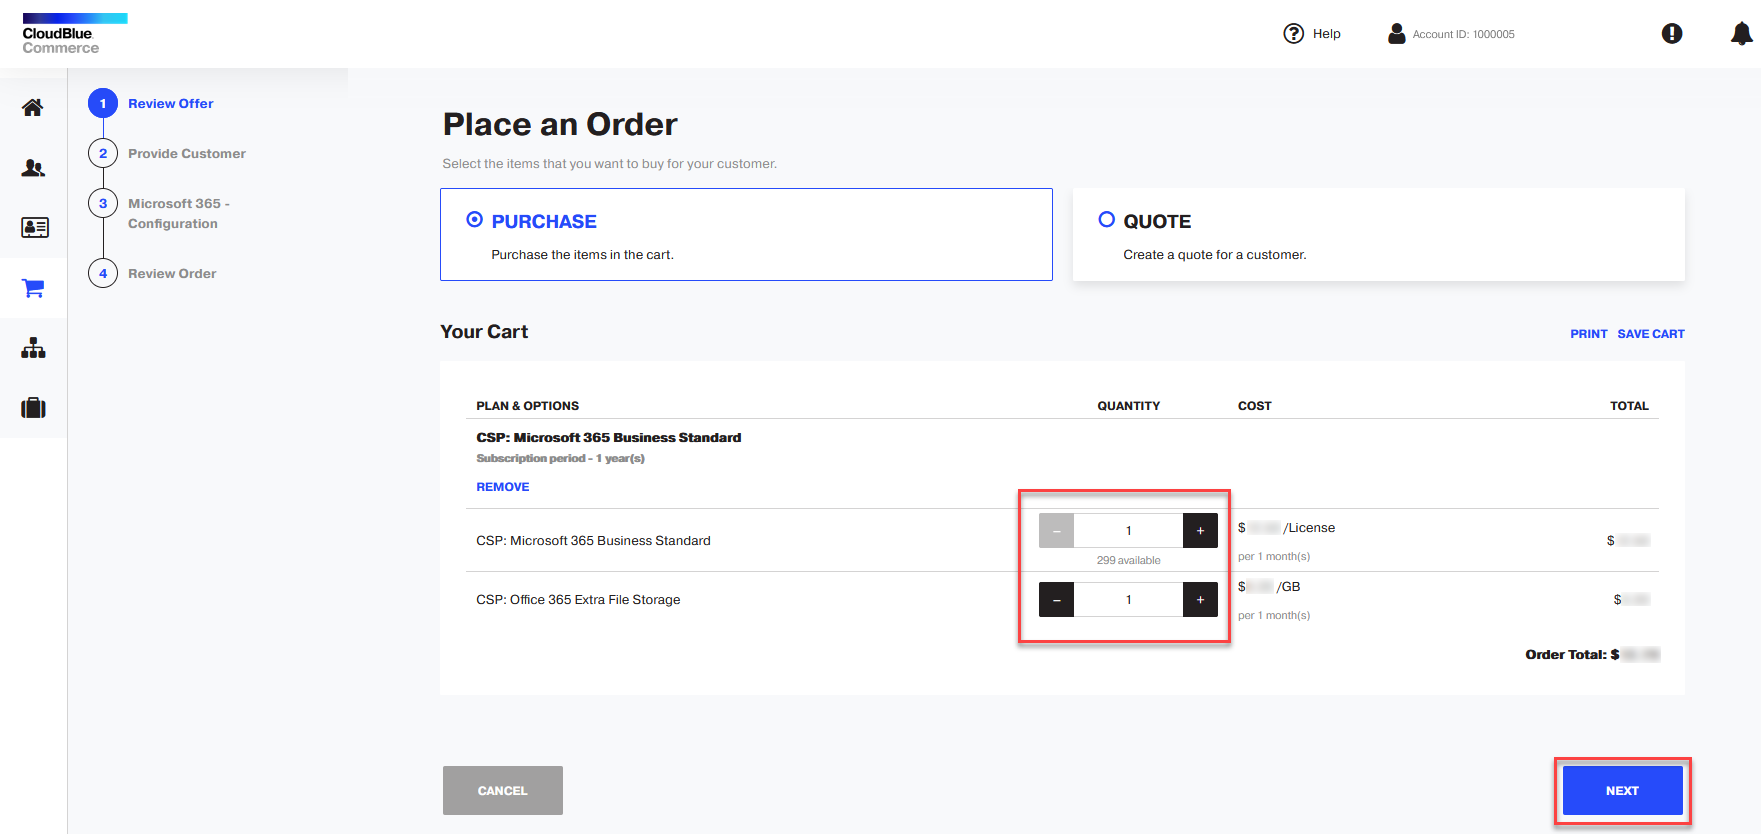
Select the options that you want and click NEXT.
-
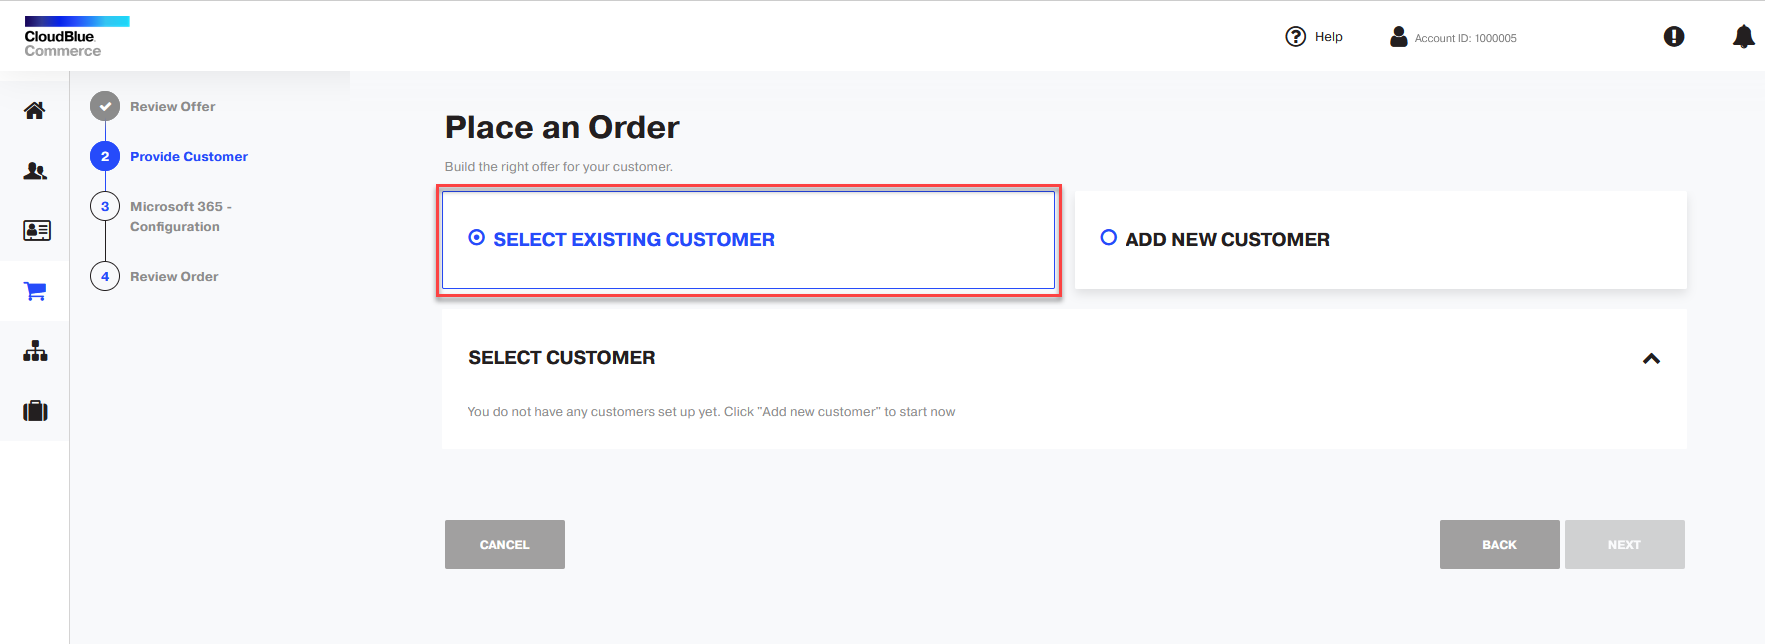
Select the user account for which you want to purchase or add a new user. Click NEXT.
-
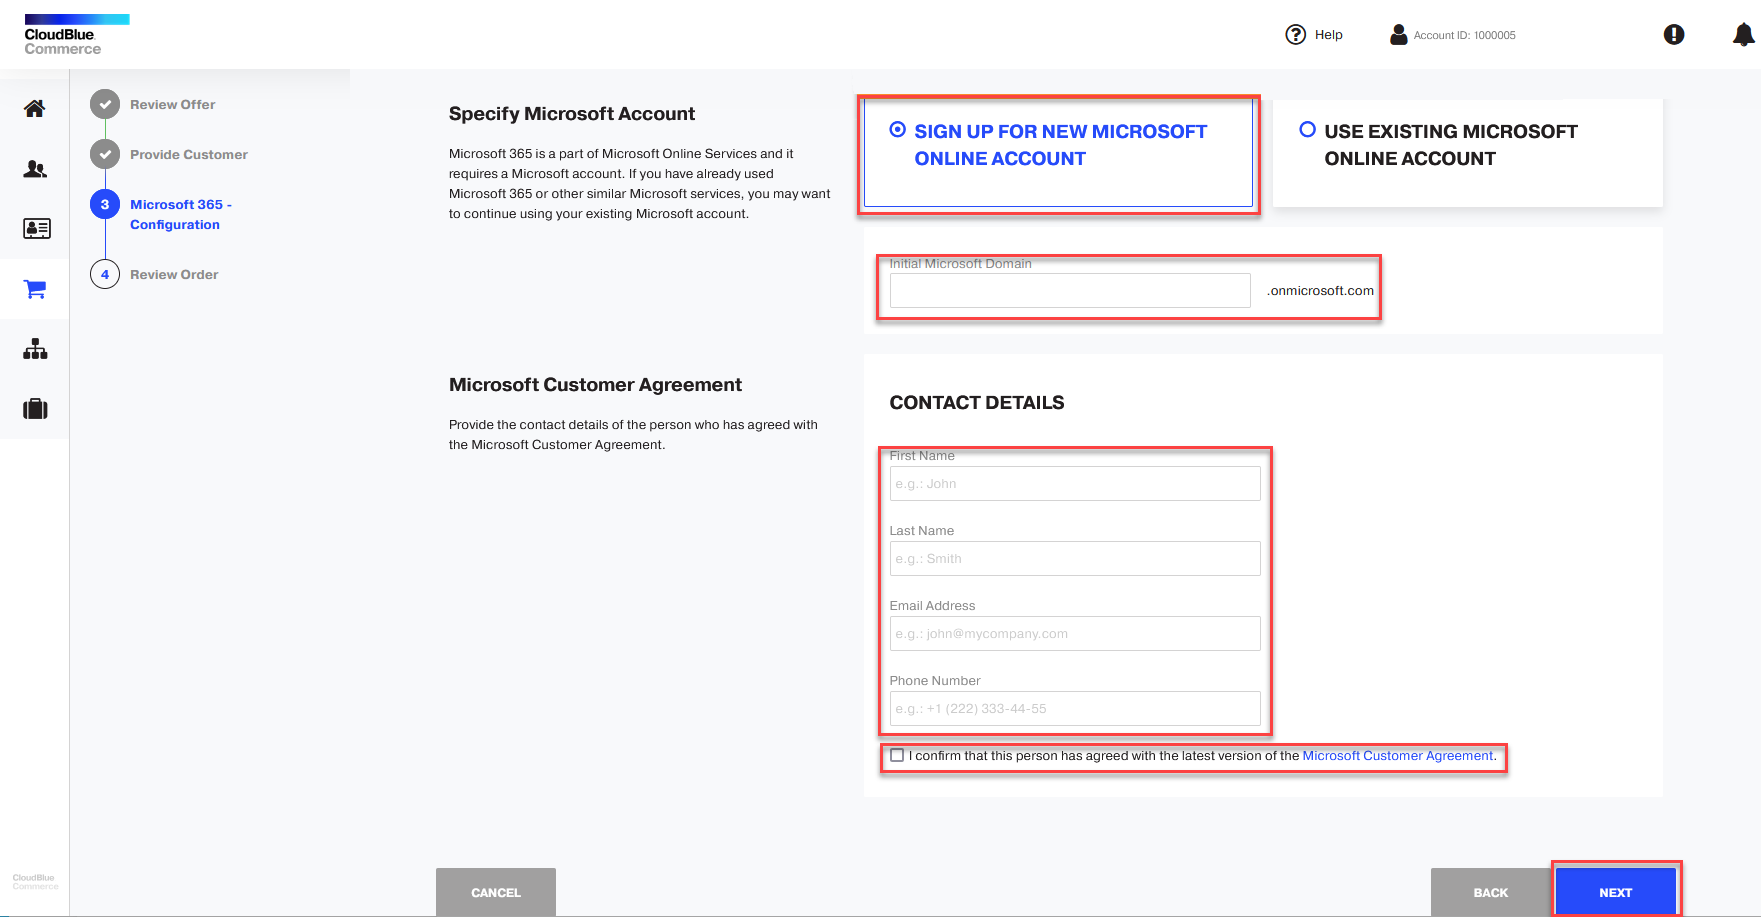
If the user does not have a Microsoft Online account yet, select the option SIGN UP FOR NEW MICROSOFT ONLINE ACCOUNT. Specify the subdomain name (also referred to as a tenant name) that will be used with Microsoft services. Provide contact information and select the checkbox I confirm that this person has agreed with the latest version of the Microsoft Customer Agreement. Click NEXT.
-
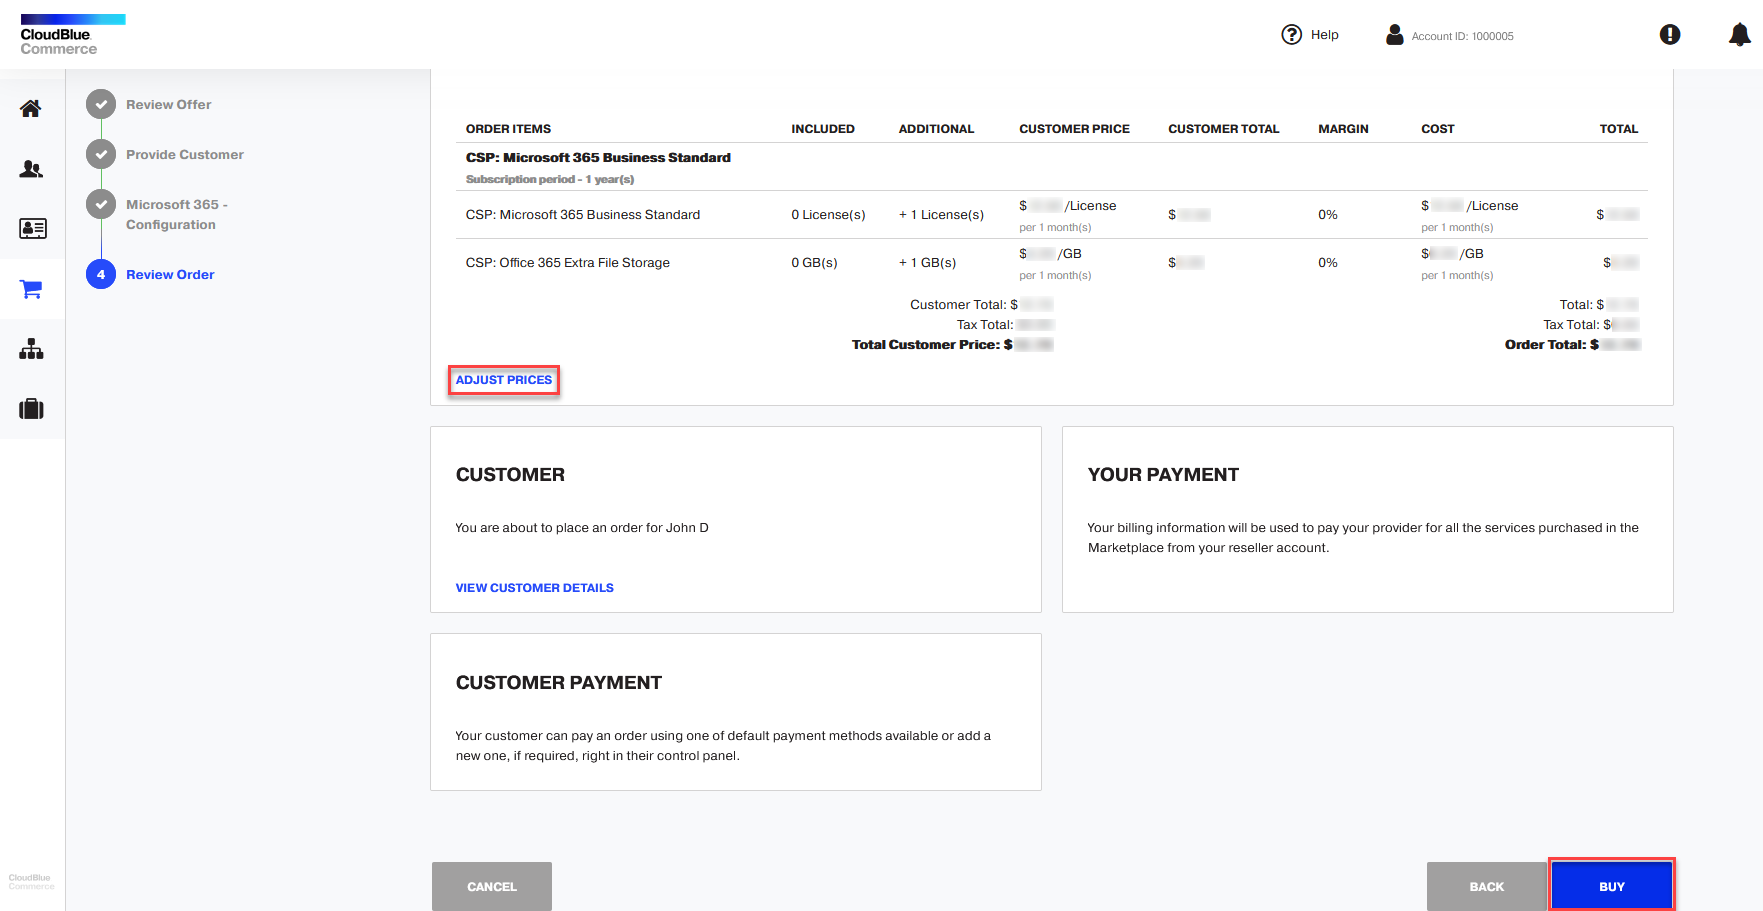
Review the order. If you want to provide a discount, click ADJUST PRICES. Click BUY.
When the service is provisioned and is ready for use, the user will receive notifications by email.
Purchasing an Adobe Plan with 3-year Commit on Behalf of Customers
Adobe can offer an additional discount for purchasing a subscription with a commitment that product quantity will not fall below the committed amount. To purchase a subscription with such a discount on behalf of a customer, complete these steps:
-
Log in to the UX1 for Customers.
-
Click the Marketplace link in the navigation pane on the left.
-
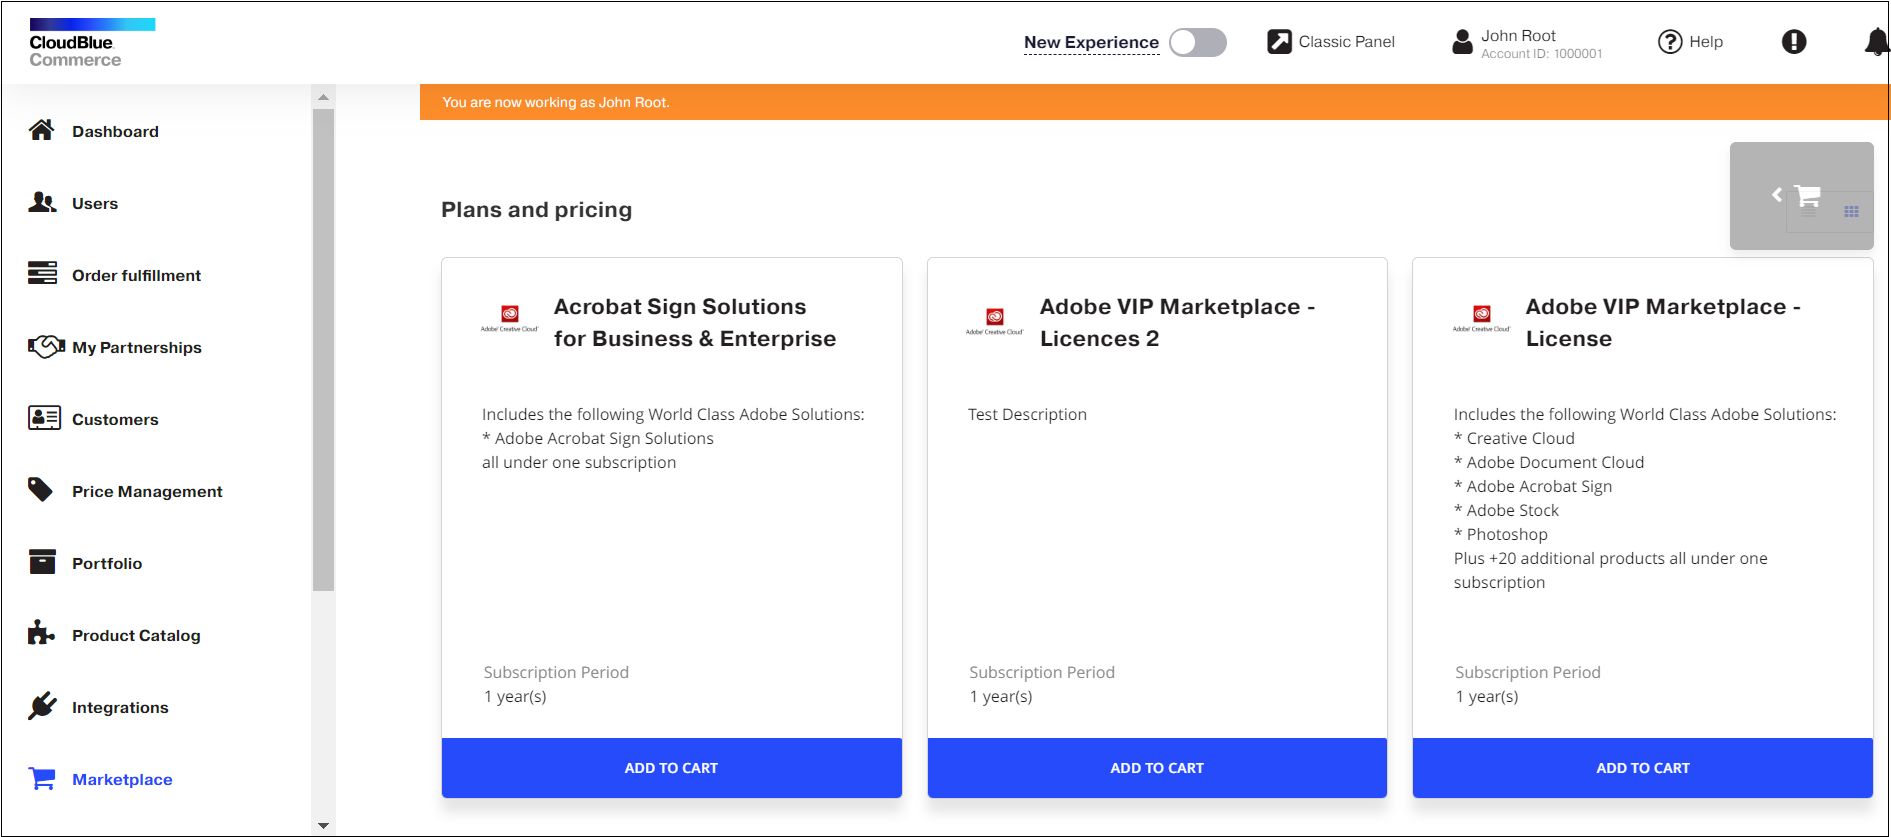
Search for an application or service by using the search bar or browse all applications under All Services.
You can also select the products by searching with product names in marketplace.
-
Choose the application, for example, Acrobat Sign Solutions and click Add to cart.
-
When ready to complete your purchase, click the shopping cart.
-
Specify the amount of product to purchase. The price hint will display price for each tier with and without commitment.

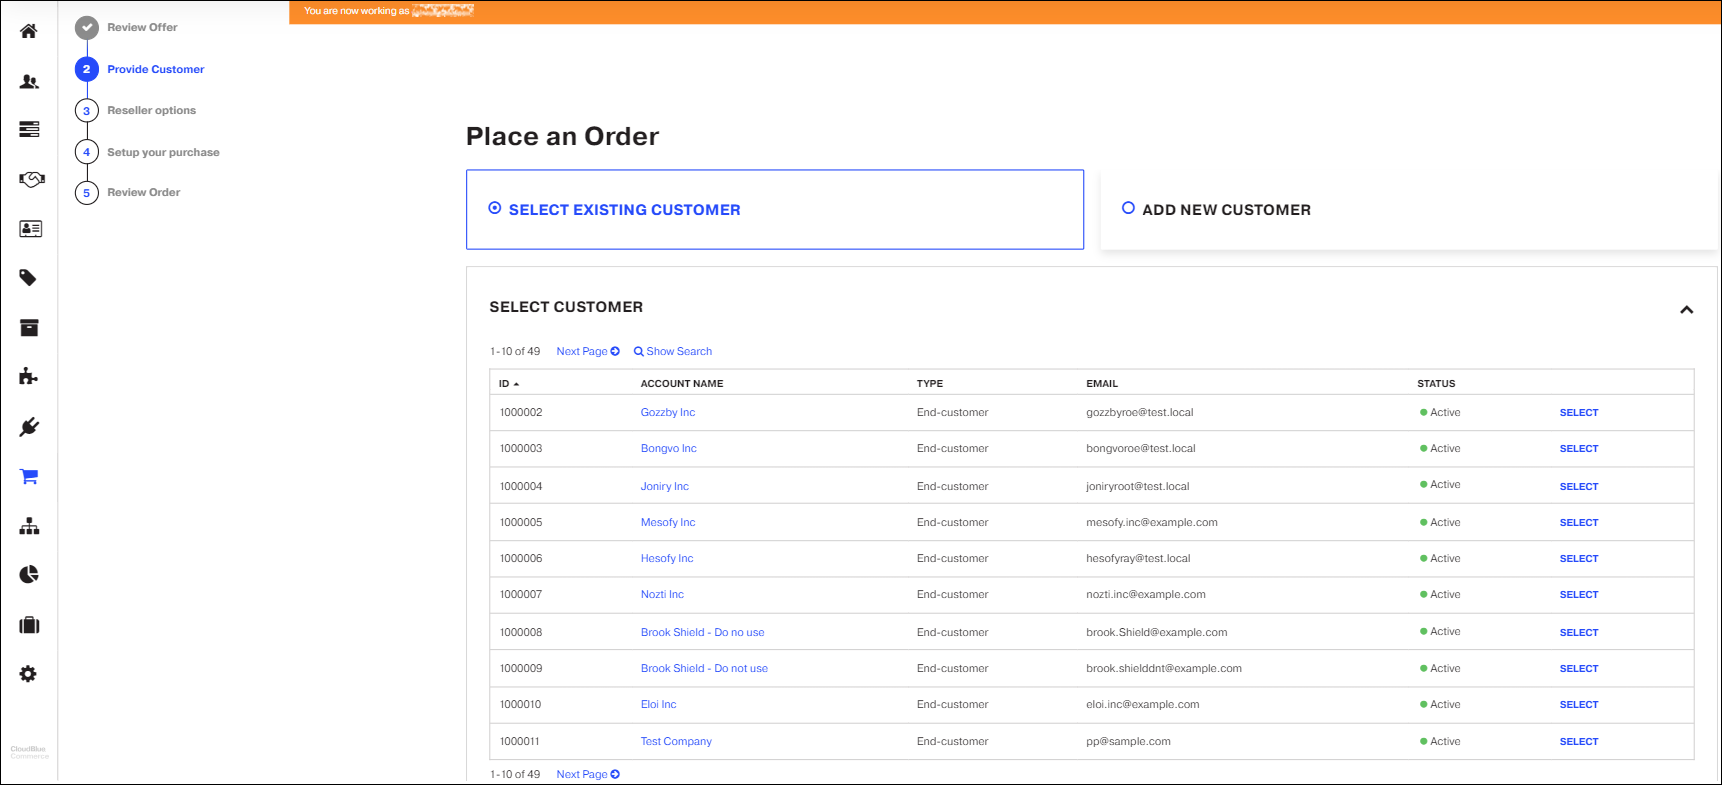
-
Select a customer, for which to purchase the subscription and click Next.
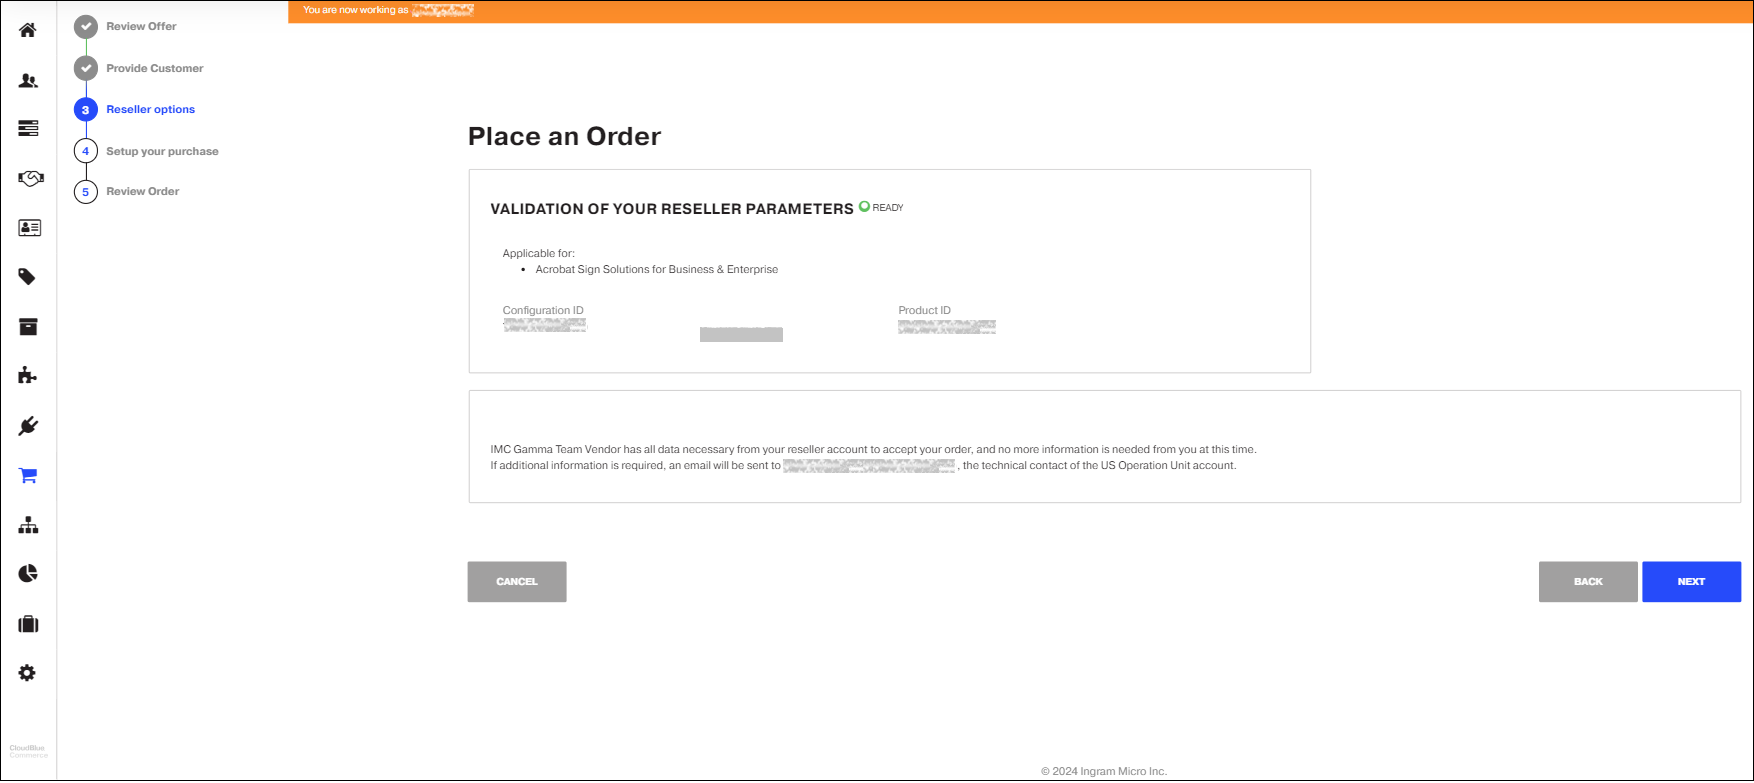
-
Verify reseller parameters that will be applied during the purchase and click Next.
-
Enable the 3YC option and specify the product quantity you want to commit. And click Next.

After that, click Next.
-
Review the order and click Purchase.
-
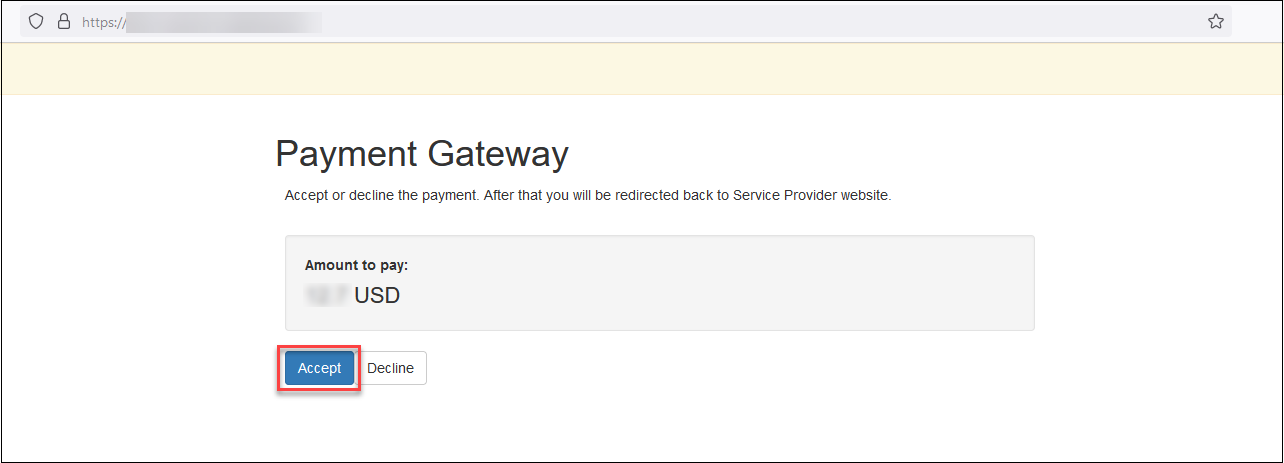
Select the payment method that you want to use and click Buy.

-
Confirm the purchase on your bank’s website or your seller's payment system.
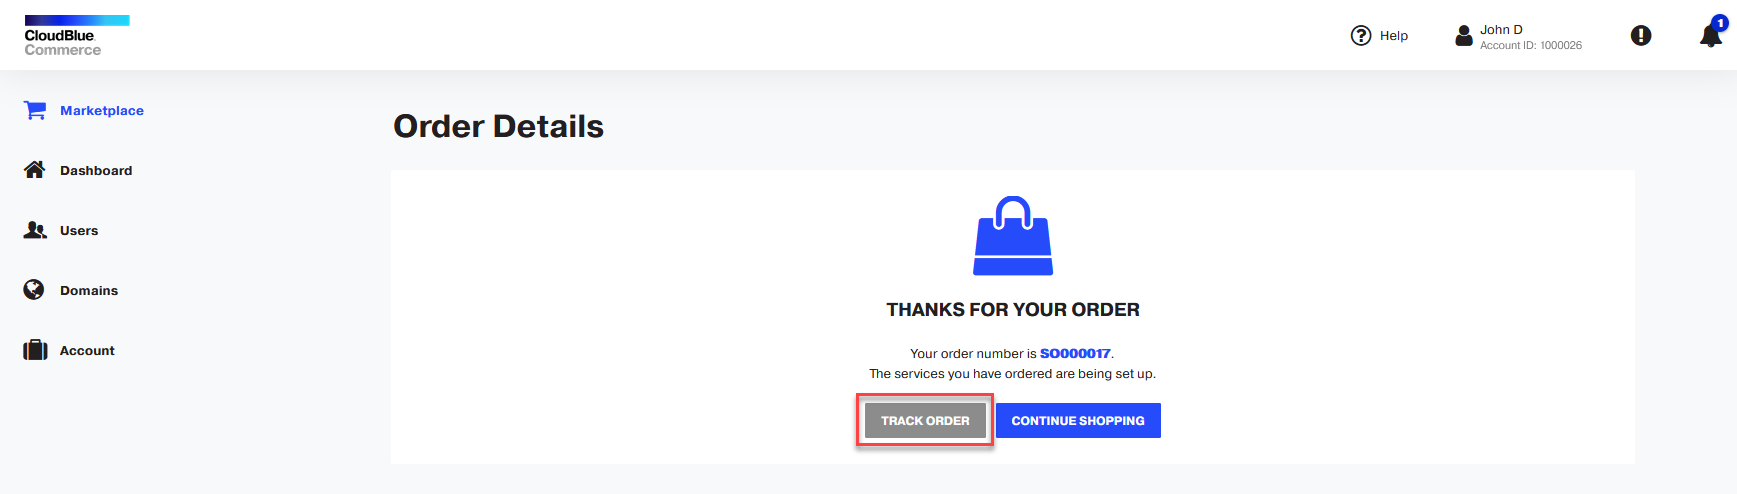
-
To view the status of your order, click Track order.
UX1 Marketplace
If you purchase a plan with prices fixed in a particular currency, your UX1 Marketplace buying experience will change in the following ways:
-
When you add a product to the cart and proceed to the checkout wizard, you will see a notification at the top of the screen informing you that your payment price may fluctuate because of the exchange rate changes:

-
For your convenience and pricing transparency, you can hover over the chart icon next to a plan and preview prices both in the currency in which prices are fixed and in the currency in which the order is paid, as well as the current exchange rate used for the price calculation.
-
If you increase the quantity, the total in the pop-up window will be recalculated automatically.

-
If you use the Adjust Prices functionality, at the last step of checkout wizard you will be prompted with a notification that prices can be adjusted in the original sales currency only. Here you can also hover over the chart icon to preview prices in both currencies and see the exchange rate that was used for price calculation.
Note: The Adjust Prices functionality is available only to those provider staff members that are eligible to define prices and have appropriate privileges assigned.
-
After you buy a plan, an order is created with the exchange rate valid for today. As a result, a subscription is provisioned for which prices are fixed in a different currency. This means your next payments for this subscription may change because of the exchange rate fluctuations.
Purchasing a plan with prices fixed in a different currency
CloudBlue Commerce expands its capabilities and now allows you to sell services with prices fixed in different currencies, converting prices on the fly using the current exchange rate. For pricing transparency and a better user experience, UX1 Marketplace and UX1 Subscription Management now allow you to view prices before and after conversion as well as the current exchange rate during order creation.
When you purchase a plan with prices fixed in a different currency on behalf of your customer, you will see changes in your user experience in:
Note: Your customers will also see changes in their buying experience.
UX1 Subscription Management
After buying a subscription based on a multi-currency plan in UX1 Marketplace, you can navigate to UX1 Subscription Management, go to Subscriptions in the left navigation pane and click the provisioned subscription. Your experience will change in the following ways:
-
On the Subscription Details screen there will be a notification informing you that the prices are fixed in a particular currency and your payment price depends on the current exchange rate. Below this notification you will see two tabs: the left tab displays the fixed prices while the right tab displays prices in your payment currency.
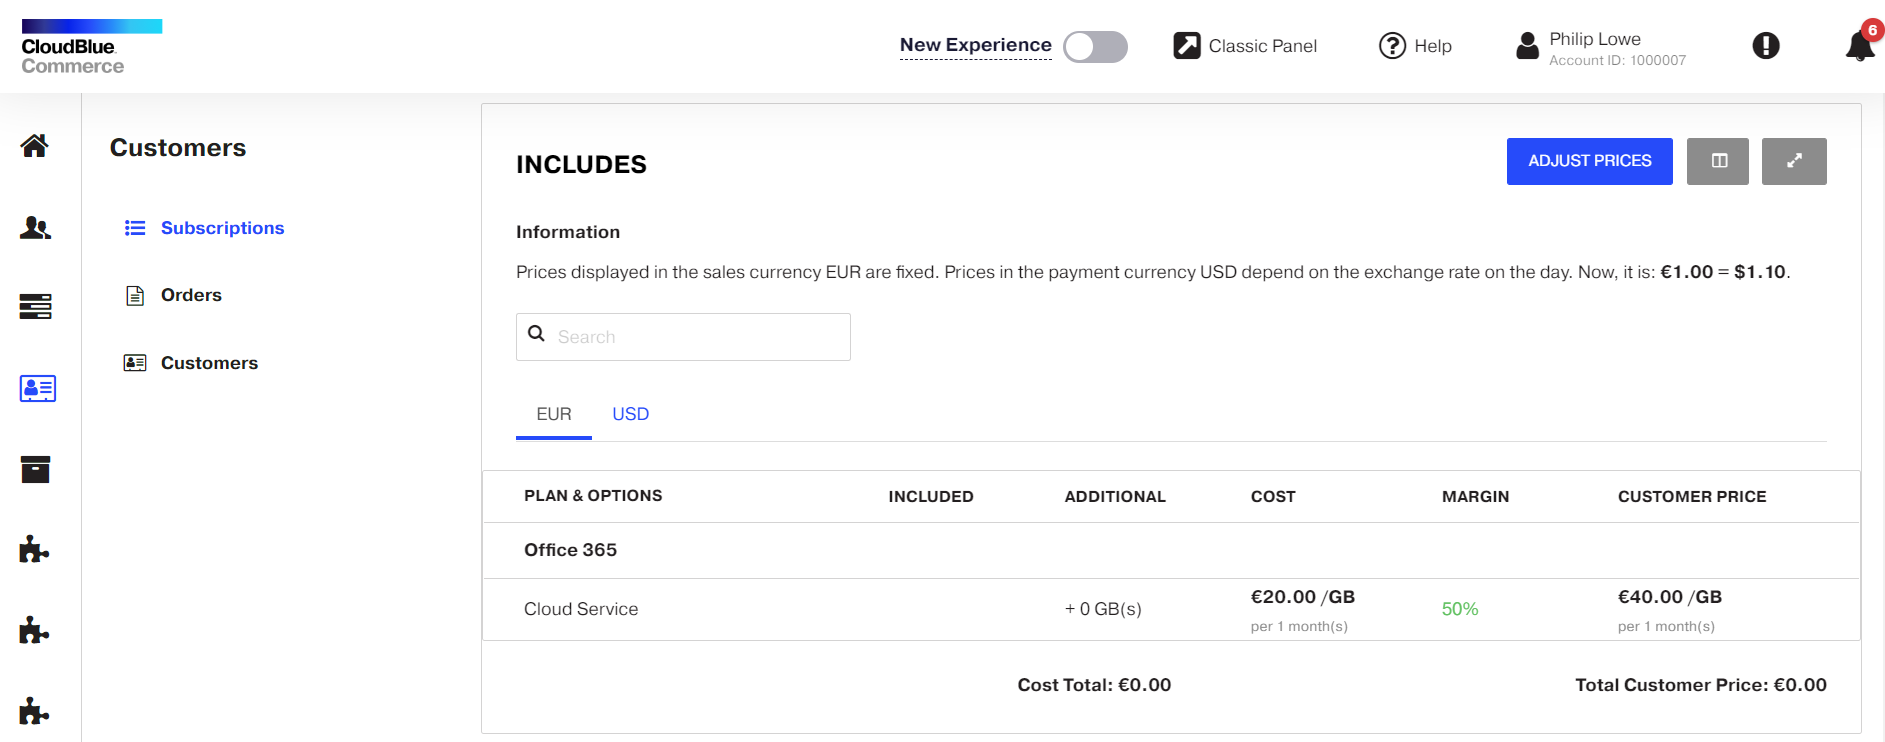
Note: Prices in your payment currency may differ from the actual payment on the last billing date and your next billing date. They are displayed for your convenience only and calculated based on the current exchange rate. You may check your last payment details by viewing an order.
When you switch tabs, prices on the top tiles will be displayed in corresponding currencies.
-
In UX1 Subscription Management you can manage a subscription in the following ways:
-
Change a subscription limits
-
Switch a subscription to a new plan
-
Renew a subscription to a new period
-
Cancel a subscription
When following wizards in these scenarios, your experience will change as follows:
-
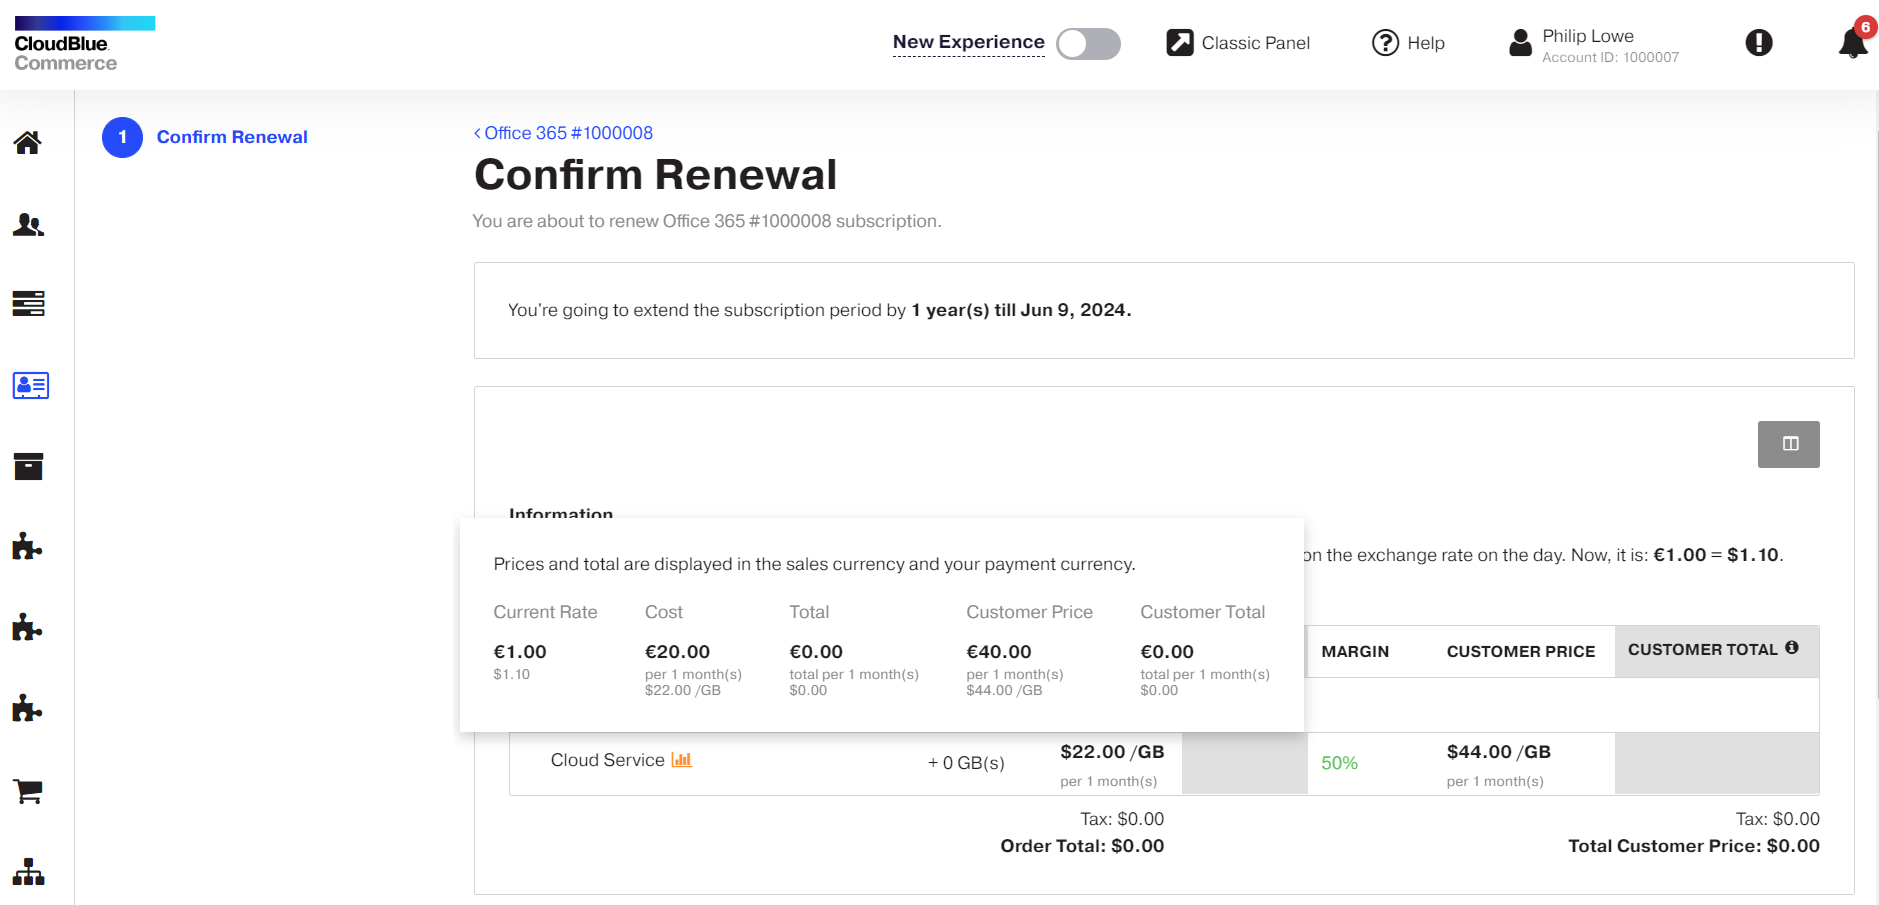
You will see a notification informing you that prices for this subscription are fixed in a particular currency and that your payment price depends on the current exchange rate. You will also see the exchange rate that will be applied if you place an order today.
-
You will see chart icons next to the plans with fixed prices. You can hover over these icons to preview prices in both currencies and see the current exchange rate.
-
Important: The exchange rate that you see in notifications and pop-up windows in UX1 Subscription Management is not fixed for the entire subscription or billing period. This means the exchange rate for any type of order may differ on the order placement day.

Note: On the subscription Confirm Cancellation screen, you will see the notification and the pop-up window on which you can preview prices only if there is a cancellation fee configured in the plan settings.
Performing a partial upgrade of Microsoft NCE subscriptions
Staff members of a reseller can perform a partial upgrade of Microsoft NCE subscriptions to a new or existing subscription while managing subscriptions in the UX1 Panel.
To perform a subscription partial upgrade, follow these steps:
-
Go to the UX1 Panel
-
Choose Customers in the left navigation menu and go to Subscriptions
-
In the list of subscriptions, click the subscription for which you want to perform a partial upgrade
-
Click the three dots and select Partial upgrade
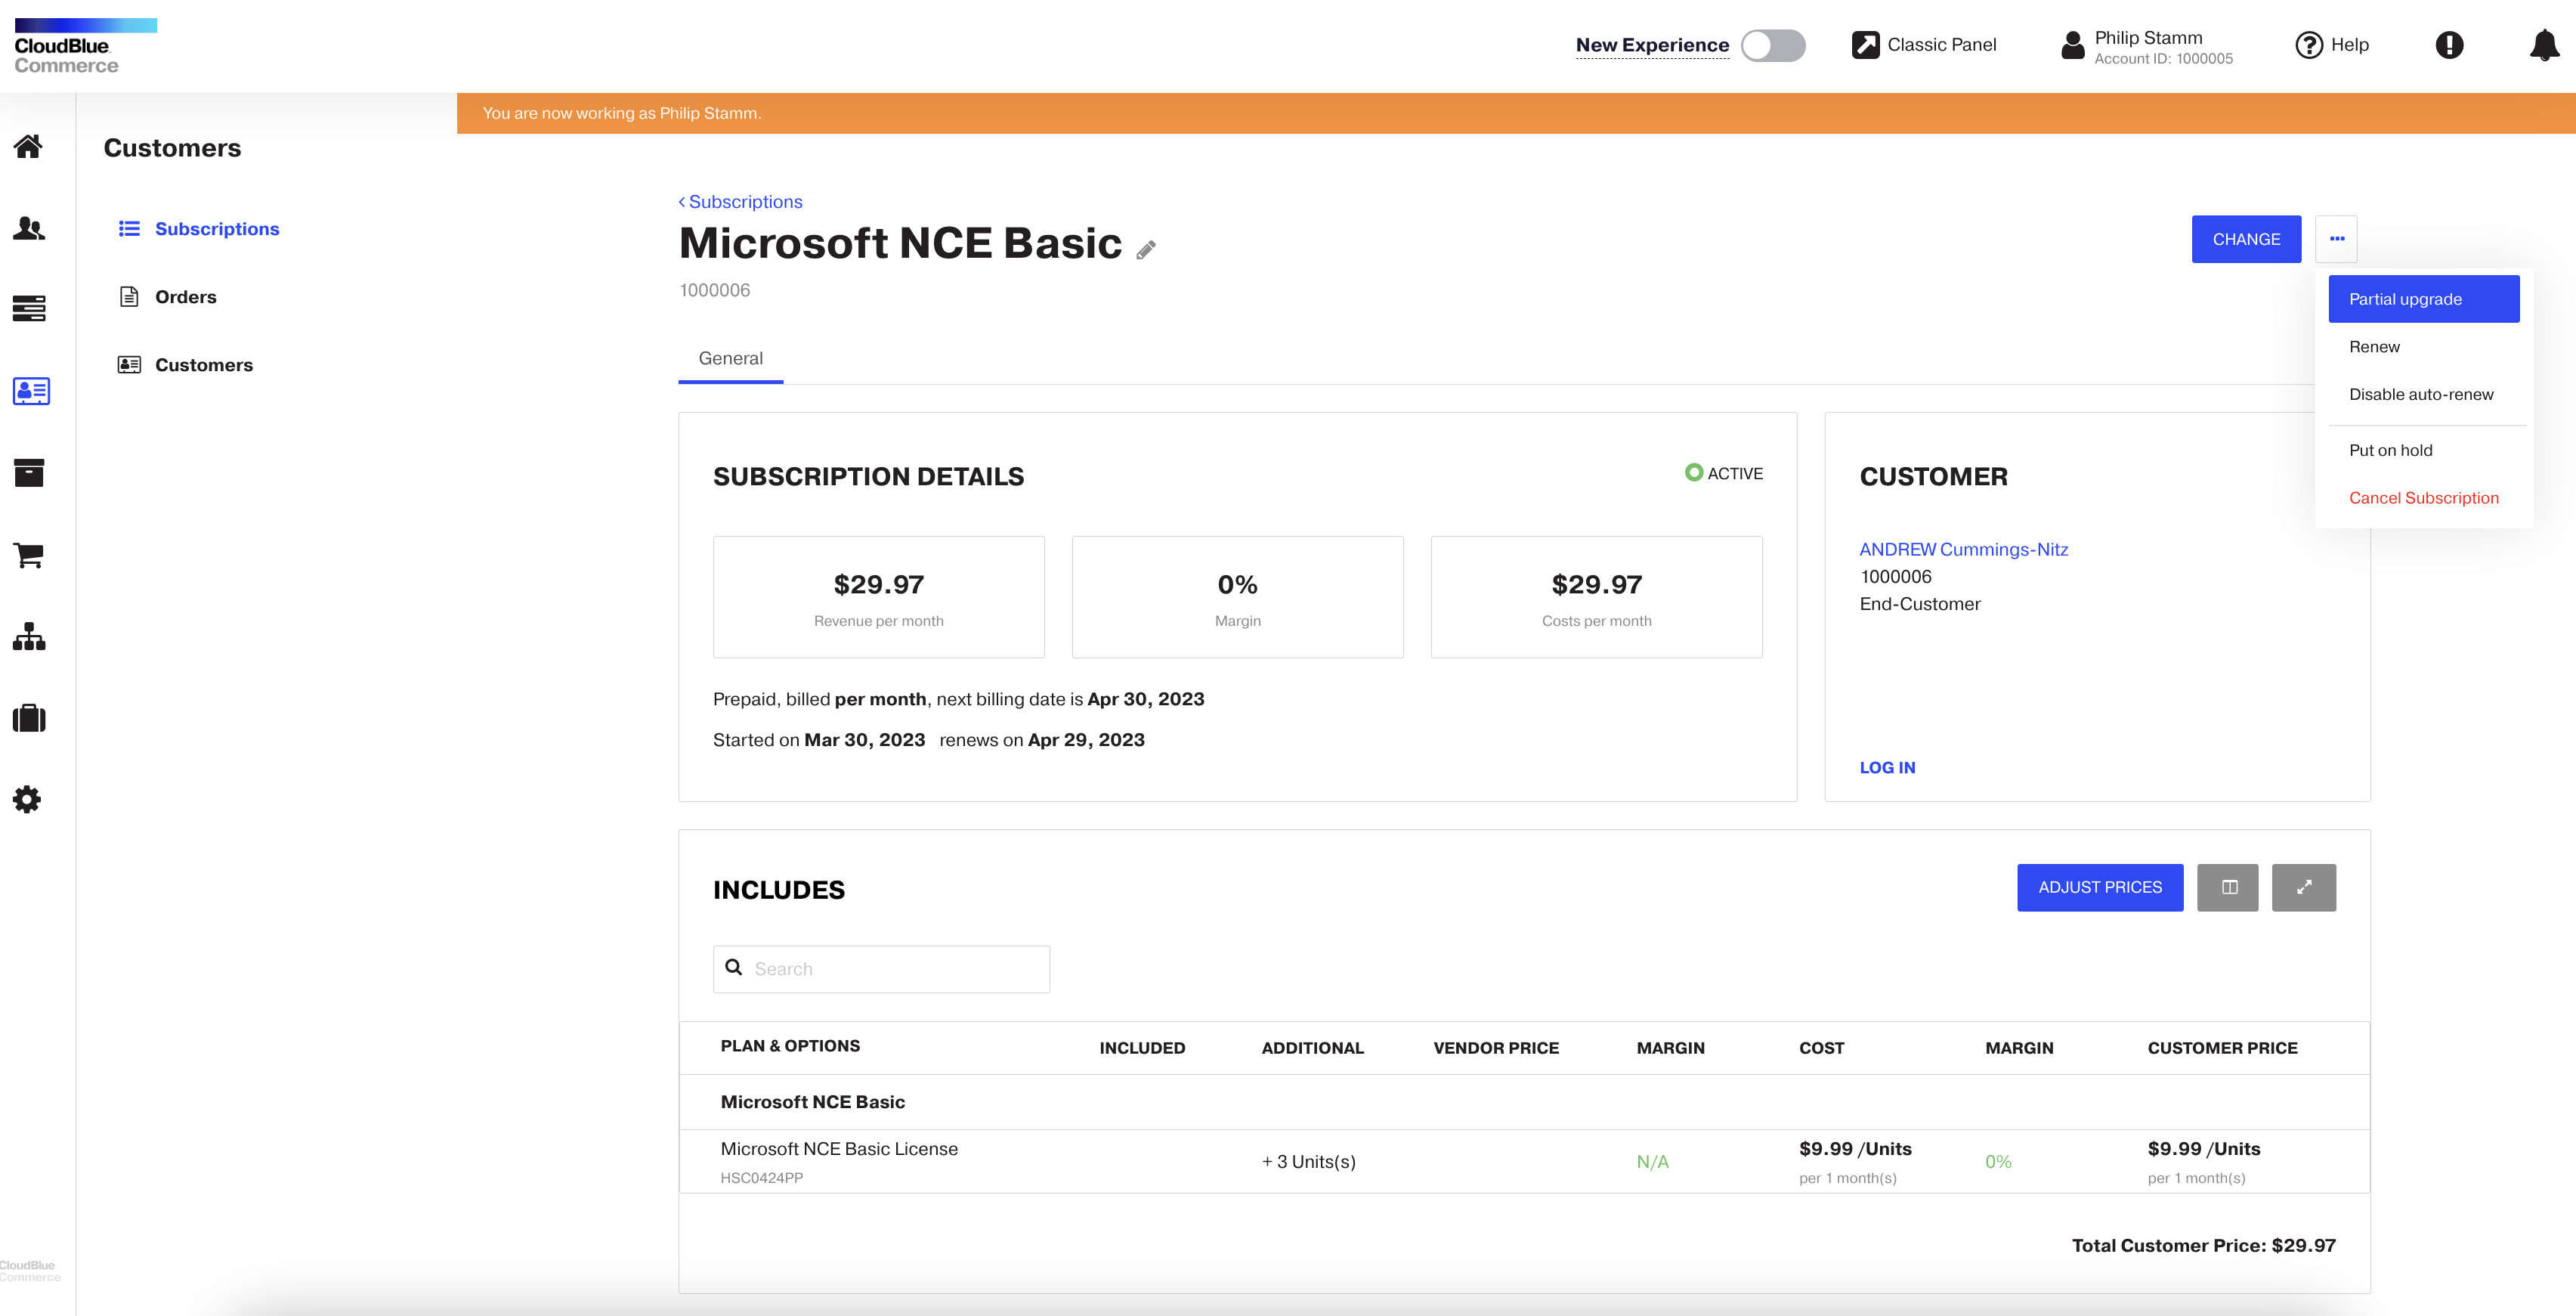
Note: The Partial upgrade wizard displays only those plans that have upgrade paths configured and an immediate switch allowed. If upgrade paths are not configured, a subscription does not have the Active status, it has pending orders, or number of seats is equal to the value set in Min Units, the Partial upgrade button on the Subscription screen and the Partial upgrade wizard will be unavailable.
-
Select a plan to upgrade to
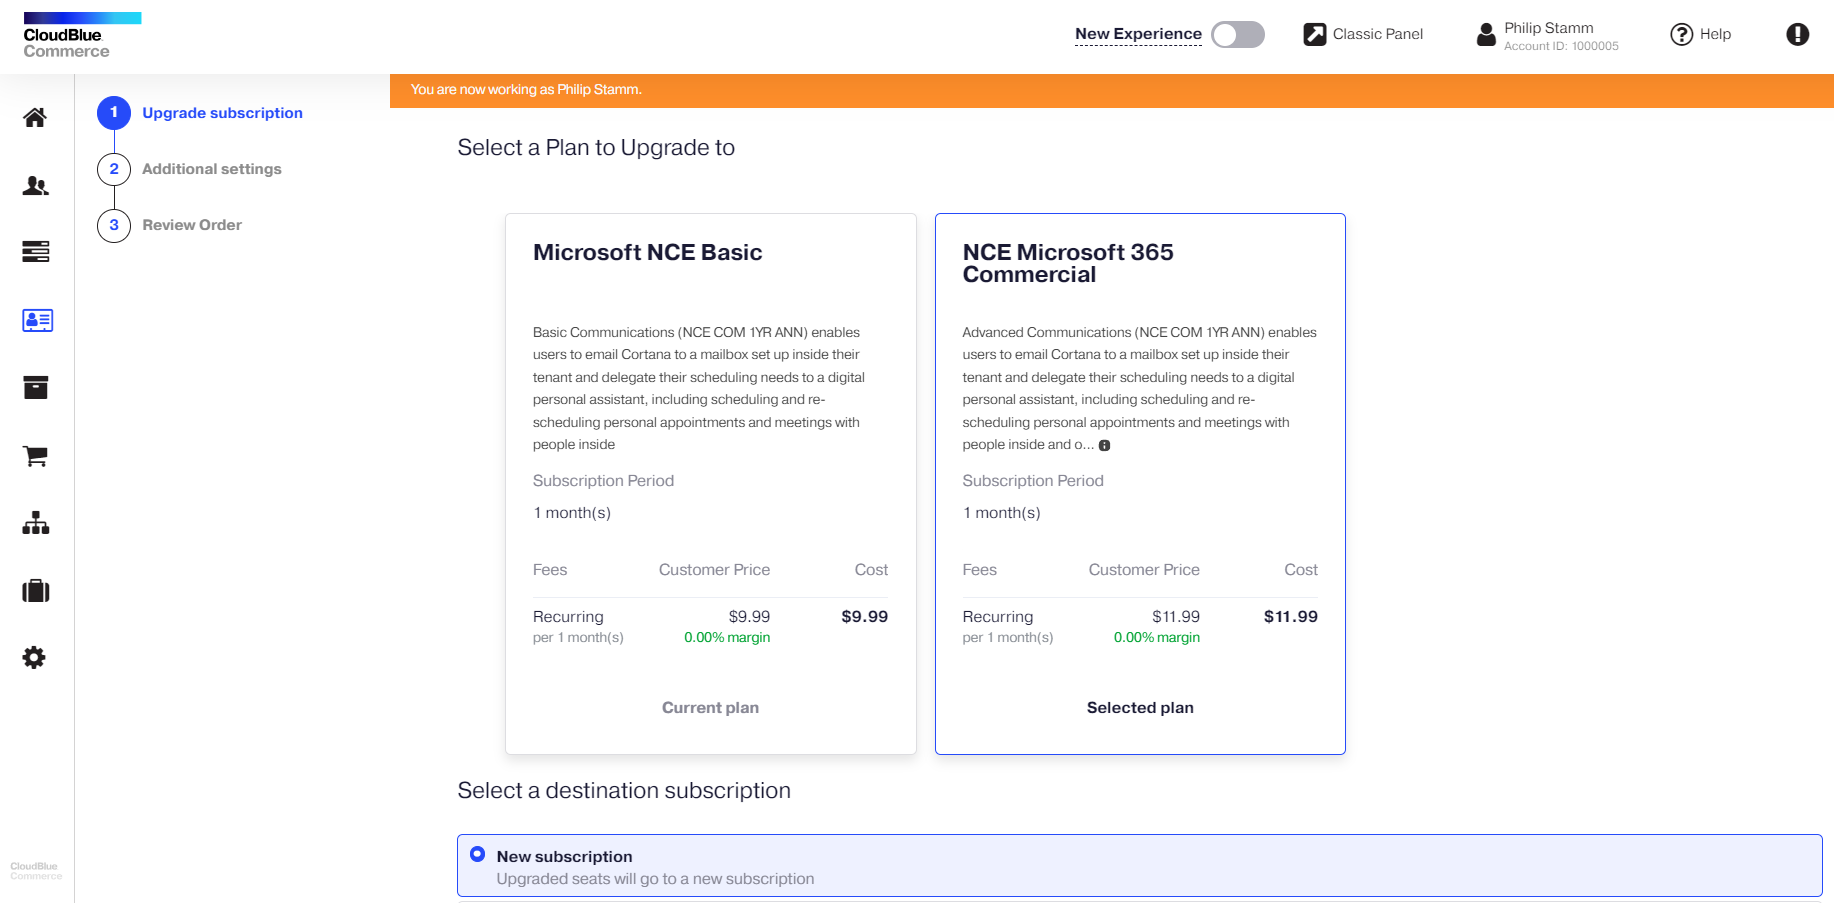
-
Choose whether you want to upgrade and move seats to a new or existing subscription and click Next:
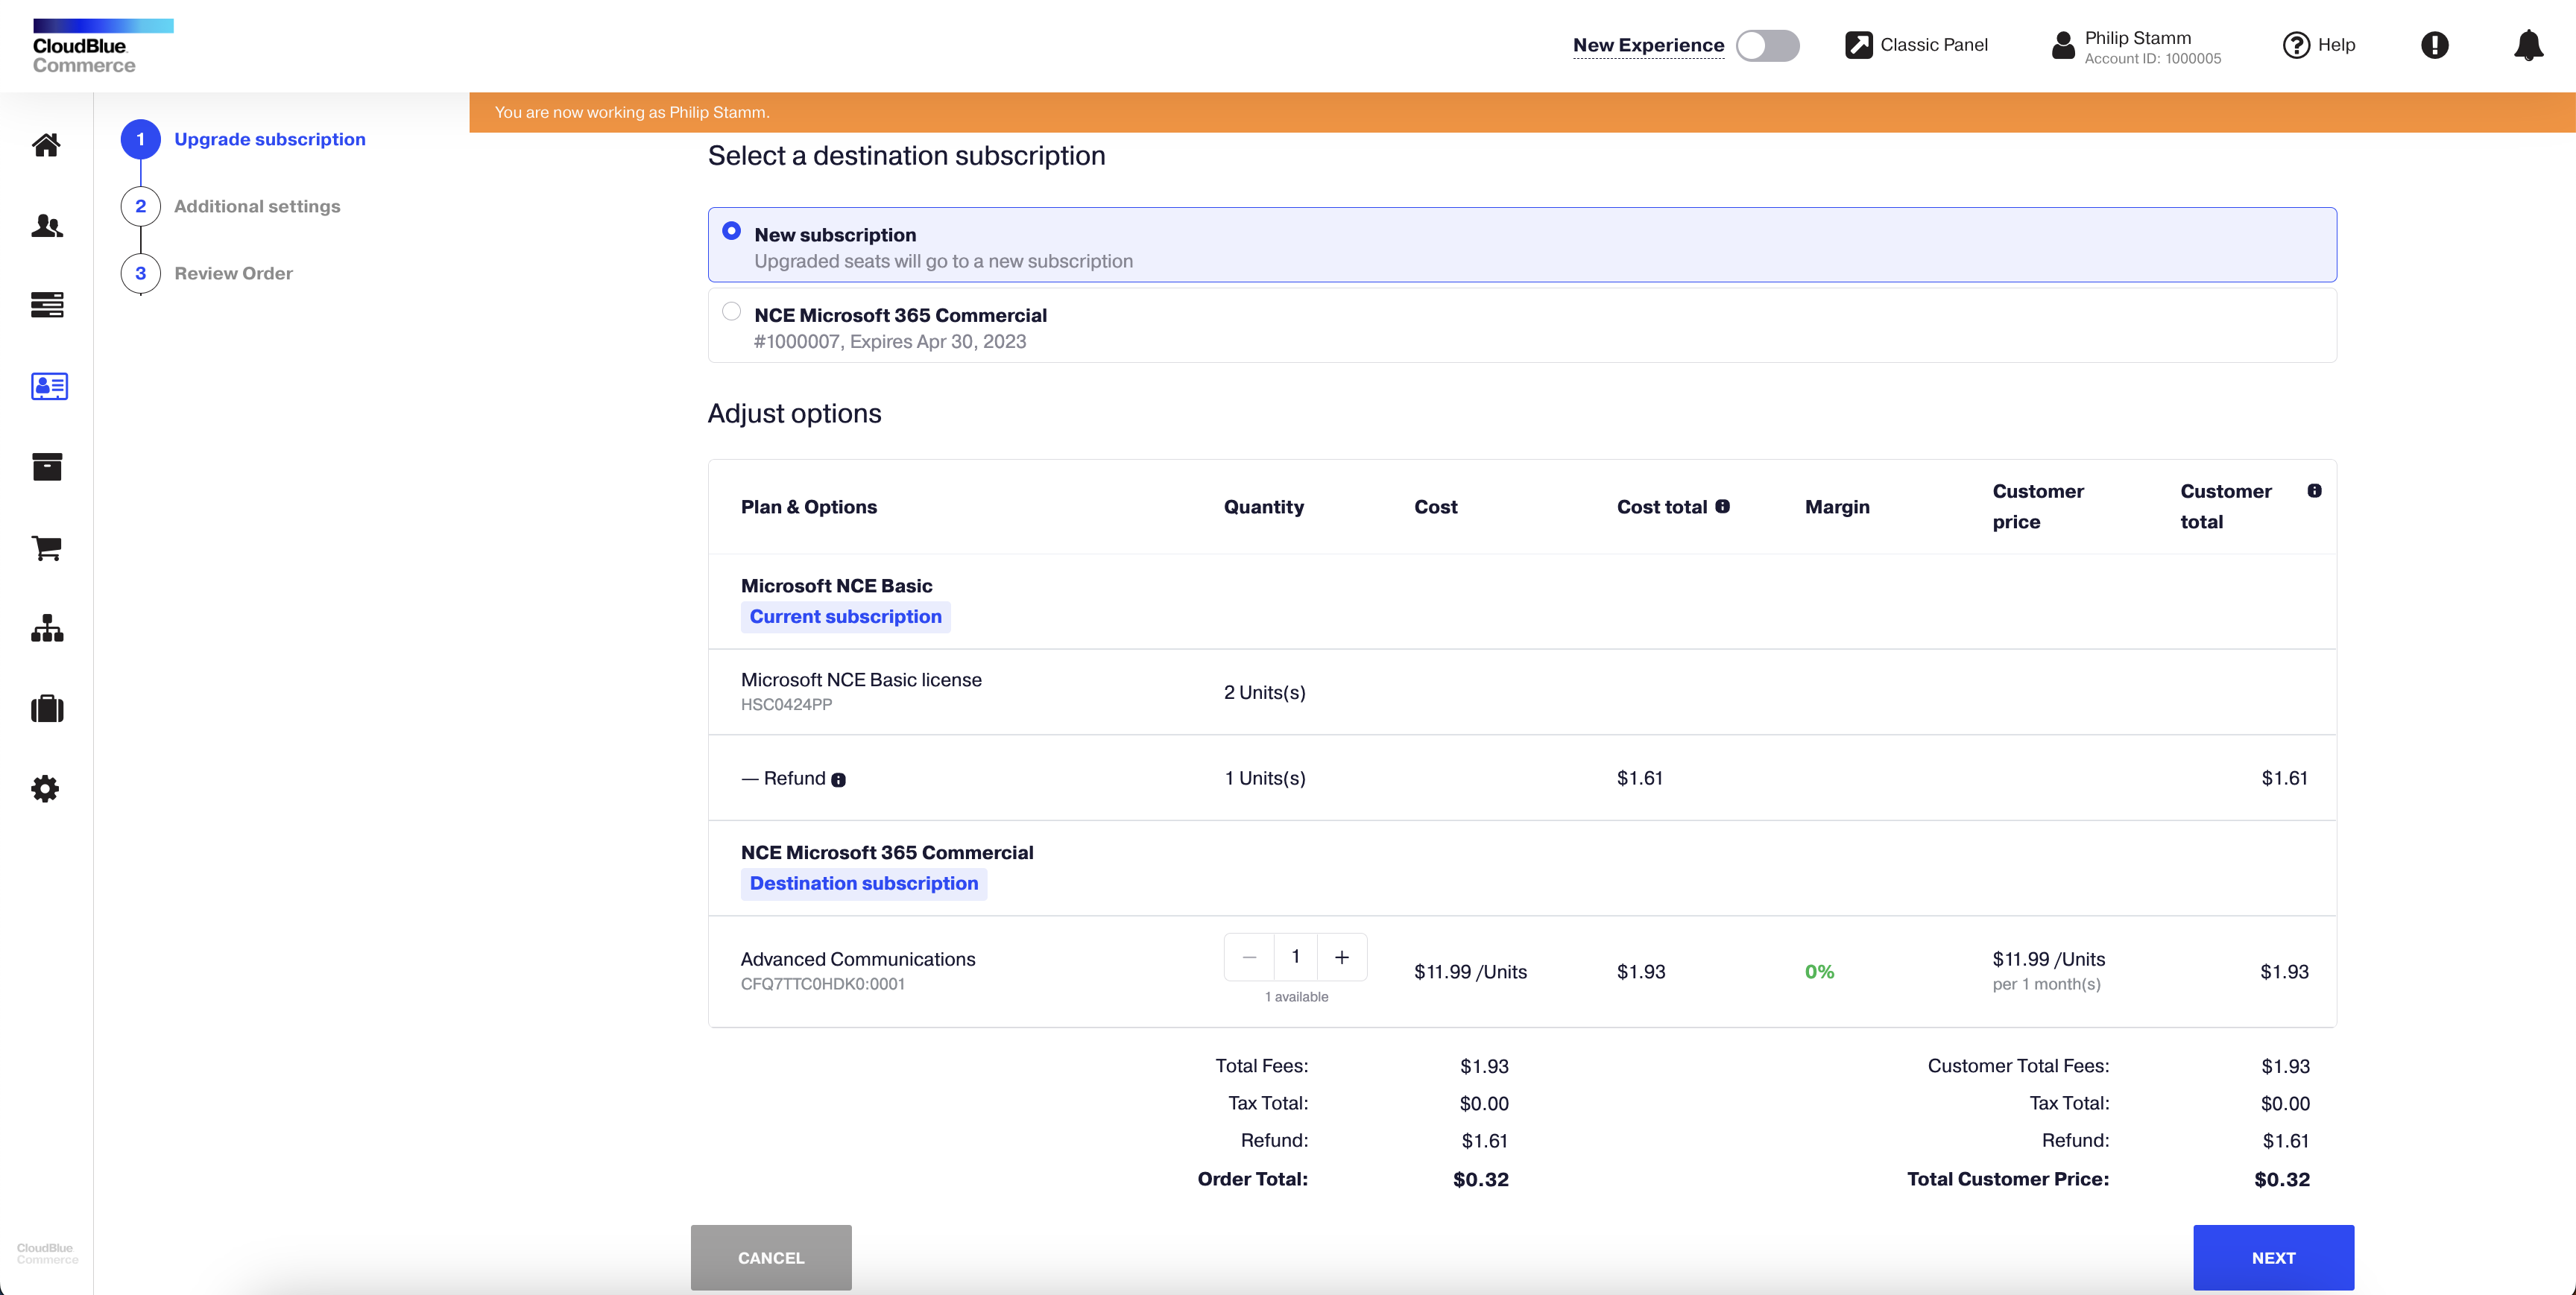
Note: The Partial upgrade wizard displays only those existing destination subscriptions that have the same or later expiration date than the one of the source subscription, have the same Microsoft tenant and billing period as the source subscription, are not in the cancellation window, and do not have any pending orders. The Next button will become active at the first step of the wizard only if the number of units selected to be moved is more than the current number of units in the existing destination subscription.
-
Review the order details and click Place order:
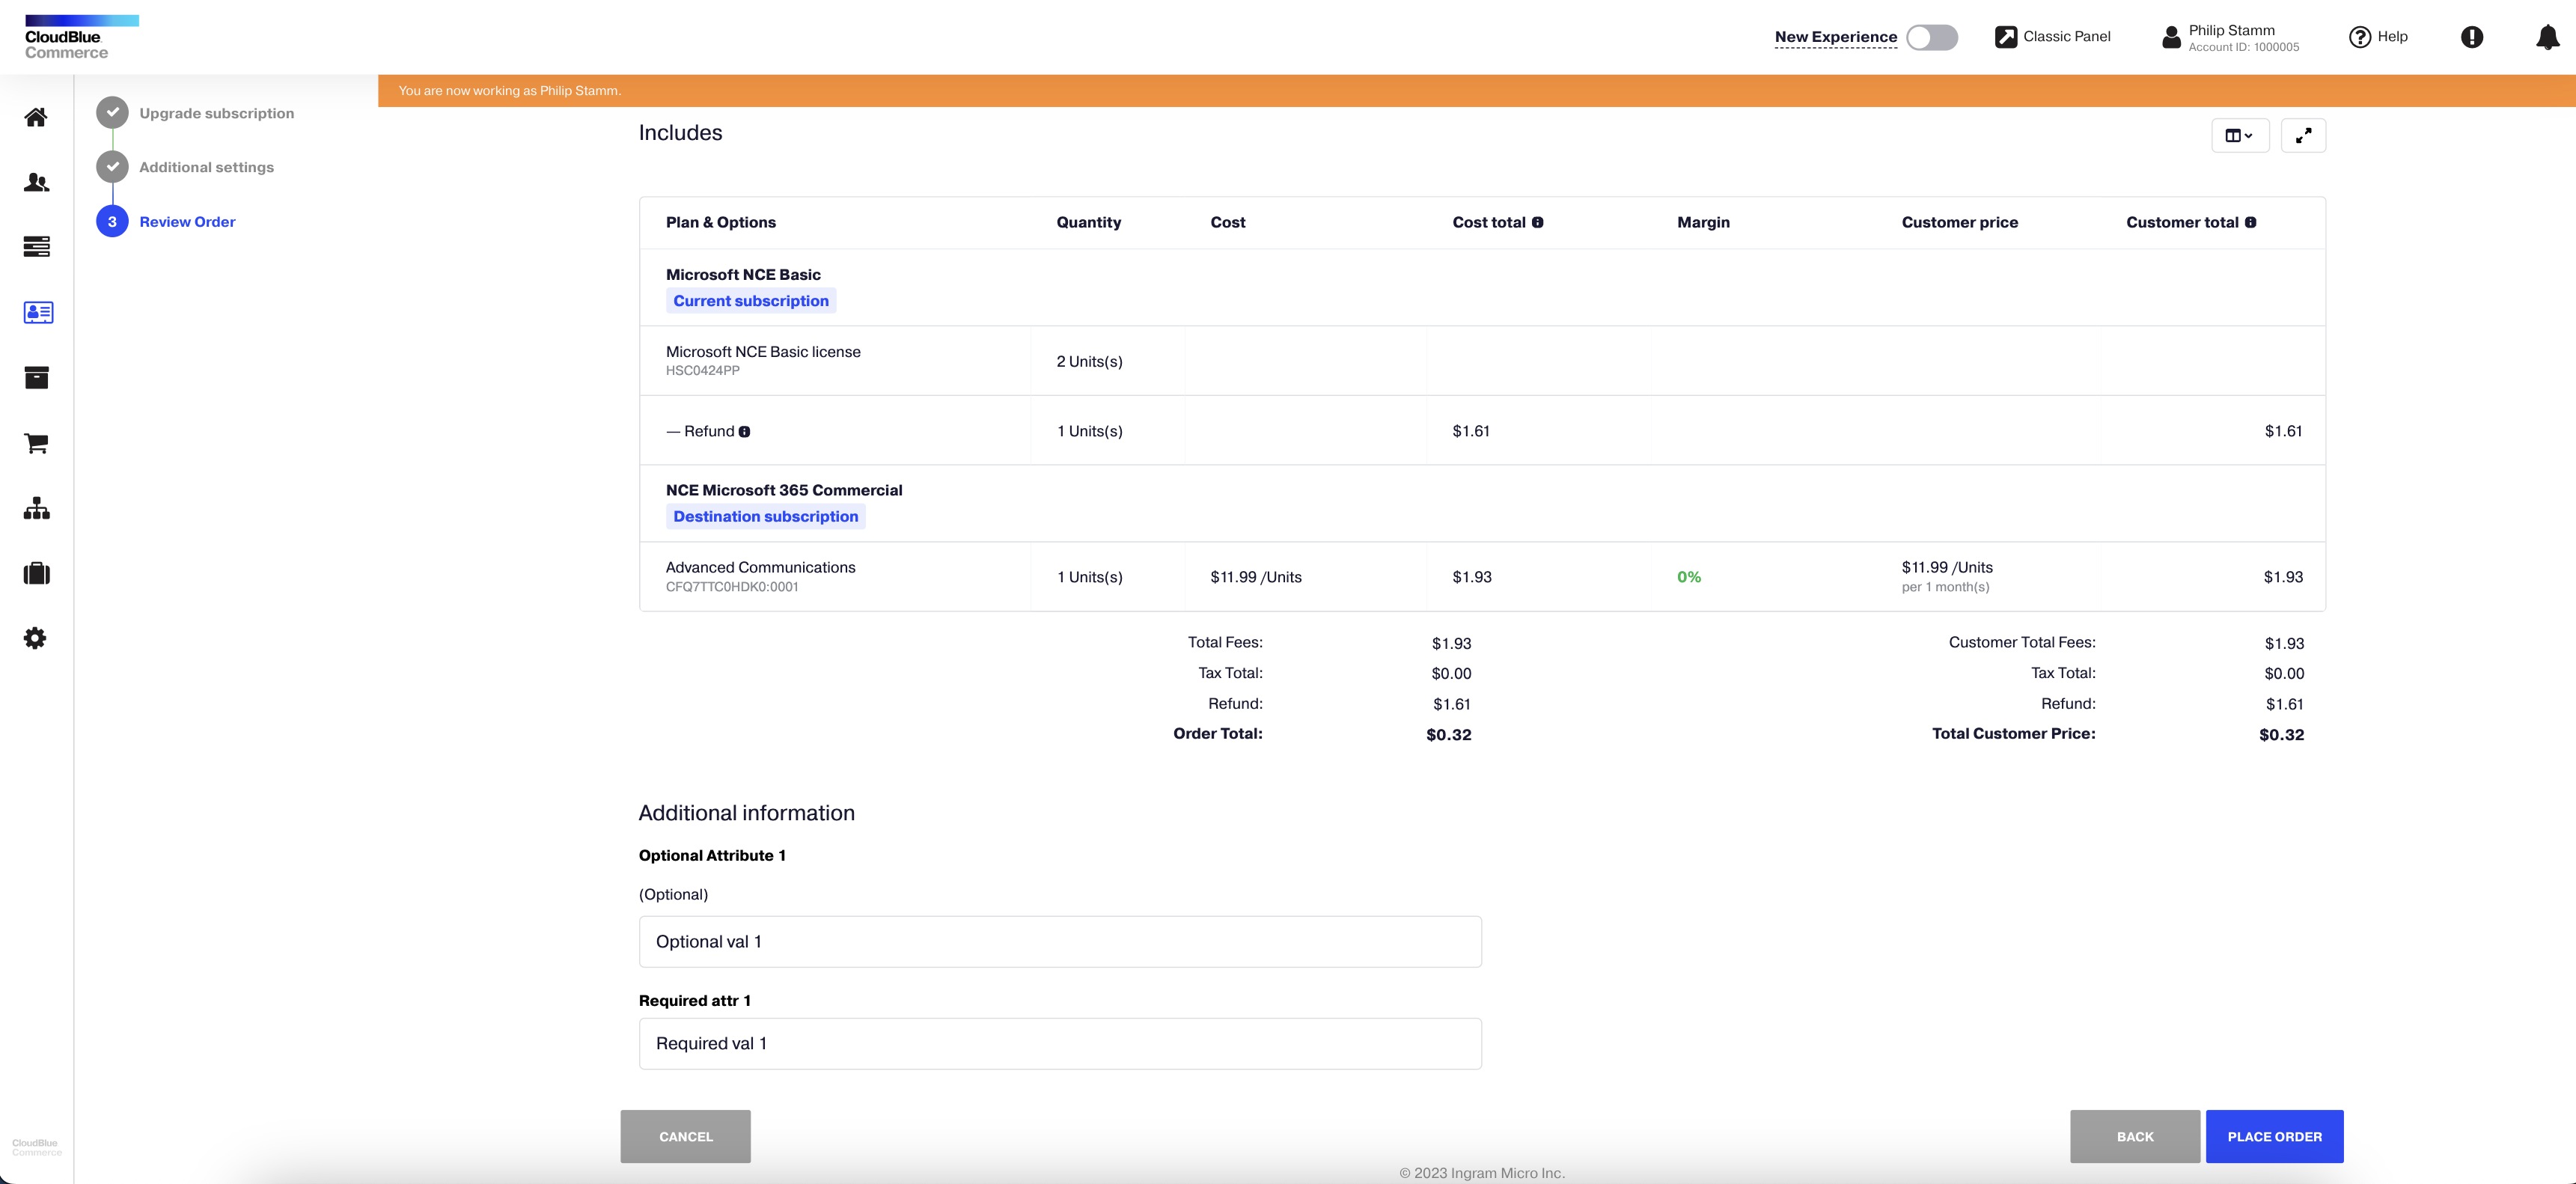
Custom attributes will be transferred to the destination subscription if the Propagate to Subscription setting is enabled.
Important: To make an attribute not visible in the UI of the Partial upgrade wizard, disable the Ask on order placement option for this attribute.

To ensure that the source and destination subscriptions' seats were updated correctly, go to the UX1 panel, choose Customers, Subscriptions, select the required subscription in the list and check the subscription details.
-
Co-terming Subscriptions
CloudBlue Commerce allows resellers to co-term subscriptions so that they expire on the same date and, optionally, their billing periods become aligned. This makes it possible to cancel the main subscription and supplementary ones of the same vendor on the same date, and can help optimize accounting efforts.
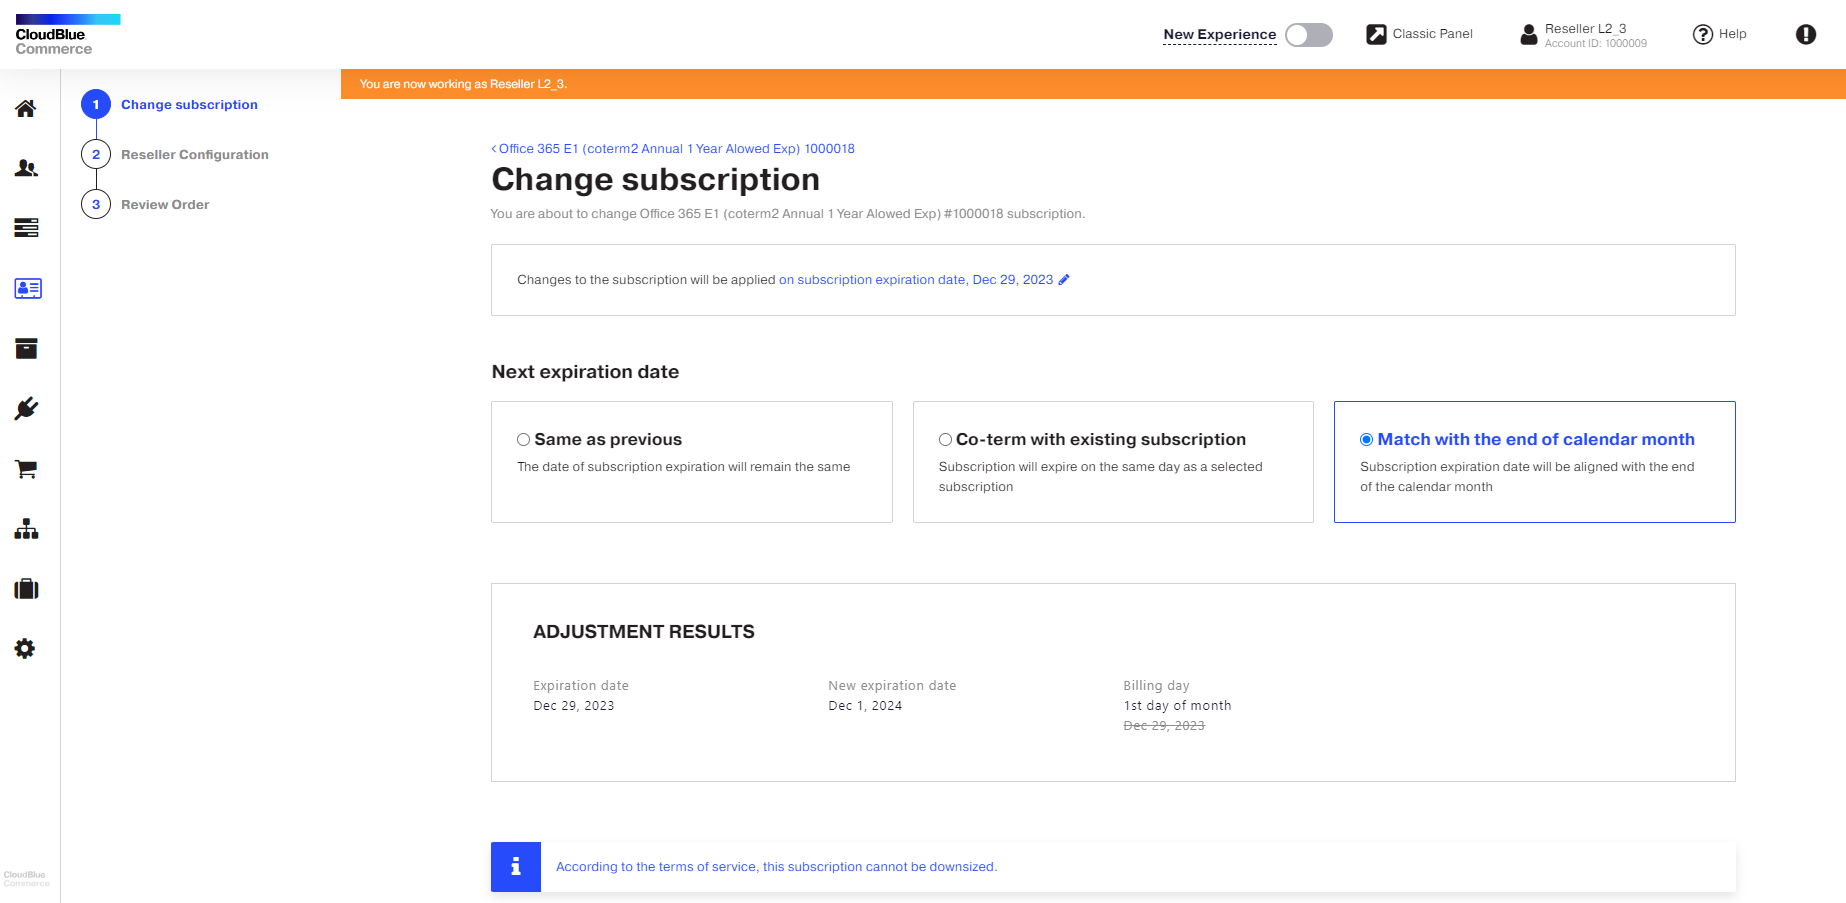
In UX1 Marketplace you can co-term a new subscription on the last step of order creation by clicking the link with subscription expiration date in one of the following ways:
-
With another customer subscription
-
With the end of the calendar month

For your convenience, you will be prompted on the Review Order screen of the Place an order wizard with a notification on the top and when you hover over the information icon next to a price that the order includes prorated prices for the current billing period:

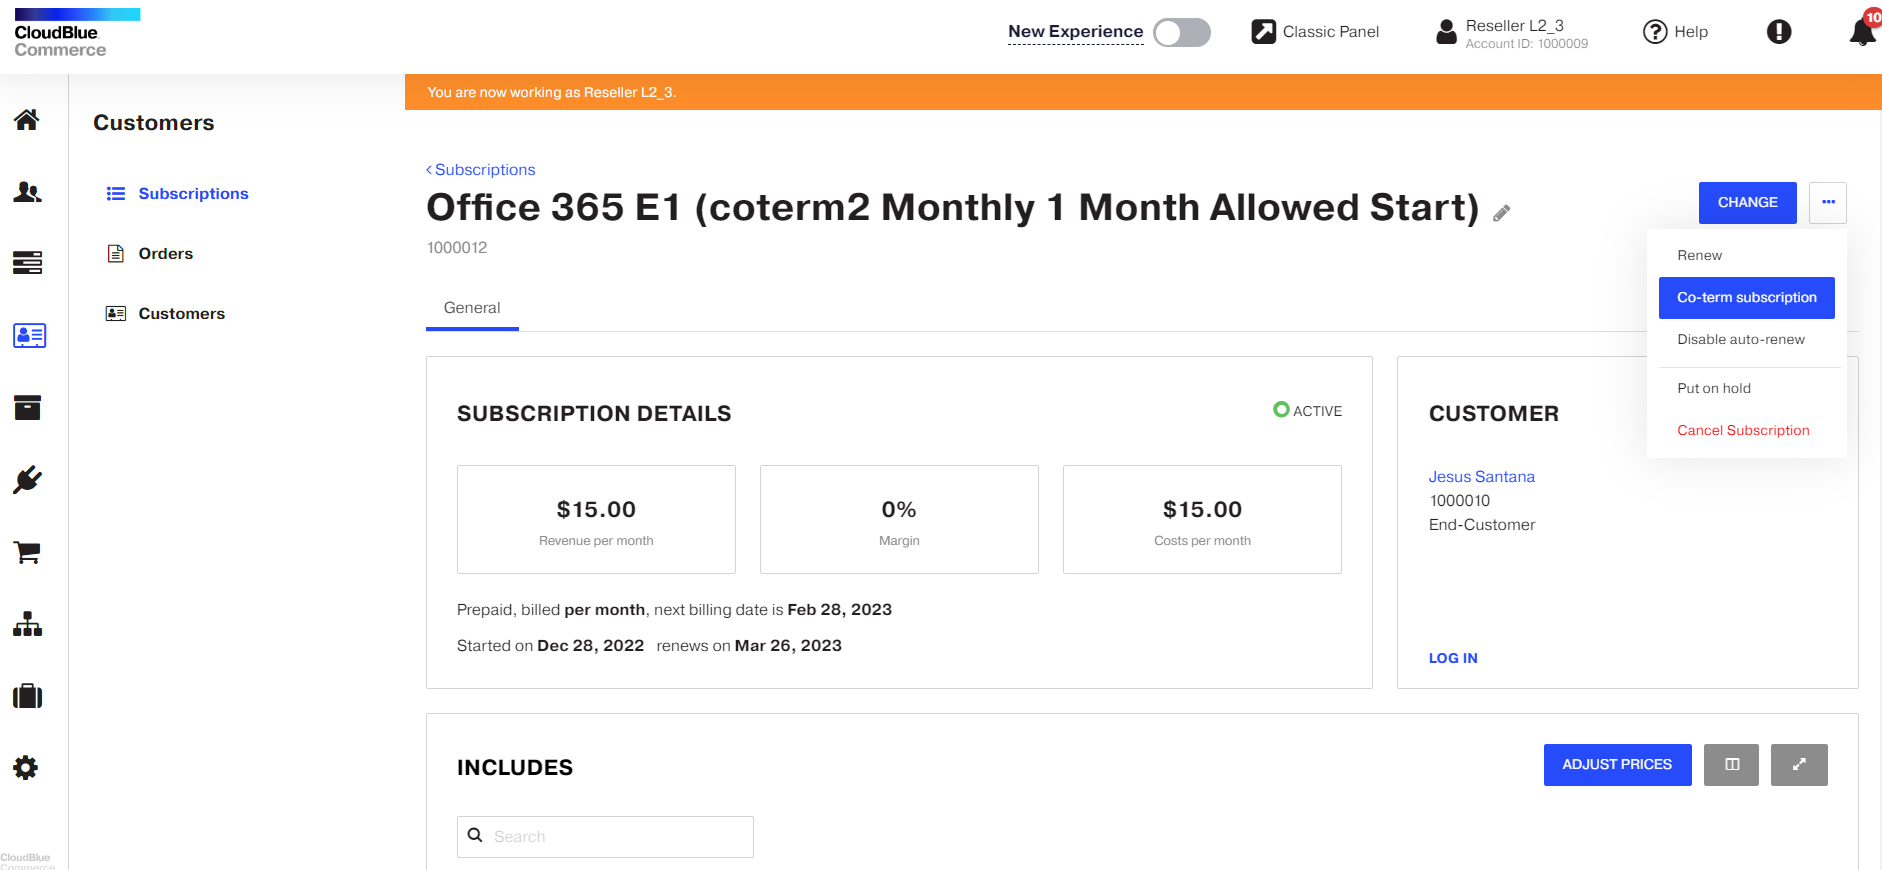
In UX1 Subscription Management you can co-term customer subscriptions by clicking the three dots icon and choosing Co-term subscription on the Subscription details screen: