CloudBlue Commerce API
Authorization through IDP
The Identity Provider (IDP) service based on the Oauth2 framework with the OpenID Connect extension can be added to the platform to authenticate and authorize all users and various client systems integrated with the platform.
In this document:
Concepts
When using the IDP, an API client must receive a user’s security token from the IDP and then use that token for authorizing its requests on the APS bus.
Security Tokens
The IDP generates three types of security tokens:
access_tokenis an access token declared in OAuth 2. It is not intended for carrying identification data about a user, although it can. The API client does not use this token.id_tokenis a user identification token, which must contain the user’s information including the user’s authentication status as specified by OpenID Connect. Its format is defined by JWT specification. When the platform receives a token, it validates this token in accordance with the JWT specification.Note
Although the IDP used by the platform generates both of the above tokens in the JWT format, API client must use only the
id_tokenas a bearer in theAuthorizationheader.The
id_tokenhas a limited expiration period that is configured per realm in the IDP.refresh_tokenis used by the API client to refresh all of these three tokens. Therefresh_tokenmust have a much longer expiration period than theid_token. This token can be used only one time.
Warning
If a refresh_token is stolen, an attacker can use it to get the other tokens and
refresh itself periodically unlimited times (if there are no preventive actions).
Authentication Process
The API client to platform interaction consists of two phases:
The API client authenticates on the IDP as a user (using a login and password pair) to receive security tokens. This is required once during the token expiration period.
The API client authenticates on the platform as a user (using the user’s access token) to send API requests for resource management.
Note
On a production installation, API clients cannot address their requests to the IDP or the platform. Brand endpoints are the frontend for such interactions.
To make the IDP trust an API client, this client must be registered in the IDP with a certain secret ID called CLI (Client ID).

In more detail, the first phase contains the following steps:
The API client sends a request for security tokens to the brand endpoint providing the login and password of a user. Along with that, the request must contain the CLI and other parameters considered later in this document.
The brand endpoint forwards the request to the IDP.
The IDP validates the CLI, authenticates the user, and if the credentials are valid, returns newly generated tokens as requested by the API client.
The brand endpoint forwards the IDP response to the API client. From now on, the API client can use the received
id_tokento authenticate on the platform when sending API requests to it.
In the second phase, the API client uses the platform API to achieve certain management goals. In this process,
the API client uses the id_token as a bearer token in the Authorization header to authenticate itself
on the platform as presented in the above diagram.
When the bearer token expires, the API client uses the refresh token to renew the security tokens. If the refresh token is expired, the API client requests for a new set of security tokens.
IDP Setup
The IDP is installed as a micro-service integrated with other parts of the platform.
Installation
Installation of the IDP and its integration with the platform requires at least the following steps:
Installation of the IDP by following the instructions in Deployment and Configuration of the Identity Service.
Installation of a brand endpoint by following the instructions in Branding Deployment.
An API client must know the domain name of the brand endpoint it will use for sending its requests to.
IDP Configuration
The key component of the IDP is the KeyCloak server installed as a Java application on the WildFly application platform. When you create a brand endpoint (also called a brand) in the platform, the corresponding realm appears in the IDP. The realm name is synced with the brand ID so that the name consists of the brand ID prefixed with “sr”. For example, if the brand ID is “3”, the realm name is “sr3”.
Note
A realm secures and manages security metadata for a set of users, applications, and registered OAuth clients.
It is important that your API client, which is also an OAuth client for the IDP, sends its requests for tokens to the realm where the API client is registered.
Configure the IDP through the KeyCloak console as follows:
Log in to the KeyCloak console by addressing your browser to
https://<brand_domain_name>/auth/admin, for example,https://reseller1.example/auth/admin. Enter the login name and password of the KeyCloak administrator to enter the UI console. On the initially configured IDP, those credentials are “admin” and “admin”.Note
In the production system, set a strong password for admin.
Find and open the realm bound to the brand endpoint you are going to use for both authentication and access to APS. Using the previous example, this will be “sr3”.
In the selected realm, register your API client. Make sure that:
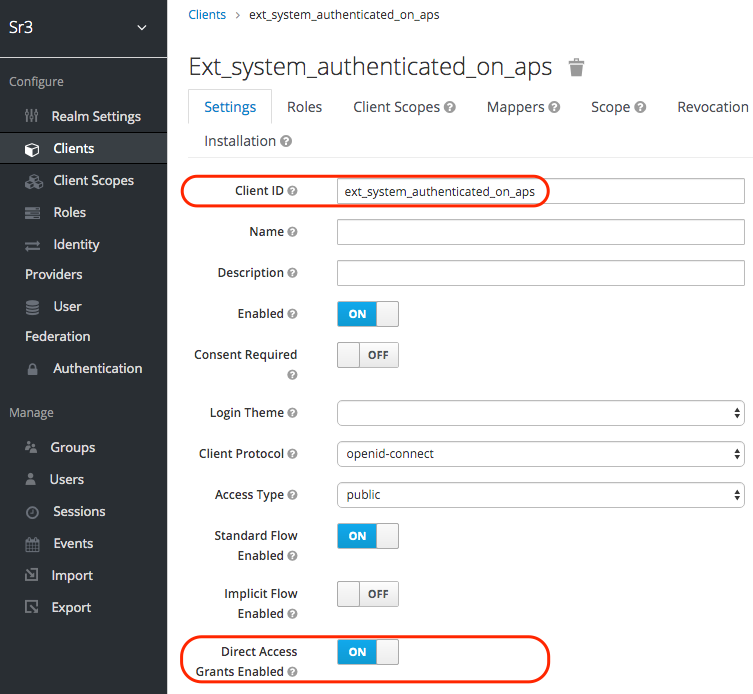
Client ID (CLI) is a random secure string that allows the IDP to identify the client. In the example above, a simplified descriptive ID is chosen for better understanding of its use in the following examples in this document.
The direct access grant is enabled, which allows the API client to get security tokens associated with a specific user by sending a request for tokens directly in one step. In OAuth 2, this is known as the Resource Owner Password Credentials flow.
User Configuration
Similar to using the OAuth 1a protocol, an API client authenticates as a user, but a custom key and secret are not needed. To use certain custom operations on the APS bus, add the APS ID of those APS types that expose those operations and specify every allowed method by a separate privilege as in this example:

Sample Workflow
The following sections direct you through the configuration, authentication, and authorization processes using a sample configuration.
Configuration
In the sample installation, we use the following brand endpoint:
https://reseller1api.example
The API client will use the following configuration in a request to the IDP:
"username" : "agent007",
"password" : "password007",
"client_id": "ext_system_authenticated_on_aps",
"grant_type" : "password",
"scope": "openid"
The last two parameters require explanation:
The specified
grant_typeindicates that the API client requires the IDP to return security tokens directly in the response to a request.The
scopeparameter must contain the “openid” string which requires the IDP to generate theid_token. This enables the API client to use the receivedid_tokenas the bearer token in its requests on the APS bus.
Getting Security Tokens
To get tokens, the request must look as follows:
curl --request POST \
   --url https://reseller1api.com/auth/realms/sr3/protocol/openid-connect/token \
   --header 'content-type: application/x-www-form-urlencoded' \
   --data grant_type=password \
   --data username=agent007 \
   --data password=password007 \
   --data client_id=ext_system_authenticated_on_aps \
   --data scope=openid
Note
Unlike other requests where the application/json media type is used, the content type here is a list of
URL-encoded parameters. That is why the API client must send the content-type:application/x-www-form-urlencoded
header.
A response looks as follows (long tokens are cut for brevity):
{
   "access_token": "eyJhbGciOiJSUzI1NiI...TnlVYjQXnd2LF30Q",
   "expires_in": 300,
   "refresh_expires_in": 36000,
   "refresh_token": "eyJhbGciOiJIUzI1NiI...fGj07YkFLrPogodxM",
   "token_type": "bearer",
   "id_token": "eyJhbGciOiJSUzI1NiI...J6ZnIly496bNRVkc_w",
   "not-before-policy": 0,
   "session_state": "7837907b-74ef-4cc8-afc1-33ee426fe2d8",
   "scope": "oss_profile_v1 roles_fake_v1"
}
The API client can use the returned id_token for 300 seconds.
The expiration period for refresh_token is 36,000 seconds. During this period, the API client can refresh the tokens
using this refresh_token for authentication. If the refresh_token is expired, the API client must use
the request considered here again to generate new security tokens.
Sending a Request for Resources to the Platform
The API client sends a request for resources to the platform. The simplest one is the following:
curl --request GET \
  --url https://poamn-6982e93f967a.aqa.int.zone/aps/2/collections/accounts \
  --header 'authorization: Bearer eyJhbGciOiJSUzI1NiI...J6ZnIly496bNRVkc_w'
The response must contain a list of all resources available for the specified credentials.
Getting Refreshed Tokens
When the id_token is expired but the refresh_token is still valid, the API client must send a request for
refreshing the tokens before it sends its requests on the APS bus. This time, authentication is granted by
the refresh_token without providing any other user credentials:
curl --request POST \
  --url https://poamn-6982e93f967a.aqa.int.zone/auth/realms/sr3/protocol/openid-connect/token \
  --header 'content-type: application/x-www-form-urlencoded' \
  --data grant_type=refresh_token \
  --data client_id=ext_system_authenticated_on_aps \
  --data refresh_token=eyJhbGciOiJIUzI1NiIsInR5cCIgOiAiSldUIiwia2lkIiA6ICJjYjkyNGFjZi01NjhhLTRmZjMtYTZmYy02YzM0ZTMxYTA5YTAifQ.eyJqdGkiOiI3ZTM2OWQ3MS1mY2Y3LTRjZDMtOTA3My04MmJhYWYwZWFmYjgiLCJleHAiOjE1ODYxODYxMTUsIm5iZiI6MCwiaWF0IjoxNTg2MTUwMTE1LCJpc3MiOiJodHRwczovL3BvYW1uLTY5ODJlOTNmOTY3YS5hcWEuaW50LnpvbmUvYXV0aC9yZWFsbXMvc3IzIiwiYXVkIjoiaHR0cHM6Ly9wb2Ftbi02OTgyZTkzZjk2N2EuYXFhLmludC56b25lL2F1dGgvcmVhbG1zL3NyMyIsInN1YiI6ImY6OTllYjBlNGItOWRhNy00NDc1LWFhZGUtNDY1MTU2M2RlODA4OjEiLCJ0eXAiOiJSZWZyZXNoIiwiYXpwIjoiZXh0X3N5c3RlbV9hdXRoZW50aWNhdGVkX29uX2FwcyIsImF1dGhfdGltZSI6MCwic2Vzc2lvbl9zdGF0ZSI6ImYxZjA5ZjFlLWMzNzktNDc5Zi1hNzEzLWNkODk2YzU5MmY4YiIsInNjb3BlIjoib3BlbmlkIG9zc19wcm9maWxlX3YxIHJvbGVzX2Zha2VfdjEifQ.-BPDWUCIzwrmLAzc4GgB8sKu-4ncc4Lf-SyNga_fZQw
If successful, the response looks like this:
{
  "access_token": "eyJhbGciOiJSUzI1NiI...zP7tHzPGVRBygLwng",
  "expires_in": 300,
  "refresh_expires_in": 35986,
  "refresh_token": "eyJhbGciOiJIUzI1NiI...fGj07YkFLrPogodxM",
  "token_type": "bearer",
  "id_token": "eyJhbGciOiJSUzI1NiI...fZlE5H8QrqLuAwV6Lw",
  "not-before-policy": 0,
  "session_state": "f1f09f1e-c379-479f-a713-cd896c592f8b",
  "scope": "openid oss_profile_v1 roles_fake_v1"
}
If the refresh_token is expired, the API client gets the following error response:
{
  "error": "invalid_grant",
  "error_description": "Refresh token expired"
}
This means that the API client must send a request for security tokens using the user login and password credentials as described in the Getting Security Tokens section.