Table Of Contents
Application Packaging Standard
Last updated 18-Mar-2019Create Resource
Continue the development of the presentation level.


Develop a wizard with two views that will walk a customer through the process of creating a resource.


In this document:
Wizard Host
The ui/vps-wizard.js file declared in APP-META.xml must function as a wizard host.
The wizard must display a text introducing a user to the process and define handlers of the typical navigation buttons:
- The onCancel handler must call
the aps.apsc.gotoView method to return a user back to the
serversview without saving the data. - The
onSubmithandler must send the new VPS JSON representation to the APS controller to start provisioning of the VPS.
Configure New Resource
The ui/wizard/server-new-1 view specified in metadata must provide the widgets
to configure a new resource. Initially, it fills out the form with the default values
copied from an auxiliary file.
Follow these recommendations when designing the view (missing out the general recommendations mentioned at the previous step):
- On top of the widget hierarchy, put the aps/Panel container. This complies with the layout rules and typical widget hierarchy.
- Use the Memory object to create a list of operating systems for selection.
Assign it to the
storeproperty of the aps/Select wizard. - Use the aps/TextBox widgets as the input fields.
- Use the aps/Spinner widgets as the other fields to assign resource properties.
- Sync the widget properties with a Model that will store new VPS JSON representation.
- The onNext handler must send the new VPS JSON representation to the next step in the wizard.
The demo project illustrates implementation of the above recommendations.
Resource Review
The ui/wizard/server-new-last view declared in the metadata
must display the new resource properties.
It allows a user either to return back to the previous view to edit the properties or commit
the operation.
Design recommendations:
- Similar to the previous view, use the aps/Panel container on top of the widget hierarchy.
- Use the aps/Output widgets to print out the properties from the model
created by the
server-new-1view. - The onPrev handler must return a user back to the
server-new-1view to edit the properties. - The onNext handler must send the reviewed data to the wizard for further processing.
The next part of the demo project illustrates implementation of the above recommendations.
Continue Your Demo Project
This section continues the demo project from its previous step. It illustrates creation of servers using a wizard with two views.
Wizard Host
Create the ui/vps-wizard.js file and follow these steps to create the new script
in it:
Start with building the recommended JavaScript skeleton:
define([
   "dojo/_base/declare",
   "dojo/when",
   "dojox/mvc/getPlainValue",
   "aps/View",
   "aps/ResourceStore",
   "./displayError"
], function (declare, when, getPlainValue, View, Store, displayError) {
   var subscriptionId;

   return declare(View, {
      init: function() {
         /* Display explanations about the process driven by the wizard */

      },

      onContext: function() {
         /* Make all views plugged into the wizard visible */

      },

      onNext: function() {
         /* Direct a user to the first view */

      },

      onSubmit: function() {
         /* Receive data from the last view and save it as new VPS resource */

      },

      onCancel: function() {
         /* Forward a user to the list of servers */

      }

   });
});
The subscription ID is necessary since we are using the default Account Wide Subscription Services mode.
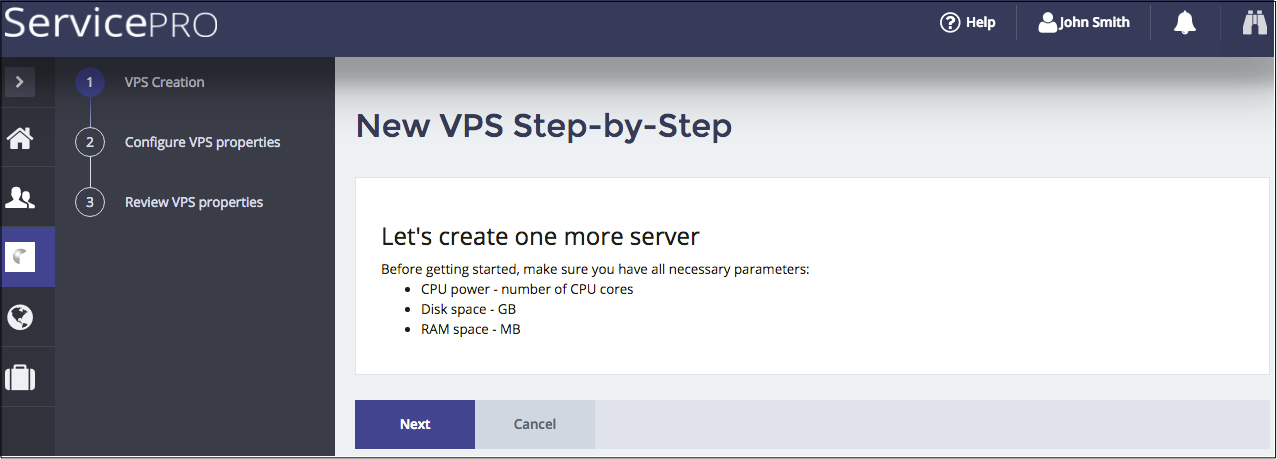
Use the
initfunction to display a text introducing customers to the wizard operations:return ["aps/Panel", { id: "wizard_panel" }, [["aps/Output", { id: "wizard_contents", content: "<h2>Let's create one more server </h2>" + "Before getting started, make sure you have all necessary parameters: <br>" + "<ul> <li> CPU power - number of CPU cores" + "<li> Disk space - GB" + "<li> RAM space - MB" }]]];
In the
onContextfunction, make all plugged views visible and sync this state with the system:subscriptionId = aps.context.vars.context.aps.subscription; aps.context.wizardState.forEach(function(view) { view.visible = true; }); aps.apsc.wizardState(aps.context.wizardState); aps.apsc.hideLoading();
The subscription ID will be sent later to the APS controller to specify the subscription whose resource will be used to create a new VPS. The subscription ID is available in the
apssection of any resource. Since the metadata declares the navigation variable calledcontextand mapped to the managementcontextresource for the whole tree, the subscription ID is available in that variable asaps.context.vars.context.aps.subscription.The code uses the shared wizardState structure to set all views visible and then calls the
aps.apsc.wizardStatemethod to sync this update with the system.Make the
onNexthandler direct a user to the first view:aps.apsc.next();
In the
onSubmithandler, get data from the last view and store it in the APS controller as a new VPS resource:/* Specify the subscription whose resource will be used */ aps.context.subscriptionId = subscriptionId; /* Create the data store */ var store = new Store({ apsType: "http://aps-standard.org/samples/vpsdemo/vps/1.0", target: "/aps/2/resources/" }); /* Receive data from the last step and save the new VPS */ var newVPS = aps.context.wizardData["http://aps-standard.org/samples/vpsdemo#server-new-last"]; when(store.put(newVPS), function() { aps.apsc.gotoView("servers"); }, displayError );
The subscription ID is assigned explicitly in the above code. The method requires the APS controller to provision the new VPS and then redirects a user to the
serversview.In the
onCancelhandler, forward a user to the list of servers. This handler processes the click on the Cancel button in any view of the wizard chain.aps.apsc.gotoView("servers");
Server Creation First Step
The ui/wizard/server-new-1 view is called from the wizard
by clicking the Next button.
Follow these steps, when creating the file from scratch.
Create the custom JavaScript skeleton:
define([
   "dojo/_base/declare",
   "dojox/mvc/at",
   "dojox/mvc/getStateful",
   "aps/View",
   "aps/Memory",
   /* Include JSON file that defines the VPS default properties */
   "aps/json!./newvps.json"
 ],
 function (declare, at, getStateful, View, Memory, newVPS) {
    return declare(View, {
      init: function() {

         /* Declare data sources */

         /* Define and return widgets */
         return [

         ];
      },

      onContext: function() {

      },

      onPrev: function() {

      },
      onNext: function() {

      }

    });
  });
In the
initfunction, define data sources for the VPS model and for the list of operating systems.Define a list of operating systems in the
osesstructure, for example:var oses = new Memory({ idProperty: "value", data: [ { value: "centos6", label: "CentOS 6" }, { value: "centos7", label: "CentOS 7" }, { value: "debian", label: "Debian" }, { value: "windows2008", label: "Windows 2008 Server" }, { value: "windows2012", label: "Windows 2012 Server" } ] });
The
osesobject contains a list of operating systems used for selecting an OS for the new VPS. This list will be used in the respective selection widget (aps/Select).Define a model to process the new VPS properties. Use the
newvps.jsonfile to initialize the model:this.vpsModel = getStateful({"data": newVPS});
Define widgets:
return ["aps/Panel", {id: this.genId("srvNew_form")}, [
   ["aps/FieldSet", {title: "General"}, [
        ["aps/TextBox", {
            label: "Server Name",
            value: at(this.vpsModel.data, "name"),
            required: true
        }],
        ["aps/TextBox", {
            label: "Description",
            value: at(this.vpsModel.data, "description")
        }]
   ]],
   ["aps/Panel", {
         id: this.genId("srvNew1_vps_configuration"),
         title: "Server Configuration"
      }, [
         ["aps/FieldSet", {id: "srvNew1_config"}, [
              ["aps/Select", {
                  label: "OS",
                  gridSize: 'md-3 xs-12',
                  value: at(this.vpsModel.data.platform.OS, "name"),
                  store: oses
              }],
              ["aps/Spinner", {
                  label:  "CPU Number",
                  gridSize: 'md-3 xs-12',
                  minimum: 1,
                  maximum: 16,
                  value: at(this.vpsModel.data.hardware.CPU, "number"),
                  step: 1
              }],
              ["aps/Spinner", {
                  label: "Disk Space",
                  gridSize: 'md-3 xs-12',
                  minimum: 1,
                  maximum: 100,
                  value: at(this.vpsModel.data.hardware, "diskspace"),
                  legend: "Gb",
                  step: 1
              }],
              ["aps/Spinner", {
                  label: "RAM",
                  gridSize: 'md-3 xs-12',
                  minimum: 128,
                  maximum: 8192,
                  value: at(this.vpsModel.data.hardware, "memory"),
                  legend: "Mb",
                  step: 128
              }]
         ]]
   ]]
]];
Define the
onContextmethod to initialize the model when necessary:if (!aps.context.wizardData["http://aps-standard.org/samples/vpsdemo#server-new-1"]) this.vpsModel.set("data", newVPS); aps.apsc.hideLoading();
If a user comes back to the view from the second view, the model must not change. To identify such a case, the function checks if the there is data sent by this view earlier. If the view has not sent its data yet, the model is initialized from the
newvps.jsonfile.Define the navigation button handlers.
Next button:
onNext: function() {
     var form = this.byId("srvNew_form");

     /* Validate the values assigned to widgets */
     if (!form.validate()) {
        aps.apsc.cancelProcessing();
        return;
     }

     /* Proceed to the next screen */
     aps.apsc.next(this.vpsModel.data);
},
The view validates the data entered in the widgets. If the data is not valid, the function cancels the data processing and requires a user to continue filling out the form. In the case of success, the function sends the data to the wizard and forwards the user to the next step.
Prev button:
onPrev: function() {
    aps.apsc.prev();
}
This is a typical handler code. When it is necessary to send data back to the wizard, the data must be an input argument, for example,
aps.apsc.prev(data).
Server Creation Final Step
The ui/wizard/server-new-last view is the last step in the VPS creation process.
It displays the selected VPS properties and allows a user to return back
or commit the updated properties.
Follow these steps, when creating the file from scratch.
Create the custom JavaScript skeleton as follows:
define([
   "dojo/_base/declare",
   "dojox/mvc/getStateful",
   "dojox/mvc/at",
   "aps/View",
   "aps/ResourceStore",
   "app/displayError",
   "aps/json!./newvps.json"
],
function (declare, when, getPlainValue, at, View, Store, displayError) {
   return declare(View, {
      init: function() {

         /* Define and return widgets */
         return [

         ];
      },
      onContext: function() {

      },

      /* Define handlers for the navigation buttons */
      onNext: function() {

      },
      onPrev: function() {

      }

   });
});
The path
app/used in the"app/displayError"definition, corresponds to the inclusion rules.In the
initmethod, define a model to process the VPS properties and initialize it from thenewvps.jsonfile:this.vpsModel = getStateful({"data": newVPS});
Define and return the widgets:
return ["aps/Panel", {
        id: this.genId("srvNew_page")
    },
    [
        ["aps/FieldSet", {
            title: "General"
        },
        [
            ["aps/Output", {
                label: "Server Name",
                value: at(this.vpsModel.data, "name")
            }],
            ["aps/Output", {
                label: "Description",
                value: at(this.vpsModel.data, "description")
            }]
        ]],
        ["aps/FieldSet", {
            title: "Server Configuration"
        },
        [
            ["aps/Output", {
                label: "OS",
                value: at(this.vpsModel.data.platform.OS, "name")
            }],
            ["aps/Output", {
                label: "CPU",
                value: at(this.vpsModel.data.hardware.CPU, "number")
            }],
            ["aps/Output", {
                label: "Disk Space",
                value: at(this.vpsModel.data.hardware, "diskspace")
            }],
            ["aps/Output", {
                label: "RAM",
                value: at(this.vpsModel.data.hardware, "memory")
            }]
        ]]
    ]
];
Only
aps/Outputwidgets are used here, since there is no need to edit any properties in this step.In the
onContextmethod, get the data passed by the previous view:this.vpsModel.set("data", aps.context.wizardData["http://aps-standard.org/samples/vpsdemo#server-new-1"] ); aps.apsc.hideLoading();
Define the navigation button handlers:
onNext: function() {
   var page = this.byId("srvNew_page");
   if (!page.validate()) {
      aps.apsc.cancelProcessing();
      return;
   }
   aps.apsc.next(this.vpsModel.data);
},
onPrev: function() {
   aps.apsc.prev();
}
The
onNexthandler sends the reviewed data to the wizard that will further process the received data as you defined it earlier.
Conclusion
You have completed development of the wizard that walks a customer through the two steps when creating a VPS.
The project files you have created are similar to the respective files in the
sample package.