CloudBlue Commerce API (DRAFT)
Table Of Contents
Real Services Integration Example
In this example, we will walk through all steps of integrating a real cloud application with the platform using a simplified sales scenario and sales model. For our example, we will take integration with GitHub - a world-wide known cloud platform (later referred to as the “cloud application” to not confuse it with our platform). This cloud application provides repositories for storing public and private data.

The demo project in this example will illustrate the end-to-end integration project lifecycle including design, development, deployment, and service provisioning. For our goal, the most important thing is that the considered cloud application exposes its comprehensive, flexible and documented GitHub API for such integration.
Your final integration package will look like the GitHub_Integration_Demo
package.
In this document:
Prerequisites
Before you get started with the practical steps, ensure the following:
You are familiar with the platform and its integration concepts by studying at least the following documents:
SDK Overview introduces the platform and its integration with applications and external management systems through the platform built-in RESTful API exposed as APS bus.
Platform Data Models provides the concepts of the platform for integrators and application developers.
You have admin permissions on a lab platform.
You have an account on GitHub that you can use for testing.
Integration Components
General Topology
A cloud application integrates with the platform through an APS application. An APS application instance (App) on the platform side represents the platform owner (the provider) as a reseller on the application side. This enables the provider to sell the application services. Generally, application services are provided to application tenants.

Note
Although GitHub provides the services that are used in the examples below for free, we will simulate a commercial relationship to illustrate the complete integration process including both technical and commercial steps.
For every customer subscribed to an application service plan, the APS application creates a tenant on both sides: one in the platform and one in the cloud application. In the platform, a tenant functions as an APS resource. In the cloud application, a tenant representation depends on the application implementation.
Original Cloud Services
GitHub enables you to provide access to your account workspace for other users and applications (your clients) by means
of security tokens. In our case, a tenant in the platform maps to a token on the application side.
When creating a security token, you must assign a list of scopes to it; through those scopes, you grant certain
privileges. For example, consider the following scopes associated with a token:
If the scopes only contain one element - “repo” - its owner is able to create repositories on GitHub.
If the scopes contain two elements - “repo” and “delete_repo” - the token enables its owner to create and delete repositories.
The outlined tenant-to-token mapping with scopes assignment to tokens can be used to sell access to the application services differentiated by scopes. For simplicity, we will use two SKUs to sell services:
“Basic service” SKU provides security tokens with the [“repo”] scopes.
“Premium service” SKU provides security tokens with the [“repo”, “delete_repo”] scopes.
A customer can subscribe to only one SKU from the above list.
Refer to the full list of scopes for more details.
Sales Model
In this example, we will sell tenants for the cloud application. For every tenant, the APS application must generate a security token with assigned scopes. The product configuration must enable a customer to purchase a token with a particular set of scopes and a limit on the total number of repositories to be created with that token. For this purpose, an application SKU defines a particular set of scopes to be assigned to the tenant’s security token. The price of a purchase must depend on the selected SKU and the limit on the total number of repositories.
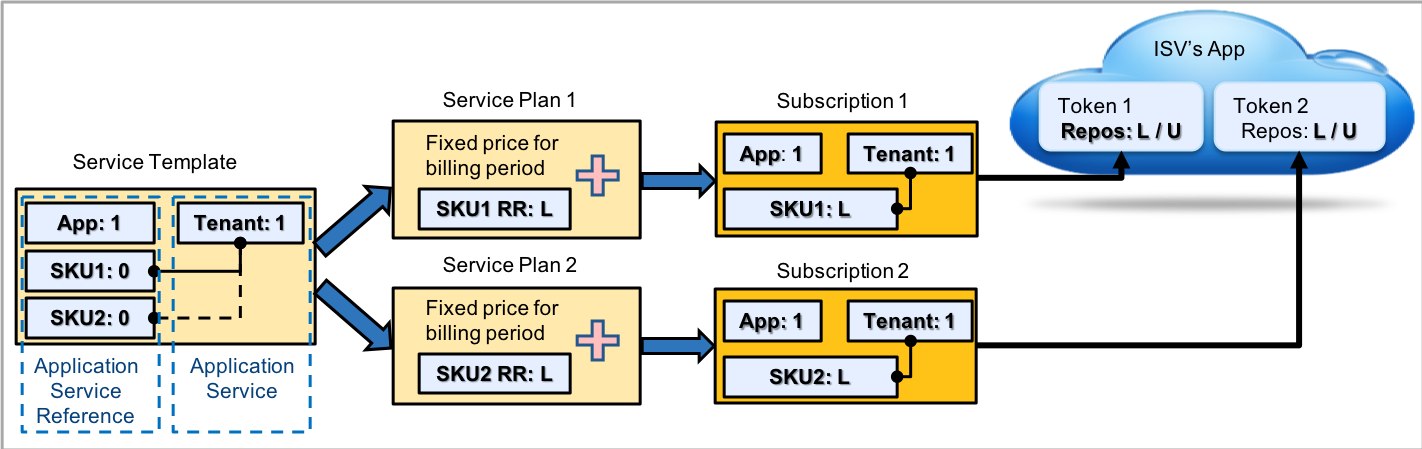
The above deployment-sales-provisioning workflow implements the required sales model.
The service template must contain three types of resources:
Application instance is mandatory in any service template. The resource limit is always
1.Tenant is a singleton resource in a subscription.
SKUs (licenses) represent a list of service offerings to sell. Every SKU defines a unique set of scopes to be assigned to a tenant and to the tenant’s token respectively. Limitations on an SKU define how many repositories are allowed to be created within that SKU. Regardless of the SKU limit specified in the service template, a subscriber must be able to purchase the SKU limit needed when subscribing to a service plan.
For every SKU created in the service template, there is a service plan configured for selling that SKU. The service plan defines a fixed price for every billing period and a unit price for SKU limit.
A customer can purchase one of the service plans and through that obtain a tenant with an auto-generated token and an associated set of scopes. During the sales process, the customer will select a limit on the total number of repositories denoted as
Lin the diagram.The application itself must ensure that the number of repositories created with a particular token does not exceed the limit assigned to that token, that is
U<=L.Note
In our case, the cloud application does not limit the number of repositories. That is why we will implement the limitation by means of the APS application provisioning logic.
Resource Model
The designed sales model maps well to the following typical APS resource model as in the diagram below:
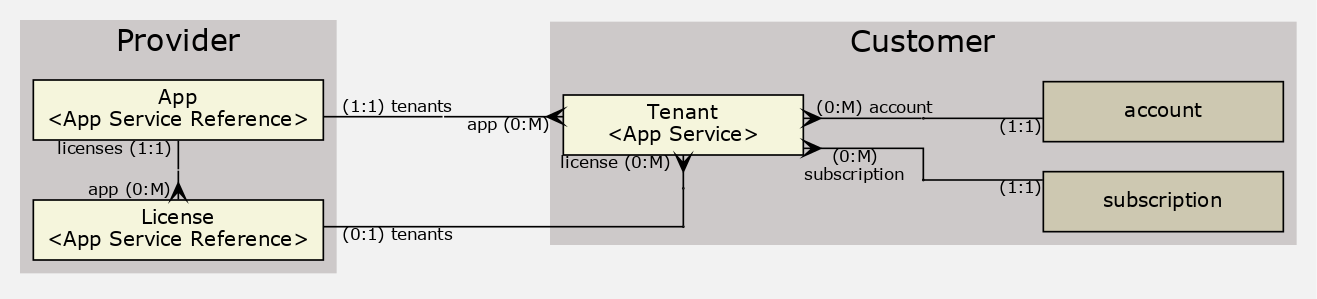
The integration package will contain three APS types:
Appis used to create a resource representing an APS application instance connected to the cloud application side. Such an APS type implementing the standard Application APS type is mandatory in any APS application. It has a collection of links with tenants and licenses.Tenantimplements the SubscriptionService APS type to create a singleton resource in a subscription that subscribers (customers) will use to consume the provided application service. Every tenant is connected to the application instance (this is a mandatory link). Besides this, during its provisioning, the tenant service must connect the respective APS resource to the APS resource representing the license sold through the subscription. The main property of this APS type will betokenwithscopescopied from the linked license.Licenseis needed to sell various product SKUs. An APS resource based on this APS type has a strong link with the application instance and it has a collection of links with tenants. Such an APS type should implement the standard ServiceProfile APS type. The main property of this APS type will bescopes.
Original RESTful API
The cloud application exposes its RESTful API for managing its resources. Start your project with testing your account on GitHub with the REST requests to be used by your APS application later.
Get Initial Account Data
Use your GitHub account login and password to read the following data:
Read account details:
$ curl -i -u your_login:your_password https://api.github.com/user
In the above command:
-irequires thecurlutility to print out the headers of the response.-uis used to authenticate the request by your login name and password. Use your real login and password instead ofyour_loginandyour_passwordrespectively. If you do not want to expose your password, omit it in the above command and then enter it when prompted.
Read the list of your tokens:
$ curl -u your_login:your_password https://api.github.com/authorizations
If you do not have any security tokens yet, the result will be an empty array; otherwise, the result will be a list of tokens without the token values. However, the response shows the token IDs to be used in other REST requests, for example, you can remove a token by its ID.
Read the list of your repositories:
$ curl -u your_login:your_password https://api.github.com/user/repos
If you do not have any repositories yet, the response will be an empty list; otherwise, the result will contain a list of your repositories with detailed data.
Create Token
For every tenant, the application must create a token and assign scopes to it. Verify this with the following command:
$ curl -i -u your_login:your_password -d '{"scopes": ["repo", "delete_repo"], \
   "note": "Tenant 1"}' https://api.github.com/authorizations
The response will look similar to the following:
{
  "id": 242655327,
  "url": "https://api.github.com/authorizations/242655327",
  "app": {
    "name": "Tenant 1",
    "url": "https://developer.github.com/v3/oauth_authorizations/",
    "client_id": "00000000000000000000"
  },
  "token": "009c59767c1e0f86db3ace129feeff531a2b9690",
  "hashed_token": "bfc77afb70617c571112338d486e0f0d2c92a18d7ea3df5147400bc6912e41f8",
  "token_last_eight": "1a2b9690",
  "note": "Tenant 1",
  "note_url": null,
  "created_at": "2018-12-06T08:30:20Z",
  "updated_at": "2018-12-06T08:30:20Z",
  "scopes": [
    "repo",
    "delete_repo"
  ],
  "fingerprint": null
}
Note
This is the only moment when you see the token value. To use it later for authentication, save it in a file.
You can create a token only through the basic “login:password” authentication.
Create Repository
With the repo scope assigned to the newly created token, you can use that token to authenticate a request for
creating a repository:
$ curl -i -H 'Authorization: token 009c59767c1e0f86db3ace129feeff531a2b9690' \
   -d '{"name":"Tenant1_repo1"}' https://api.github.com/user/repos
Read a list of repositories using the same authenticaion:
$ curl -i -H 'Authorization: token 009c59767c1e0f86db3ace129feeff531a2b9690' \
   https://api.github.com/user/repos
Remove Repository
With the delete_repo scope assigned to the newly created token, you can use that token to authenticate a request for
removing a repository:
$ curl -i -H 'Authorization: token 009c59767c1e0f86db3ace129feeff531a2b9690' \
   -X DELETE https://api.github.com/repos/your_login/Tenant1_repo1
The return code must be HTTP/1.1 204 No Content.
Remove Token
When removing (unprovisioning) a tenant, the respective token must be removed as well. You should test it using the basic “login: password” authentication as in this example:
curl -i -u your_login:your_password -X DELETE https://api.github.com/authorizations/242655327
In the above URL, the token ID specifies which token will be removed.
The return code must be HTTP/1.1 204 No Content.
Start Your Demo Project
To start a new project, you can use any IDE tool suitable for JavaScript and PHP. Whichever tool you use, follow these steps:
In your development workspace, create a folder where you will develop your APS application. Let us call it
github.Copy the compressed
project templateto this folder and decompress the template there, as in this example:$ unzip <pathto>/project.zip -d <pathto>/github/
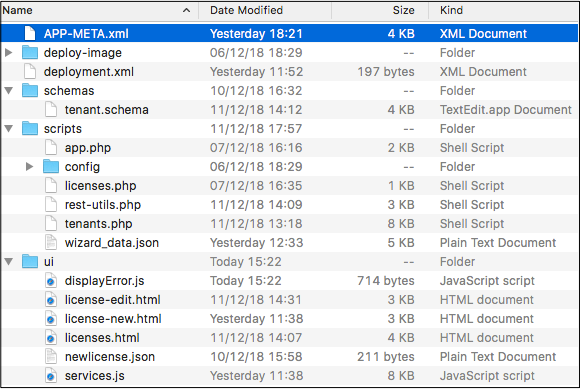
You will find the following contents in the
github/folder: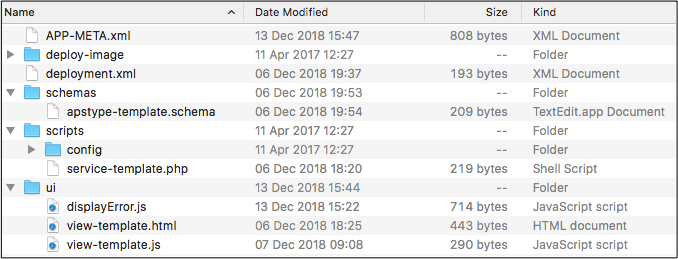
Look through the initial contents of the
APP-META.xmlfile:<application xmlns="http://aps-standard.org/ns/2" version="2.0"> <id></id> <name></name> <version>1.0</version> <release>0</release> <vendor> <name></name> <homepage></homepage> </vendor> <packager> <name></name> <homepage></homepage> </packager> <presentation> <summary>Demo package</summary> <description>Demonstrates an APS project lifecycle</description> <categories> <category>Samples</category> </categories> <navigation></navigation> </presentation> <license-agreement must-accept="true"> <free/> <text> <name>End-User License Agreement</name> <file>http://opensource.org/licenses/bsd-license</file> </text> </license-agreement> <service> </service> </application>
The above metadata contains the minimal set of required elements with empty values. You will fill them later with the values corresponding to your application.
In the
scripts/folder, create the following files from theservice-template.phpfile:scripts/app.phpdefines the service for theAppAPS type.scripts/tenants.phpdefines the service for theTenantAPS type.scripts/licenses.phpdefines the service for theLicenseAPS type.
Every PHP script does the following tasks:
Declares the corresponding APS type through the special PHP inline annotations.
Defines the APS type properties, structures, relations, and operations using PHP in-line annotations.
Defines PHP functions (methods) for some operations declared in the APS type.
service-template.phpcontents:<?php define('APS_DEVELOPMENT_MODE', true); require "aps/2/runtime.php"; /** * @type("") * @implements("http://aps-standard.org/types/core/resource/1.0") */ class type extends \APS\ResourceBase { } ?>
Additionally,
scripts/rest-utils.phpwill be used to define auxiliary functions for sending REST requests throughcurl.In the
ui/folder, use theview-template.jsandview-template.htmlto create the following*.js(views for UX1) and*.html(views for PCP) files respectively:ui/services.jsbuilds the main service view in the UX1 panel that allows a subscriber to manage repositories.ui/licenses.htmlbuilds the main service view in the provider control panel that allows the provider to manage licenses.ui/license-new.htmlcontains the source code of the license editor for creating a new license APS resource.ui/license-edit.htmlcontains the source code the license editor for updating an existing license APS resource.
In the same folder, create the
ui/newlicense.jsonfile for the JSON representation of the default license APS resource to be used by the license editors.view-template.jscontents:define([ "dojo/_base/declare", "aps/View" ], function ( declare, View ) { return declare(View, { init: function() { /* Declare the data sources */ /* Define and return widgets */ return [ ]; }, onContext: function(context) { } });});
view-template.htmlcontents:<!DOCTYPE html> <html> <head> <script src="/aps/2/ui/runtime/client/aps/aps.js"></script> <script> require([ "./displayError.js", "aps/ready!" ], function (displayError) { /* Define data source */ /* Define and load the widgets */ load(["aps/PageContainer", { id: "page" }, [ /* ...Define widgets here */ ]]).then(function() { /* ...Define button processing here */ }); }); </script> </head> <body> </body> </html>
The templates contain a minimal set of elements of a view structure. You will extend the JavaScript code in the later project phases.
In the
schemas/folder, rename theapstype-template.schemafile totenant.schema. This is its initial contents:{ "apsVersion": "2.0", "name": "", "id": "", "implements": [ "" ], "properties": { }, "operations": { }, "structures": { }, "relations": { } }
After all of the above steps are done, your project folder looks as follows:
Conclusion
This document introduces a cloud application to be integrated with the platform, describes the typical resource model for the APS application to be developed and helps you test your user account on the cloud application for its readiness to be used in the integration process.
To verify if the application resources are processed as expected on the application side, in addition to the application API calls, you can use the following URLs in your browser:
You have started the demo project that will be the basis of the next documents.