CloudBlue Commerce API (DRAFT)
Table Of Contents
Skin Customization
This guide will help you modify the look of the platform control panels CP and UX1 to match the corporate identity and style of your company.
For more aspects of the platform branding, refer to the respective documentation.
In this document:
Introduction to Panel Skins
Skins are assigned to brands and they cover all control panels of Operations Support System (OSS) and Business Support System (BSS):
Provider control panel (PCP)
Reseller control panel (RCP) that looks similar to PCP
Customer control panel (CCP)
Service user (end user) panel, also known as MyCP that looks similar to CCP
Unified user panel (UX1) used by resellers and customers
Note
Skins do not define the general layout of UI controls, like the positioning and visibility of frames, tabs, tree nodes, and so on - editing the skin has no effect on those.
Skin Structure
In the platform, a skin is implemented through an APS 1 package that can contain customization for both versions of the panels.
Package Components
Inside a skin package,
the content/ folder contains sub-folders for each panel version
and common folders that both versions of the panels can use.
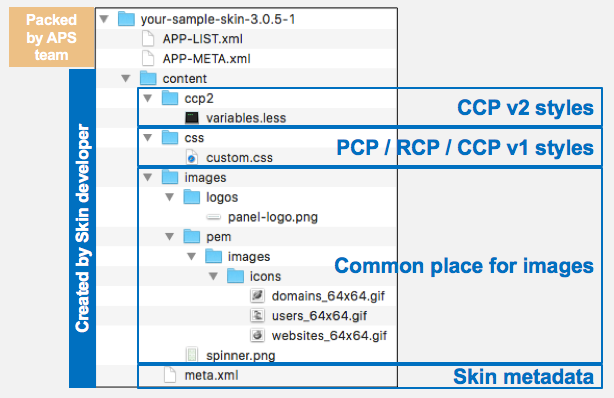
In the content/ folder, a skin developer adds all new files and files to be changed in the skin.
After all works are done with the skin, the developer provides the zipped content folder for
the Validation and Publication process.
Pay attention to the following skin specifics:
content/css/contains thecustom.cssfile to customize CP styles.content/ccp2/contains thevariables.lessfile in the LESS format to customize UX1. The file is used to compile the respective CSS file every time the skin is assigned to a brand.images/is the common place for image files to refer from the CSS and LESS files.
Note
images/logos/panel-logo.png is the logo for all control panels in all brands that use the skin.
Image Customization
A general way to customize an image in a CP consists of the following typical steps:
In the CP, find the internal path to the image using the browser development tools. In the following example, the internal path to the
Websitesicon is/pem/images/icons/websites_64x64.gif: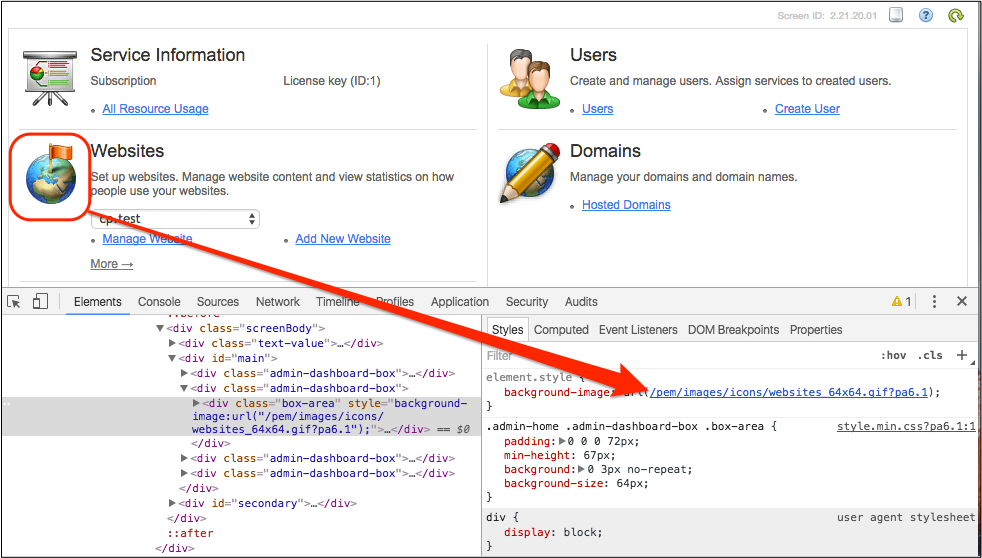
Using your preferable image editing tool, create an image of the same size that you want to replace.
Place the new image in the skin package using the same path relative to the
content/images/folder. In the sample package presented earlier, it iscontent/images/pem/images/icons/websites_64x64.gif.
Metadata
The content/meta.xml file contains metadata with the general description of the skin, for example:
<meta>
   <name>your-sample-skin</name>
   <description>Sample skin for Control Panels</description>
   <version>3.0.5-1</version>
   <vendor>You company name</vendor>
</meta>
The file must contain the following elements:
name- the name to be assigned to the packaged APS archive file.description- skin description.version- the version to be assigned to the package and the file name of the archived APS package.For the above example, the generated APS package will be namedyour-sample-skin-3.0.5-1.app.zip.vendor- the name of the skin package owner.
Prerequisites
The platform skins are bundled as APS packages validated and uploaded to the APS catalog by the APS team. To be able to create and modify skins, you need the following:
Contact with the APS support team to register on the APS development portal.
A test installation of the platform (also known as lab system) to test and debug skin packages. In the simplest case, you can test a skin on the OSS management node.