CloudBlue Commerce API (DRAFT)
Table Of Contents
Demo Project
The following basic demo procedures will help you be more confident in skin customization.
In this document:
Set Local Development Environment
Download and install Koala or LESS CLI on your computer.
Skip this step if you have one of the compilers installed on your computer.
Download the skin source
bootstrap.zipfile from the management node. The path to the file depends on theWildFlyversion, as in the following command:$ scp root@a.isv1.apsdemo.org/usr/local/pem/wildfly-10.1.0.Final/ext/aps/2/ui/runtime/theme/bootstrap.zip
Unzip the archive. You will find all source files in the
./bootstrap/folder.If you use Koala, drag and drop the new
bootstrap/folder into the Koala workspace.Optionally, for the sake of simplicity, you can remove all files from the Koala workspace, except for
bootstrap.lessand theskins/variables.lessfiles you are going to customize. This will not delete any files physically from thebootstrap/folder.In Koala, verify if the output file for
bootstrap.lessisbootstrap.css.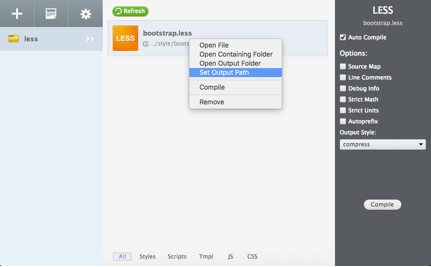
When using LESS CLI there is do not need to do any preparations.
Apply Predefined Skin
As a first step, try to apply a predefined skin from the source package to test the customization procedure as explained here.
Copy the content of a sample skin file, for example,
skins/skin-yellow.less, to theskins/variables.lessfile.Depending on the LESS compiler you use, compile the package as follows.
In Koala, right click on
bootstrap.lessand selectCompile. In a case of errors, you will see a pop-up screen with an error message. Fix the errors and compile the project again. On success, you will have the outputbootstrap.cssfile.If you use the LESS CLI:
Enter inside the top level folder:
$ cd bootstrap
Compile the skin into the
bootstrap.cssfile:$ lessc bootstrap.less bootstrap.css
- On your management node, navigate to
/usr/local/pem/wildfly-10.1.0.Final/ext/webgate/static/skins/v3/ccp2/and save the originalbootstrap.cssfile under another name.Note
The internal version
10.1.0is valid at the moment of writing this section and can be changed later. Copy the compiled
bootstrap.cssfile to the management node. For example, if your management node isa.isv1.apsdemo.org, use this command:$ scp bootstrap.css root@a.isv1.apsdemo.org:/usr/local/pem/wildfly-10.1.0.Final/ext/webgate/static/skins/v3/ccp2/
Use your browser to log in UX1. You will notice the changed view of the customer panel.
Customize Skin
Make your own customization in the skin as follows.
In the
skins/variables.lessfile, modify some elements. For example, to make the page background darker, modify the following element:@brand-color-0: #777777; // #ffffff - original value - Page background
Compile the project and copy the
bootstrap.cssfile to the management node.Refresh UX1 in your browser. The browser cache can prevent the contents refresh. In this case, turn on the browser development tools and then refresh the browser.

Pay attention to the changed background color.