CloudBlue Commerce API (DRAFT)
Table Of Contents
Advanced Method
In some cases, the deployment method based on the use of the initialization wizard cannot create final products in the desired configuration. For example, there is a complicated set of links between APS types of this application and APS types of other applications, so a service template must contain resource types presenting various applications. The method explained here is helpful for either, creating products from scratch, or edit those products that were created by the initialization wizard.
In this document:
Setting Reference Resources
Reference resources are shared for all customers. For example, they can offer a number of available configurations from which customers can choose whichever is better for them when purchasing a resource as demonstrated at Custom Resource Relationship. Suppose, our APS application allows the provider to create a number of VPS offers (Platinum, Premium, and Starter offers) in order customers can select them when purchasing VPSes. For example, a customer can purchase 15 VPSes, two of them will be based on the Platinum offer, three on Premium, and ten on Starter.
To create an offer, the provider should go through the following steps in the provider control panel (PCP):
Open the application instance screen and switch to the custom tab added by the APS application.
Note
Such a tab will appear if the custom UI in the package declares a navigation tree plugged into PCP.
Create the needed number of offers using custom UI.
Creating Resource Types
The platform contains built-in resource classes used to create various resource types. Every resource type maps to a certain APS component as explained in the table:
APS component |
Resource class |
Example in Diagram |
Resource type description |
|---|---|---|---|
Application instance (reference resource) |
Application Service Reference |
cloud |
Usually a single resource type mapped to the APS reference resource representing the APS application instance. |
Reference resource |
Application Service Reference |
offer |
A resource type mapped to an APS reference resource containing a configuration set for all subscribers. In a subscription, such a resource type allows setting a limited number of links to the respective APS reference resource. |
APS type |
Application Service |
context, vps |
A resource type used to create APS resources owned by a subscriber. The APS application may require such an APS resource to have a link with an APS reference resource. |
APS resource counter |
Application Counter |
CPU cores, Memory |
A resource type that allows the platform to poll the respective counter inside an APS resource belonged to a subscriber, usually inside a singular resource in a subscription. The platform polls APS resource counters periodically to collect application resource consumption. |
The table helps providers to correctly select the resource classes when creating a list of needed resource types. The Application Counter class is actually presented with its modifications that should be selected depending on the unit of measure used by a resource counter:
Application Counter (KB) maps to APS resource counters measuring resource usage in Bytes, KBytes, MBytes, etc. It is suitable for memory and storage counters.
Application Counter (unit) maps to unit counters, for example, to counters of CPU cores or mailboxes.
Application Counter (MHz) is suitable for counters of CPU power.
To create a resource type, a provider goes through the following general steps:
Open the imported application and switch to the Resource Types tab.
Click Create and select the resource class in accordance with the table.
Assign a name to the resource type.
Select the proper APS type. When creating the resource type representing the application, you need to select the application instance.
Complete the operation.
A provider needs to repeat the outlined process until all needed resource types are created.
Note
One of the resource types, usually the resource providing management context for customers, must have the Autoprovisioning attribute turned on.
Creating Service Template
A provider includes all the resource types created in the previous step into a service template to use the latter for provisioning the application services to customers. Follow these steps in the PCP to create a service template (ST).
Navigate to Products > Service Templates and click Add New Service Template.
Enter the ST name, for example, Cloud VPS Services, mark the Autoprovisioning box, make sure Custom is selected in the drop-down Type list, and click Next.
Select all APS related resource types created in the previous step. Probably, the application needs some other resources, for example, DNS hosting. Add them as needed, and then click Next.
Note
If you missed any resources in this step, you can easily add them later, after the ST is created.
Set resource limits keeping in mind the following key points:
The subscription should provide only one application instance and one management context.
The limits for the other resources should be set by following some commercial reasons.
The limits set in the ST can be overridden in a service plan configured in BSS.
Save the ST.
This is a sample service template:
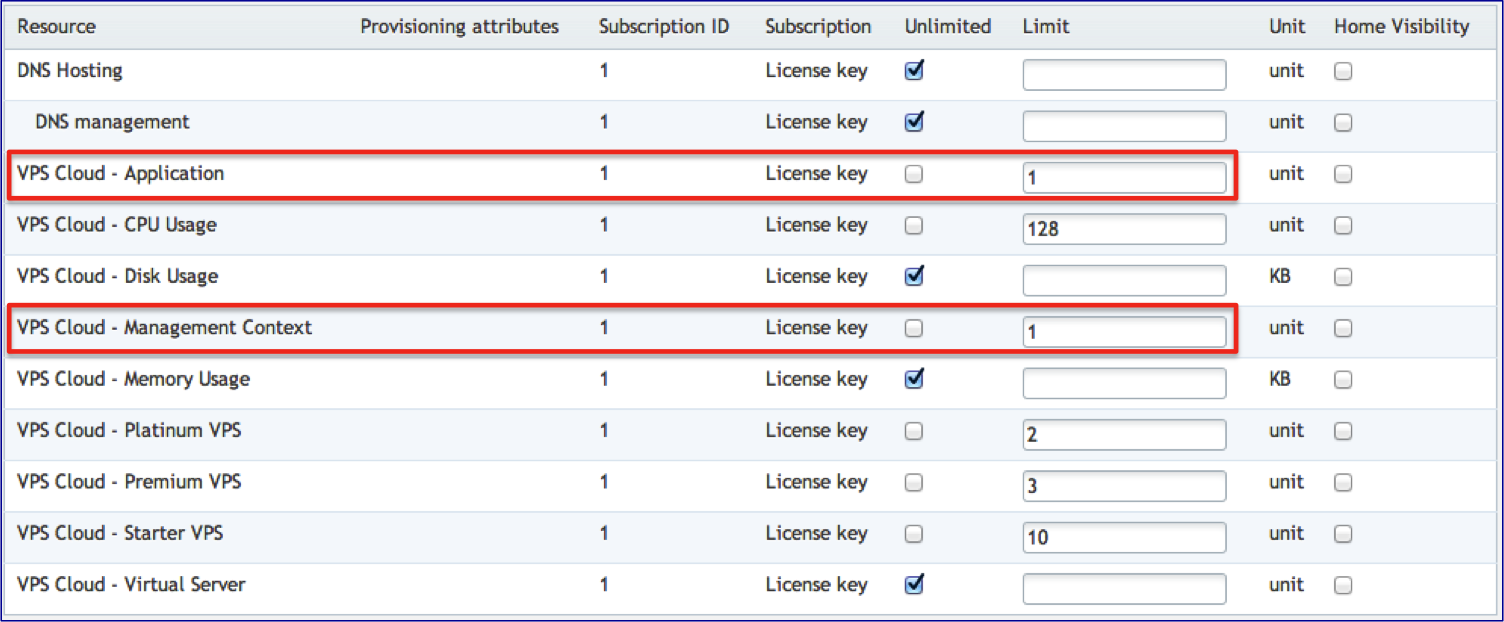
In accordance with this ST, the total number of virtual servers is unlimited. However, a subscriber cannot create more than 15 servers, as the total limit on the number of VPS configurations (offers) that the customer can select is 2+3+10=15. Still, please keep in mind that the limits can be overridden in a service plan created in BSS and based on this ST.
Creating and Configuring Service Plan
Creating Service Plan
In BSS, the provider creates a service plan following this typical procedure.
In the BSS provider control panel, navigate to Products > Service Plans. On the Service Templates tab, ensure there is the service template you have created in OSS.
Click on the service template name to open it for editing.
On the Plans tab, click Add New Service Plan to start creating the required plan.
Fill in the required fields:
In the Name field, type the plan name, for example, Cloud Servers - Demo.
In the Plan Category drop down list, select a category, for example, Hosting Services.
In the Short Summary and Detailed Description fields, enter any text you like.
Check the Published box.
Click Next on the bottom of the screen.
In the list of periods, select those periods that you want to enable for your customers and then click Next.
In the next steps, set the prices for each subscription period you have added to the plan. Click Finish after that.
Post-Creation Configuration
Optionally, the provider can add more features to the service plan. Find the newly created plan in the list of plans and click on its name to open it for editing.
If you want to upsell service plans from a sales category, for example, the Domains sales category, follow these steps:
Switch to the Up-sales tab.
Click Add new Up-sale Category.
In the Up-sale Category field, select the category you want to upsell.
In the Maximum Up-sale Subscriptions, enter the upper limit on the number of subscriptions you want to upsell.
Click Save to store this setting.
To configure resource rates, follow these steps:
Switch to the Resource Rates tab.
Click Add New Resource Rate to start a wizard.
In the Select Resources step, tick the resources that the new resource rates will be based on.
For each of the selected resources, select a resource category from the drop-down list. Then click Next.
In the Define Resource Rates step, set the limits and prices. Then click Finish.
Enable Plan for Sales
On the Publications Settings tab of the service plan, click edit and ensure the plan is ready for sale:
The Published box is checked.
A sales category is assigned.
Click Save to store the updated setting.
The service plan is ready for sale now.