CloudBlue Commerce API (DRAFT)
Table Of Contents
External Connector with SSL Authentication
When setting external APS connectors based on the SSL authentication, the recommended way to arrange the interaction between the APS controller and those APS connectors is the use of a NAT for both inbound and outbound connections.
In this document:
Integration Steps
The deployment schema looks as follows:
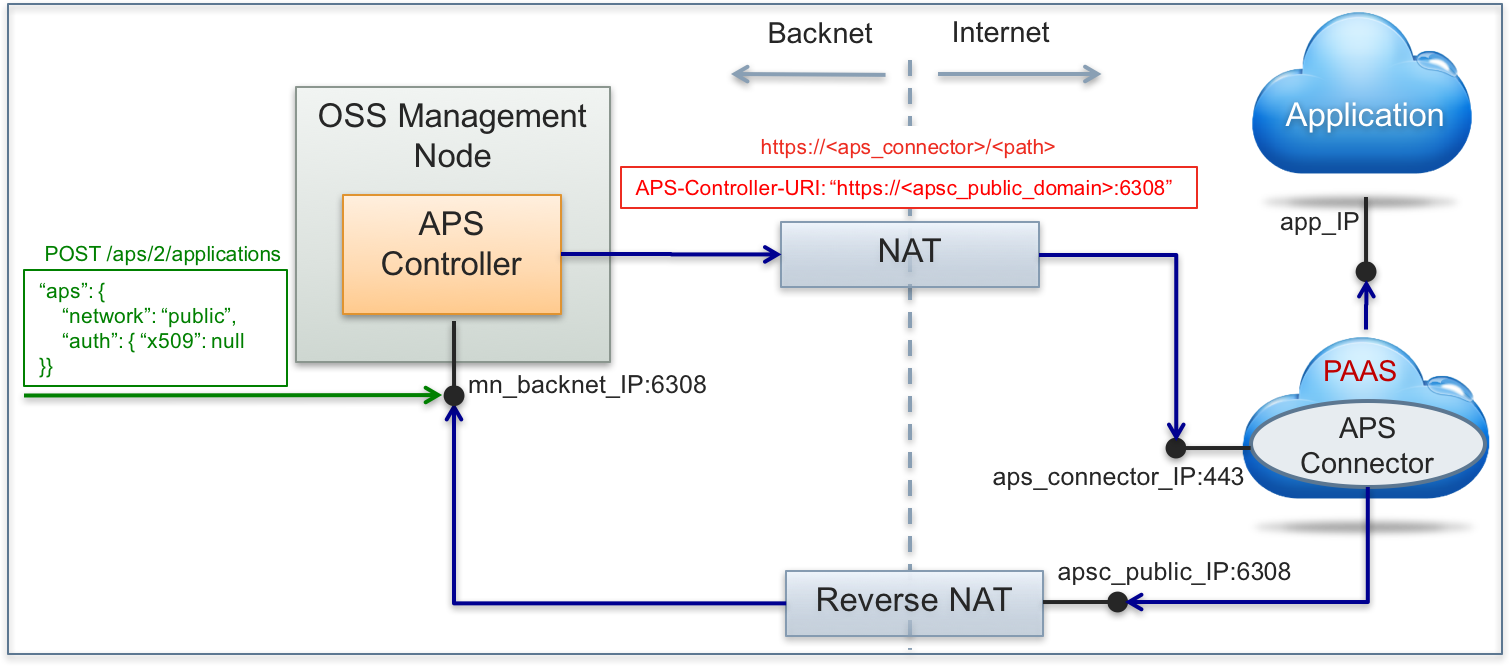
The following steps are required for the considered deployment schema:
Set up the Internet connection for the APS controller.
Install the APS connector in the Internet, for example in a PaaS (Platform as a service).
Install the APS application instance on the APS connector.
Set up Internet Connection
Let us consider connections in both directions:
The APS controller gets access to the Internet like any other personal computer in the provider’s premises. For example, it can go through a NAT server.
The provider ensures, that the APS controller is available from the Internet on a public inbound connection. For this purpose, the provider must have a reverse (static) NAT with a public interface accepting the REST requests.
The APS controller must inform an external APS connector about the APS controller inbound URL containing the public IP address or domain name and TCP port. The APS controller sends its public URL in the APS-Controller-URI header. The provider must configure this parameter in the provider control panel as follows:
Navigate to System > Settings and click on the System Properties link.
Click Edit.
In the APS controller public host name field, enter the domain name (or public IP address) and TCP port (optional) as configured in the reverse NAT server in the form of <domain-name>:<port> or <ip-address>:<port>.
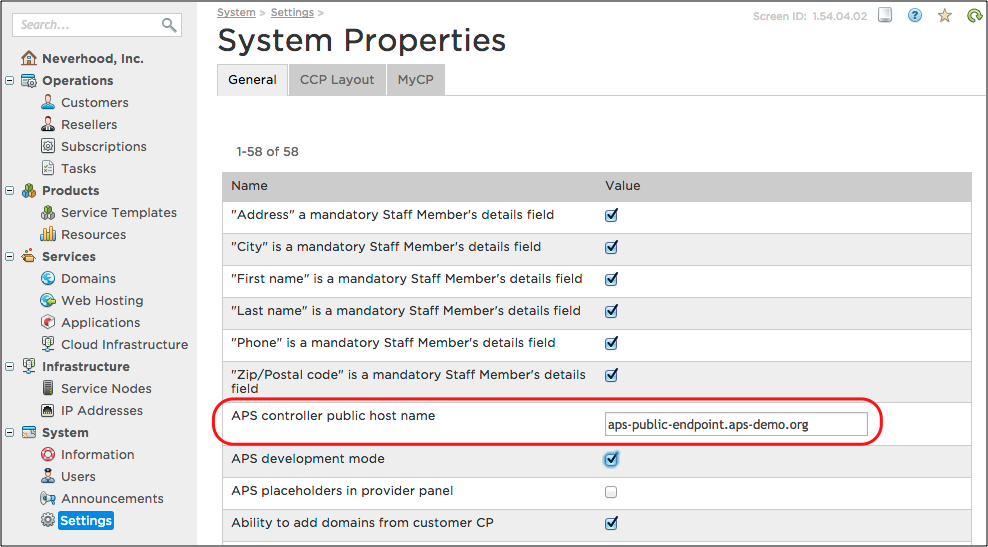
Note
TCP port is optional and its default value is 443. In any case, the APS controller will use SSL when establishing a session with an APS connector. By default, the URL will be https://<public host-name or IP>:443.
Click Submit to save the configuration.
Install APS Connector
Typically, all APS connector files are shipped in the scripts/ folder of the APS package as PHP scripts
functioning in the APS PHP framework.
Follow the APS Connector on Separate Host instruction to install the APS PHP framework, configure a web server, and then deploy an APS connector. You can use other alternative ways as well.
Test the APS connector by sending an “empty” request to the application root service. In the sample package tested here, it is the
vpscloudshandler. So the request might look as follows:# curl -v -X POST -d '{}' https://endpoint.isv1.example.com:443/vpscloudsThe response must contain a code-500 unauthorized access error message. This is normal because an APS connector expects a message signed by the SSL certificate of the APS controller.
Install APS Application Instance
The first application deployment steps are typical:
Build the APS package. For example, if the project folder name is basic-connector, run the following command from the parent folder:
$ aps build basic-connector
Using the provider control panel, import the APS package to the platform:
Navigate to Services > Applications.
Click Import Package.
Follow the other steps to import the archived package.
Unlike the case with internal APS connectors, a provider cannot use the provider control panel to
install an APS application instance on an APS connector of the type we are considering here.
An installation request must contain the network property that
you can specify using a REST client, either a GUI client, for example,
a REST plugin in a browser, or the curl utility in the command line as in the following example:
POST /aps/2/applications

{
   "aps": {
      "package": {
         "type": "http://event-mgmt.demo.apsdemo.org/vpscloud"
      },
      "endpoint": "https://endpoint.isv1.example.com:443/vpsclouds",
      "network": "public"
   },
   ...
}
Once the installation is completed successfully with the return code 200, you can use the provider control panel to find the installed APS application instance in the application profile.
After that, you can proceed with the typical deployment and provisioning steps:
Create the platform resource types base on corresponding APS resources of the application.
Create a service template and a service plan.
Provision a subscription for a test customer.
Log in to the customer control panel and provision the application resources.