CloudBlue Commerce API (DRAFT)
Table Of Contents
Migration to Docker Container
The Docker based Deployment method appeared later than the application integrators started using the Deployment in Shared Apache Web Space method. This may cause the providers to migrate from the older method to the newer one. The document explains a typical process of migrating an existing APS connector along with the APS application instance in it to the newer endpoint infrastructure.
In this document:
Migration Steps
The common configuration for the two methods:
An APS connector is installed on a virtual web server with similar configuration for both methods.
The APS connectors are based on the same framework type, typically this is the APS PHP runtime.
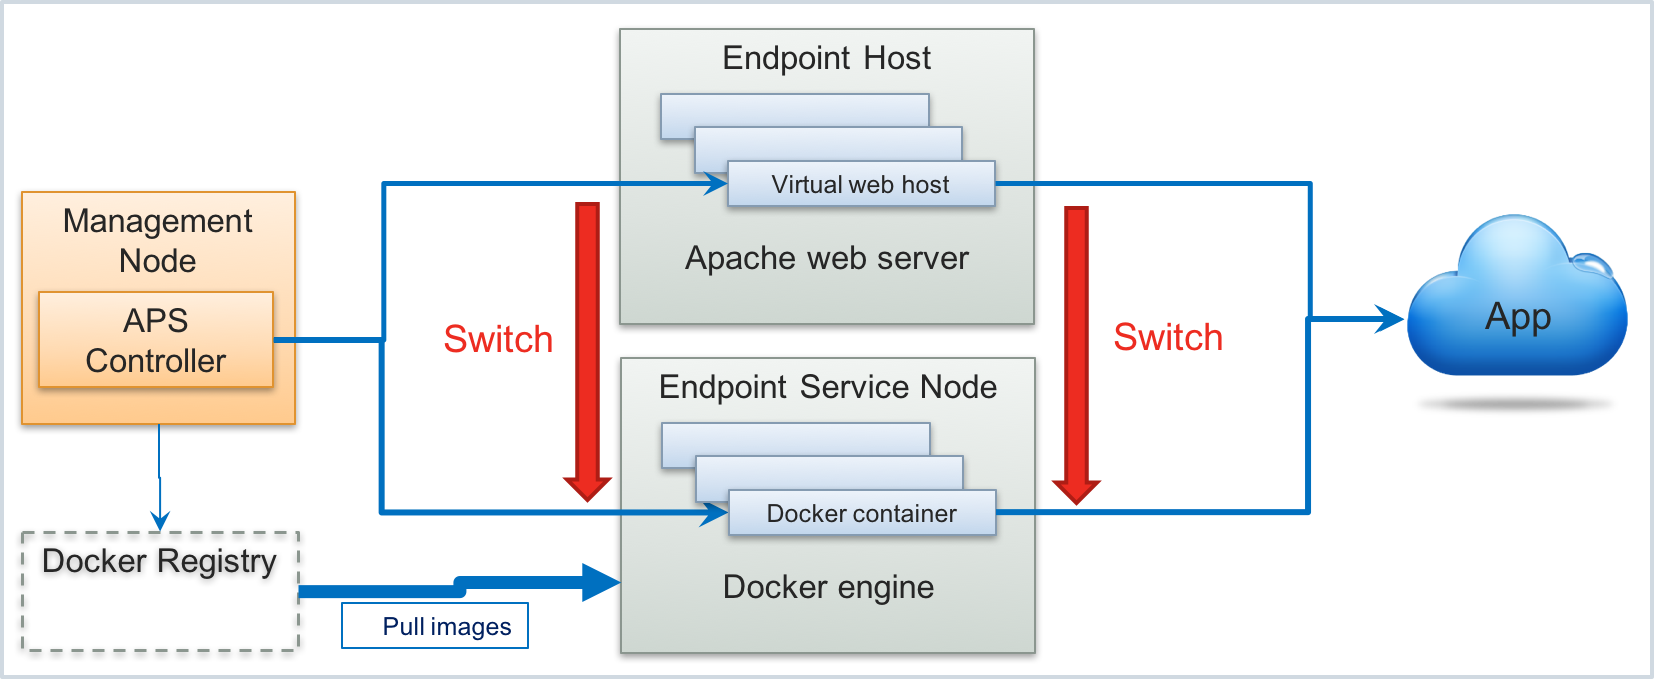
The difference between the two methods (first method - Deployment in Shared Apache Web Space, and the second - Docker based Deployment):
In the first method, all APS connectors use the same virtual web server as configured by the
endpoint.shutility. All APS connectors share the same APS PHP runtime instance. Also it is possible to change it by creating a separate virtual web host for every APS container but with a more complex configuration.In the second method, every APS connector runs in its own web server and uses its own APS PHP runtime, all wrapped in an isolated Docker container.
The following steps are recommended to implement the migration:
Analyze the initial state based on the Deployment in Shared Apache Web Space method.
Ensure the platform is ready to use the Docker based Deployment.
Get a new version of the APS package with the Docker based Deployment configuration and its image in a Docker registry.
Install an APS connector using the application image in a Docker registry.
Copy the essential data from the current APS connector to the new one.
Upgrade the APS application deployment on the platform.
Upgrade the APS application instance.
Test if the updated deployment works as expected.
Analyze Initial State
Assume, we have an APS application deployed in the APS ecosystem using the Deployment in Shared Apache Web Space method. The migration requires the following details about the deployed APS connector:
Host name or IP address of the server that contains the APS connector, for example,
endpoint.a.isv1.apsdemo.org.The folder on that server that contains the web space with the installed APS connector, for example,
/var/www/html/starter/.
Ensure Platform Readiness
Walk through the following steps in the provider control panel (PCP) to ensure the platform is ready to use the Docker based Deployment to deploy APS applications.
Navigate to System > Settings and click on the Docker Registry Settings link to ensure the platform uses the same host name for the Docker registry as used by the APS application whose deployment you are migrating.
Note
The docker public registry host name is
docker.io.Navigate to Infrastructure > Service Nodes and ensure there is a server implementing the APS Endpoint Node role. If there is no such a server, registry one as explained in the Register Endpoint Host section.
In this document, we suppose the host name is docker-endpoint.a.isv1.apsdemo.org. So, we must migrate the APS
connector along with the APS application instance from the endpoint.a.isv1.apsdemo.org server, as discovered in
the Analyze Initial State step, to the docker-endpoint.a.isv1.apsdemo.org server.
Analyze upgraded APS Package
The upgraded APS package must comply with the following requirements.
The Docker registry used by the platform (see the Ensure Platform Readiness step) must store the APS connector image.
The stored image tag must be the same as the value assigned to the <imageName> element in the
deployment.xmlfile of the package. The file may look as follows:<?xml version="1.0" encoding="UTF-8"?> <deployment> <imageName>apsdemo/starter</imageName> <applicationPort>1443</applicationPort> <applicationUrlPath>endpoint</applicationUrlPath> </deployment>
In the above code, the tag is
apsdemo/starter.The stored image tag version must be the same as the package version specified by the <version> and <release> elements in the
APP-META.xmlfile, for example:<version>2.0</version> <release>0</release>
In accordance with the above code, the package version and the tag version must be
2.0-0.
Install APS Connector
Install the target APS connector as follows.
Connect to the new endpoint host through SSH, for example:
$ ssh root@docker-endpoint.a.isv1.apsdemo.org
[root@docker-endpoint ~]#
Create a Docker container using the APS application image as discovered in the Analyze upgraded APS Package step. For example:
# docker run -d -P -t apsdemo/starter:2.0-0

Unable to find image 'apsdemo/starter:2.0-0' locally
Trying to pull repository docker.io/apsdemo/starter ...

// The other messages are missed here for brevity

Digest: sha256:5e2447c0bd786a04f49acc77dcac3e450209b6f36c51ab6a89d5cd4ee7933d39
Status: Downloaded newer image for docker.io/apsdemo/starter:2.0-0
2839abc48121ac5e01169f2831eb3c5809bf98de129b51678de4d969b534ff3a
Verify the container state and find its ID:
# docker ps
CONTAINER ID  IMAGE                  COMMAND                  PORTS
2839abc48121  apsdemo/starter:2.0-0  "/bin/sh -c 'sh /root"   0.0.0.0:32772->1443/tcp
Some columns are missed in the above print out for brevity.
Migrate Essential Data
Now, when you have two APS connectors, you should copy from the current APS connector the essential data that is not stored in the image of the new APS connector. Among that data, the most important are SSL certificates. The transfer of the latter will actually transfer the APS application instance, and this allows you to switch the APS controller to using the same APS application instance on the new place.
Copy the SSL certificates from one server to the other, for example:
# scp -r root@endpoint.a.isv1.ap.int.zone:/var/www/html/starter/config .

# ls -al config/
total 28
drwxr-xr-x   2 root root 4096 May 22 18:29 .
dr-xr-x---. 16 root root 4096 May 22 18:29 ..
-rw-------   1 root root 4211 May 22 18:29 5cbcd225-e368-496a-9149-a41fffb24908
-rw-------   1 root root 1196 May 22 18:29 5cbcd225-e368-496a-9149-a41fffb24908.apsc.pem
-rw-------   1 root root 2818 May 22 18:29 5cbcd225-e368-496a-9149-a41fffb24908.pem
-rw-r--r--   1 root root   31 May 23 13:48 .htaccess
Find the correct place for the
configfolder inside the container as in the following example:# docker exec -i -t 2839abc48121 /bin/bash # [root@2839abc48121 /]# ls -al /var/www/aps-php-runtime/scripts/config/ total 4 drwxr-xr-x 2 apache apache 22 May 23 09:28 . drwxr-xr-x 3 apache apache 111 Mar 20 12:09 .. -rw-r--r-- 1 apache apache 31 Mar 20 12:03 .htaccess [root@2839abc48121 /]# exit exit
To enter inside the container you use the container ID as discovered in the Install APS Connector step.
Copy that content into the container:
# docker cp config 2839abc48121:/var/www/aps-php-runtime/scripts/
Change the owner of the copied SSL certificates for
apache:# docker exec -i -t 2839abc48121 /bin/bash [root@2839abc48121 /]# chown -R apache:apache /var/www/aps-php-runtime/scripts/config [root@2839abc48121 /]# exit
Upgrade APS Application in Platform
To switch the APS controller to the APS application instance on the new place, you should run the APS instance upgrade. The latter is available after importing the APS application of the higher version. Do the following in PCP:
Navigate to Services > Applications.
Click Import Package and upload the upgraded APS package. Once the package has successfully loaded, it must upgrade the application version in the platform.
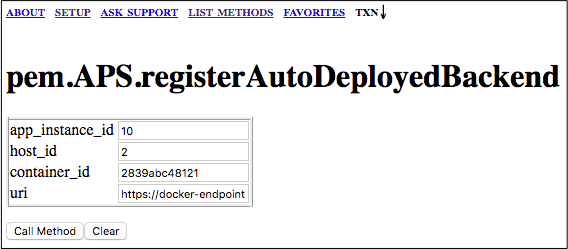
Register the new APS connector in the platform using the
pem.APS.registerAutoDeployedBackendmethod with the following input:host_id, for example,2- the ID of the server that implements the APS Endpoint role. You will find it in PCP by opening the list of registered service nodes.app_instance_id, for example,10- the ID of the APS application instance. You will find it in PCP by opening the list of APS instances.container_id, for example,2839abc48121- the Docker container ID you have created in the Install APS Connector step.uri, for example,https://docker-endpoint.a.isv1.ap.int.zone:32772/endpoint- the new APS application endpoint URI. In this URI, the host name is the domain name or IP address of the endpoint host, the port is the TCP port on the endpoint host mapped to the container internal host as you noticed in the Install APS Connector step, and the remained suffix is specified in thedeployment.xmlfile, as may noticed in the Analyze upgraded APS Package step.
If you have a special XML-API server on your premises, the configuration of the
pem.APS.registerAutoDeployedBackend method looks as follows:
The other way is to use cURL utility as explained in the
Platform XML-RPC API
documentation. In this case, use the following XML request and response as examples.
XML-RPC request
<?xml version='1.0'?>
<methodCall>
   <methodName>pem.APS.registerAutoDeployedBackend</methodName>
   <params>
      <param>
         <value>
            <struct>
               <member>
                  <name>host_id</name>
                  <value>
                     <i4>2</i4>
                  </value>
               </member>
               <member>
                  <name>app_instance_id</name>
                  <value>
                     <i4>10</i4>
                  </value>
               </member>
               <member>
                  <name>container_id</name>
                  <value>
                     <string>2839abc48121</string>
                  </value>
               </member>
               <member>
                  <name>uri</name>
                  <value>
                    <string>https://docker-endpoint.a.isv1.ap.int.zone:32772/endpoint</string>
                  </value>
               </member>
            </struct>
         </value>
      </param>
   </params>
</methodCall>
XML-RPC response
<?xml version='1.0'?>
<methodResponse>
   <params>
      <param>
         <value>
            <struct>
               <member>
                  <name>status</name>
                  <value>
                     <i4>0</i4>
                  </value>
               </member>
            </struct>
         </value>
      </param>
   </params>
</methodResponse>
Upgrade APS Application Instance
The final step is to upgrade the APS application instance data in the APS controller database. This will make the APS controller start using the new version of the APS application instance in the new place (new URL).
In PCP, open the upgraded application and then open the APS application instance.
Click Upgrade to make the required changes.
The application instance version must change for the new version and the Application API end-point URI must show the new URI.
Test updated Deployment
Test the updated deployment using a customer subsription. Open the customer control panel and try various provisioning, updating, custom, and deleting operations.