CloudBlue Commerce API (DRAFT)
Table Of Contents
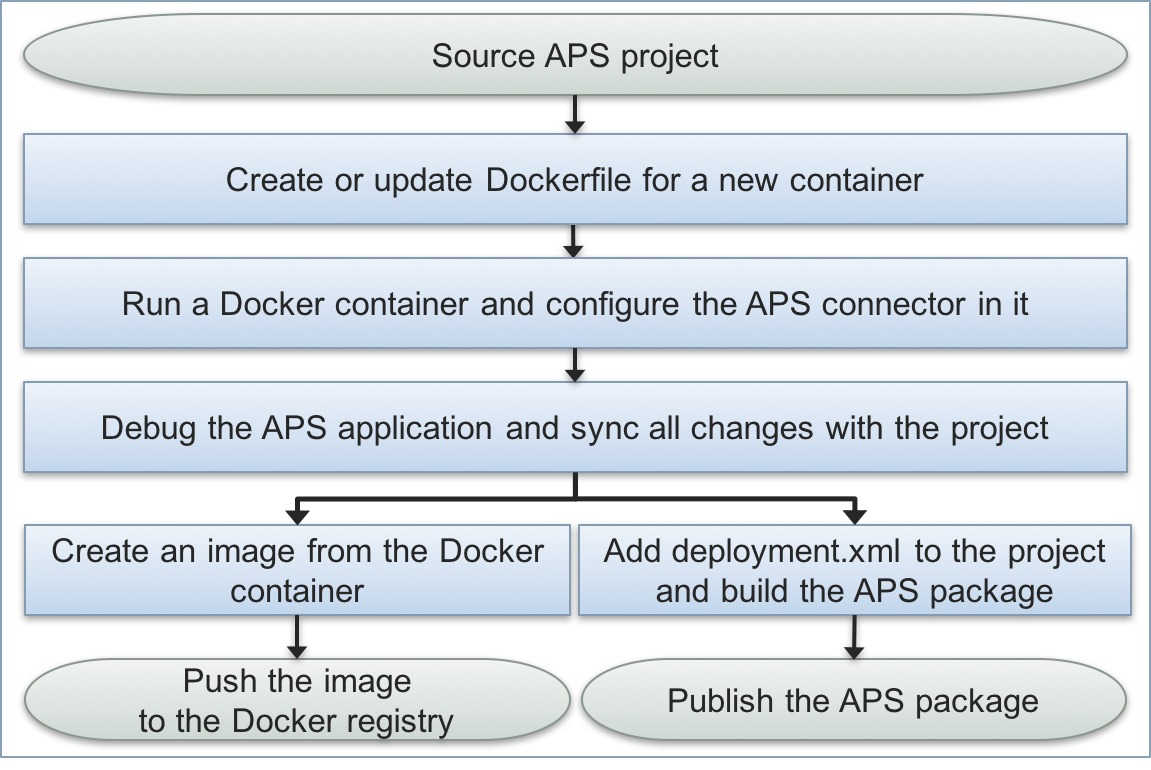
General Approach
If the Simple Method of deployment does not completely meet your requirements, you can customize this method or use your own way to create a deployment image.
In this document:
Deployment Customization
In the following sections, you will find examples of deployment customization.
Alias in URL Path and TCP Port
Requirement
The container must use an alias in the URL path and an internal TCP port for the APS connector different from the default
endpoint and 1443 used in the Simple Method.
Solution
Since an APS container image is based on the aps-php-runtime image, it is necessary to update
the alias and the TCP port in several files:
./deployment.xml- update the alias and TCP port in the <applicationUrlPath> and <applicationPort> elements respectively, for example, change them forbasicand3443:<deployment> <imageName>apsdemo/basic</imageName> <applicationPort>3443</applicationPort> <applicationUrlPath>basic</applicationUrlPath> </deployment>
./deploy-image/Dockerfile- update the TCP port in theEXPOSEdirective, for example, change it for3443:# Application port that will be bound to external container port EXPOSE 3443
./deploy-image/etc/httpd/conf.d/aps-php-runtime.conf- update the TCP port in theListendirective and <Virtual Host> configuration, for example, change it for3443:Listen 3443 <VirtualHost *:3443>
./deploy-image/etc/httpd/conf.d/aps-php-runtime.conf.d/endpoint.conf- update theAliasdirective, for example, change it forbasic:Alias /basic /var/www/aps-php-runtime/scripts
Big Amount of Data in APS Container
Requirement
The container must have additional data that makes the APS package too big. Actually that data is needed inside the APS connector and there is no need to upload it to the management node along with the APS package.
Solution
To not store big data in the APS package, restructure the project as follows:
Separate the
deploy-image/folder from the APS project folder.Include the additional data and copy the APS application
scripts/folder to thedeploy-image/folder.Update the
Dockerfileto meet the customized structure.
Building Image from Container
In some complicated cases, you probably need to do a lot of test and debug experiments with your APS connector to ensure it functions as needed. After completion of the this process, you can create an image just from the container using the docker commit command.
Generally, the process contains the following steps:
Using Private Docker Registry
If you need to use your own server as a Docker registry, replace the existing settings on your test platform with the parameters of your private Docker registry as explained in the next section.
If you do not have a Docker registry, first follow the Create Docker Registry instructions to create one.
Replace Docker Registry
In the provider control panel, follow these steps to replace the Docker registry settings:
Navigate to System > Settings and click on the Docker Registry Settings link.
Click Edit.
Replace the default host name for your Docker registry IP address or domain name.
Click Choose File and upload the SSL certificate of your Docker registry.
Click Submit.
Create Docker Registry
The How To Set Up a Private Docker Registry document explains how to set up a Docker registry on Ubuntu.
To create a private Docker registry on a hardware node or a virtual machine with CentOS-7 on it, some steps must be modified as follows.
Update
yum:# yum update
Add the Docker repository for
yumby adding the/etc/yum.repos.d/docker.repofile with the following contents:[dockerrepo] name=Docker Repository baseurl=https://yum.dockerproject.org/repo/main/centos/7/ enabled=1 gpgcheck=1 gpgkey=https://yum.dockerproject.org/gpg
Install the Docker engine and then enable and start it:
# yum install docker-engine
# systemctl enable docker.service
# systemctl start docker.service
Install the
docker-composeutility:# curl -L "https://github.com/docker/compose/releases/download/1.9.0/docker-compose-$(uname -s)-$(uname -m)" -o /usr/local/bin/docker-compose # chmod +x /usr/local/bin/docker-compose # docker-compose --version
Note
The specified version
1.9.0was the newest at the moment of writing this section.Create a Docker context folder for the registry image:
# mkdir /docker-registry
# cd /docker-registry
# mkdir data
Create the
docker-compose.ymlconfiguration file with the following contents:registry: image: registry:2 ports: - 127.0.0.1:5000:5000 environment: REGISTRY_STORAGE_FILESYSTEM_ROOTDIRECTORY: /data volumes: - ./data:/data
Run the Docker registry to verify the configuration:
# docker-compose up

Pulling registry (registry:2)...
2: Pulling from library/registry
3690ec4760f9: Already exists
930045f1e8fb: Pull complete
feeaa90cbdbc: Pull complete
61f85310d350: Pull complete
b6082c239858: Pull complete
Digest: sha256:1152291c7f93a4ea2ddc95e46d142c31e743b6dd70e194af9e6ebe530f782c17
Status: Downloaded newer image for registry:2
Creating dockerregistry_registry_1
Attaching to dockerregistry_registry_1
registry_1  | time="2016-12-07T08:22:56Z" level=warning msg="No HTTP secret provided - generated random secret...
registry_1  | time="2016-12-07T08:22:56Z" level=info msg="Starting upload purge in 27m0s" go.version=go1.6.3...
registry_1  | time="2016-12-07T08:22:56Z" level=info msg="redis not configured" go.version=go1.6.3...
registry_1  | time="2016-12-07T08:22:56Z" level=info msg="using inmemory blob descriptor cache"...
registry_1  | time="2016-12-07T08:22:56Z" level=info msg="listening on [::]:5000" go.version=go1.6.3...
Click CTRL-C to shut down the container.
Create a build context folder for an Nginx container:
# mkdir /docker-registry/nginx
Configure the Nginx container by editing the
/docker-registry/docker-compose.ymland/docker-registry/nginx/registry.conffiles./docker-registry/docker-compose.yml:nginx: image: "nginx:1.9" ports: - 443:443 links: - registry:registry volumes: - ./nginx/:/etc/nginx/conf.d registry: image: registry:2 ports: - 127.0.0.1:5000:5000 environment: REGISTRY_STORAGE_FILESYSTEM_ROOTDIRECTORY: /data volumes: - ./data:/data
/docker-registry/nginx/registry.conf:upstream docker-registry { server registry:5000; } server { listen 80; # Enter your server domain name server_name docker.registry.domain.name; location /v2/ { if ($http_user_agent ~ "^(docker\/1\.(3|4|5(?!\.[0-9]-dev))|Go ).*$" ) { return 404; } } } server { listen 443; # Enter your server domain name server_name docker.registry.domain.name; # SSL ssl on; ssl_certificate /etc/nginx/conf.d/domain.crt; ssl_certificate_key /etc/nginx/conf.d/domain.key; # disable any limits to avoid HTTP 413 for large image uploads client_max_body_size 0; # required to avoid HTTP 411: see Issue #1486 (https://github.com/docker/docker/issues/1486) chunked_transfer_encoding on; location /v2/ { # Do not allow connections from docker 1.5 and earlier # docker pre-1.6.0 did not properly set the user agent on ping, catch "Go *" user agents if ($http_user_agent ~ "^(docker\/1\.(3|4|5(?!\.[0-9]-dev))|Go ).*$" ) { return 404; } # To add basic authentication to v2 use auth_basic setting plus add_header add_header 'Docker-Distribution-Api-Version' 'registry/2.0' always; limit_except GET HEAD OPTIONS { auth_basic "registry.localhost"; auth_basic_user_file /etc/nginx/conf.d/registry.password; } proxy_pass http://docker-registry; proxy_set_header Host $http_host; # required for docker client's sake proxy_set_header X-Real-IP $remote_addr; # pass on real client's IP proxy_set_header X-Forwarded-For $proxy_add_x_forwarded_for; proxy_set_header X-Forwarded-Proto $scheme; proxy_read_timeout 900; } }
Generate an SSL certificate:
Create a root key in the
/docker-registry/nginx/devdockerCA.keyfile:# cd nginx # openssl genrsa -out devdockerCA.key 2048
Generate a root certificate:
# openssl req -x509 -new -nodes -key devdockerCA.key -days 10000 -out devdockerCA.crt
Generate a key for the server:
# openssl genrsa -out domain.key 2048
Create and sign the certificate request:
# openssl req -new -key domain.key -out dev-docker-registry.com.csr
Do not enter a challenge password when prompted for it.
# openssl x509 -req -in dev-docker-registry.com.csr -CA devdockerCA.crt -CAkey devdockerCA.key \
  -CAcreateserial -out domain.crt -days 10000
Copy the generated SSL certificate to the folder used by the host machine folder containing remote certificates. This allows using the newly created Docker registry from the local machine.
Enable the dynamic CA configuration feature:
# update-ca-trust force-enable
Place the created certificate to the folder that must contain remote certificates:
# cp devdockerCA.crt /etc/pki/ca-trust/source/anchors/devdockerCA.crt
# update-ca-trust extract
Restart the Docker engine:
# systemctl restart docker
Verify the registry:
Run the registry:
# cd ~/docker-registry
# docker-compose up
Open another window on the same host and call the registry, for example, if the host name is
docker-endpoint.a.isv1.apsdemo.org, run the following command:# curl https://docker-endpoint.a.isv1.apsdemo.org/v2/ {}
To start up the registry container automatically on the host boot, create the
/etc/systemd/system/docker-registry.servicefile with the following contents:[Unit] Description=Docker RegistryService After=network.target [Service] Type=simple WorkingDirectory=/docker-registry ExecStart=/usr/local/bin/docker-compose up Restart=on-abort [Install] WantedBy=multi-user.target
Remove the containers and then start the new service:
# docker-compose rm  # this removes the containers
# systemctl start docker-registry
Verify if the containers are running:
# docker ps

CONTAINER ID  IMAGE                  COMMAND                  CREATED              STATUS              PORTS
6d7f07fcc70f  nginx:1.9              "nginx -g 'daemon off"   About a minute ago   Up About a minute   80/tcp, 0.0.0.0:443->443/tcp
3717dbdfd782  registry:2             "/entrypoint.sh /etc/"   About a minute ago   Up About a minute   127.0.0.1:5000->5000/tcp
0d37367465d5  docker/compose:1.9.0   "/usr/bin/docker-comp"   About a minute ago   Up About a minute