CloudBlue Commerce API (DRAFT)
Table Of Contents
Simple Method
In this document:
Assumptions and Requirements
The method explained here is based on the following assumptions:
The
scripts/folder in the APS package contains the APS application provisioning logic written in PHP.The PHP scripts in the
scripts/folder are based on the APS PHP runtime.
With these assumptions, an image for Docker containers, should include the APS PHP runtime image
and the contents of the scripts/ folder.
The APS application upgrade process replaces the current container with another one that uses the configuration of the old container. The process requires that the APS PHP runtime logs and the SSL certificates are transferred from the old container to the new one through the container volumes mounted on the host files system.
Project Template
Following the above assumptions and requirements, a developer can download and use the
project template as a folder with the following structure:

In addition to the standard APS package contents, the template contains two deployment configuration parts:
The
deploy-image/folder contains typical data and configuration structures necessary to create a container image based on the underlying APS PHP framework and Apache web server.The
deployment.xmlfile contains a reference to the image that the platform uses when it deploys the APS application.
Copy both of the above, the folder and the file to your project folder.
Image Configuration
Image Structure
The project template provides an image structure inside the deploy-image/ folder. You can use it as is
without any changes. Along with the scripts/ folder of the APS application, it provides all necessary data
and configuration to create a container image.
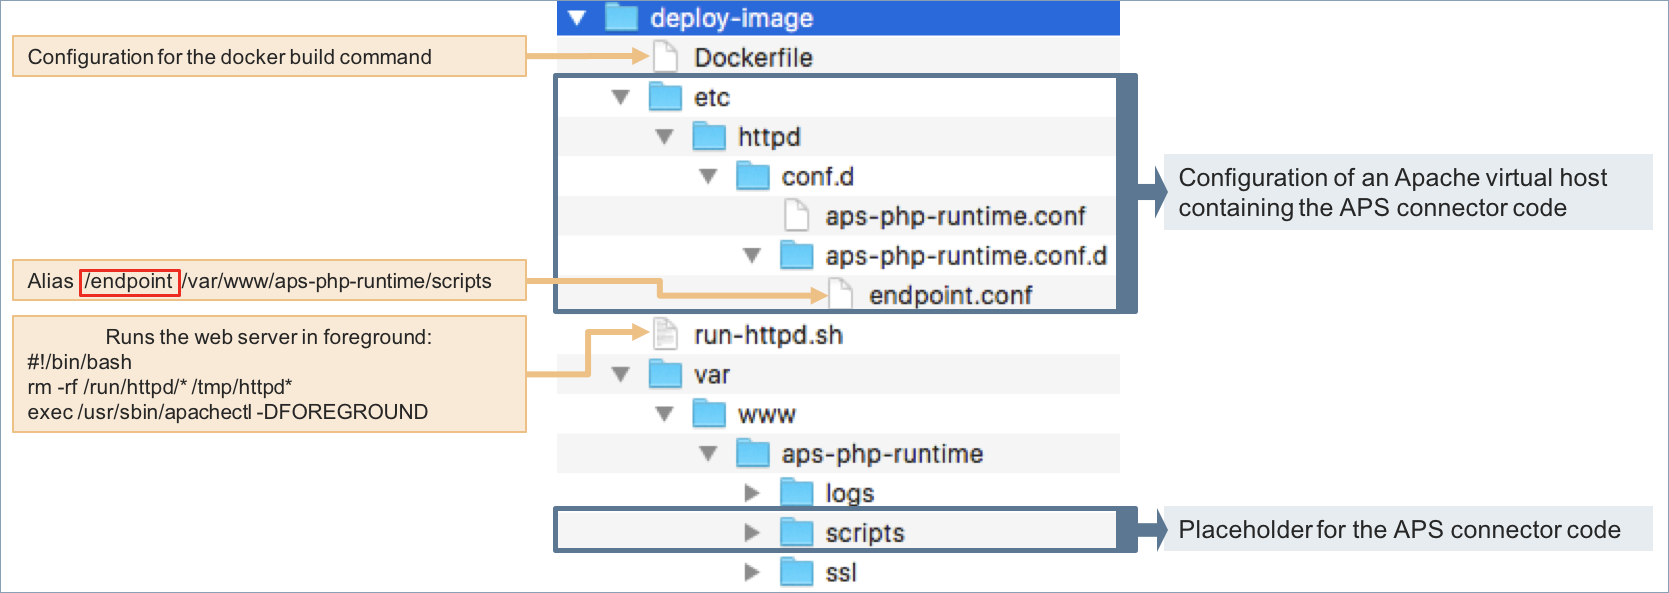
Keynotes:
The folder contains a typical structure of an Apache virtual host in the
/var/folder and its configuration in the/etc/folder.The
run-httpd.shscript will make the web service run permanently to avoid stopping of the container.All containers deployed from the image will use the same alias
/endpoint, but the APS application endpoint for every application will be different due to the mapping of the container TCP port to a unique TCP port of the endpoint node. For example, if the container TCP port is mapped to the 32771 port of the endpoint node, the endpoint URL will be:https://<endpoint-name or IP address>:32771/endpoint/
Dockerfile
The predefined contents of the Dockerfile contained in the project template is oriented on using
the top level folder as the Docker build context, that is one level above the deploy-image/ folder.
The Dockerfile contents is as follows:
FROM apsstandard/aps-php-runtime

# Copy Apache configuration and data structures
ADD /deploy-image/etc /etc
ADD /deploy-image/var /var

# Add the APS application provisioning logic
ADD /scripts /var/www/aps-php-runtime/scripts

# Access rights
RUN chown -R apache:apache /var/www/aps-php-runtime

# Application port that will be bound to external container port
EXPOSE 1443

# Data to save during App upgrade
VOLUME /var/www/aps-php-runtime/logs
VOLUME /var/www/aps-php-runtime/scripts/config

# Run Apache in foreground as a container process
ADD /deploy-image/run-httpd.sh /root/run-httpd.sh
ENTRYPOINT sh /root/run-httpd.sh
Keynotes:
At the time of writing, the base template is pulled from the Docker registry in the internal network.
The image is based on the APS PHP runtime image supported and provided by the APS team.
There is a number of the ADD commands that create a set of the APS connector specific files.
A container created from the image will expose the TCP port 1443. An endpoint node will map the latter to its own free TCP port that the node will expose.
The VOLUME commands make the following folders stored on the host:
The
logs/folder of the APS PHP runtimeThe
configfolder of the APS connector
Those volumes are important for the APS application upgrade.
The
run-httpd.shscript keeps the Apache service running. This will prevents a container from stopping.
Image Creation
The docker build command creates an image using a Dockerfile and a build context
provided respectively as the inputs. You must save the image in a Docker registry where you have an account
and that is available for the server you are going to install that image.
The easiest way is to use the publicly available Docker repository where you can have an account, for example
“isv1”. Conrrespondingly, when deploying the application on a platform ensure the platform refers to the same
Docker registry, as explained later in the System Wide Configuration section.
In this case, if your current directory is
the project/ folder, the following command will create an image:
# docker build -f deploy-image/Dockerfile -t isv1/basic:1.0-0 .
In this command:
-fspecifies the configurationDockerfile.-tspecifies the full image name consisting of the Docker registry account, for example, “isv1”, followed by a unique application name, for example, “basic”, and the tag, for example, “1.0-0”.The last input argument
.refers to the build context, which is the current directory in the considered command.
The package must contain the parameters you used in the above command to allow a platform to identify the image:
The
deployment.xmlfile must refer to the full image name, for example:<imageName>isv1/basic</imageName>
The
APP-META.xmlfile specifies the image version, for example:<version>1.0</version> <release>0</release>
Once you have created the image, save it in the Docker registry. For example, to save it in the official Docker registry where you have your own account called “isv1”, login to the registry and then push the image there as follows.
Log in to the Docker registry:
# docker login
When prompted, enter your account name and the password.
Push the image to the registry:
# docker push isv1/basic:1.0-0
The full image name and the tag must be the same as you assigned it to the image when creating the latter.
Deployment Configuration
When deploying an APS application from an APS package, the platform looks for the deployment.xml file
in the imported package. If the file exists, its contents looks similar to the following example:
<?xml version="1.0" encoding="UTF-8"?>
<deployment>
	<imageName>isv1/basic</imageName>
	<applicationPort>1443</applicationPort>
	<applicationUrlPath>endpoint</applicationUrlPath>
</deployment>
In this file:
imageNamespecifies a short image name. When creating a container, the platform adds the Registry host name or IP address (configured in the platform) and the APS package version as an image tag.applicationPortspecifies the TCP port that the container must expose locally in accordance with the configuration in theDockerfile.applicationUrlPathspecifies the suffix of the APS application endpoint URL to be created. It must be the same as specified in thedocker buildcommand when creating the image.
The last element helps the platform identify the APS application endpoint URL after completion of the deployment process. In accordance with the example above, it will be:
https://<endpoint-node>:<mapped-TCP-port>/endpoint/
In this URL:
<endpoint-node> - the domain name or IP address of the APS endpoint service node registered in the platform.
<mapped-TCP-port> - the TCP port on the endpoint host mapped to the container local TCP port during the deployment.
As mentioned in the Image Creation section, the <imageName> element must specify the full image name, for example, “isv1/basic”.
Finally, the developer should build the APS package, for example:
# aps build project/
In this command, project/ is the top level folder of the APS project.
Conclusion
From this document, you must be aware of the following:
How to use the project template to prepare and store an image to be used during the APS application deployment.
How to add the deployment configuration to the APS package through the
deployment.xmlfile.
The Get Started scenario contains the Deployment stage illustrating in details the deployment process based on the considered approach.