CloudBlue Commerce API (DRAFT)
Table Of Contents
Deployment
This step continues the demo project from the previous step.
In this document:
Requirements
You can test the application on the platform consisting of both OSS and BSS. Besides, ensure that the the Rating Engine service is installed on the platform. This service imports vendor rated data to BSS and computes the invoices based on the imported data. It must be installed as an APS application, so find it in the list of APS applications under the Rating Engine PAYG name.
Get Ready for Product Configurator
Since the input package is prepared for using the product configurator (init wizard),
you can do minor changes in the scripts/wizard_data.json, for example, change the names of the product components.
Create Docker Image
Follow these typical steps to create a Docker image and upload it to an available Docker registry, for example, to
docker.io.
If your local computer does not have installed Docker engine, either install it or copy the whole file structure of your project to a server that is equipped with the Docker engine, for example:
$ scp -r package <login-name>@<server-name>:
Collect the following data from the project before you create an image:
Image tag must be the same as declared in the
deployment.xmlfile. If you want to use thedocker.ioregistry, the tag must contain your login name in that registry, followed by an arbitrary unique name, for example,isv1/vrd.Image tag structure must also contain a version assigned from the <version> and <release> elements of the
APP-META.xmlfile. For example:If
<version>1.0</version>
<release>0</release>
then
tag = isv1/vrd:1.0-0
Create a Docker image using the following commands:
$ cd package
$ docker build -f deploy-image/Dockerfile -t isv1/vrd:1.0-0 .
This will create an image locally.
Upload the image to an available Docker registry. If you use
docker.io, the following commands will do it:# docker login # docker push isv1/vrd:1.0-0
Import APS Package
In the platform provider control panel, navigate to Services > Applications and import the package from your local computer.
Install APS Application Instance
Once the application is uploaded, follow these steps to set up an APS application instance from the package.
Navigate to Infrastructure > Service Nodes and ensure there is a server registered in the platform as an APS endpoint host.
Navigate to Systems > Settings, open Docker Registry Settings, and ensure the Docker registry you are going to use is registered there. In our example, it must be
docker.io.Navigate to Services > Applications and open the imported APS application.
Click Add Instance and use the default settings to set up the instance.
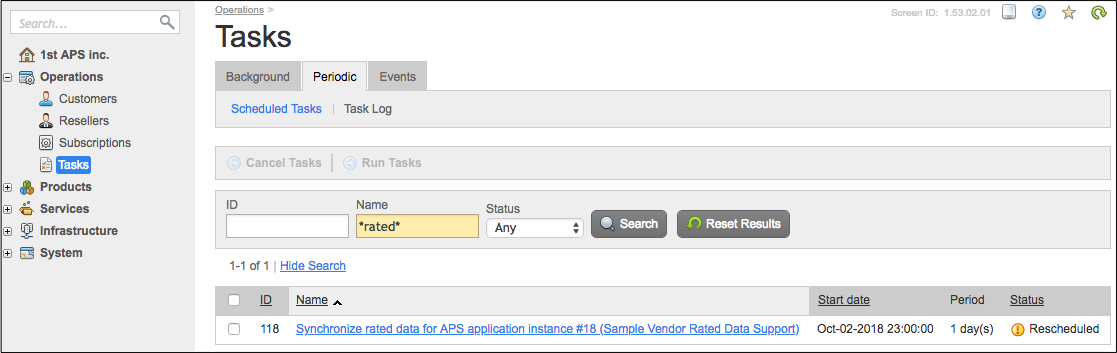
Note a new periodic task bound to the newly created APS application instance:
Navigate to Operations > Tasks.
On the Periodic tab, use the search tool to find the periodic task by a pattern. For example:
Configure Product
The configuration of the product for sale requires the following steps for your application.
Open again the imported APS application.
Click Configure Product.
Walk through all default steps to create a service plan with the default configuration contained in your package.
Verify that the new service plan is available in the BSS control panel. For this purpose, click the Billing button on the top right to switch to BSS and then navigate to Products > Service Plans to find the new service plan.
In the service plan configuration, ensure the following specifics of the VRD based billing:
In the Billing Terms section, select the Rely on External Rating billing model.
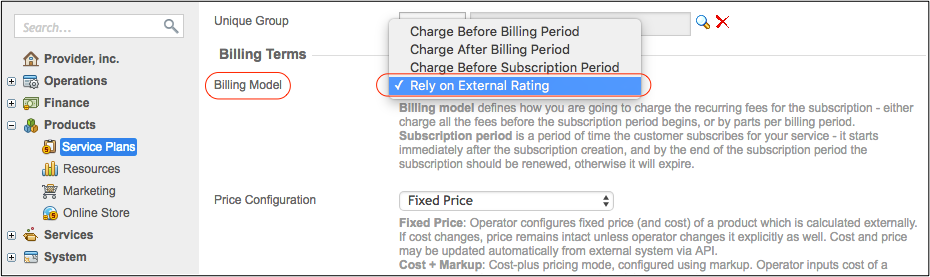
On the Resource Rates tab, ensure there is the resource that implements the
RatedDataSupportAPS type. Its configuration must require the needed number of the resource in a subscription. In our example, it is a singleton resource within a subscription. Other parameters does not matter for the VRD scenario:
Conclusion
On completion of the deployment stage, everything is ready to sell and provision the application services to customers.