Important: Viewing and managing prices or SKUs in the classic panel is not available after Price Manager is switched to production mode. To manage prices, as well as recommended prices (MSRP) and SKUs, go to UX1 > Portfolio > Prices.
Important:
• Volume Pricing functionality is available only when Rating Engine is installed. When Rating Engine is not installed or volume pricing is disabled for a service plan, tiered pricing is used.
• You can enable or choose not to enable volume pricing only during the service plan creation. For existing service plans, volume pricing cannot be enabled or disabled. As an alternative, you can replace an existing service plan with a new service plan with the same resources and enabled volume pricing. By default, volume pricing is disabled.
As a Provider, you can create and configure Service Plans with volume pricing:
- using Product Configuration Manager (PCM) or Product Lifecycle Management, and Product Inventory.
- using the classic service plan creation wizard.
Resellers also can delegate service plans with volume pricing to lower-level resellers. However, starting at the L2 level, resellers cannot make their own volume pricing configurations.
Useful Scenarios and Examples
- Scenario 1: Create an offering with volume pricing:
- Scenario 2: Replace an existing Service Plan without volume pricing with a new Service Plan with the same resources and volume pricing.
- Scenario 3: View volume prices and quantity ranges in the Provider, Reseller, and Customer panels.
- Example 1: Change a subscription (Volume pricing at the subscription level).
- Example 2: Change a subscription (Volume pricing at the order level).
Volume Pricing Models
CloudBlue Commerce supports volume pricing at the subscription and order levels. Within these pricing models, the unit price depends on the quantity, usually in the following way:
- Volume Pricing at the Order Level: The more units purchased within an order, the lower the unit price.
- Volume Pricing at the Subscription Level: The more units purchased within a subscription, the lower the unit price.
-
Multi-resource volume pricing at order and subscription levels. The more units with the same units of measure are purchased within an order, the lower the unit price. At the same time, the more units are in the subscription the lower the unit price on subscription renewal.
As a result, providers now can offer better deals to resellers and customers for bigger quantities and better align to vendor pricing policies where vendors use volume pricing.
Creating an Offering with Volume Pricing Using Product Configuration Manager (PCM) or Product Lifecycle Management (PLM), and Product Inventory
Depending on whether you distribute through regional operating units (L1), the following configuration options are possible for service plans with volume pricing:
- Providers who market services through a network of regional operating units, can create service plans with volume pricing:
- at the provider level (L0) and delegate them to the operating unit (L1 reseller) level.
- at the operating unit (L1) level.
The quantity ranges and corresponding prices for both options are configured at the operating unit (L1) level, in the Reseller Control Panel.
- Providers who do not use regional operating units (L1) and market services only at the L0 level or through third-party resellers can create and configure service plans with volume pricing at the L0 level, in the Provider Control Panel.
To create an offering with volume pricing using Product Configuration Manager (PCM) and Product Inventory:
Note: You can also create plans through Product Lifecycle Management.
- Step 1: Create a service plan with volume pricing using Product Configuration Manager (PCM) or Product Lifecycle Management
- Step 2: Configure volume pricing for service plan resources using Product Inventory.
- Step 3: Synchronize volume prices from an L1 to an L2 Reseller.
Step 1: Create a Service Plan with Volume Pricing Using Product Configuration Manager (PCM)
To create a service plan with volume pricing:
- In the Provider Control Panel, follow the PCM wizard steps in either the First-Time or Edit configuration mode. In the Service Templates step, select a service template.
- In the Service Plans step, click New Service Plan. Complete the configurations at the provider and L1 reseller levels.
-
Enable Volume Pricing: in the Additional Billing Features section, select Use Rating Engine to Process Transactions of This Service Plan.
Important:
• Volume Pricing functionality is available only when Rating Engine is installed. When Rating Engine is not installed or volume pricing is disabled for a service plan, tiered pricing is used.
• You can enable or choose not to enable volume pricing only during the service plan creation. For existing service plans, volume pricing cannot be enabled or disabled. As an alternative, you can replace an existing service plan with a new service plan with the same resources and enabled volume pricing. By default, volume pricing is disabled. -
Configure volume-based resources:
In the Service Plan Resource Rates section, select the necessary resources and set the following fields:
- Min: Set to the necessary value (equal to or lower than the lower limit of the first volume range). If the first volume range starts at '0', set the field to '0'. If you want customers to purchase some minimum resource quantity, set the field to that quantity.
- Max: Set to the necessary value (equal to or greater than the upper limit of the upper volume range). If necessary, set to '-1' (unlimited).
-
Included = 0.
Important: For the correct functioning of the volume pricing functionality, Included must be set to '0'.
Warning: Do not set the fees. You will set them below using Product Inventory.
-
Save the service plan.
Step 2: Configure Volume Pricing for Service Plan Resources
Prerequisites
Configuration
To configure volume pricing for a service plan under creation:
-
The Product Inventory menu item is available in both classic panel and in UX1. Depending on the panel, complete the steps below.
-
In classic panel, go to Services > Product Inventory.
-
In UX1, go to Portfolio > Product Inventory.
Note: If the new service plan resources are not displayed in the list, you will still be able to configure volume pricing for them. They may not be displayed because the resources have different configurations in different published service plans. Product Inventory display only resources that have the same configuration. To display the resources, temporarily disable the publication of the other service plans.
-
- To be able to configure volume pricing for the necessary resources, export a file with all resources listed in Product Inventory.
- Configure volume pricing in the exported Excel file:
- Configure volume ranges:
- To configure the necessary number of volume ranges, duplicate the necessary resource records the necessary number of times. For example, for 3 volume ranges, duplicate the record 3 times.
For each volume range, set the Lower Limit value to the necessary number. For example, for gigabyte volume ranges 0-9, 10-49, 50+, you must set Lower Limit to 0, 9, and 49, respectively.
Important:
• The lower limit is not included in the interval.
• Lower Limit values must be whole numbers, not fractions. By typical business logic, although some services support fractional units (for example, for usage reporting or pay-as-you-go billing), volume range borders are integer, not fractional. For example, traffic usage can be 9.999 Gb. However, for volume pricing purposes, Lower Limit is set to integers, such as 0, 9, and 49. These limits translate to the following intervals:
- 1st interval = (0; 9]: The lower limit, 0, is not included (when 0 resources are chosen, the extended price is $0); 0.001Gb, 1GB, and 9Gb (the right border) belong to this interval;
- 2nd interval = (9; 49]: The lower limit, 9Gb, is not included; 9.001Gb, 9.999Gb, and 49Gb (the right border) belong to this interval;
- 3rd interval = 49+ : The lower limit, 49Gb, is not included; all values above 49Gb, such as 49.001Gb and 49.999Gb, belong to this interval.
• UX1 for Customers and UX1 for Resellers display only integer Lower Limit values and do not support fractions.
- Configure unit prices for the volume ranges by completing the Price column.
- Save the file.
- Configure volume ranges:
- Upload the volume pricing configuration:
- Click Update Prices. In the pop-up window, browse for the file. To update the prices, select the Prices checkbox. To also configure the costs, select both Prices and Costs.
- To update the costs, set Date when the costs become effective. Click Next.
- Click Upload.
- Choose one of the volume pricing models:
- Volume pricing at subscription level
- Volume pricing at order level
- Multi-resource volume pricing at order and subscription levels
Set the fee type (you can choose only one for Volume Pricing):
Important: For a service plan with enabled volume pricing, you can configure volume pricing only for one selected fee type.
- Setup
- Overuse
- Recurring
- Save the changes.
Step 3: Synchronize Volume Prices from an L1 to an L2 Reseller
This step is mandatory if the service plan is delegated to an L2 reseller.
For an L2 reseller to be able to see and use the volume prices configured at the L1 level, synchronize resellers.
Creating an Offering with Volume Pricing Using the Classic Service Plan Creation Wizard
To create an offering with volume pricing using the classic service plan creation wizard:
- Step 1: Create a service plan and enable volume pricing using the classic service plan creation wizard.
- Step 2: Configure volume pricing for service plan resources in the service plan profile.
- Step 3: Synchronize volume prices from an L1 to an L2 Reseller.
Step 1: Create a Service Plan and Enable Volume Pricing (Classic Wizard)
To create a service plan and enable volume pricing for it using the classic service plan creation wizard:
- Go to the classic Provider Control Panel. In the top menu, switch from Operations to Billing.
- Go to Products > Service Plans. Click Add New Service Plan.
- For Service Plan Type, choose Generic Service Plan and follow the wizard:
-
In Step 1. Configure Billing Terms, enable Volume Pricing:
In the Additional Billing Features section, select Use Rating Engine to Process Transactions of This Service Plan.
Important:
• Volume Pricing functionality is available only when Rating Engine is installed. When Rating Engine is not installed or volume pricing is disabled for a service plan, tiered pricing is used.
• You can enable or choose not to enable volume pricing only during the service plan creation. For existing service plans, volume pricing cannot be enabled or disabled. As an alternative, you can replace an existing service plan with a new service plan with the same resources and enabled volume pricing. By default, volume pricing is disabled. -
In Step 4. Configure Resource Rates, configure volume-based resources:
- Min: Set to the necessary value (equal to or lower than the lower limit of the first volume range). If the first volume range starts at '0', set the field to '0'. If you want customers to purchase some minimum resource quantity, set the field to that quantity.
- Max: Set to the necessary value (equal to or greater than the upper limit of the upper volume range). If necessary, set to '-1' (unlimited).
-
Included = 0.
Important: For the correct functioning of the volume pricing functionality, Included must be set to '0'.
-
Complete the wizard steps.
Step 2: Configure Volume Pricing for Service Plan Resources in the Service Plan Profile
To configure volume ranges and prices using the classic functionality:
- Go to Products > Service Plans. Click a service plan with volume pricing enabled as described above.
- Switch to the Resource Rates tab. Click a resource for which you want to set volume ranges and prices.
-
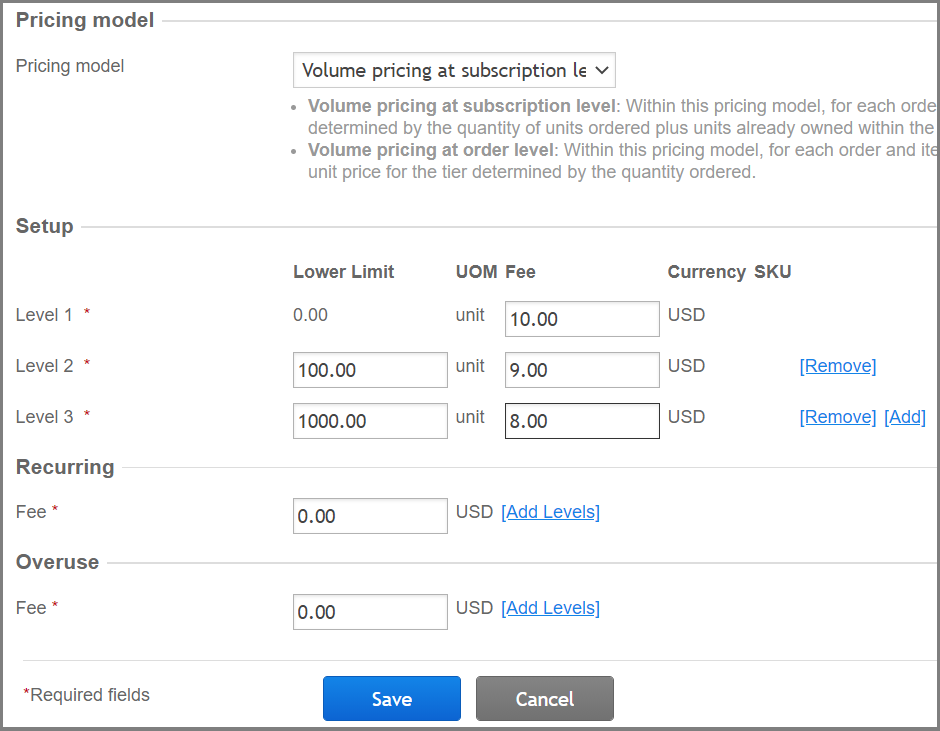
Scroll down and click Edit Price Levels. Complete the fields:
-
Pricing model: From the drop-down list, choose one of the options:
Note: This field is available only when volume pricing is enabled for the service plan. When volume pricing is disabled, tiered pricing is used.
-
Volume pricing at subscription level: Within this pricing model, for each order and item ordered, the total is calculated based on the unit price of the tier determined by the quantity of units ordered plus units already owned within the subscription.
-
Volume pricing at order level: Within this pricing model, for each order and item ordered, the total is calculated by multiplying the quantity ordered by the unit price for the tier determined by the quantity ordered.
-
Multi-resource volume pricing at order and subscription levels: Within this pricing model, the aggregated volume of all resources with the same units of measure is considered. The order type defines what resource volume is considered for price tier selection:
-
On a purchase, only resource quantity in the order is considered to define the price tier.
-
On an upsize, ordered and already owned resource quantity is considered.
-
On a renew, price tier is based on the resource quantity already owned within the subscription.
-
-
-
For the Setup, Recurring, and Overuse fee types, using Add Levels, Add, and Remove links, define:
-
Define volume ranges by setting the Lower Limit values for different pricing levels.
-
Set prices in the Fee column.
-
-
-
Save the volume pricing configuration for the resource. Repeat the steps for other resources.
Step 3: Synchronize Volume Prices from an L1 to an L2 Reseller
This step is mandatory if the service plan is delegated to an L2 reseller.
For an L2 reseller to be able to see and use the volume prices configured at the L1 level, synchronize resellers.
Replacing an Existing Service Plan with a New Service Plan with the Same Resources and Enabled Volume Pricing
Currently, volume pricing can be enabled only for new service plans. To offer volume pricing options for existing offerings, you may need to replace an existing service plan with a new service plan with the same resources and enabled volume pricing while maintaining existing subscriptions. Such replacement is possible if your customers will be able to subscribe only to the new service plan: the existing service plan will need to be made unavailable for new subscriptions.
Mass-Transitioning to New Service Plans with Volume Pricing
Warning: To avoid business disruptions and reduce business downtime, ensure this procedure. A recommended approach is to minimize the number of transitions (in other words, business downtime windows) and maximize the number of service plans within a single transition.
To mass-transition from existing service plans without volume pricing to new service plans with volume pricing:
-
Plan a business downtime for all service plans created using Product Configuration Manager with prices configured using Product Inventory.
Warning:
• All such service plans must be unpublished temporarily during the configuration of new service plans.
• To reduce overall business downtime, we strongly recommend that you configure all the necessary service plans with volume pricing within a single business downtime window. - Before making your current service plans temporarily unavailable for customers to purchase, export the current configuration of resource prices from Product Inventory and save it for reference purposes.
- Start business downtime.
- Temporarily unpublish all service plans whose prices were configured using Product Inventory.
-
Create the necessary service plans with enabled volume pricing with the same resources as in the existing service plans.
Warning: To avoid accidental sales for zero prices, do not include the service plans in a sales category in either Provider (L0) or Reseller (L1) configurations until you configure the prices. If you fail to do so, the service plans will become available to customers at zero prices after you publish them in the next step.
-
Unpublish the existing service plans without volume pricing and publish the new service plans without making them available for customers to view and purchase.
Warning: If you make resource price changes in Product Inventory while both the existing and the new service plans are published, the changes will affect both the new and the existing service plans.
Note: When none of the currently existing service plans are published, price changes in Product Inventory affect all service plans. If at least one service plan is published, price changes affect only the published service plans.
-
Configure volume pricing for the new service plans.
Warning: To avoid unwanted price changes, make sure that you configure resource prices for the new service plans in line with their current configuration in Product Inventory. When setting resource prices for the new service plans, refer to the current configuration of resource prices you exported from Product Inventory.
Important: After volume pricing is configured for resources of the new service plan, the same resources in the existing service plan will retain their original pricing, including the pricing model, because price changes in Product Inventory affect only published service plans.
-
Make the new service plans available for purchase by including them in a sales category through PCM.
Warning: To avoid business disruptions due to unexpected price changes in the new service plans, ensure that the existing service plans without volume pricing remain not available for purchase.
-
Re-publish the temporarily unpublished service plans.
Note: The existing service plans without volume pricing that you replaced with new service plans with volume pricing must remain unpublished and, therefore, unavailable for purchase.
- Stop business downtime. Resume normal business.
Viewing Volume Prices and Quantity Ranges in the Provider, Reseller, and Customer Panels
How A Provider (L0) or Reseller (L1, L2) Can View Volume Pricing Information for a Service Plan in the Classic Panel
For the Provider (L0) or Reseller (L1, L2) reseller to view volume prices for a service plan in the classic panel:
-
Log in to the Provider or Reseller account in the classic control panel. Go to Billing > Products > Service Plans. Click the necessary service plan.
Note: L1 resellers can edit delegated service plans, L2 resellers cannot.
- Switch to the Resource Rates tab. View volume ranges and prices for the service plan resources:
- Option 1: Click the fee type for which you configured volume pricing (it is displayed as a link in the resource list) and see the volume price information in a pop-up window.
- Option 2: Click a volume resource and view the volume prices for the corresponding fee type.
How an L1 or L2 Reseller Can View Volume Pricing Information for a Service Plan in UX1 for Resellers
For a reseller to view volume pricing information for a service plan in UX1 for Resellers:
- Log in to the reseller account in UX1 for Resellers. Switch to the Marketplace tab. Service plans with volume pricing are marked with Volume Pricing on the tile.
- Move the pointer over the unit price. Volume pricing information is displayed in a pop-up window. The unit price on the tile reflects the price of the first volume range.
How an L2 Reseller Can View Customer Subscription Details with Volume Pricing in UX1 for Resellers
For an L2 reseller to view volume price information for a customer subscription in UX1 for Resellers:
- Log in to the L2 account in UX1 for Resellers. Go to customers. Click the customer name.
-
Click the necessary subscription. View the volume pricing information:
For the necessary resource, click Volume Pricing.
How a Customer Can View Volume Pricing Information
A customer can see volume pricing information for purchased service plans:
- Log in to a customer account in the UX1 for Customers. Go to Marketplace.
-
Choose a service plan with volume pricing. Choose resource volumes and purchase the service plan.
The unit price is displayed only in the order details screen when the purchasing is complete, and is not displayed in the order confirmation screen.
Examples of Changing a Volume Pricing Subscription
Example 1. Volume Pricing at Subscription Level
Configurations
Assumptions:
- Billing Model = Charge Before Billing Period
- Prorated refunds
- Fee type = Recurring
Volume ranges and prices:
| Tier | Volume Range | Unit Price |
|---|---|---|
| Tier 1 | 0 - 299 seats | $10 |
| Tier 2 | 300 - 599 seats | $9.5 |
| Tier 3 | 600+ seats | $9 |
First purchase:
On June 01, a customer requests 150 seats and is:
- Billed for 150 seats * $10 (Tier 1) * 1 (for the full period Jun 01 - Jul 01) = $1500
Second purchase (upsize):
On June 10, the customer requests 550 more seats. The total number of seats within the subscription becomes 700 and the customer is:
- Refunded for: 150 seats * $10 (Tier 1) * 0.7 (for the unused period Jun 10 - Jul 01) = $1050
- Billed for: 700 seats * $9 (Tier 3) * 0.7 (for the remaining period Jun 10 - Jul 01) = $4410
The order total is: $4410 - $1050 = $3360
Third purchase (downsize):
On June 20, the customer returns 200 seats. The total number of seats within the subscription becomes 500 and the customer is:
- Refunded for: 700 seats * $9 (Tier 3) * 0.37 (for the unused period Jun 20 - Jul 01) = $2331
- Billed for: 500 seats * $9.5 (Tier 2) * 0.37 (for the remaining period Jun 20 - Jul 01) = $1757.5
The order total is: $1757.5 - $2331 = - $573.5 (refund)
Fourth purchase (recurring billing at the beginning if the next billing period)
On July 01, a billing order is issued automatically and the customer is:
- Billed for: 500 seats * $9.5 (Tier 2) * 1 (for the full period Jul 01 - Aug 01) = $4750
Example 2. Volume Pricing at Order Level
Configurations
Assumptions:
- Billing Model = Charge Before Billing Period
- Prorated refunds
- Fee type = Recurring
Volume ranges and prices:
| Tier | Volume Range | Unit Price |
|---|---|---|
| Tier 1 | 0 - 299 seats | $10 |
| Tier 2 | 300 - 599 seats | $9.5 |
| Tier 3 | 600+ seats | $9 |
First purchase:
On June 01, a customer requests 150 seats and is:
- Billed for: 150 seats * $10 (Tier 1) * 1 (for the full period Jun 1 - Jul 1) = $1500
Second purchase (upsize):
On June 10, the customer requests 550 more seats. The total number of seats within the subscription becomes 700 and the customer is:
- Billed for: 550 seats * $9.5 (Tier 2) * 0.7 (for the remaining period Jun 10 - Jul 01) = $3657.5
Third purchase (downsize):
On June 20, the customer returns 200 seats. The total number of seats within the subscription becomes 500 and the customer is:
-
Refunded for: 200 seats * $10 (Tier 1) * 0.37 (for the unused period Jun 20 - Jul 01) = $740
Note: Because the quantity of units in the order (200) is within Tier 1, the Tier 1 price is used in the refund calculation.
Fourth purchase (recurring billing at the beginning if the next billing period)
On July 01, a billing order is issued automatically and the customer is:
-
Billed for: 500 seats * $9.5 (Tier 2) * 1 (for the full period Jul 01 - Aug 01) = $4750
Note: Because the quantity of units in the order (500) is within Tier 2, the Tier 2 price is used in the billing order calculation.
Example 3. Multi-resource Volume Pricing at Order and Subscription Levels
Configurations
Assumptions:
- Billing Model = Charge Before Billing Period
- No refund
- Fee type = Recurring
Volume ranges and prices:
| Tier | Volume Range | Unit Price |
|---|---|---|
| Tier 1 | 0 - 299 seats | $10 |
| Tier 2 | 300 - 599 seats | $9.5 |
| Tier 3 | 600+ seats | $9 |
First purchase:
On June 01, a customer requests 150 seats and is:
- Billed for: 150 seats * $10 (Tier 1) * 1 (for the full period Jun 1 - Jul 1) = $1500
Second purchase (upsize):
On June 10, the customer requests 550 seats of another product within the same subscription. Despite, the total number of seats within the subscription becomes 700, only number of seats in the order are taken into consideration. So the customer is:
- Billed for: 550 seats * $9.5 (Tier 2) = $5225
Renewal
On July 01, a billing order is issued automatically and the customer is:
-
Billed for: 700 seats * $9 (Tier 3) = $6300
Note: Because the quantity of units in the order (700) is within Tier 3, the Tier 3 price is used in the billing order calculation.