CloudBlue Commerce API (DRAFT)
Table Of Contents
Provisioning
At the provisioning stage, you should verify if a subscriber will be able to monitor consumption of resources that are used by their servers in total.


Continue your demo project from the previous step. Depending on your platform configuration, whether it contains the OSS only or the BSS as well, consider the two ways of provisioning of the application resources and then notice the updates of the counters.
In this document:
Subscribe without BSS
In a case when you are testing your integration code and do not care of the billing part, your lab system, most probably, contains only the OSS part. In this case, you can create a subscription just from the service template in the OSS provider control panel.
If you do not have a customer for testing, create it first by navigating to Operations > Customers.
Open the customer profile, and on the Subscriptions tab, click Create New Subscription.
Follow the wizard steps to select the correct service template and complete the subscription provisioning.
After you have passed the above steps, open UX1 and go to the Monitor Resource Consumption section.
Subscribe in BSS
In a case your platform contains both OSS and BSS, the provider can subscribe a customer through the BSS only.
Navigate to Operations > Orders and then click either Add New Order, if you have a customer already, or click Create Account And Place Order, if you have no customers for testing. In the former case, skip the next step.
To configure a customer account:
Select the Personal account type and click Next.
Enter the personal data and click Next.
Enter a password or generate it and click Next.
For the selected customer account, select subscription parameters:
In the Service Plan field, select the service plan you are testing.
In the Subscription Period field, select the subscription period. Only 1 month period must be available if you followed the previous instructions.
Click Next.
Leave the Domain Name empty and click Next.
Click Place Order.
You will find a new sales order with the New status.
Click on the new order to open its profile.
If the price is zero, click Open Order to start order processing. Otherwise, you have to add preliminary a payment document on the Documents tab.
After the order processing is completed successfully, your customer will have a new subscription.
To move to the next step, navigate to Operations > Subscriptions, find the new subscription, and click on the link in the Actions column to enter UX1 on behalf of the customer.
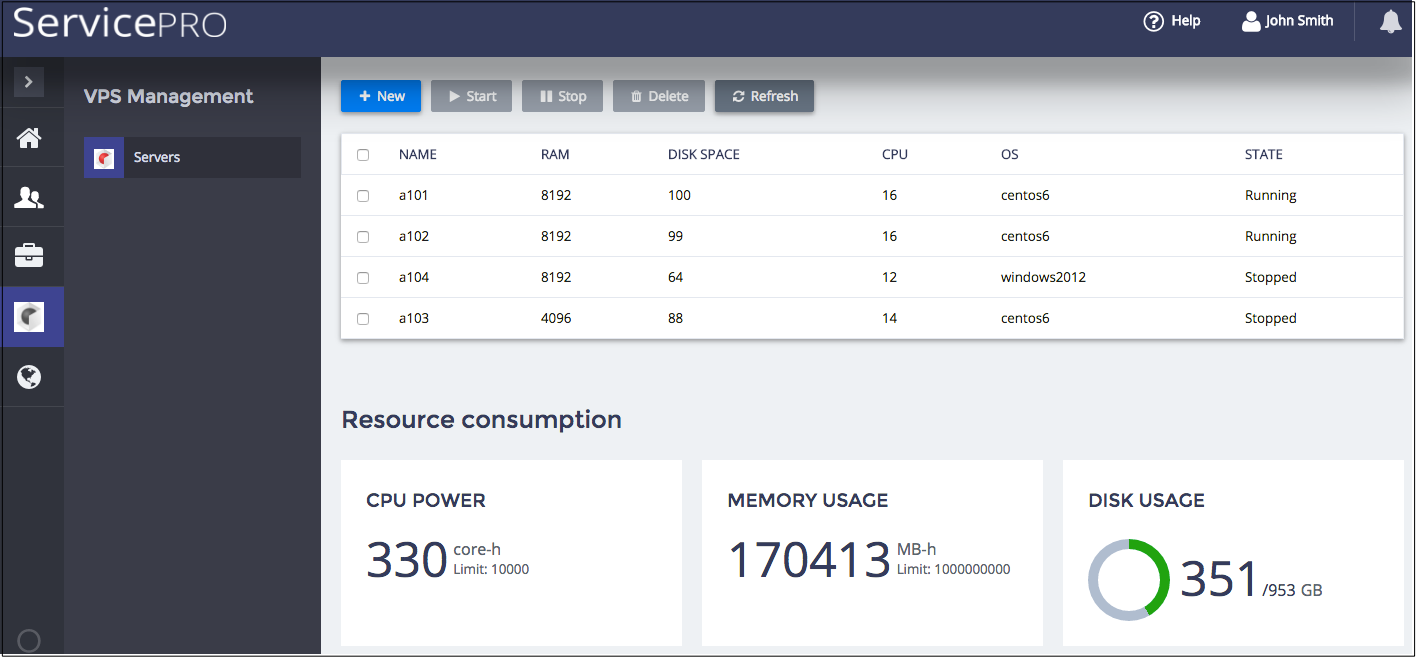
Monitor Resource Consumption
The following are the recommended steps in UX1 to test the application:
In UX1, switch to the VPS Management tab and create several VPSes with different configurations.
In the list of servers, select the created VPSes and click Start to make them running.
Click Refresh to update the resource consumption counters. To have better effect on the additive counters, repeat it in several minutes.
Conclusion
This completes the APS application development cycle. You have created an application that uses additive and non-additive counters to monitor resource consumption.
If you experienced any issues when following the project steps, you can compare your code
with the similar contents in the sample package.