CloudBlue Commerce API (DRAFT)
Table Of Contents
Deployment
In this document, consider the application deployment on the platform OSS and then, if your platform contains the BSS, deploy the application also on the BSS.


Continue your demo project from the previous step.
In this document:
Deploy Application Instance
The Application Deployment document explains in details the application deployment in the platform.
Choose one of the following methods to prepare the APS connector image and to build the APS package:
The Docker based deployment is the preferable method. It prepares an image of an APS connector to install it later in a separate virtual container. Follow the Get Started demo project that provides the detailed procedure on creating an image for a Docker container and building the APS package. If you followed that demo project, you must have already the deployment environment for this method.
The deployment based on a shared Apache web space creates a virtual web host for every APS connector in a shared web space.
Follow the Deployment Process to install an APS application instance. The Get Started demo project also illustrates this process.
Create Resource Types
In accordance with the resource model, we need to create the following resource types (RT) from the respective resource classes (RC) to representing APS resources in subscriptions:
APS Service |
Resource Class |
Resource Type |
Description |
|---|---|---|---|
VPS cloud globals |
Application Service Reference |
Counters - App REF |
Application instance |
VPS Management |
Application Service |
Counters - VPS Management |
Customer management environment (context) |
Virtual Private Server |
Application Service |
Counters - VPS |
Customer’s virtual server |
VPS Management |
Application Counter (unit-hours) |
Counters - CPU Power |
Additive counter of total used CPU core, item-hour |
VPS Management |
Application Counter (MB-hours) |
Counters - RAM |
Additive counter of total used RAM space, MB-hour |
VPS Management |
Application Counter (KB) |
Counters - Disk Space |
Counter of total used disk space: KB in OSS subscriptions, converted to GB in UX1 |
Follow the steps described in the Setting Reference Resources and Creating Resource Types sections to create the resource types.
Note
1. Keep in mind that the VPS Management resource type must be marked as Automatically provision service. Make sure the checkbox is clean for the other resources.
2. The predefined resource class Application Counter (KB) measures disk space in KB. Take it into account when setting the resource limit in a service template and when setting a price in the billing system.
Now, you have all resource types that you can use for creating a service template in the platform.
Create Service Template
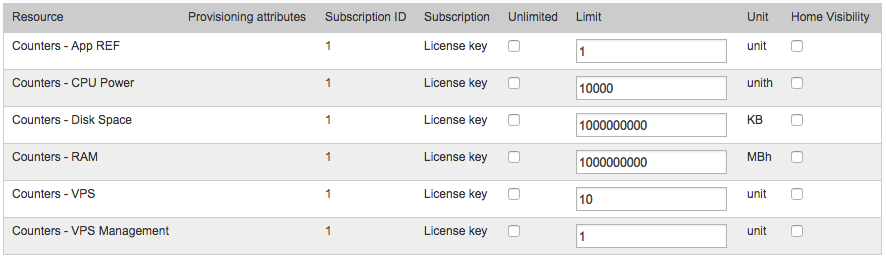
Create a service template and add all the application resources to it as described in the Creating Service Template section. Finally, it must look as follows:
If your platform contains both parts, OSS and BSS, you can subscribe a customer only through a service plan created in BSS as explained in the next section.
Deploy Application in BSS (optional)
Follow this section, if your platform contains the BSS.
Create Service Plan
In the BSS provider control panel, navigate to Products > Service Plans and then on the Service Templates tab open the service template you have created in OSS.
On the Plans tab, click Add New Service Plan and configure the following:
In the Name field, enter the plan name, for example, “Resource Counting”.
In the Plan Category, select the “Hosting Services” category.
In the Short Summary and Detailed Description, add any text.
In the Billing Model field, select Charge After Billing Period.
Check the Published box.
Leave all other fields intact and click the Next button to proceed to the next step.
On the Periods configuration step, select 1 Month period and leave zero prices. Click Next.
Click Finish on the next step.
Now you have a service plan providing its services for free. Let us see how you can set prices for resource usage.
Configure Resource Rates
Before you start setting price, ensure the unit of measure suit your price per unit. For example, as you know disk space is measured by OSS in KB. It is practically not possible to charge for disk space per KB and it would be more convenient to charge per GB instead.
Go back to the service template profile and open the Resources tab in it.
Click on the Disk Space resource to open its profile.
In the resource profile, click Change Unit of Measure, and change the unit of measure for GB.
The same way, change the unit of the RAM counter from MBh to GBh.
Configure resource rates as follows:
Open the newly created plan and switch to the Resource Rates tab.
Click Add New Resource Rate.
Check the resource counters you need to set up and select a resource category for them, for example, as shown below:
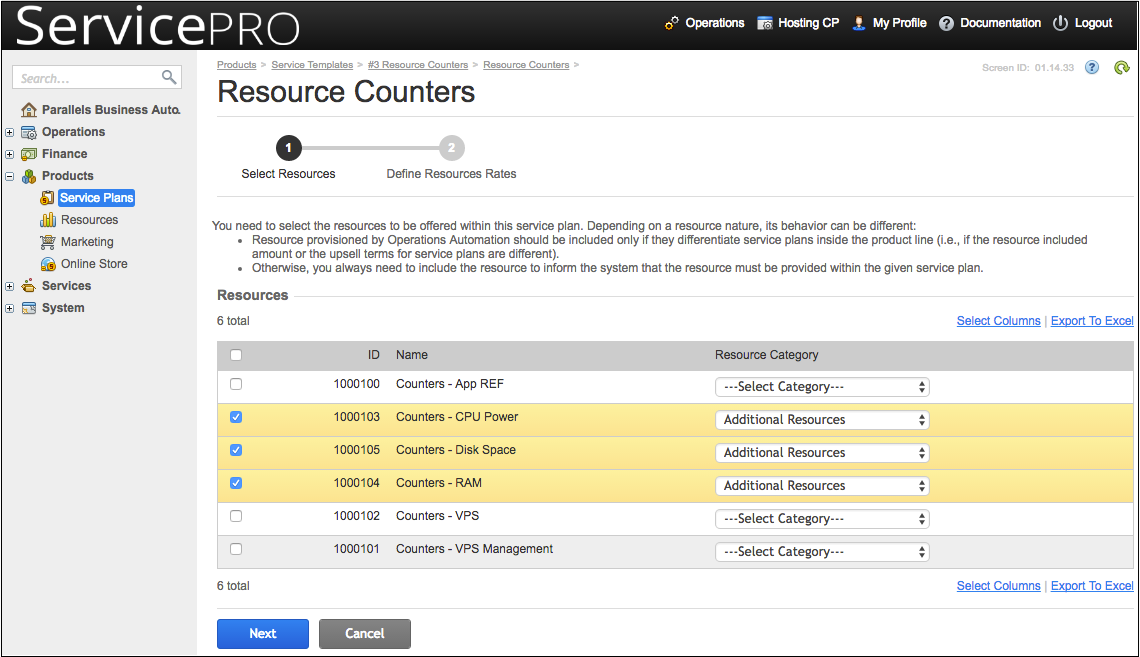
Click Next after that.
Click Select Columns and add the Charge Per Unit (Recurring Fee) column to the table.
Set the price for each selected resource, for example, as shown below:

Click Finish after that.
Note
If some columns are not visible in your settings, click Select Columns and tune the grid as needed.
Make each of the resource rates measurable. For this goal, open them one by one, check the Measurable box and save the configuration.
Activate Service Plan
Make the service plan available for customers:
Navigate to Products > Service Plans and switch to the Sales Category tab.
Click Add New Service Category and configure the following parameters:
In the Category Name and Description fields, enter any text you like.
Check the Expand By Default and Show in Customer Control Panel boxes.
Click Save.
Open the new category and switch to the Service Plans tab.
Click Add New Plan, select the service plan you are testing, and click Add Plan(s) To Category.
Your new service plan must be marked now as Available for Sale - In CCP Only.
Conclusion
You have completed the application deployment in the platform based on one of the two configurations, either it has the OSS only that requires a service template with the application resources in it or it also contains the BSS that requires additionally a service plan with the resource rates in it.