CloudBlue Commerce API (DRAFT)
Table Of Contents
Presentation Logic
To take part in the service activation process, an application must declare a view plugged into the service activation wizard and define the view source code.


In this document:
Requirements to Presentation Logic
The key points when developing a view JavaScript code:
Define widgets to help the user enter required service activation properties.
Identify the resources assigned to the current user and bind their activation properties to the respective widgets.
Prepare an
xhrrequest to update resource properties and send the request to the APS controller.
For example, if the VPS properties are collected in the vpsData.vps structure,
the xhr request looks as follows:
var savedXhr = {
   url: '/aps/2/resources/' + vpsData.vps.aps.id + '/activate',
   method: 'PUT',
   headers: {
      "Content-Type": 'application/json'
   },
   data: JSON.stringify(vpsData.vps)
};
In the above example, the APS controller will call the activate custom method in accordance
with the meta definition example considered earlier.
The onNext event handler must send the xhr request structure to the wizard through the aps.apsc.next
method:
aps.apsc.next({objects: [{ xhr: savedXhr }]});
Continue Your Demo Project
Continue the demo project from the previous step.
Activation View
In metadata, you have declared the ui/activate.js source file for the service-activate view.
Develop the file as explained here.
Create the JavaScript skeleton as recommended for UX1:
define([ "dojo/_base/declare",
   "dojo/when",
   "aps/View" ],
function(declare, when, View) {

   var vpsData = { vps:{} }; // Global structure with VPS properties

   return declare(View, {

      /* Widget initialization */
      init: function() {
         return ["aps/Panel",
            //...
         ];

      },   // End of Init

      /* Auxiliary function to draw widgets with actual VPS properties*/
      _drawPanel: function (vps) {
         // ...
      },

      /* Data initialization */
      onContext: function(context) {
         // ...
      },

      /* Handler for the Activate button */
      onNext: function () {
         //...
      }

   });      // End of Declare
});         // End of Define
In the
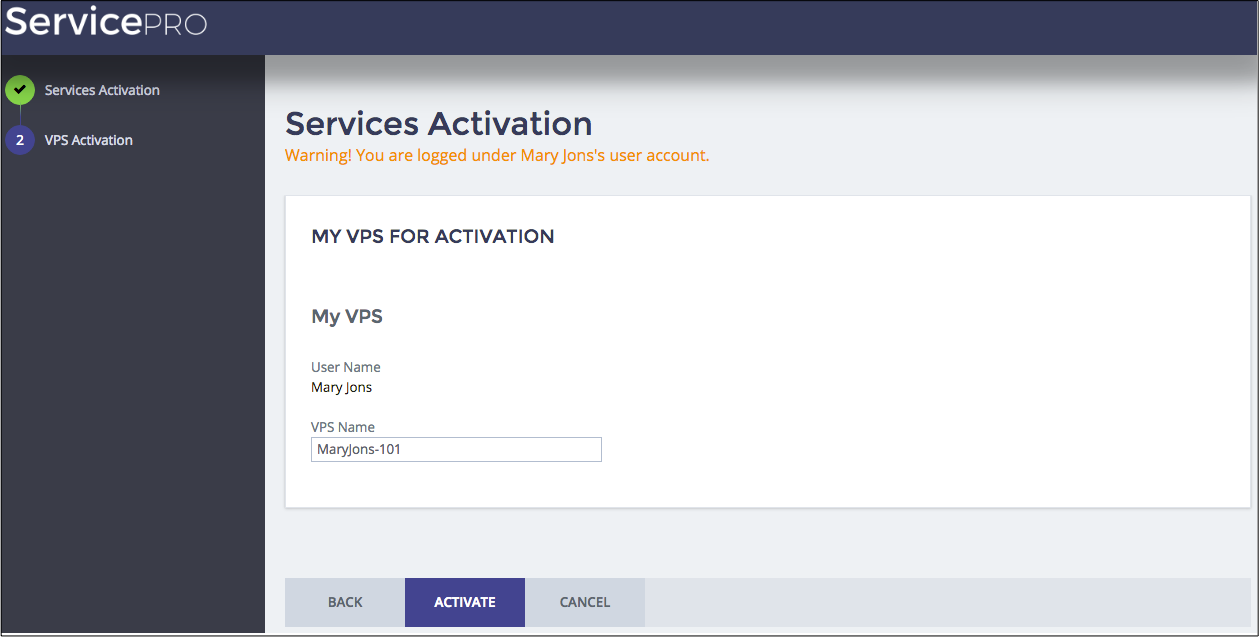
initmethod, return widget definition. For example, use an output widget to display the current user name and an input widget where a user will type the VPS host name.return ["aps/Panel", { id: this.genId("vps-aw-panel"), title: "My VPS for Activation" }, [["aps/FieldSet", { id: this.genId("vps-aw-fieldset"), title: "My VPS", gridSize: "md-12 xs-12" }, [ ["aps/Output", { id: this.genId("user-aw-name"), label: 'User Name' }], ["aps/TextBox",{ id: this.genId("vps-aw-textbox"), autoSize: false, label: 'VPS Name', required: true }] ]]] ];
Define the
_drawPanelfunction that prints out the current values in the widget - user name and VPS name:_drawPanel: function (vps) { vpsData.vps = vps; this.byId("user-aw-name").set("value", aps.context.user.displayName); this.byId("vps-aw-textbox").set("value", vps.name); }
In the
onContextmethod, identify a VPS linked with the user from the list of VPSes contained in theendusersnavigation variable that the wizard passes to the view:var vps = context.vars.endusers.find(function(vps) { return vps.user.userId === aps.context.user.userId; }); if (vps) { this._drawPanel(vps); } aps.apsc.hideLoading();
Define the event handler for the Activate button. It must create a structure containing the
xhrcall and then pass it to the wizard through theaps.apsc.nextcall.onNext: function () { vpsData.vps.name = this.byId("vps-aw-textbox").value; var savedXhr = { url: '/aps/2/resources/' + vpsData.vps.aps.id + '/activate', method: 'PUT', headers: { "Content-Type": 'application/json' }, data: JSON.stringify(vpsData.vps) }; aps.apsc.next({objects: [{ xhr: savedXhr }]}); }
The wizard will call the custom
activatemethod and pass the VPS JSON representation to it.
Servers List
Update the views presenting a table with servers in UX1, for both staff members and service users, by adding the VPS status column. The latter will show the current status of VPSes to customers and service users.
For this purpose, in both files, ui/servers.js and ui/myservers.js, add the following column to the grid:
{ field: "aps.status", name: "APS Status" }
Conclusion
This completes the modification of the presentation logic, which is now able to interact with the service activation wizard in MyCP.
The files you have updated are similar to the respective files in the
sample package