CloudBlue Commerce API (DRAFT)
Table Of Contents
Product Deployment Assistance
You can add a deployment configuration that providers can use when configuring products for sales (service template and service plan) as explained in Product Initialization.
For this purpose, continue your demo project.
In this document:
Update APS Types
Cloud
The application root APS type must implement the http://odin.com/init-wizard/config/1.0 type.
Add this implementation to the cloud class definition in scripts/clouds.php as follows:
/**
 * Class cloud presents application and its global parameters
 * @type("http://aps-standard.org/samples/offer1p/cloud/1.0")
 * @implements("http://aps-standard.org/types/core/application/1.0","http://odin.com/init-wizard/config/1.0")
 */
class cloud extends APS\ResourceBase {

   // ... class properties and methods

}
Offer
http://aps-standard.org/types/core/profile/service/1.0 APS type.Add this implementation in the offer class definition in scripts/offers.php as follows:
/**
* Class offer
* @type("http://aps-standard.org/samples/offer1p/offer/1.0")
* @implements("http://aps-standard.org/types/core/resource/1.0","http://aps-standard.org/types/core/profile/service/1.0")
*/
class offer extends \APS\ResourceBase {

   // ... class properties and methods

}
Add Assistance Methods
The application root service must contain the methods to configure the product initialization wizard and to test the connection with the cloud application.
Edit the scripts/clouds.php file to add the required methods as follows.
In the
cloudclass, add thegetInitWizardConfigmethod with a typical definition:/** * @verb(GET) * @path("/getInitWizardConfig") * @access(admin, true) * @access(owner, true) * @access(referrer, true) */ public function getInitWizardConfig() { $myfile = fopen("./wizard_data.json", "r") or die("Unable to open file!"); $data = fread($myfile,filesize("./wizard_data.json")); fclose($myfile); return json_decode($data); }
The method returns the contents of the
wizard_data.jsonthat we will consider later.In the
cloudclass, add thetestConnectionmethod. In this demo, when this method is called, the APS connector always returns “200 OK” as configured below:/** * @verb(GET) * @path("/testConnection") * @param(object,body) * @access(admin, true) * @access(owner, true) * @access(referrer, true) */ public function testConnection($body) { return ""; }
Add Wizard Data
The data returned by the getInitWizardConfig method must contain the default configuration of product components
as explained in Configuration for OSS and Configuration for BSS.
This is the description of the wizard_data.json file as if
you create it step by step.
Use the following data structure:
{
   "defaults": {
      "appId": "http://aps-standard.org/samples/offer1p/cloud/1.0",
      "apsName": "Offering Management Demo",
      "apsVersion": "2.2",
      "apsResources": [ /* APS resources presenting Offers */ ],
      "resourceTypes": [ /* Resource types for a service template */ ],
      "serviceTemplate": { /* Service template configuration */ },
      "billing": { /* Categories used by service plans and resources in BSS */ },
      "servicePlans": [{ /* Service plan configuration */ }]
   }
}
If your platform does not contain BSS you can omit the
billingandservicePlanscomponents.In the
apsResourcesarray, add a couple of offers similar to those explained in the Create Offers section:"apsResources": [ { "apsType":"http://aps-standard.org/samples/offer1p/offer/1.0", "type": "http://aps-standard.org/types/core/profile/service/1.0", "id": "idc2922c137c7a58", "fields": { "profileName": "VPS mainstream configuration", "name": "Mainstream", "platform": { "OS": { "name": "centos7" } }, "hardware": { "CPU": { "number": 4 }, "diskspace": 32, "memory": 512 } }, "relations": { "cloud": "idglobals" } }, { "apsType":"http://aps-standard.org/samples/offer1p/offer/1.0", "type": "http://aps-standard.org/types/core/profile/service/1.0", "id": "idc2922c137c7a59", "fields": { "profileName": "VPS premium configuration", "name": "Premium", "platform": { "OS": { "name": "windows2012" } }, "hardware": { "CPU": { "number": 16 }, "diskspace": 100, "memory": 16384 } }, "relations": { "cloud": "idglobals" } } ]
In the
resourceTypesarray, add resource types similar to those explained in the Create Resource Types section:"resourceTypes": [ { "name": "Deployment Assistance - App REF", "id": -500001, "resClass": "rc.saas.service.link", "required": true, "actParams": { "app_id": "idOAID", "resource_uid": "idglobals" } }, { "name": "Deployment Assistance - VPS Mainstream Profile", "id": -500002, "resClass": "rc.saas.service.link", "required": false, "rtfor": "http://aps-standard.org/types/core/profile/service/1.0", "actParams": { "resource_uid": "idc2922c137c7a58" } }, { "name": "Deployment Assistance - VPS Premium Profile", "id": -500003, "resClass": "rc.saas.service.link", "required": false, "rtfor": "http://aps-standard.org/types/core/profile/service/1.0", "actParams": { "resource_uid": "idc2922c137c7a59" } }, { "name": "Deployment Assistance - Management Environment", "id": -500004, "resClass": "rc.saas.service", "required": true, "actParams": { "service_id": "contexts", "autoprovide_service": 1 } }, { "name": "Deployment Assistance - Virtual Server", "id": -500005, "resClass": "rc.saas.service", "required": false, "actParams": { "service_id": "vpses", "autoprovide_service": 0 } } ]
In the
serviceTemplateobject, define a service template similar to the one explained in the Create Service Template section:"serviceTemplate": { "id": -600001, "name": "Deployment Assistance", "resources": [ { "limit": 1, "unlimited": false, "rtID": -500001 }, { "limit": 10, "unlimited": false, "rtID": -500002 }, { "limit": 5, "unlimited": false, "rtID": -500003 }, { "limit": 1, "unlimited": false, "rtID": -500004 }, { "limit": 0, "unlimited": true, "rtID": -500005 } ] }
In the
billingnamed set, create three categories required when configuring a service plan and resource rates in it:"billing": { "planCategory": { "id":-21, "name": "Deployment Assistance", "description": "Testing the integration with the Product Initialization wizard" }, "salesCategory": { "id":-22, "inCCP": true, "name": "Deployment Assistance", "expand": true, "description": "Testing the integration with the Product Initialization wizard" }, "resourceCategory": { "id":-23, "optional": true, "name": "Deployment Assistance", "description": "Testing the integration with the Product Initialization wizard", "displayType": "default" } }
In the
servicePlansarray, create a service plan containing resource rates based on the offer resource types configured earlier:"servicePlans": [{ "name": "Deployment Assistance", "id": -20, "stId": -600001, "shortDescription": "Deployment Assistance - demo", "longDescription": "Testing the integration with the Product Initialization wizard", "planBillingPeriod": 1, "renewOrderInterval": 0, "renewPointDays": 0, "subscrPeriodType": 2, "subscrRefundType": 0, "subscrPeriod": 1, "subscrRenewalFee": 0, "subscrRecurringFee": 4.25, "subscrDepositFee": 0, "subscrTrial": false, "subscrSetupFee": 2.0, "subscrTransferFee": 0, "resources": [ { "id": -700002, "rtID": -500002, "inCP": true, "instore": true, "incl": 1, "min": 1, "max": -1, "sFeePerUnit": true, "rFeePerUnit": true, "setupFee": 0, "recFee": 1, "overFee": 0, "measurable": false }, { "id": -700003, "rtID": -500003, "inCP": true, "instore": true, "incl": 0, "min": 0, "max": -1, "sFeePerUnit": true, "rFeePerUnit": true, "setupFee": 0, "recFee": 1.5, "overFee": 0, "measurable": false } ] }]
Update Installed APS Application
If the APS application is installed already on the platform as explained in the Deployment section, update it with the new package as follows.
In the
APP-META.xmlfile, increase thereleaseparameter and then build the updated package.Update the APS connector using one of the following ways:
In a case you use the Docker based deployment, update the Docker image from the updated package and save it in the Docker registry.
In a case you use a web shared environment, copy the new
scripts/wizard_data.jsonfile and the updatedscripts/clouds.phpfile to the corresponding location of the web site.
In the provider control panel, upload the updated package.
Open the uploaded package and then on the
Instancestab select the installed instance and clickUpgrade. This will update the instance to the new version.
Test Product Deployment
Instead of creating all product components separately as described in the Deployment section, run the product configuration wizard as follows.
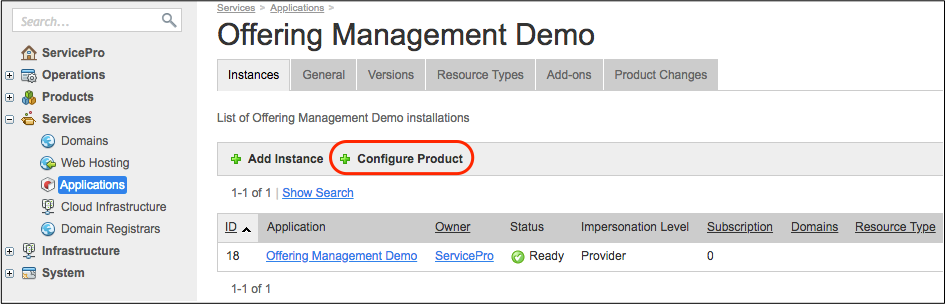
In the provider control panel, navigate to Services > Applications and open the application you are testing. On the Instances tab, click Configure Product to start the configuration process.
The product configurator will start in the wizard mode. Follow the wizard steps to configure the product.
In the APS Instance Selection step, select your package.

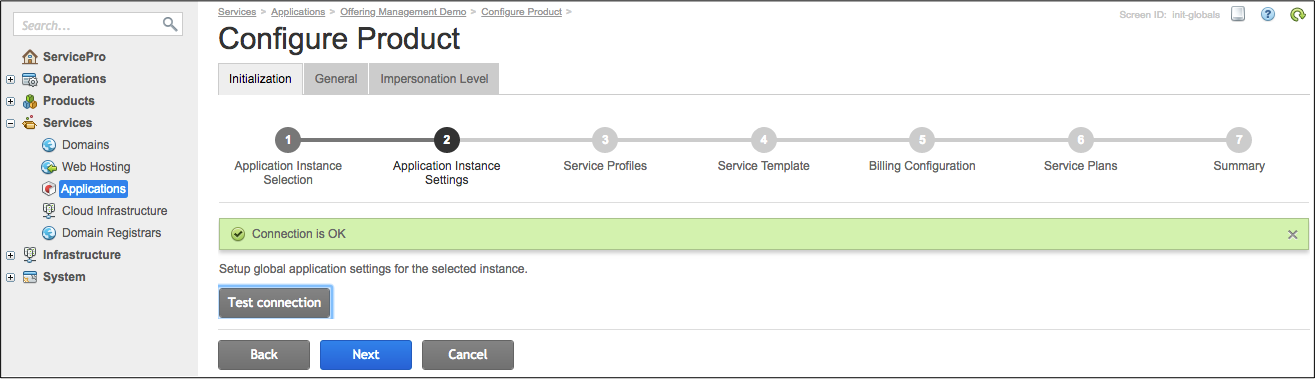
In the Application Instance Settings step, click Test connection to ensure you get the Connection is OK response.
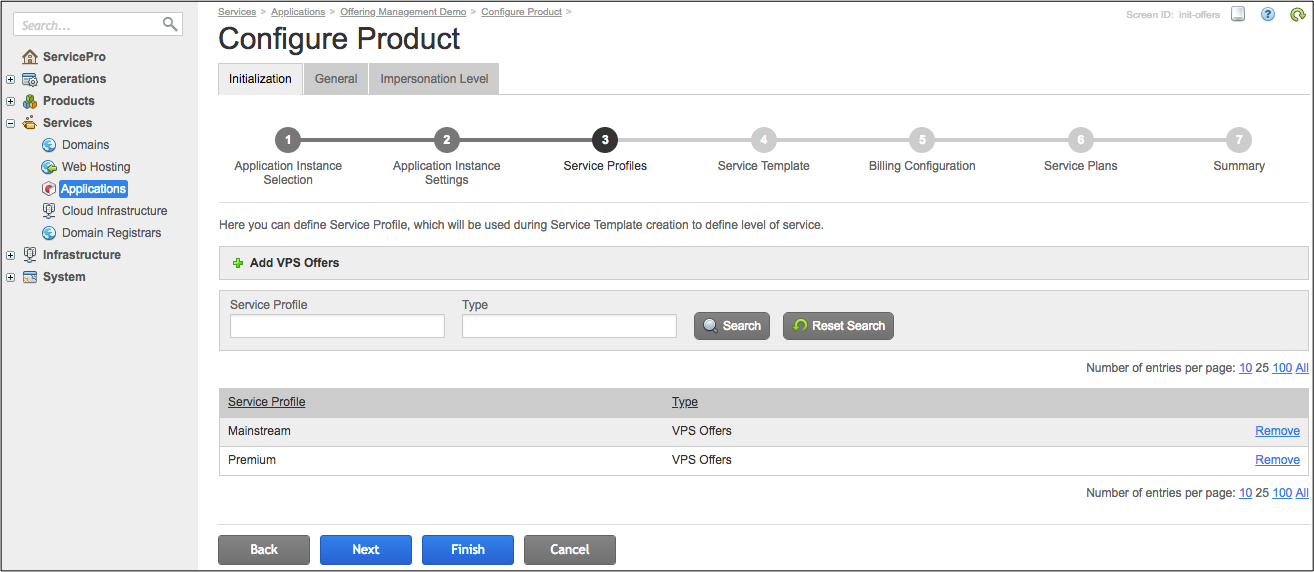
In the Service Profiles step, find the two APS resources presenting the application offers as configured in the wizard data.
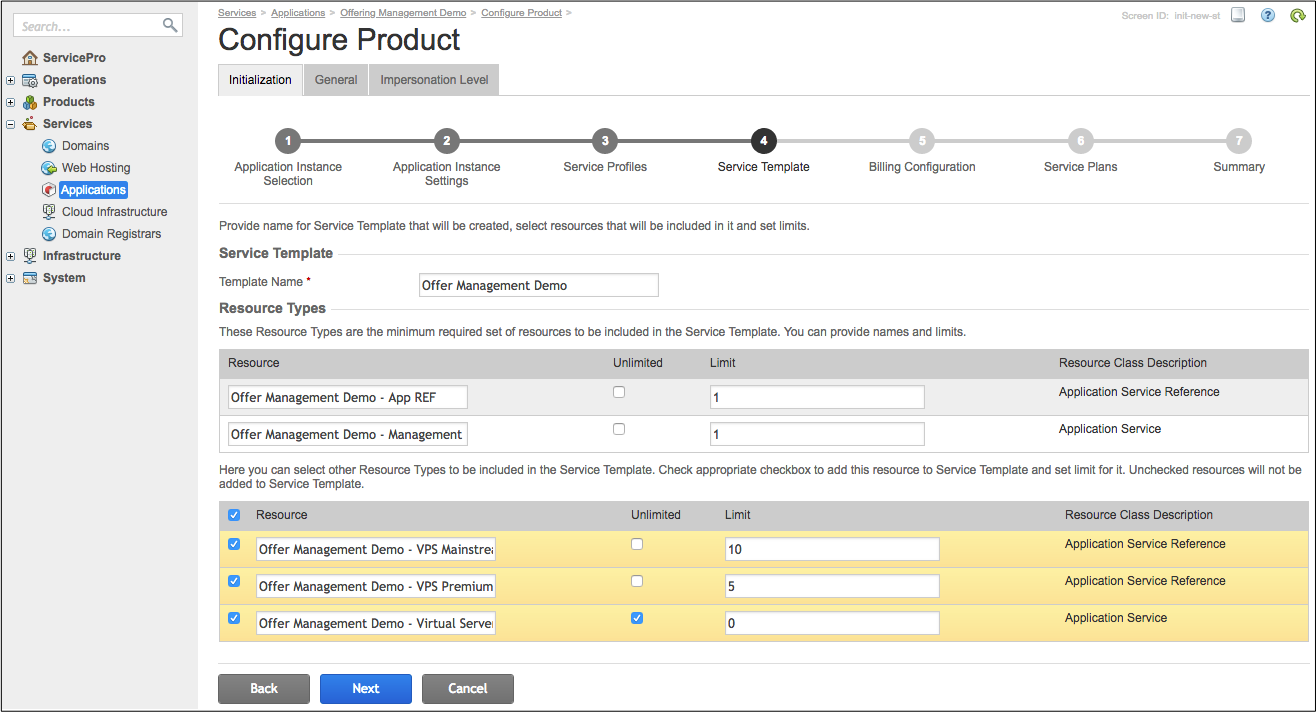
In the Service Template step, find the service template configured in the wizard data and inside it the list of resource types with limits.
In the Billing Configuration step, find the categories configured in the wizard data.
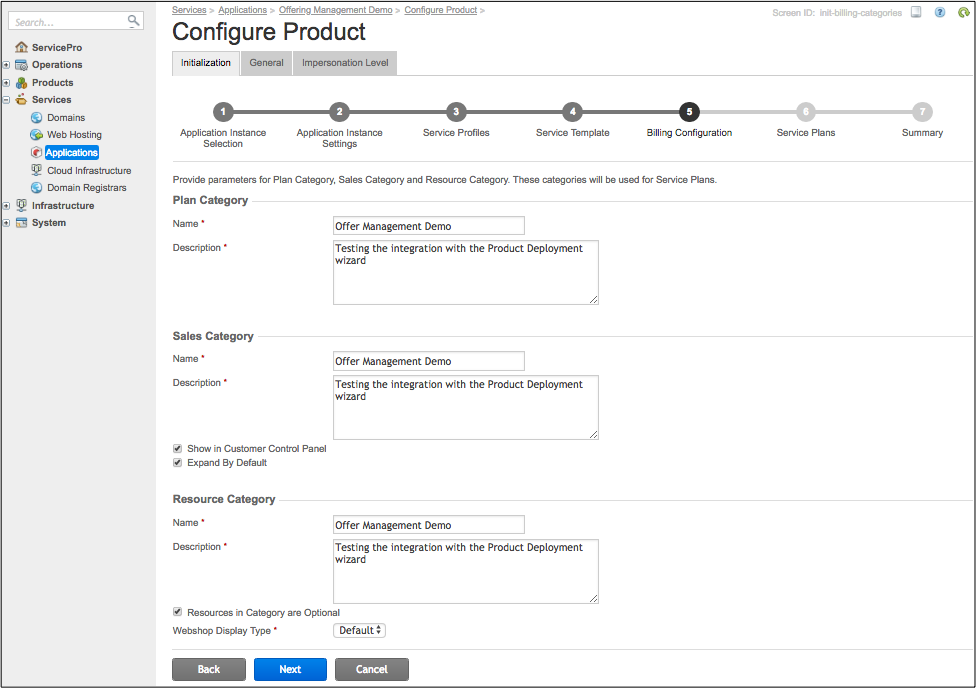
Ensure the Show in Customer Control Panel checkbox is ticked.
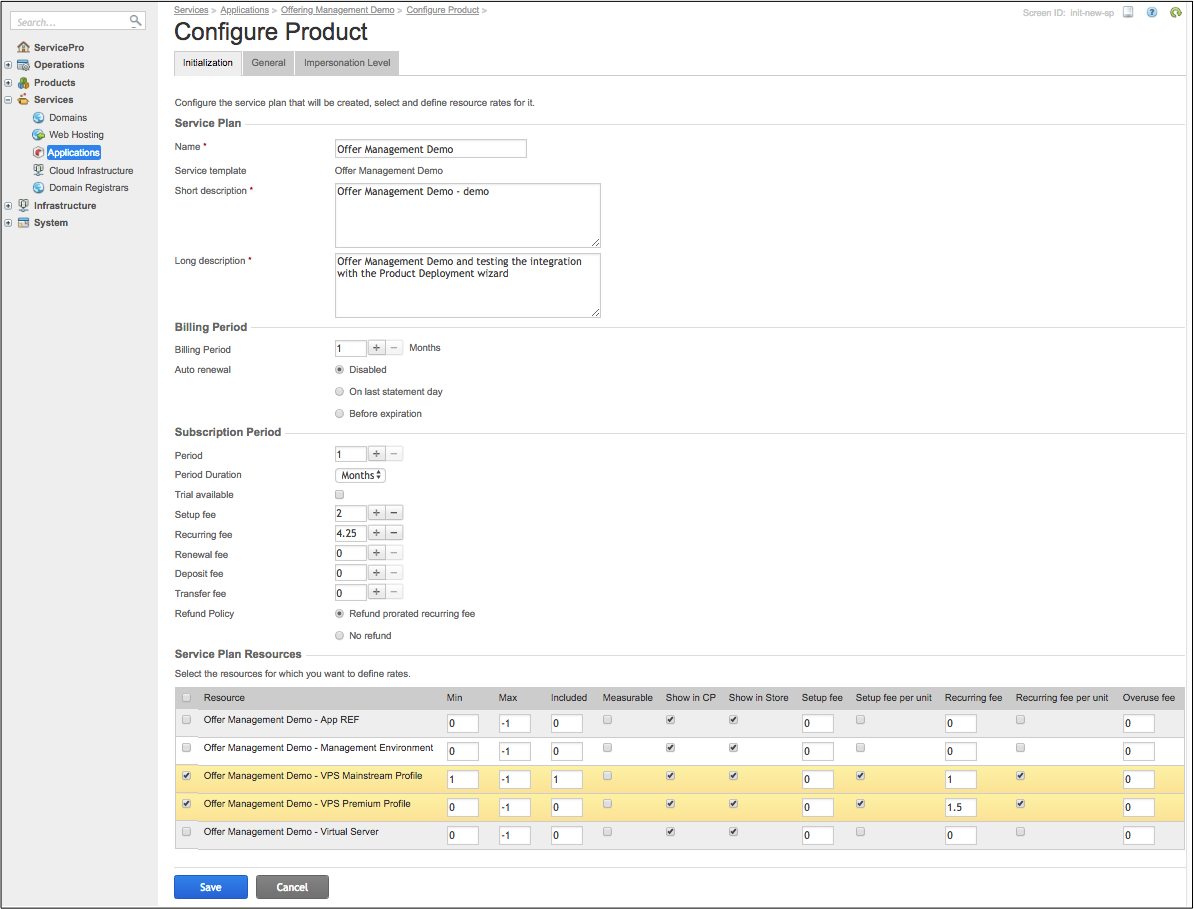
In the Service Plans step, find the service plan as configured in the wizard data. Click on its name to get the general properties, subscription period properties, and a list of resource rates with prices and limits.
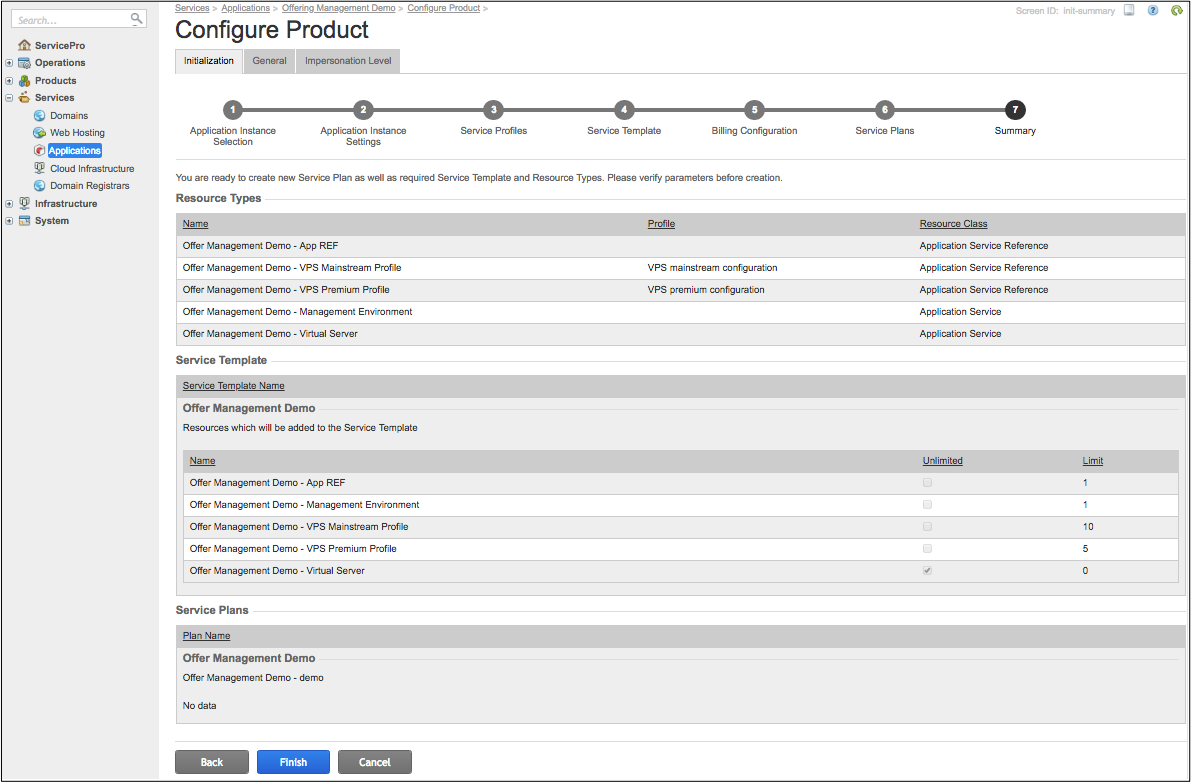
In the Summary step, you will find the final configuration containing all product components you have configured.
After you have completed the product deployment, verify if the new product components are visible in the provider control panel.
In the OSS provider control panel, navigate to the following screens:
Services > Applications - open the application and then its instance to discover the new offers (reference resources).
Products > Service Templates - find the new service template and resource types in it.
Products > Resources - find the new resource types.
Switch to BSS, to discover the other product components:
Products > Service Plans - find the new service plan.
Open the new service plan to view its general properties on the General tab, the subscription period on the Subscription Periods tab, and the resource rates on the Resource Rates tab.
Conclusion
This completes the configuration and testing of the integration with the product deployment process. You can proceed to the provisioning of the application resources as described in the Provisioning section.
If you experienced any issues when following the project steps, you can compare your code
with the similar contents in the sample package.