CloudBlue Commerce API (DRAFT)
Table Of Contents
Additional Capabilities (Optional)
In this document:
Assign Ownership
Purpose
As explained in Permissions, by default a user receives the referrer role
when operating an assigned resource. This role, by default, is allowed to read the resource properties
and run custom operations based on the GET verb. You can extend the users capabilities by assigning them
ownership over the linked resources as specified in Role Assignment.
Steps
To proof the concept, you need to do the following.
Update the
vpstype by adding theassignobject to theuserrelation.In the UI
server-new-1view, replace customstartandstopoperations with the generic PUT requests that will change the serverstateproperty directly.
Update VPS Type
In the scripts/vpses.php file, there was no need to define the user relation
since it was implemented through the inherited UserService type. However, to assign the ownership
to users, you have to define this relation as follows:
/**
 * @link("http://aps-standard.org/types/core/service-user/1.0")
 * @required
 * @assign.access(owner,true)
 */
 public $user;
This definition assigns the owner role to a user whom a server will be assigned.
Update User Creation View
In the ui/server-new-1.js file, replace the call of the custom start and stop operations
with the generic PUT request that will change servers state directly. This looks like in
the ui/servers.js file used by customer administrators.
Update the
changeStatefunction by replacing the custom methods with thestore.putmethod:function changeState(state, btn) { var sel = grid.get("selectionArray"), counter = sel.length; /* Clear the current messages on the screen */ page.get("messageList").removeAll(); arr.forEach(sel, function(vpsId){ console.log("I'm trying to change state of VPS with id = [" + vpsId + "]"); var vps = { aps: { id: vpsId }, state: state }; /* Save the VPS properties */ when(store.put(vps), /* If success, process the next VPS until the list is empty */ function(){ console.log("State of VPS with id = [" + vpsId + "] changed"); sel.splice(sel.indexOf(vpsId),1); grid.refresh(); if (--counter === 0) { btn.cancel(); } /* Remove busy state for button */ }, /* If failure, call the error handler */ function(e){ displayError(e); if (--counter === 0) { btn.cancel(); } } ); }); }
Update the on-click handlers to specify directly the new state for the selected VPSes:
/* Create the on-click handler for the *Stop* button */
var stop = function() {
   changeState("Stopped", this);
};

/* Create the on-click handler for the *Start* button */
var start = function() {
   changeState("Running", this);
};
Update Versions
To update the vps type in the deployed application, you should increase the vps type version
and the package release. The minor upgrade
of the mentioned components is sufficient.
In the package, replace all occurrences of the “vps/1.0” string with the new “vps/1.1” string. For example, use the following in the command line:
$ for fl in `find suwizard1p/ -type f`; do vim -c '%s@vps/1.0@vps/1.1@gc' -c 'wq' $fl; done
Increase the package release. For example, if in
APP-META.xmlthe package version-release is 1.0-0, change it to 1.0-1 as follows:<version>1.0</version> <release>1</release>
Build the package and import it to the system as you did it already. Ensure the package version is increased in the system.
Upgrade the application instance:
Log in to the provider control panel.
Navigate to Services > Applications and open the imported package.
On the Instances tab, select the instance you use and click Upgrade. Ensure it is updated to the new version.
Provisioning
Follow Provisioning to create a new user and assign a VPS to the user.
Log in to the control panel as the new user.
In the My own servers list, play with the Start and Stop buttons to verify if they change the VPS state as expected.
Manage User Collection
Since the application considered here provides a user-centric service, the UX designer may want to add the list of all customer users to the main service page. The aps/biz/UsersCollection widget makes it easy for a customer administrator to find whom the service is assigned and whom not.
Update Page Layout
The application must present on its main service page a list of users showing the status of the users and the service assigned to them. In the last column, the list must provide a drop-down list of actions.
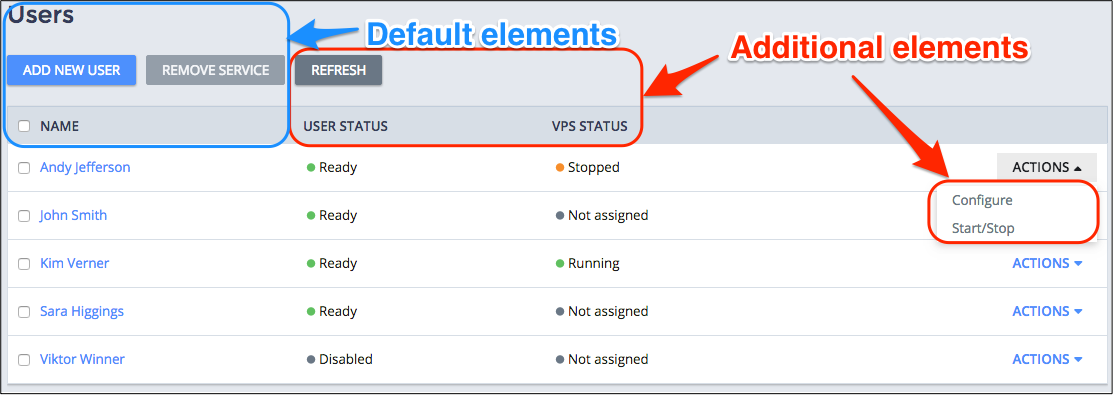
By default, the aps/biz/UsersCollection widget provides a grid with the following elements:
The default title “Users” that you can change in the widget definition
A toolbar with two buttons to add a user and to remove selected services
A column “Name” filled automatically with the full names of the customer users
A column with actions
To reach the goal, you must add the following elements to the widget:
An additional button to refresh the user collection
Two columns to show the status of users and assigned services
Action buttons, for example, “Configure”, “Start/Stop” (if the service is assigned), and “Add Service” (if the service is not assigned yet)
Develop UI
You can reach the design goal by editing the ui/services.js file.
In that file, find the return(...) method inside the init method, add the aps/biz/UserCollection widget
to it, and then modify the latter following these steps.
Wrap the existing widget definition into
aps/Containerand add a skeleton of the new widget to the widget hierarchy:return [ ["aps/Container", {title: "Servers"}, [ ["aps/Grid", { /* ... Existing widget definition ... */ }, [ /* ... */ ]] ]], ["aps/biz/UsersCollection", { id: self.genId("user_list"), title: "Users", confirmTexts: { title: "Remove the VPS(es) assigned to __count__ user(s)", description: "Do you want to remove VPS(es) assigned to the __count__ user(s)?", submitLabel: "Remove" }, apsType: "http://aps-standard.org/samples/suwizard1p/vps/1.0", additionalBtns: [ /* ... Additional button will be defined here ... */ ], columns: [ /* ... Additional columns will be defined here ... */ ], getUserActions: function(user) { /* List of actions will be defined here ... */ } }] ];
Keynotes:
The
confirmTextsproperty defines the configuration of the popup view that shows up when a user clicks the default Remove button.apsTypedefines the APS resources (service) to be processed by the handler of the default Remove Service button.
In the
onContextmethod, add a reference to the new widget to simplify access to it from various parts of the script:self.users = self.byId("user_list");
Define the additional Refresh button and its handler in the
additionalBtnssection:additionalBtns: [ "aps/Button", { label: "Refresh", onClick: function() { self.users.refresh(); this.set("isBusy", false); } }],
The handler runs the
refresh()method of the widget and then makes the button available again by settingisBusytofalse.In the
columnssection, add a column to show a user status and reserve a column for the VPS status:columns: [ { name: "User Status", sortable: false, renderCell: function (user) { return new Status({status : user.disabled ? "disabled" : "ready"}); } }, { name: "VPS Status" } ],
The column shows a user status by means of the aps/Status widget.
Continue the definition of the “VPS Status” column:
{
   name: "VPS Status",
   sortable: false,
   renderCell: function (user) {
      var vpsServices = user.services.filter(function(vps) {
         return vps.aps.type == "http://aps-standard.org/samples/suwizard1p/vps/1.0";
      });
      var vpsStatus = "Unassigned";
      if(vpsServices.length) {
         var vps = vpsServices[0];
         vpsStatus = vps.state;
      }
      return new Status({
         statusInfo: {
            "Unassigned": { label: "Not assigned", type: "disabled" },
            "Stopped": { label: "Stopped", type: "warning" },
            "Running": { label: "Running", type: "success" }
         },
         status: vpsStatus
      });
   }
}
The function assigned to the
renderCellproperty defines all VPSes assigned to a user and then, for simplicity in this demo, defines and returns the status of the first VPS.Build the structure of the function that must return a list of actions for the last column in the grid:
getUserActions: function(user) {
   var vpsServices = user.services.filter(function(vps) {
       return vps.aps.type == "http://aps-standard.org/samples/suwizard1p/vps/1.0";
   });
   var userId = user.aps.id;
   var vps;
   var vpsId;
   if(vpsServices.length) {
       vps = vpsServices[0];   // For simplicity, we will use only one assigned VPS
       vpsId = vps.aps.id;
   }

   var serviceAssigned = [ /* ...Actions when a user has an assigned VPS... */ ];
   var serviceUnassigned = [ /* ...Actions when a user doesn't have any assigned VPS...*/ ];

   return vpsServices.length ? serviceAssigned : serviceUnassigned;
}
Keynotes:
From the full list of services assigned to a user, the function selects the service provided by the application we consider now. This is the
vpsServicesarray.The returned list of actions depends of the service status. When a VPS is assigned to a user, the function returns the list of actions defined by the
serviceAssignedarray, otherwise it returns the actions defined by theserviceUnassignedarray.
Define two actions (Configure and Start/Stop) valid for the case when a VPS is assigned to a user:
var serviceAssigned = [
    {
        label: "Configure",
        type: "default",
        onClick: function() {
            aps.apsc.gotoView("server-edit", vpsId);
        }
    },
    {
        label: "Start/Stop",
        type: "default",
        onClick: function() {
            when(vpsStore.put({
                    "aps" : { "id": vpsId },
                    "state" : vps.state == "Running" ? "Stopped" : "Running"
                }),
                function() { self.users.refresh(); },
                /* If failure, call the error handler */
                function(e) { displayError(e); }
            );
        }
    }
];
Keynotes:
The first action calls the VPS editor defined earlier. The editor will find the VPS JSON representation inside the
aps.context.varsobject.The second action changes the state of a VPS - from “Running” to “Stopped” or vice versa.
Define the “Add the service” action for the case when no VPS is assigned to a user:
var serviceUnassigned = [{
   label: "Add the service",
   type: "default",
   onClick: function() {
      aps.apsc.gotoView("vps-wizard", null, {
          "userId": userId
      });
   }
 }];
Update Deployed Application
Update the deployed application as explained earlier on this page but with less changes:
In the
APP-META.xml, increase the package version-release, for example, from 1.0-1 to 1.0-2:<version>1.0</version> <release>2</release>
Build the package and import it to the platform as you did it already.
Upgrade the application instance:
In the provider control panel, navigate to Services > Applications and open the imported package.
On the Instances tab, select the instance you use and click Upgrade. Ensure it is updated to the new version.